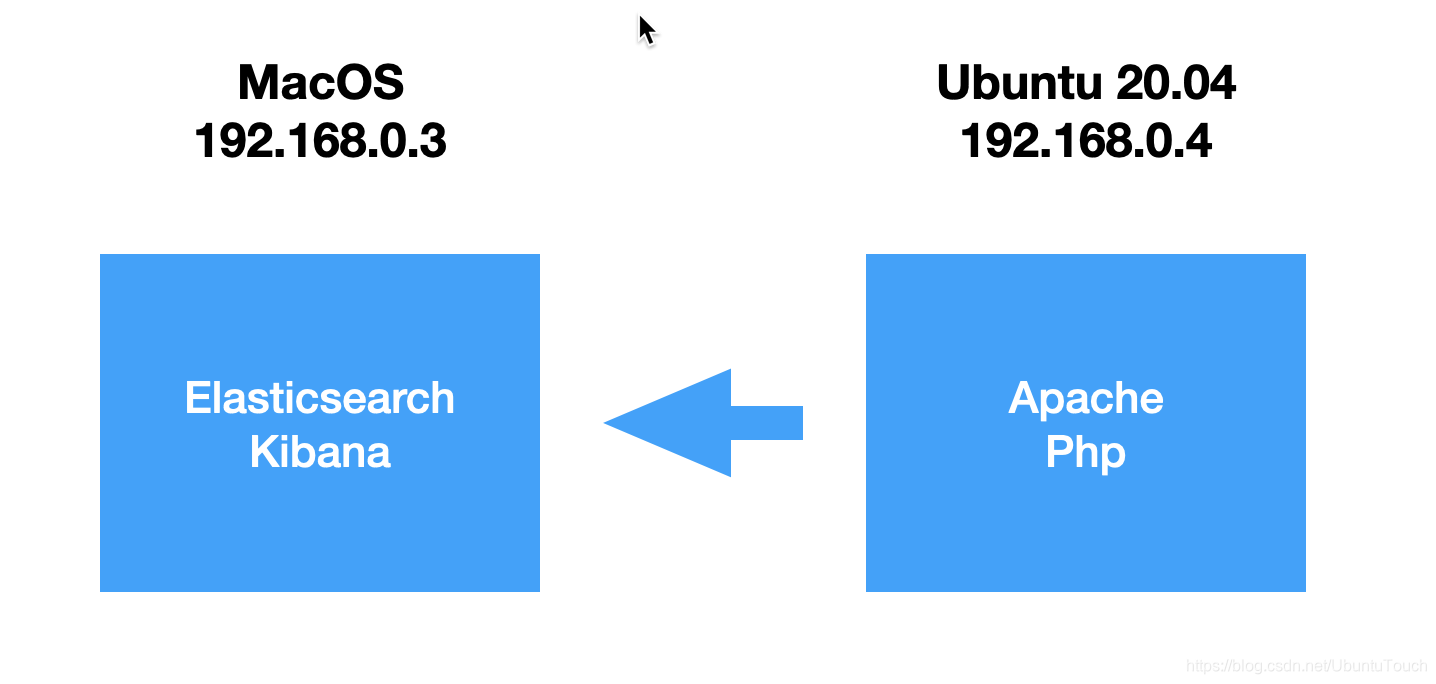
如果你正在寻找快速、强大的搜索功能,Elasticsearch 是合乎逻辑的选择。 这种可扩展的搜索引擎可以执行快速、高效的全文搜索和其他复杂查询。 你可以使用 PHP 创建一个简单的搜索引擎来演示 Elasticsearch 的功能。 在本教程中,我们将通过使用 Elasticsearch 构建一个简单的搜索引擎,向你展示如何使用 PHP 创建和索引文档。
在今天的练习中,我们将使用如下的配置:

安装
Elasticsearch
你需要按照文章 “如何在 Linux,MacOS 及 Windows 上进行安装 Elasticsearch” 来按照好 Elasticsearch。由于我们的 Elasticsearch 需要被另外一个机器所访问,我们修改 Elasticsearch 的配置如下:
config/elasticsearch.yml
network.host: 0.0.0.0
discovery.type: single-node
Kibana
我们需要按照文章 “Kibana:如何在 Linux,MacOS 及 Windows上安装 Elastic 栈中的 Kibana” 来安装 Kibana。
安装完毕 Kibana 后,我们可以在 MacOS 机器上使用浏览器启动 Kibana:

Apache
我们可以参考我之前的文章 “Logstash:如何使用 Elasticsearch,Logstash 和 Kibana 管理 Apache 日志” 来安装 Apache。这里就不再累述了。
我们可以通过如下的命令来查看 Apache 服务的运行状态:
service apache2 status$ service apache2 status
● apache2.service - The Apache HTTP Server
Loaded: loaded (/lib/systemd/system/apache2.service; enabled; vendor prese>
Active: active (running) since Thu 2021-08-19 15:20:57 CST; 18s ago
Docs: https://httpd.apache.org/docs/2.4/
Process: 10214 ExecStart=/usr/sbin/apachectl start (code=exited, status=0/S>
Main PID: 10233 (apache2)
Tasks: 55 (limit: 18982)
Memory: 7.4M
CGroup: /system.slice/apache2.service
├─10233 /usr/sbin/apache2 -k start
├─10234 /usr/sbin/apache2 -k start
└─10235 /usr/sbin/apache2 -k startPHP
我们在 Ubuntu 机器的 terminal 中打入如下的命令来安装 PHP:
sudo apt install php7.4-cli我们可以通过如下的命令来查看 PHP 的版本:
$ php -v
PHP 7.4.3 (cli) (built: Jul  5 2021 15:13:35) ( NTS )
Copyright (c) The PHP Group
Zend Engine v3.4.0, Copyright (c) Zend Technologies
    with Zend OPcache v7.4.3, Copyright (c), by Zend Technologies
为了能够使得 PHP 在 Apache 里运行,你需要安装如下的包:
sudo apt-get install libapache2-mod-php7.4否则我们的 php 脚本将不被执行。只会显示 php 脚本本身。
安装完毕后,你需要使用如下的命令启动并且重新运行 Apache:
sudo a2enmod php7.4
sudo service apache2 start
为了能够使得 Elasticsearch 的模块能正常运行,我们需要按照如下的一个包:
sudo apt-get install php-curl否则在下面的如下命令中:
$client = ClientBuilder::create()->build();我们将会得到一个如下的一个异常:
Elasticsearch-PHP needs curl or custom http handler为 Elasticsearch PHP 搜索引擎设置文件夹
一旦我们确认所有系统要求都已到位,我们就可以为 Elasticsearch PHP 搜索引擎设置文件夹。
首先,在终端窗口中使用 cd 命令导航到包含客户端 vendor 库的目录。 你也可以只记下 vendor 库的相对路径,以便将其包含在脚本中。
接下来,创建一个新目录,其中将包含你的 PHP 脚本和供应商目录。 在 Linux?终端窗口中,使用以下命令:
cd /var/www/html
sudo mkdir elastic-php
sudo chown -R $USER:$USER /var/www/html/elastic-php
sudo chmod -R 755 /var/www
cd elastic-php
如果您在创建此目录时遇到任何问题,可能是由于父目录的权限问题。
我们接下来参照 Elastic 官方文档。你也可以参考链接。我们首先进入到 elastic-php 文件夹,并创建如下的一个文件:
sudo vi composer.json我们把如下的内容输入进去:
composer.json
{
    "require": {
        "elasticsearch/elasticsearch": "~7.0"
    }
}
我们接着打入如下的命令:
sudo curl -s http://getcomposer.org/installer | phpliuxg@liuxgu:/var/www/html/elastic-php$ sudo curl -s http://getcomposer.org/installer | php
All settings correct for using Composer
Downloading...
Composer (version 2.1.5) successfully installed to: /var/www/html/elastic-php/composer.phar
Use it: php composer.phar经过上面的步骤,我们可以看到如下的文件:
$ pwd
/var/www/html/elastic-php
liuxg@liuxgu:/var/www/html/elastic-php$ ls
composer.json composer.phar
我们接着使用如下的命令来安装 Elasticsearch PHP:
php composer.phar installliuxg@liuxgu:/var/www/html/elastic-php$ php composer.phar install
Composer is operating significantly slower than normal because you do not have the PHP curl extension enabled.
No composer.lock file present. Updating dependencies to latest instead of installing from lock file. See https://getcomposer.org/install for more information.
Loading composer repositories with package information
Updating dependencies
Lock file operations: 5 installs, 0 updates, 0 removals
- Locking elasticsearch/elasticsearch (v7.14.0)
- Locking ezimuel/guzzlestreams (3.0.1)
- Locking ezimuel/ringphp (1.1.2)
- Locking psr/log (1.1.4)
- Locking react/promise (v2.8.0)
Writing lock file
Installing dependencies from lock file (including require-dev)
Package operations: 5 installs, 0 updates, 0 removals
- Downloading psr/log (1.1.4)
- Downloading react/promise (v2.8.0)
- Downloading ezimuel/guzzlestreams (3.0.1)
- Downloading ezimuel/ringphp (1.1.2)
- Downloading elasticsearch/elasticsearch (v7.14.0)
- Installing psr/log (1.1.4): Extracting archive
- Installing react/promise (v2.8.0): Extracting archive
- Installing ezimuel/guzzlestreams (3.0.1): Extracting archive
- Installing ezimuel/ringphp (1.1.2): Extracting archive
- Installing elasticsearch/elasticsearch (v7.14.0): Extracting archive
3 package suggestions were added by new dependencies, use `composer suggest` to see details.
Generating autoload files经过上面的安装后,我们可以看到如下的文件:
$ pwd
/var/www/html/elastic-php
liuxg@liuxgu:/var/www/html/elastic-php$ ls
composer.json  composer.lock  composer.phar vendor
Elasticsearch 的 PHP 客户端库包含在 Composer 创建的 vendor 文件夹中。
我们接下来创建两个文件:
- index.php
- add.php
我们将创建的搜索引擎使用两个 PHP 脚本:一个使用 HTML 来创建搜索查询,另一个将 HTML 数据放入 Elasticsearch 索引中。?默认情况下将在没有指定路径的情况下运行的主要 PHP 脚本将是 index 脚本:
sudo touch index.php
sudo touch add.php
经过上面的命令后,我们的文档如下:
$ pwd
/var/www/html/elastic-php
liuxg@liuxgu:/var/www/html/elastic-php$ ls
add.php  composer.json  composer.lock  composer.phar  index.php  vendor
我可以使用自己喜欢的编辑器来辩解 index.php 文件。
为了能够使得 Apache 能够显示我们刚才创建的 index.php 文件。我们按照如下的步骤来操作:
创建一个叫做 test.dev 的文件:
/etc/apache2/sites-available/test.dev.conf
<VirtualHost *:80>
        ServerName test.dev
        ServerAdmin admini@test.dev
        DocumentRoot /var/www/html/elastic-php
        ErrorLog ${APACHE_LOG_DIR}/error.log
        CustomLog ${APACHE_LOG_DIR}/access.log combined
</VirtualHost>
创建完毕后,我们使用如下的命令来启动:
sudo a2dissite 000-default.conf
sudo a2ensite test.dev.conf
systemctl reload apache2
经过上面的命令,我们可以查如下的目录:
$ pwd
/etc/apache2/sites-enabled
liuxg@liuxgu:/etc/apache2/sites-enabled$ ls
test.dev.conf
从上面我们可以看出来 test.dev.conf 目前是唯一可见的网站。
我们接下来修改 add.php 文件的内容:
/var/www/html/elastic-php/add.php
<?php
require 'vendor/autoload.php'; //(1)
use Elasticsearch\ClientBuilder;

$hosts = [
    '192.168.0.3:9200'         // IP + Port
];

try {
  $client = ClientBuilder::create()         // (2) Instantiate a new ClientBuilder
                    ->setHosts($hosts)      // Set the hosts
                    ->build();              // (3) Build the client object
}
catch(Exception $e) {
  echo 'Message: ' .$e->getMessage() .'<br>';
}

if(!empty($_POST)){ // (4)
if(isset($_POST['name'],$_POST['gender'], $_POST['age'],
$_POST['complexion'],
$_POST['attributes'])){
$name = $_POST['name'];
$gender = $_POST['gender'];
$age = $_POST['age'];
$complexion = $_POST['complexion'];
$attributes = explode(',', $_POST['attributes']); // (5)

// (6)
$indexed = $client->index([
    'index' => 'children',
    'type' => 'child',
    'body' => [
        'name' => $name,
        'gender' => $gender,
        'age' => $age,
        'complexion' => $complexion,
        'attributes' => $attributes
     ],
]);
}
}
?>
这段代码有很多内容,所以让我们看几个关键部分,以便更好地理解它:
- 在代码的顶部,注意 Composer 的 autoload.php 是必需的。 这会加载它下载的任何库中的所有类。
- 接下来,我们实例化一个新的 ClientBuilder,并构建客户端对象。
- 然后我们检查以确保 $_POST “superglobal” 变量在提交表单时确实包含值。
- explode() 函数用于将字符串拆分为数组。
- 然后我们创建关联数组并将其传递给 Elasticsearch 客户端进行索引,一个新的 child?文档被索引到代码中指定的 children?索引中。
在接下来,我们来编写 index.php 的代码:
/var/www/html/elastic-php/index.php
<?php
require 'vendor/autoload.php'; // (1)
use Elasticsearch\ClientBuilder;

$hosts = [
    '192.168.0.3:9200'         // IP + Port
];

try {
  $client = ClientBuilder::create()         // (2) Instantiate a new ClientBuilder
                    ->setHosts($hosts)      // Set the hosts
                    ->build();              // (3) Build the client object
}
catch(Exception $e) {
  echo 'Message: ' .$e->getMessage() .'<br>';
}

echo "ES client has been created. <br>";
$query = $_GET['q'];
echo "You are going to search for: " .$query ."<br>";

if(isset($_GET['q'])) { // (4)
  $q = $_GET['q'];

  $query = $client->search([
     'body' => [
        'query' => [ // (5)
           'bool' => [
              'must' => [
                 'match' => ['name' => $q]
               ]
           ]
        ]
     ]
  ]);

  if($query['hits']['total'] >=1 ) { // (6)
    $results = $query['hits']['hits'];
    print_r($results);
  }
}

?>
就像我们在前面的代码示例中所做的那样,让我们仔细看看这个脚本,以便更好地理解发生了什么:
- 首先,composer 的 autoload.php 加载它下载的任何库中的所有类。
- 接下来,我们实例化一个新的 ClientBuilder,并构建客户端对象。
- 然后我们检查是否在 “superglobals” $_GET 中设置了值。
- 这个多查询字符串告诉我们查询应该匹配我们在 $q 变量中传递的参数。
- “hits”的 “total” 只是告诉我们有多少结果。
我们接下来在?/var/www/html/elastic-php 位置分别创建两个子目录: add 及 search。在 add 子目录下创建如下的一个 index.html 文件:
/var/www/html/elastic-php/add/index.html
<!DOCTYPE>
<html>
    <head>
        <meta charset="utf-8">
        <title>Add Child Details</title>
    </head>
    <body>
        <form action="../add.php" method="post" autocomplete="off">
            <div>
                <label>
                    Name
                    <input type="text" name="name">
                </label>
                <br>
                <label>
                    Gender
                    <input type="text" name="gender">
                </label>
                <br>
                <label>
                    Age
                    <input type="text" name="age" placeholder="number only">
                </label>
                <br>
                <label>
                    Complexion
                    <input type="text" name="complexion">
                </label>
                <br>
                <label>
                    The Attributes
                    <textarea type="text" name="attributes" rows="4" placeholder="comma, separated attributes" ></textarea>
                </label>

                <input type="submit" value="Add">
            </div>
        </form>
    </body>
</html>
这是一个非常之简单的 HTML 文件。我们在浏览器中运行它:

点击上面的 Add 按钮。这样一个新的文档就在 Elasticsearch 中生成了。
我们在 Kibana 中来进行查看:

从上面我们可以看出来,我们的文档已经被写入到 Elasticsearch 中了。
接下来,我们通过网页对写入的文档进行搜索。我们在 search 子目录下创建如下的一个 index.html 文件:
/var/www/html/elastic-php/search/index.html
<!DOCTYPE>
<html>
    <head>
        <meta charset="utf-8">
        <title>Search Elasticsearch</title>
    </head>
    <body>
        <form action="../index.php" method="get" autocomplete="off">
            <label>
                Search for Something
                <input type="text" name="q">
            </label>
            <input type="submit" value="search">
        </form>

        <div class="res">
            <a href="#id">Name</a>
        </div>
        <div>Attributes</div>
    </body>
</html>
我们在浏览器中显示这个页面:

同样这也是一个非常简单的 HTML 页面。我们在上面的输入框中输入 liuxg,并点击 search 按钮:
 ?我们在页面中看到被搜索的文档。
参考