nginx
什么是lnmp架构
LNMP是指一组通常一起使用来运行动态网站或者服务器的自由软件名称首字母缩写
L指Linux,N指Nginx,M一般指MySQL,也可以指MariaDB,P一般指PHP,也可以指Perl或Python
LNMP代表的就是:Linux系统下Nginx+MySQL+PHP这种网站服务器架构
Linux是一类Unix计算机操作系统的统称,是目前最流行的免费操作系统
代表版本有:debian、centos、ubuntu、fedora、gentoo等
Nginx是一个高性能的HTTP和反向代理服务器,也是一个IMAP/POP3/SMTP代理服务器
Mysql是一个小型关系型数据库管理系统
PHP是一种在服务器端执行的嵌入HTML文档的脚本语言
这四种软件均为免费开源软件,组合到一起,成为一个免费、高效、扩展性强的网站服务系统

配置用户
在/usr/local/nginx/conf/nginx.conf中可以定义nginx使用的用户,以及worker数,一般worker数与cpu核心数一致。使用lscpu命令可以查看cpu信息

使用nginx用户,需要添加该用户;worker_processes默认与核心数保持一致,auto为自动识别
[root@server1 ~]# useradd -d /usr/local/nginx -M -s /sbin/nologin nginx
[root@server1 ~]# vim /usr/local/nginx/conf/nginx.conf

修改配置后测试没有问题,重载nginx
[root@server1 ~]# nginx -t
nginx: the configuration file /usr/local/nginx/conf/nginx.conf syntax is ok
nginx: configuration file /usr/local/nginx/conf/nginx.conf test is successful
[root@server1 ~]# nginx -s reload
[root@server1 ~]# ps -ax
查看进程,一个master和两个worker

配置最大连接数
修改连接数vim /usr/local/nginx/conf/nginx.conf

一个应用程序能开启的最大连接数是受到限制的,内核限制>系统限制>应用软件限制。
首先需要查看内核的文件限制,这与系统的内存有关,所设置的最大连接数小于此数目即可;

使用如下命令可以查看系统限制

操作系统限制文件储存在,vim /etc/security/limits.conf编辑文件添加内容,此值同样需要大于等于所设定的最大连接数

/etc/pam.d/system-auth文件下记录了系统控制session方式
#session组件:配置和管理用户sesison

nginx的反向代理和负载均衡
nginx提供反向代理服务,同时也提供不同的负载均衡算法。
做反向代理的时候,连接数要除以2,根据http协议版本,有可能除以4,但操作系统会有限制。
演示环境:
server1		172.25.38.1		nginx-master
server2		172.25.38.2		nginx后端
server3		172.25.38.3		nginx后端
将配好的nginx目录发给另外两台虚拟机,在两个后端配置nginx服务,默认连接数为1024即可,无需设定用户。
[root@server1 local]# scp -r nginx/ server3:/usr/local
[root@server2 ~]# ln -s /usr/local/nginx/sbin/nginx /usr/local/sbin/
[root@server2 ~]# vim /usr/local/nginx/conf/nginx.conf

设定不同的web默认页面以示区别
[root@server2 ~]# echo server2 > /usr/local/nginx/html/index.html
[root@server2 ~]# curl server2
server2
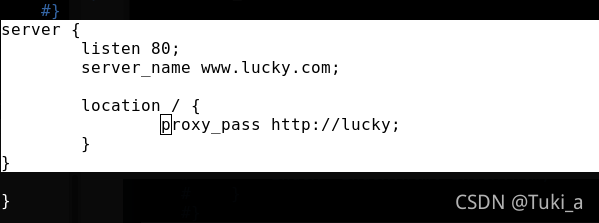
在调度端server1,编辑主配置文件,添加负载均衡器;在http模块中添加负载均衡器,默认为rr调度
[root@server1 ~]# vim /usr/local/nginx/conf/nginx.conf

upstream lucky {
        server 172.25.38.2:80;
        server 172.25.38.3:80;
        }

server {
        listen 80;
        server_name www.lucky.com;

        location / {
                proxy_pass http://lucky;
        }
}

server就相当于apache里的虚拟主机,访问www.lucky.com这个域名就会根据负载均衡器算法调度到两个后端

测试成功并重载nginx

在真机添加解析

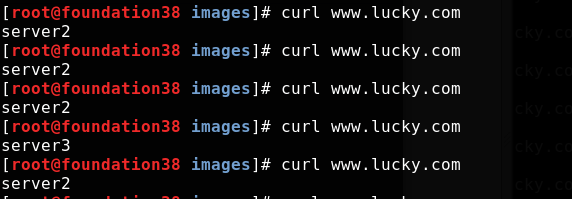
在真机测试访问,实现了负载均衡

可指定后端权重

测试成功并重载nginx

在真机测试访问

会话保持
会话保持是指在负载均衡器上的一种机制,可以识别客户端与服务器之间交互过程的关连性,在作负载均衡的同时还保证一系列相关连的访问请求都会分配到一台机器上。
使用ip_hash模块实现会话保持

测试成功并重载nginx
[root@server1 local]# nginx -t
nginx: the configuration file /usr/local/nginx/conf/nginx.conf syntax is ok
nginx: configuration file /usr/local/nginx/conf/nginx.conf test is successful
[root@server1 local]# nginx -s reload
在真机测试访问,真机一开始分配的是server2,只要server2存活之后也一直是

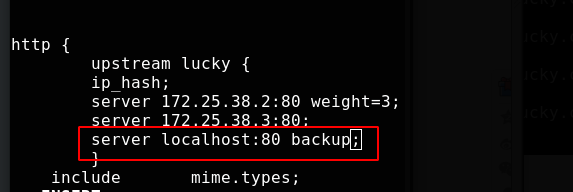
后备
设置server1即本地为后备

测试成功并重载nginx
[root@server1 ~]# nginx -t
nginx: the configuration file /usr/local/nginx/conf/nginx.conf syntax is ok
nginx: configuration file /usr/local/nginx/conf/nginx.conf test is successful
[root@server1 ~]# nginx -s reload
把2、3的nginx都关闭,修改1的nginx访问页面
[root@server1 ~]# echo server1 > /usr/local/nginx/html/index.html
在真机测试访问,因为后端都挂掉了,所以只能调度到后备(因为nginx自带健康监测)

开启2的nginx,那么再访问就会回到2

worker限制
[root@server1 ~]# vim /usr/local/nginx/conf/nginx.conf


nginx版本平滑升级
先到官网下载一个新版本的nginx,解压进入解压目录,关闭debug
[root@server1 ~]# tar zxf nginx-1.21.1.tar.gz
[root@server1 ~]# cd nginx-1.21.1/
[root@server1 nginx-1.21.1]# vim auto/cc/gcc

进行源码编译三部曲的前两步
[root@server1 nginx-1.21.1]# ./configure --prefix=/usr/local/nginx --with-http_ssl_module --with-http_stub_status_module --with-threads --with-file-aio
[root@server1 nginx-1.21.1]# make
到软件目录下备份旧版本的二进制程序,并将新版本的二进制程序放到执行目录下
[root@server1 nginx-1.21.1]# cd /usr/local/nginx/sbin
[root@server1 sbin]# ls
nginx
[root@server1 sbin]# cp nginx nginx.old
[root@server1 sbin]# cd -
/root/nginx-1.21.1
[root@server1 nginx-1.21.1]# cd objs/
[root@server1 objs]# \cp -f nginx /usr/local/nginx/sbin/
很多命令省略了一些参数,比如只执行rm其实执行的是rm -i,\cp -f就是强制完全备份,不提示信息

关掉旧版本的master,告知应用程序重载配置文件。发送升级信号,会在原master不关闭的情况下关闭其worker,并且新开master以及worker,使用新的nginx文件
SIGUSR1和SIGUSR2是发送给一个进程的信号,它表示了用户定义的情况。
USR1亦通常被用来告知应用程序重载配置文件

查看进程,旧的就只剩master进程,SIGWINCH信号是默认进程忽略的信号,窗口大小改变时发出

这时版本就已经在用户不知不觉中升级成功了

用户访问没有问题

nginx版本回退
针对升级前的master进程,开启woker节点
[root@server1 objs]# cd /usr/local/nginx/sbin/
[root@server1 sbin]# \cp -f nginx.old nginx
[root@server1 sbin]# kill -HUP 24020		#发送SIGHUP信号,重新加载进程
[root@server1 sbin]# kill -WINCH 32021		#SIGWINCH信号是默认进程忽略的信号,窗口大小改变时发出
[root@server1 sbin]# curl localhost -I


这时版本就已经在用户不知不觉中回退成功了

这个时候如果以后不用新版本就可以把新版本的master进程直接杀掉了
非nginx自带会话保持模块
在多台后台服务器的环境下,为了确保一个客户只和一台服务器通信,势必使用长连接。常见的有使用nginx自带的ip_hash来做,但如果前端是CDN,或者说一个局域网的客户同时访问服务器,导致出现服务器分配不均衡,以及不能保证每次访问都粘滞在同一台服务器。如果基于cookie可以在保持长连接的同时还保证了服务器的压力均衡,ngx_http_sticky_module可以实现此功能。
客户端client请求访问服务 -> DNS服务器将域名解析到cdn -> cdn(nginx,squid,varnish)反向代理 -> nginx反向代理到后端服务器取东西 -> webserver
下载解压ngx_http_sticky_module
[root@server1 ~]# yum install -y unzip
[root@server1 ~]# unzip nginx-goodies-nginx-sticky-module-ng-08a395c66e42.zip
[root@server1 ~]# cd nginx-1.20.1/
[root@server1 nginx-1.20.1]# make clean
rm -rf Makefile objs
在nginx源码文件夹中重新预编译,添加此模块
[root@server1 nginx-1.20.1]# ./configure --prefix=/usr/local/nginx --with-http_ssl_module --with-http_stub_status_module --with-threads --with-file-aio --add-module=/root/nginx-goodies-nginx-sticky-module-ng-08a395c66e42
[root@server1 nginx-1.20.1]# make
重新编译,覆盖之前的二进制文件,编辑配置文件添加模块
[root@server1 nginx-1.20.1]# cd objs/
[root@server1 objs]# \cp -f nginx /usr/local/nginx/sbin/
[root@server1 objs]# cd /usr/local/nginx/conf/
[root@server1 conf]# vim nginx.conf

测试成功并重载nginx

curl访问测试,无cookie,不做会话保持

在真机测试访问

打开工作台,可以加载cookie

限制对代理 HTTP 资源的访问
使用 NGINX 和 NGINX Plus,可以限制:
1、每个键值的连接数(例如,每个 IP 地址)
2、每个键值的请求率(一秒或一分钟内允许处理的请求数)
3、连接的下载速度
请注意,IP 地址可以在 NAT 设备后面共享,因此应谨慎使用 IP 地址限制。
以下修改的内容官方文档都有,所以在下边只展示图片了:https://docs.nginx.com/nginx/admin-guide/security-controls/controlling-access-proxied-http/
以下修改的都是/usr/local/nginx/conf/nginx.conf配置文件
限制连接数
修改配置文件,加入如下内容。使用limit_conn 指令的适用范围内的限制location {}上下文。将共享内存区域的名称指定为第一个参数,将每个键允许的连接数指定为第二个参数:

测试成功并重载nginx

创建download目录放一张图
[root@server1 conf]# mkdir /usr/local/nginx/html/download
[root@server1 conf]# mv /root/vim.jpg /usr/local/nginx/html/download/
重载nginx,浏览器访问成功

做压测,-c并发数10,-n请求数10,即10个请求一起发送,因为我们上边做了限制,所以会有访问失败的请求

上边的显示可能不准确,日志是准确的,要到日志里看
[root@server1 conf]# cat /usr/local/nginx/logs/access.log
大部分请求都失败

将并发数改为1即符合我们的限制,不会有失败的

限制请求率
速率限制可用于防止 DDoS(分布式拒绝服务攻击) 攻击,或防止上游服务器同时被过多请求淹没。该方法基于以下leaky bucket 算法:请求以各种速率到达存储桶并以固定速率离开存储桶。
修改配置文件,用limit_req_zone 指令设置参数。该指令是在http {}级别上定义的, 这种方法允许将不同的区域和请求溢出参数应用于不同的上下文。我们设置允许相同标识的客户端的访问频次,这里限制的是每秒1次

重载nginx,做压测,超过速率的9个全部失败。

处理过多的请求
请求仅限于符合limit_req_zone 指令中定义的速率。如果请求数量超过指定的速率并且共享内存区域已满,NGINX 将响应错误。由于流量往往是突发的,因此在流量突发期间返回错误以响应客户端请求并不是最好的情况。
NGINX 中这种过多的请求可以被缓冲和处理。limit_req 指令的burst参数设置等待以指定速率处理的最大请求数
修改配置文件,超出zone限制的请求会被放入数目为5的队列中。重载nginx

现在虽然超过了我们设置的只允许一秒一个请求,但可以被放入队列中,一秒处理一个,最后只用了9秒多是因为请求本身就不用多久,第十个已经是最后一个了,请求完自然就结束了

还可以设置只排一次队,即第一秒处理一个,多的放入容纳5个请求的队列,再多的就直接被拒绝

重载nginx访问。如下,因为我们请求了10次所以1+5只会有6个成功

限制带宽
要限制每个连接的带宽,请使用limit_rate 指令:

请求10次,一次大概两秒

自动索引:下载方便
当访问location时未指定路径,且路径下无主页文件时,开启自动索引将会显示该location的目录结构

重载nginx,到浏览器访问

Nginx expire缓存配置
Nginx expire缓存配置: 缓存可以降低网站带宽,加速用户访问
修改配置文件/usr/local/nginx/conf/nginx.conf,在server模块内添加参数
        location ~ .*\.(gif|jpg|png)$ {
                expires 365d;
                root html;
        }
访问server/path/x.jpg时,将会访问nginx工作目录下的html下的path内的x.jpg

未重载nginx前的访问

重载nginx 后的测试缓存访问

日志轮询
编写脚本用于记录日志,每24小时即一天记录一次日志
[root@server1 conf]# cd ..
[root@server1 nginx]# cd /opt/
[root@server1 opt]# ls
[root@server1 opt]# vim nginx.sh	#脚本内容
#!/bin/bash
cd /usr/local/nginx/logs && mv access.log access_$(date +%F -d -1day).log
kill -USR1 `cat /usr/local/nginx/logs/nginx.pid`
因为要在0点记录前一天的,所以天数要减一天

给脚本执行权限直接执行,可以看到日志记录成功

添加crontab任务以实现每24小时即一天记录一次日志
crontab -e
00 00 * * * /opt/scripts/nginxlog.sh &> /dev/null
设定日志权限
chmod -R 700 /usr/local/nginx/logs
监控日志
开启监控页面,不记录监控日志

访问监控页面

访问次数增多会实时监控到

查看日志,如我们配置的一般,没有记录

访问其他资源

日志会记录

浏览器访问其他资源也会被记录

现在设置监控页面只允许本地访问

浏览器用的是真机的,自然就访问不了了

在本地访问要用如下的方式访问

中文乱码
虽然前端也可以解决中文乱码的问题,但在服务器这儿也是可以直接配置解决有些浏览器访问会出现中文乱码的情况
先往测试页面写入写中文

浏览器访问,有乱码

修改配置文件

重载nginx,清理浏览器缓存后重新访问,没有乱码(curl访问本身没有缓存)

防止域名恶意解析到服务器IP
防止域名恶意解析到服务器IP(有的网站会把域名解析到你的网站地址上去),需要在访问时配置拒绝的域名到服务器ip的解析,可以设置访问哪个域名就被拒绝返回500状态码
如下我只用本地做了简单测试


也可以重定向,比如访问我哪个域名就会定向到我指定的网页,我还是用本地做了测试

访问显示301重定向

输入ip访问,重定向到了指定网页

80->443
修改配置文件,对如图内容取消注释,启用443,修改证书密钥文件名
批量取消注释的方法:
1、:125,144s/#//g
2、用vim可视化,按d即可

添加重写规则

使用脚本生成pem文件

将生成的pem拷贝至nginx conf目录下

重新加载nginx,查看端口是否打开

访问http:server,会重定向至https
