1.nginx源码安装
1.configure
在真机上:ssh -l root 172.25.21.1连到虚拟机server1:
wget http://nginx.org/download/nginx-1.20.1.tar.gz  #下载1.20.1版本的压缩包
tar zxf nginx-1.20.1.tar.gz 	##解压
ls
cd nginx-1.20.1/
./configure --prefix=/usr/local/nginx --with-	http_ssl_module --with-http_stub_status_module --with-threads --with-file-aio	##设定下载目录同时安装服务,但是失败,需要下载依赖
yum install -y gcc
yum install -y pcre-devel
yum install -y openssl-devel
./configure --prefix=/usr/local/nginx --with-http_ssl_module --with-http_stub_status_module --with-threads --with-file-aio	##重新configure
此时会生成makefile文件

make install #此时会安装makefile文件,则会在objs目录中生成nginx文件
ls objs/ 
cd /usr/local/nginx/sbin
netstat -antlup   #查看端口
./nginx   #启动nginx服务
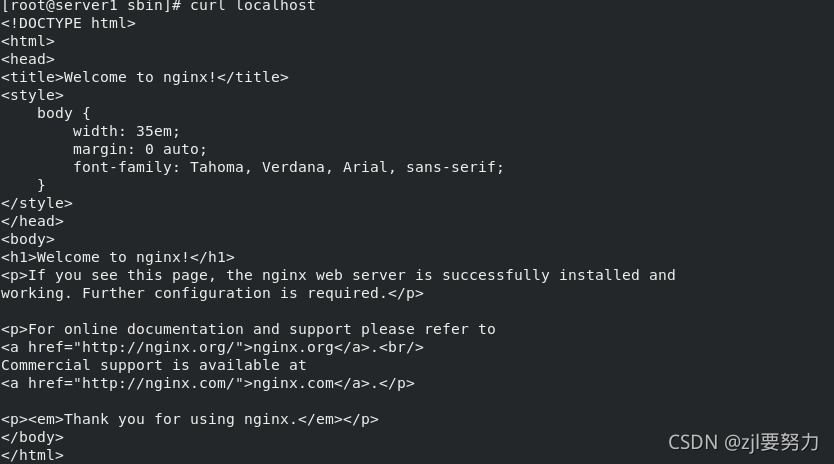
curl localhhost      #检测源码内容

2.nginx 并发优化
cd nginx-1.20.1/
cd /usr/local/nginx/sbin/		##开启nginx服务需要进入该目录,不方便
nginx -s stop		##关闭服务
netstat -antlp		##没有80端口
ln -s /usr/local/nginx/sbin/nginx /usr/local/sbin/	##建立软链接方便开启全局nginx
nginx -s stop
make clean	##清除缓存

vim auto/cc/gcc		##瘦身nginx,减少被攻击机会
///
# debug
#CFLAGS="$CFLAGS -g"
///
cd nginx-1.20.1/
vim src/core/nginx.h
///
#define NGINX_VER          "nginx" 		##删除隐藏版本号以及/
///原本是"nginx/" NGINX_VERSION
./configure --prefix=/usr/local/nginx --with-http_ssl_module 	--with-http_stub_status_module --with-threads --with-file-aio
make
cd objs/
ls-->nginx
du -h /usr/local/nginx/sbin/nginx	##瘦身成功,安全性提高

echo $PATH
nginx -t	##检测语法
curl -I localhost	##检查版本号已经被隐藏


cd /usr/local/nginx/conf
useradd -d /usr/local/nginx -M -s /sbin/nologin nginx
vim nginx.conf
///
user  nginx;
worker_processes  auto;      #并发数由1变为自动

events {
worker_connections  65535;
}
///
cd /etc/pam.d
vim /etc/security/limits.conf
///
ngnix  - nofile 65536	##最后一行加入
///
nginx -s reload
nginx的开机自启
cd /usr/lib/systemd/system/
lftp 172.25.254.250
> ls
> cd pub/docs/lamp
> get nginx.service             #下载nginx服务,也可以从网页上下载
> exit
vim nginx.service
///
[Unit]
Description=The NGINX HTTP and reverse proxy server
After=syslog.target network.target remote-fs.target nss-	lookup.target
Wants=network-online.target

[Service]
Type=forking
PIDFile=/usr/local/nginx/logs/nginx.pid
ExecStartPre=/usr/local/nginx/sbin/nginx -t
ExecStart=/usr/local/nginx/sbin/nginx
ExecReload=/usr/local/nginx/sbin/nginx -s reload
ExecStop=/bin/kill -s QUIT $MAINPID
PrivateTmp=true

[Install]
WantedBy=multi-user.target
///
systemctl daemon-reload		##刷新服务列表
systemctl enable --now nginx.service	##开机自启
3.负载均衡+反向代理
在server1主机中,做负载均衡和反向代理,检测语法,重启服务,将本机配置好的nginx复制到server2主机。
cd /usr/local/nginx/conf/
vim nginx.conf
///
http {
 	   upstream westos {
	    server 172.25.21.2:80;
	    server 172.25.21.3:80;
	    }

server {
      listen 80;
 	   server_name www.westos.org;

 	   location / {
    	        proxy_pass http://westos;
  	     	     }
    }
}##注意此处http的后括号
///


nginx -t
nginx -s reload

cd /usr/local
scp -r nginx/ server2:/usr/local/
server2:建立软链接以便全局使用nginx,编辑配置文件,将server1中的设定修改回默认值,写入发布内容,在本次尝试是否能访问。
ln -s /usr/local/nginx/sbin/nginx /usr/local/sbin/
cd /usr/local/nginx/sbin/
ls
cd ..(nginx)
cd conf/
vim nginx.conf
///
#user  nobody;
worker_processes  auto;

events {
    worker_connections  1024;	##改回默认
}
///
nginx -t	##检测语法
cd ..(nginx)
cd html/
ls
echo server2 > index.html
nginx
curl localhost

在server3中作同样的操作,显示内容与server2相同:
 此时在真机上对快照进行地址解析,ping通www.westos.org之后便可以使用curl命令查看server主机的发布文件。
vim /etc/hosts
///
172.25.24.1     server1         www.westos.org
172.25.24.2     server2
172.25.24.3     server3
///
ping www.westos.org
curl www.westos.org


此时server2和server3的出现频率相同,当改变端口的权重,则会改变频率。在server1中改变:
cd /usr/local/nginx/conf/
vim nginx.conf
///
http {
   	  upstream westos {
  	  server 172.25.24.2:80 weight=2;
///
nginx -t
nginx -s reload
此时显示频率会按照权重比例显示:

4.ip_hash
ip_hash对后端做健康检测,如果server3出问题,则调度server2(###模拟问题server3 nginx -s stop)
如果后端全挂,则http报错502(500表示服务器错误)
在server1主机中修改配置文件,在负载均衡模块中添加ip_hash,检测语法,重启服务。
vim nginx.conf
///
http {
        upstream westos {
        ip-hash;
///
nginx -t
nginx -s reload
 在server3主机中关闭nginx服务,以模仿后端该主机出现问题的情况,此时在真机做检测时,则只有server2主机的发布文件。
###server3
nginx -s stop
###真机
只有server2
server1------备用机
vim nginx.conf
///
http {
	#ip_hash
       server localhost:80 backup;	##备用机
///
nginx -t
nginx -s reload
cd ..
cd html/
ls
echo helloworld > index.html
###真机
curl www.westos.org	##helloworld
##如果后端恢复,则不会访问备用机
 当两台后端服务器都不能使用时,则显示server1备用机的发布文件。
###真机
curl www.westos.org
helloworld
