hash table 简述
简单地说,hash table是以key => value的方式实现O(1)时间复杂度的查询,发生冲突的时候往往采用拉链法的方式来处理。而当hash table的装载因子较高时,发生冲突的概率也会变大,这时候通常会使用扩大容量以及重哈希的方式来处理。
但基于特定场景,实现方法略有不同,下面详细讲讲Redis和PHP在hash table的实现上有何特点。
Redis
Redis对外暴露的数据结构包含字符串、哈希、列表、集合、有序集合,其中我们日常使用的哈希,在底层储存的时候,采用的结构可能是ziplist,也可能是dict,这里我们要讨论Redis的hash table,实际上讲的是dict的结构。先来看看Redis(代码版本更新至2021-08-22)中跟hash table相关的几个关键数据结构。
struct dict {
    dictType *type;

    dictEntry **ht_table[2];
    unsigned long ht_used[2];

    long rehashidx; /* rehashing not in progress if rehashidx == -1 */

    /* Keep small vars at end for optimal (minimal) struct padding */
    int16_t pauserehash; /* If >0 rehashing is paused (<0 indicates coding error) */
    signed char ht_size_exp[2]; /* exponent of size. (size = 1<<exp) */
};

typedef struct dictEntry {
    void *key;
    union {
        void *val;
        uint64_t u64;
        int64_t s64;
        double d;
    } v;
    struct dictEntry *next;
} dictEntry;
从数据结构上可以看出,Redis的hash table实现还是比较常规的,比较特别的点是dict结构中有一个dictEntry结构的数组,包含了2个元素,其中一个是用来承载数据,另一个是用来重哈希的。
下面我们通过hash table的查找算法来看看是如何使用的。
dictEntry *dictFind(dict *d, const void *key)
{
    dictEntry *he;
    uint64_t h, idx, table;

    if (dictSize(d) == 0) return NULL; /* dict is empty */
    if (dictIsRehashing(d)) _dictRehashStep(d); //如果正在进行重哈希,则往前推进
    h = dictHashKey(d, key);
    for (table = 0; table <= 1; table++) {
        idx = h & DICTHT_SIZE_MASK(d->ht_size_exp[table]);
        he = d->ht_table[table][idx];
        while(he) {
            if (key==he->key || dictCompareKeys(d, key, he->key))
                return he;
            he = he->next;
        }
        if (!dictIsRehashing(d)) return NULL;
    }
    return NULL;
}

#define dictIsRehashing(d) ((d)->rehashidx != -1)
看for循环的代码可以发现,Redis先是在d->ht_table[0]里面去搜索,根据对key做hash以及对拉链上的key做dictCompareKeys操作,如果找到了就返回结果。
注意,当在d->ht_table[0]找不到目标值的时候,Redis就会通过dictIsRehashing去检查(d)->rehashidx != -1,也就是看该hash table是否处于重哈希阶段,是的话就从d->ht_table[1]里用相同的方式去搜索值。
我们进一步观察_dictRehashStep方法,看Redis的重哈希过程是如何进行的。
static void _dictRehashStep(dict *d) {
    if (d->pauserehash == 0) dictRehash(d,1);
}


int dictRehash(dict *d, int n) {
    int empty_visits = n*10; /* Max number of empty buckets to visit. */
    if (!dictIsRehashing(d)) return 0;

    while(n-- && d->ht_used[0] != 0) {
        dictEntry *de, *nextde;

        /* Note that rehashidx can't overflow as we are sure there are more
         * elements because ht[0].used != 0 */
        assert(DICTHT_SIZE(d->ht_size_exp[0]) > (unsigned long)d->rehashidx);
        while(d->ht_table[0][d->rehashidx] == NULL) {
            d->rehashidx++;
            if (--empty_visits == 0) return 1;
        }
        de = d->ht_table[0][d->rehashidx];
        /* Move all the keys in this bucket from the old to the new hash HT */
        while(de) {
            uint64_t h;

            nextde = de->next;
            /* Get the index in the new hash table */
            h = dictHashKey(d, de->key) & DICTHT_SIZE_MASK(d->ht_size_exp[1]);
            de->next = d->ht_table[1][h];
            d->ht_table[1][h] = de;
            d->ht_used[0]--;
            d->ht_used[1]++;
            de = nextde;
        }
        d->ht_table[0][d->rehashidx] = NULL;
        d->rehashidx++;
    }

    /* Check if we already rehashed the whole table... */
    if (d->ht_used[0] == 0) {
        zfree(d->ht_table[0]);
        /* Copy the new ht onto the old one */
        d->ht_table[0] = d->ht_table[1];
        d->ht_used[0] = d->ht_used[1];
        d->ht_size_exp[0] = d->ht_size_exp[1];
        _dictReset(d, 1);
        d->rehashidx = -1;
        return 0;
    }

    /* More to rehash... */
    return 1;
}
可以看出,每次调用dictRehash方法,hash的重哈希过程最多会往前走十步,并且每次都将d->ht_table[0]的值以新的索引重定向到d->ht_table[1]上。
当d->ht_table[0]的数据为空,即d->ht_used[0] == 0 的时候,将d->ht_table[1]的值赋值给d->ht_table[0],重置d->ht_table[1]并将d->rehashidx 赋值 -1,也就是结束重哈希。
同样的,在插入,更新,删除操作中同样也会触发dictRehash来促进重哈希的过程(当然只有在重哈希过程的dict才会受影响),Redis用这种将重哈希的过程散步到多个请求中去,这种设计是为了保证稳定的快速响应,防止某个请求因为过大的hash table重哈希而迟迟没有响应。
PHP
PHP的hash table就更有意思了,因为在PHP,hash table不仅仅是Map,它同时还是数组,是栈,是队列。。是一个非常通用的设计。注意,PHP5和PHP7的hash table差异很大,这里我们只讨论PHP7的版本。(后续可能会写PHP5和PHP7之间hash table的设计差异)我们先来看看PHP7的hash table结构。(代码取自PHP-8.0分支,版本更新至2021-05-16)
struct _zend_array {
	zend_refcounted_h gc;
	union {
		struct {
			ZEND_ENDIAN_LOHI_4(
				zend_uchar    flags,
				zend_uchar    _unused,
				zend_uchar    nIteratorsCount,
				zend_uchar    _unused2)
		} v;
		uint32_t flags;
	} u;
	uint32_t          nTableMask; //掩码
	Bucket           *arData; //数据存储的地方
	uint32_t          nNumUsed; //已使用的桶的数量
	uint32_t          nNumOfElements; //有效桶数量
	uint32_t          nTableSize; //哈希表总大小,为2的n次方
	uint32_t          nInternalPointer;
	zend_long         nNextFreeElement;
	dtor_func_t       pDestructor;
};
在上述的数据结构中,我们目前只需要关注做了中文注释的几个字段。
nTableMask是一个掩码,用来跟hash后的key做或运算(注意,这里用的是或运算),他的取值是nTableSize的2倍取反,代码如下
uint32_t nSize = ht->nTableSize;
ht->nTableMask = HT_SIZE_TO_MASK(nSize);

#define HT_SIZE_TO_MASK(nTableSize) \
	((uint32_t)(-((nTableSize) + (nTableSize))))
常规的hash table在做key映射的时候,常见的用法是
index = hash(key) & mask
而PHP的设计却用的是或运算,这个我们在后面会详细讨论。
至于nNumUsed和nNumOfElements两个字段,区别点在于hash table在对桶做删除操作的时候,并不是直接把桶删掉,而是对桶做一个删除标识,所以nNumUsed>=nNumOfElements,当nNumUsed - nNumOfElements的差值达到阈值ht->nNumUsed > ht->nNumOfElements + (ht->nNumOfElements >> 5)之后,会引发重哈希,这个过程会将删除了的桶移除掉。
最关键的字段,*arData,是一个指针,指向数据的头部,也就是第一个桶的地址。这里我们有必要看看桶的数据结构长什么样子。
typedef struct _Bucket {
	zval              val;
	zend_ulong        h; /* hash value (or numeric index)   */
	zend_string      *key; /* string key or NULL for numerics */
} Bucket;
zval是PHP存储数据的结构,可以是任意类型,PHP的弱类型就是用他实现的,这里不是我们今天讨论的重点,不详细展开。
剩下两个字段的含义,代码本身的备注已经很清晰了。
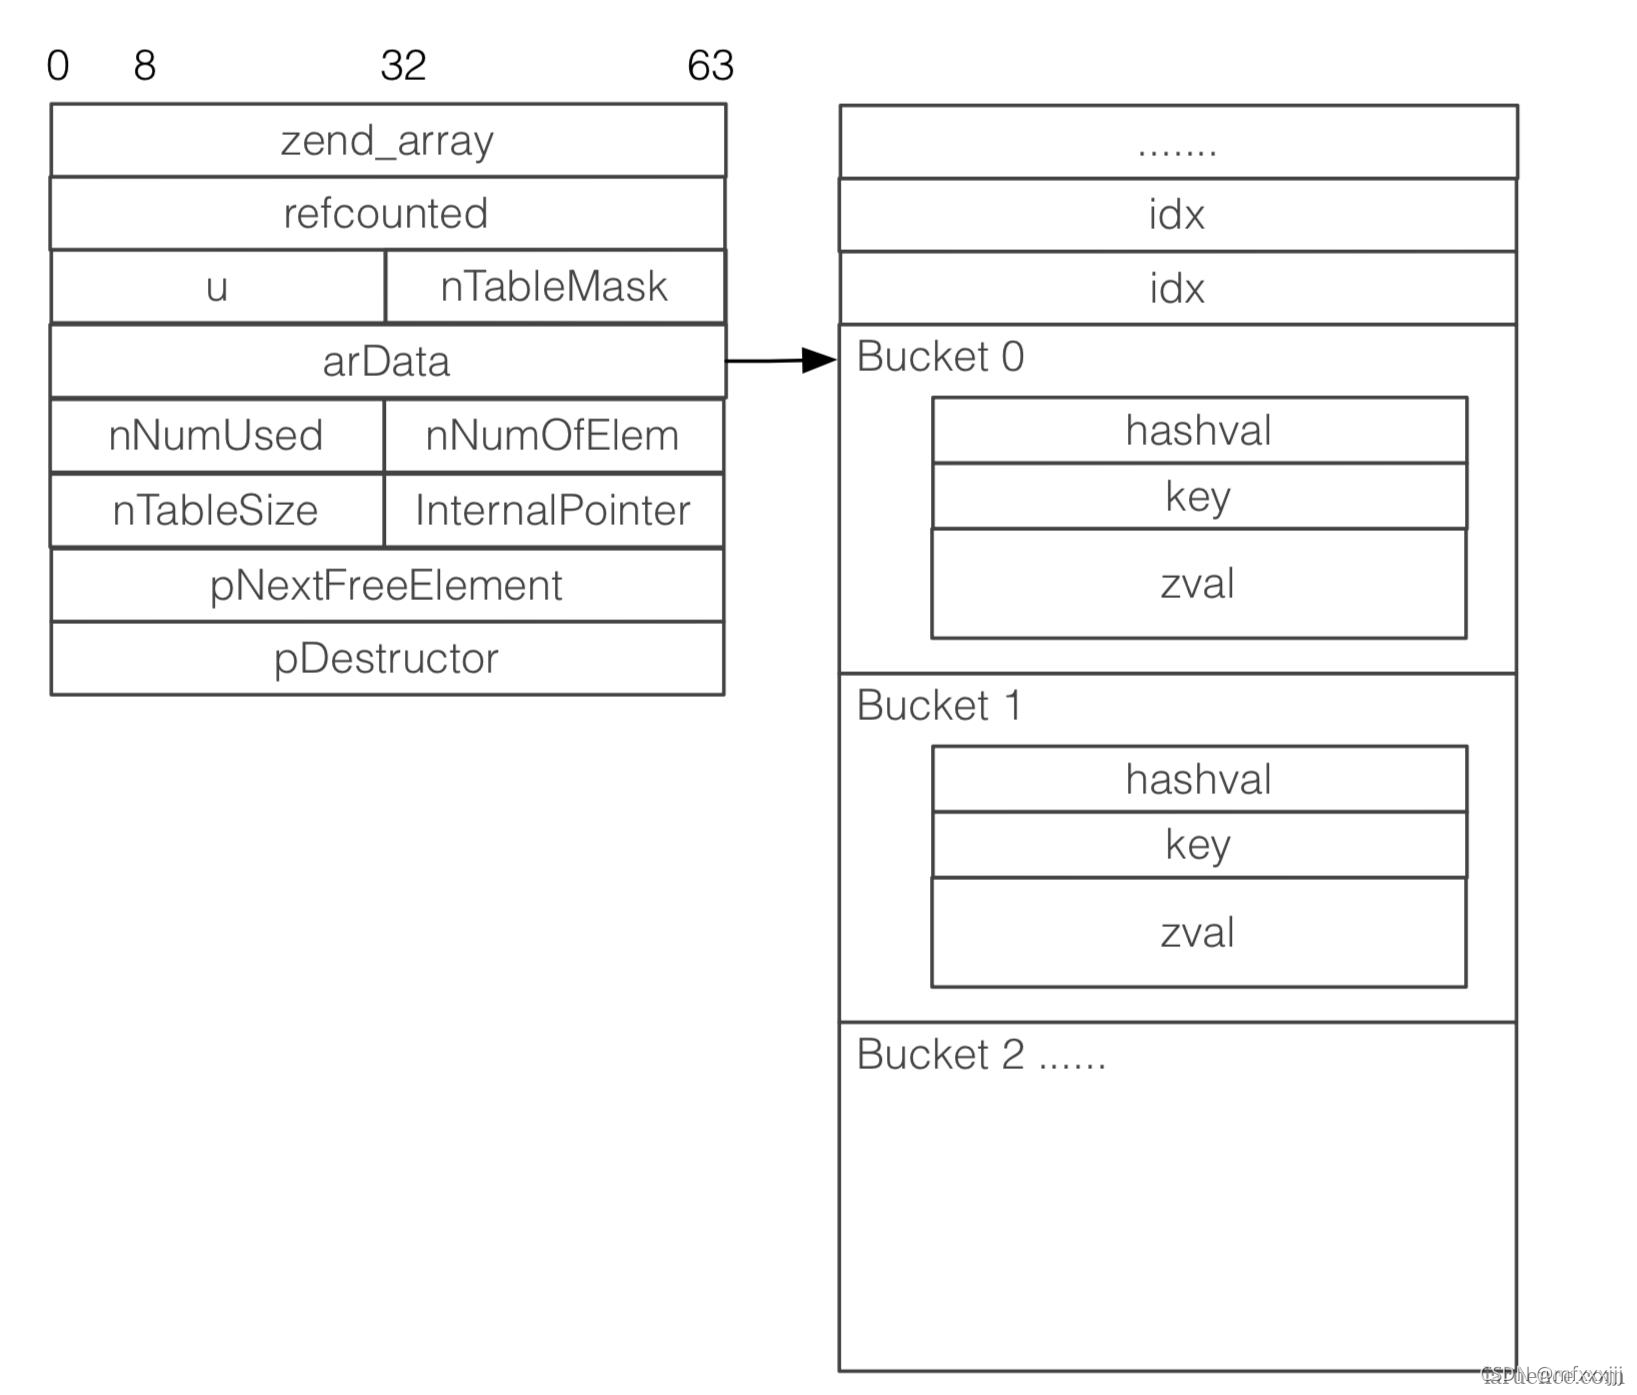
接下来我们借用鸟哥博客的一张图来帮我们理解。

可以看到,arData指向了一个桶的数组,桶的结构我们已经了解了,细心的同学应该发现了诡异的地方,在Bucket 0 之前居然还有多个idx值,这里是怎么回事呢?
我们来看看hash table的一个初始化方法。
static zend_always_inline void zend_hash_real_init_packed_ex(HashTable *ht)
{
	void *data;

	if (UNEXPECTED(GC_FLAGS(ht) & IS_ARRAY_PERSISTENT)) {
		data = pemalloc(HT_SIZE_EX(ht->nTableSize, HT_MIN_MASK), 1);
	} else {
		data = emalloc(HT_SIZE_EX(ht->nTableSize, HT_MIN_MASK));
	}
	HT_SET_DATA_ADDR(ht, data);
	/* Don't overwrite iterator count. */
	ht->u.v.flags = HASH_FLAG_PACKED | HASH_FLAG_STATIC_KEYS;
	HT_HASH_RESET_PACKED(ht);
}

#define HT_SIZE_EX(nTableSize, nTableMask) \
	(HT_DATA_SIZE((nTableSize)) + HT_HASH_SIZE((nTableMask)))

#define HT_SET_DATA_ADDR(ht, ptr) do { \
		(ht)->arData = (Bucket*)(((char*)(ptr)) + HT_HASH_SIZE((ht)->nTableMask)); \
	} while (0)

#define HT_HASH_SIZE(nTableMask) \
	(((size_t)(uint32_t)-(int32_t)(nTableMask)) * sizeof(uint32_t))
原来PHP在给arData申请内存的时候是分成了两部分的,
data = emalloc(HT_SIZE_EX(ht->nTableSize, HT_MIN_MASK)); 即数据+索引两个部分,并且通过调用宏HT_SET_DATA_ADDR将arData指向了第一个桶,也就是说arData的左边是索引部分,右边是数据,这种设计还是比较有意思的。常规的哈希设计索引和数据是在一起的,对key做哈希之后做一个截断操作,得出的结果作为索引,直接数据存放于索引对应的位置。那么PHP7的这种设计,索引跟数据是怎么关联起来的呢?
我们通过PHP的hash table的查找方法来解释这个问题。
static zend_always_inline Bucket *zend_hash_find_bucket(const HashTable *ht, zend_string *key, zend_bool known_hash)
{
	zend_ulong h;
	uint32_t nIndex;
	uint32_t idx;
	Bucket *p, *arData;

	if (known_hash) {
		h = ZSTR_H(key);
	} else {
		h = zend_string_hash_val(key);
	}
	arData = ht->arData;
	nIndex = h | ht->nTableMask;
	idx = HT_HASH_EX(arData, nIndex);

	if (UNEXPECTED(idx == HT_INVALID_IDX)) {
		return NULL;
	}
	p = HT_HASH_TO_BUCKET_EX(arData, idx);
	if (EXPECTED(p->key == key)) { /* check for the same interned string */
		return p;
	}

	while (1) {
		if (p->h == ZSTR_H(key) &&
		    EXPECTED(p->key) &&
		    zend_string_equal_content(p->key, key)) {
			return p;
		}
		idx = Z_NEXT(p->val);
		if (idx == HT_INVALID_IDX) {
			return NULL;
		}
		p = HT_HASH_TO_BUCKET_EX(arData, idx);
		if (p->key == key) { /* check for the same interned string */
			return p;
		}
	}
}
- 在对key做hash之后可以得到一个值,赋值给变量h。
- 通过
nIndex = h | ht->nTableMask操作,得出索引的下标。 - 根据第二步得出的下标,利用宏
HT_HASH_EX计算出索引的值。 - 最终再用索引值和宏
HT_HASH_TO_BUCKET_EX就可以找到我们要的结果。 - 当然这里有可能会存在哈希冲突的情况,我们在做第四步的时候,同时也要对比一下原始key,这个值就存放在Bucket结构的key字段里,如果相同,则返回值,否则会利用zval结构来做一个拉链的遍历。
为了避免篇幅过长,插入跟更新的代码就不贴了,这里面有3个点需要补充讲一下,
- 在插入值的时候,索引的下标通过计算得出,而数据的下标则是顺延的,比如上一个数据存放的位置是arData[2],那么下一个插入的位置是arData[3],这里衍生了一个经典的PHP问题,foreach和for谁更快的问题,答案是foreach快,因为foreach读数据就是直接顺着下标顺序去读就好了,不需要对key做任何的hash操作。而for的性能好坏则要分情况讨论了,因为PHP的数据并不一定总是需要索引的部分。细心的同学会发现,这里其实也解释了foreach的读取顺序问题。
- PHP7的哈希冲突时也是用拉链法解决的,其中拉链中的各个元素通过zval结构相连,hash table的索引指向链表的头部,这里的头部指的是hash(key)的值相同且最后一个插入hash table的数据。
- 在求索引下标的时候,使用的方法是或运算,
nIndex = h | ht->nTableMask,这里与arData将索引和数据分开的设计是紧密关联的。
前面我们说过nTableMask的取值是nTableSize的2倍取反,而nTableMask的取值是2的n次方,假设nTableSize为0000 1000,那么nTableMask的值为1111 0000(补码),跟nTableSize对应的4位全是0,这样就能保证结果落在数组索引的范围之内。