1、lnmp架构简介
1、什么是lnmp架构
LNMP=Linux+Nginx+Mysql+PHP:lnmp是指一组通常在一起使用来运行动态网站或者服务器的自由软件名称首字母缩写
2、lnmp特点:
nginx性能稳定,功能丰富,运维简单,处理静态文件速度快且消耗系统资源极少。作为web服务器,nginx相比于apache使用更少的资源,支持更多的并发连接,体现更高的效率。
2、mysql安装
1、得到mysql的源码包,并解压,然后进入解压后的mysql文件
[root@server1 ~]# tar zxf mysql-boost-5.7.31.tar.gz
[root@server1 ~]# cd mysql-5.7.31/
[root@server1 mysql-5.7.31]#
2、创建/usr/local/mysql,之后编译的mysql文件可以放在这个文件中
[root@server1 ~]# mkdir /usr/local/mysql
3、安装cmake软件(cmake跨平台工具是用来编译mysql源码的,用于设置mysql的编译参数,如安装目录,数据存放目录,字符编码,排序规则等)
[root@server1 ~]# yum install -y cmake
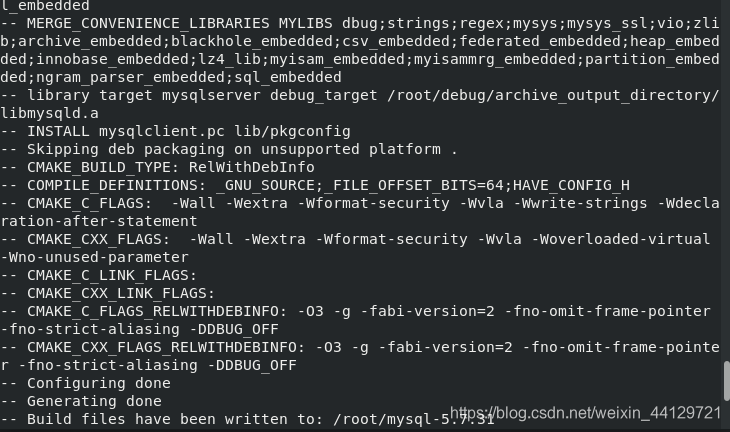
4、编译,在mysql-5.7.31目录执行cmake命令
[root@server1 mysql-5.7.31]# cmake -DCMAKE_INSTALL_PREFIX=/usr/local/mysql -DMYSQL_DATADIR=/usr/local/mysql/data -DMYSQL_UNIX_ADDR=/usr/local/mysql/data/mysql.sock -DWITH_INNOBASE_STORAGE_ENGINE=1 -DDEFAULT_CHARSET=utf8 -DDEFAULT_COLLATION=utf8_general_ci -DEXTRA_CHARSETS=all -DWITH_BOOST=/root/mysql-5.7.31/boost/boost_1_59_0
然后根据报错一个一个解决依赖性
yum install -y gcc gcc-c++ make ncurses-devel bison openssl-devel zlib-devel
编译成功

5、安装
[root@server1 mysql-5.7.31]# make
[root@server1 mysql-5.7.31]# make install
首先执行make命令,等到编译到100%再继续执行make install命令,如果make命令不成功那就删除源码包重新安装。
安装完成

6、启动数据库
将启动脚本复制到/etc/init.d
[root@server1 support-files]# pwd
/usr/local/mysql/support-files
[root@server1 support-files]# cp mysql.server  /etc/init.d/mysqld
编辑/etc/my.cnf文件
[mysqld]
datadir=/usr/local/mysql/data             ##数据目录
socket=/usr/local/mysql/data/mysql.sock
symbolic-links=0

创建用户
useradd -M -d /usr/local/mysql/ -s /sbin/nologin mysql
创建环境变量在.bash_profile文件下添加mysql的配置文件
[root@server1 bin]# pwd
/usr/local/mysql/bin
[root@server1 bin]# cd
[root@server1 ~]# vim .bash_profile
[root@server1 ~]# source .bash_profile

mysql初始化,生成随机密码
[root@server1 ~]# mysqld --initialize --user=mysql
打开mysql
[root@server1 ~]# /etc/init.d/mysqld start
Starting MySQL SUCCESS!
使用命令netstat -antlp可以看到3306端口打开,说明mysql已经运行

执行mysql_secure_installation命令进行安全安装设定
[root@server1 ~]# mysql_secure_installation
输入刚刚生成的随机密码

生成密码校验插件选择否

要不要删除匿名 需要,输入y


上述操作完成之后就可以登陆mysql
[root@server1 ~]# mysql -pwestos

3、PHP安装
1、解压php源码
[root@server1 ~]# tar jxf php-7.4.12.tar.bz2
如果没有bzip2软件则需要安装
[root@server1 ~]# yum install bzip2
[root@server1 ~]# cd php-7.4.12/
2、编译
[root@server1 php-7.4.12]# ./configure --prefix=/usr/local/php --with-config-file-path=/usr/local/php/etc --enable-mysqlnd --with-pdo-mysql --with-mysqli --with-openssl-dir --enable-gd --with-zlib-dir --with-curl --with-pear --enable-inline-optimization --enable-soap --enable-sockets --enable-mbstring --enable-fpm --with-fpm-user=nginx --with-fpm-group=nginx --with-fpm-systemd

 --prefix=/usr/local/php    ##指定安装路径
 --with-config-file-path=/usr/local/php/etc  ##指定php主配置文件的目录
 --enable-fpm         ##激活fastcji的管理器
 --with-fpm-user=nginx   ##指定php运行的身份,与nginx保持一致
执行./configure命令,根据提示安装依赖
 yum install -y libxml2-devel
 yum install -y sqlite-devel.x86_64
 yum install -y libcurl-devel.x86_64
yum install -y libpng-devel.x86_64
yum install oniguruma-devel-6.8.2-1.el7.x86_64.rpm oniguruma-6.8.2-1.el7.x86_64.rpm
之后执行安装命令
make&make install
3、添加环境变量
[root@server1 bin]# pwd
/usr/local/php/bin
[root@server1 bin]# cd
[root@server1 ~]# vim .bash_profile
[root@server1 ~]# source  .bash_profile

4、添加php配置文件
在/usr/local/php/etc目录下添加php配置文件,以.conf结尾
[root@server1 etc]# cp php-fpm.conf.default php-fpm.conf
配置php-fpm.conf文件(fastcji管理器)
[global]
; Pid file
; Note: the default prefix is /usr/local/php/var
; Default Value: none                      ##因为默认设置为none
pid = run/php-fpm.pid

[root@server1 etc]# cd php-fpm.d/
[root@server1 php-fpm.d]# cp www.conf.default  www.conf
[root@server1 php-fpm.d]# ls
www.conf  www.conf.default
将主配置文件复制到/usr/local/php/etc/php.ini目录下
[root@server1 php-7.4.12]# cp php.ini-production /usr/local/php/etc/php.ini
6、设置启动脚本两种方式
第一种
[root@server1 fpm]# pwd
/root/php-7.4.12/sapi/fpm
[root@server1 fpm]# cp init.d.php-fpm /etc/init.d/php-fpm
[root@server1 fpm]# chmod +x /etc/init.d/php-fpm

配置完成就可以启动php
[root@server1 ~]# /etc/init.d/php-fpm start
Starting php-fpm  done

监听端口是9000

第二种
[root@server1 fpm]# cp php-fpm.service /usr/lib/systemd/system/
这种方法默认是有报错
编辑/usr/lib/systemd/system/php-fpm.service
# Mounts the /usr, /boot, and /etc directories read-only for processes invoked by this unit.
#ProtectSystem=full

编辑完成后就可以启动
[root@server1 system]# systemctl start php-fpm

编辑php主配置文件/usr/local/php/etc/php.ini
[root@server1 etc]# vim php.ini

[Date]
; Defines the default timezone used by the date functions
; http://php.net/date.timezone
date.timezone =Asia/Shanghai            ##调整默认时区


[root@server1 etc]# systemctl reload php-fpm
4、 lnmp架构
1、整合nginx与php
编辑/usr/local/nginx/conf/nginx.conf
  location ~ \.php$ {                         ##当nginx处理php结尾的页面时,会将这个请求通过fastcgi_pass发送给9000端口
            root           html;
            fastcgi_pass   127.0.0.1:9000;
            fastcgi_index  index.php;
          #  fastcgi_param  SCRIPT_FILENAME  /scripts$fastcgi_script_name;
            include        fastcgi.conf;
        }

[root@server1 conf]# nginx -s reload   ##编辑完成后重启nginx
2、设置nginx的开机自启动
[root@server1 conf]# cd /usr/lib/systemd/system
[root@server1 system]# vim nginx.service

[Unit]
Description=The NGINX HTTP and reverse proxy server
After=syslog.target network-online.target remote-fs.target nss-lookup.target
Wants=network-online.target

[Service]
Type=forking
PIDFile=/usr/local/nginx/logs/nginx.pid
ExecStartPre=/usr/local/nginx/sbin/nginx -t
ExecStart=/usr/local/nginx/sbin/nginx
ExecReload=/usr/local/nginx/sbin/nginx -s reload
ExecStop=/bin/kill -s QUIT $MAINPID
PrivateTmp=true

[Install]
WantedBy=multi-user.target


[root@server1 system]# systemctl daemon-reload
3、编写php首页
[root@server1 ~]# cd /usr/local/nginx/html
[root@server1 html]# vim index.php
[root@server1 html]# cat index.php
<?php
phpinfo()

?>
![- [ ] List item](https://img-blog.csdnimg.cn/20210412130713284.png?x-oss-process=image/watermark,type_ZmFuZ3poZW5naGVpdGk,shadow_10,text_aHR0cHM6Ly9ibG9nLmNzZG4ubmV0L3dlaXhpbl80NDEyOTcyMQ==,size_16,color_FFFFFF,t_70)
4、整合nginx+php-fpm+mysql
vim /usr/local/php/etc/php.ini
[Pdo_mysql]
; Default socket name for local MySQL connects.  If empty, uses the built-in
; MySQL defaults.
pdo_mysql.default_socket=/usr/local   /mysql/data/mysql.sock
; Default socket name for local MySQL connects.  If empty, uses the built-in
; MySQL defaults.
; http://php.net/mysqli.default-socket
mysqli.default_socket =/usr/local/mysql/data/mysql.sock

[root@server1 etc]# systemctl reload php-fpm


5、使用phpMyadim进行检测
[root@server1 etc]# unzip phpMyAdmin-5.0.2-all-languages.zip
[root@server1 ~]# cp phpMyAdmin-5.0.2-all-languages /usr/local/nginx/html/phpadmin
[root@server1 ~]# chmod 755 /usr/local/mysql/data

打开数据库,nginx
[root@server1 phpadmin]# nginx
[root@server1 phpadmin]# /etc/init.d/mysqld  start
Starting MySQL. SUCCESS!

输入用户名和密码进入

5、memcache模块
[root@server1 ~]# tar zxf memcache-4.0.5.2.tgz   ##解压memcache文件
[root@server1 ~]# cd memcache-4.0.5.2/           ##进入memcache文件夹,发现没有configure文件所以使用phpize命令
[root@server1 ~]# yum install -y autoconf
[root@server1 memcache-4.0.5.2]# phpize
Configuring for:
PHP Api Version:         20190902
Zend Module Api No:      20190902
Zend Extension Api No:   320190902
[root@server1 memcache-4.0.5.2]# ls
autom4te.cache   config.h.in   config.w32  example.php   README
build            config.m4     CREDITS     LICENSE       run-tests.php
cloudbuild.yaml  configure     docker      memcache.php  tests
config9.m4       configure.ac  Dockerfile  php7                  ##出现configure文件
[root@server1 memcache-4.0.5.2]# ./configure --enable-memcache
[root@server1 memcache-4.0.5.2]# make
[root@server1 memcache-4.0.5.2]# make install
Installing shared extensions:     /usr/local/php/lib/php/extensions/no-debug-non-zts-20190902/
之后编辑文件/usr/local/php/etc/php.ini
添加拓展参数extension=memcache

[root@server1 ~]# yum install -y memcached
[root@server1 ~]# systemctl start memcached

[root@server1 memcache-4.0.5.2]# cp example.php /usr/local/nginx/html
##复制配置文件

[root@server1 memcache-4.0.5.2]# cp memcache.php  /usr/local/nginx/html/
##将监控文件放到/usr/local/nginx/html目录
[root@server1 html]# pwd
/usr/local/nginx/html
[root@server1 html]# vim memcache.php


