在PHP中安装Xdebug扩展
方法一:直接在phpstudy中快速安装的扩展

[Xdebug]
zend_extension=E:/Program Files/phpstudy_pro/Extensions/php/php7.3.4nts/ext/php_xdebug.dll
xdebug.collect_params=1
xdebug.collect_return=1
xdebug.auto_trace=Off
xdebug.trace_output_dir=E:/Program Files/phpstudy_pro/Extensions/php_log/php7.3.4nts.xdebug.trace
xdebug.profiler_enable=Off
xdebug.profiler_output_dir=E:/Program Files/phpstudy_pro/Extensions/php_log/php7.3.4nts.xdebug.profiler
xdebug.remote_enable=On
xdebug.remote_host=localhost
xdebug.remote_port=9090
xdebug.remote_handler=dbgp
?方法二:
- 通过phpinfo()查看有没有安装xdebug

-
进入xdebug官网Xdebug: Downloads下载,根据php版本选择,我这边是php7.3.4

-
把下载好的文件放入php环境中,比如E:\Program Files\phpstudy_pro\Extensions\php\php7.3.4nts\ext在E:\Program Files\phpstudy_pro\Extensions\php\php7.3.4nts目录中找到php.ini将如下代码段配置进去
[Xdebug] zend_extension=E:/Program Files/phpstudy_pro/Extensions/php/php7.3.4nts/ext/php_xdebug-3.1.1-7.3-vc15-nts-x86_64.dll xdebug.collect_params=1 xdebug.collect_return=1 xdebug.auto_trace=Off xdebug.trace_output_dir=E:/Program Files/phpstudy_pro/Extensions/php_log/php7.3.4nts.xdebug.trace xdebug.profiler_enable=Off xdebug.profiler_output_dir=E:/Program Files/phpstudy_pro/Extensions/php_log/php7.3.4nts.xdebug.profiler xdebug.remote_enable=On xdebug.remote_host=localhost xdebug.remote_port=9090 xdebug.remote_handler=dbgp - ?重启服务
Atom安装Xdebug
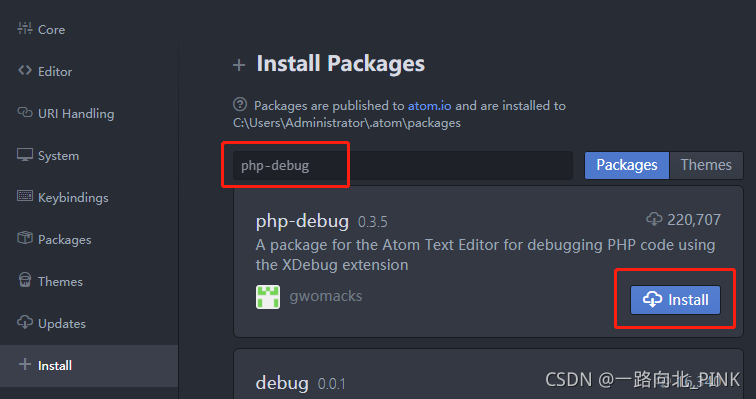
- 打开Atom File->Settings,搜索php-debug,下载(点击install)

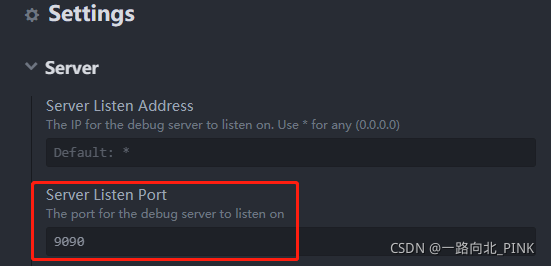
- 下载完后点击Settings

- 基本不需要改什么,如果端口有改动则更改此处

调试代码?
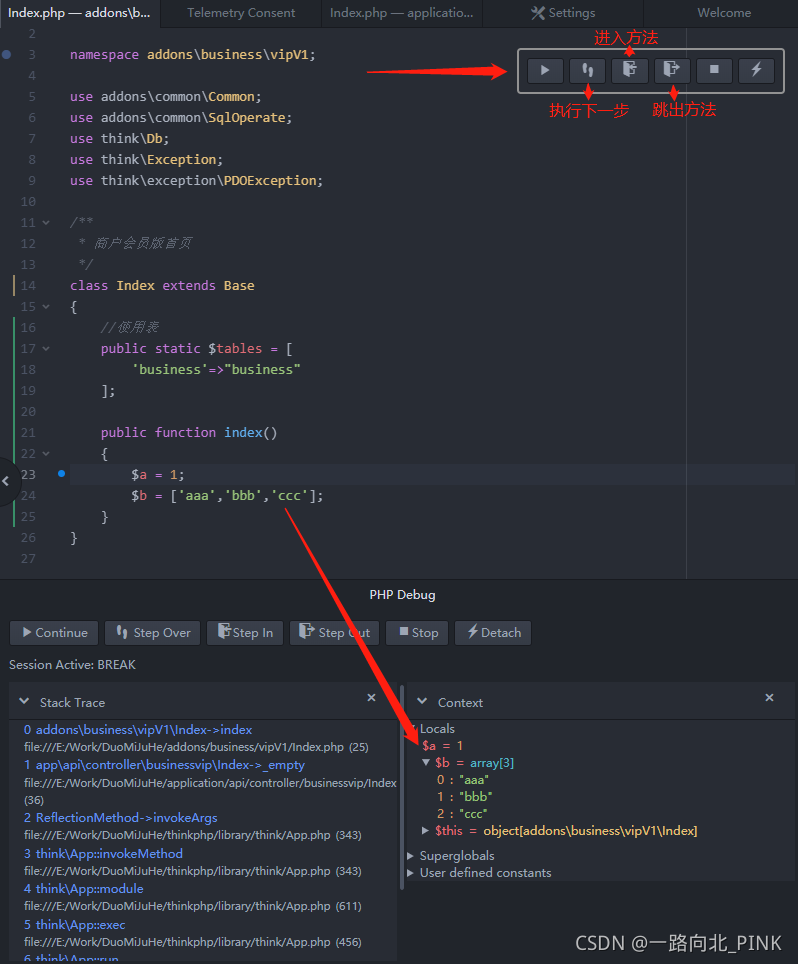
- 设置/删除断点:点击设置断点

- 开启debug:点击左下角PHP Debug

- 访问链接:给链接后面加个参数??XDEBUG_SESSION_START=1
- 访问后就会跳进来,右上角为调试面板

? ? ? ? ?注意:端口要确保没被占用,以及php.ini配置的端口与Atom中port设置的一致!!!