下载版本
apache:2.4
php:7
首先下载压缩包,下载完成后将包解压
(中间多了一个文件压不用管)

Apache配置
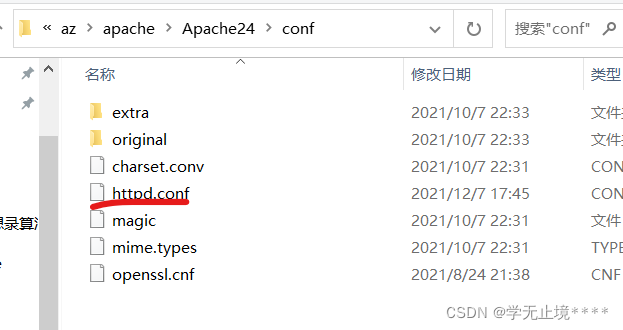
首先打开httpd.conf (建议下载Sublime Text,这样可以看到行数,当然也可以用记事本)

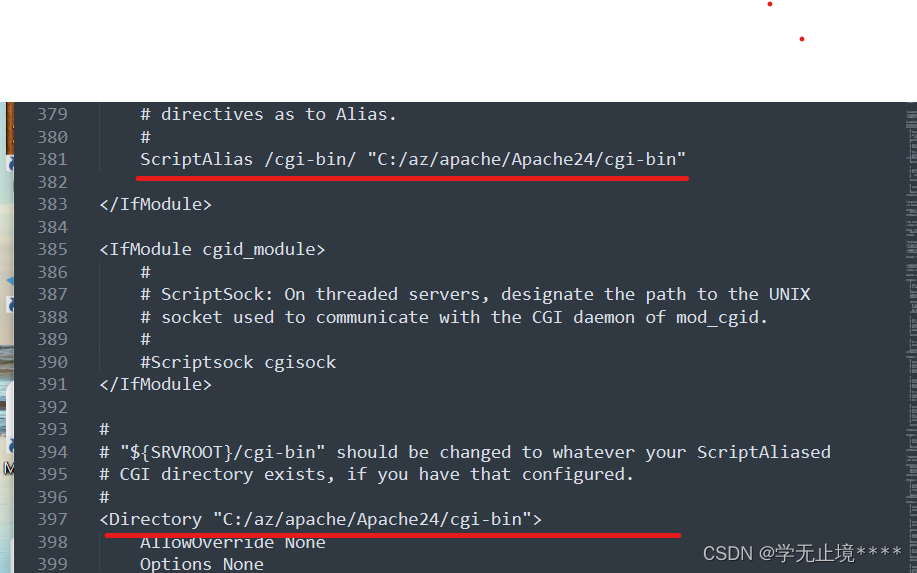
将路径改为绝对路径

端口可能会被占用,我这里将Listen后面的80改为了8088

在#LoadModule vhost_alias_module modules/mod_vhost_alias.so后面添加LoadModule php7_module “C:/az/php/php7apache2_4.dll”
PHPIniDir “C:/az/php”
AddType application/x-httpd-php .php .html .htm
(上面的路径要改为你自己的绝对路径)

将#ServerNamewww.example.com:80 改为
ServerName localhost:80

找到DocumentRoot

在index.html前面添加index.php


配置php
找到php.ini-development文件,复制一下命名为php.ini

打开php.ini
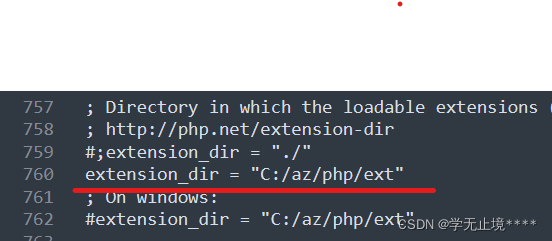
将extension_dir="./"前面的;去掉,改为
extension_dir = “C:/az/php/ext”

有些人会连接Mysql,但是没有驱动
要是有就将前面的;去掉,没有就添加以下代码
extension=php_pdo.dll
extension=php_pdo_firebird.dll
extension=php_pdo_mssql.dll
extension=php_pdo_mysql.dll
extension=php_mysqli.dll

运行Apache
我的电脑–>高级系统设计–>环境变量–>找到path,双击–>新建–>输入C:\az\apache\Apache24\bin

打开cmd
输入httpd.exe -k install

再输入
httpd.exe(如果配置成功,则不会出现提示,大多数都是端口号被占用,你可以改变一下端口)

在去浏览器的时候不要将cmd退出,否则打不开网页
打开浏览器输入localhost
如果出现了It works!,则Apache配置成功!
打开C:\az\apache\Apache24\htdocs\index.html
添加<?php phpinfo()?>
再在浏览器输入http://localhost:8088/index.html
出现以下截图说明Apache和Php整合成功

连接数据库
创建t2.php
<?php
$servername = "localhost";
$username = "root";
$password = "111111";
$dbname='yy';


$pdo= new PDO("mysql:host=$servername;dbname=$dbname", $username, $password);

$pdo->exec('set names utf8');

$sql="select * from t2";

$smt=$pdo->query($sql);
$rows=$smt->fetchAll(PDO::FETCH_ASSOC);


?>
<!DOCTYPE html>
<html lang="en">
<head>
	<meta charset="UTF-8">

	<title>查看用户</title>
	<link rel="stylesheet" href="bs/css/bootstrap.css">
	<script src='bs/js/jquery.js'></script>
	<script src='bs/js/bootstrap.js'></script>


</head>
<body>
	<div class="container">

		<h1 class="page-header">查看用户:</h1>
		<table class='table table-striped table-hover table-bordered'>
			<tr>
				<th>用户</th>
				<th>用户名</th>
				<th>年龄</th>
			</tr>
			<?php
				foreach($rows as $row){
					echo '<tr>';
					echo "<td>{$row['id']}</td>";
					echo "<td>{$row['name']}</td>";
					echo "<td>{$row['sex']}</td>";
					echo '</tr>';

				}


			?>
		</table>
	</div>


</body>
</html>
连接成功,显示数据库中的表

参考博客,你们也可以看看这个博主写的
-----我在安装中也遇到了很多困难,就是希望对你们能够有所帮助