magento2
m2的核心源代码通过composer install后,存放在vendor/magento里
db
在app/etc/文件夹下会多出config.php和env.php两个php文件,config.php可以看到magento2加载了那些模块;env.php保存了连接的数据库的一些信息
eav
1、eav_entity_type 表:
eav_entity_code: 代表 实体(表名)
attribute_model: 实例化model
entity_table: 实体所对应的最关键表(XXX_entity表)
2、eav_attribute 表:
eav_entity_id: 关联eav_entity_type表
attribute_code: 代表 属性(字段名)
3、xxx_eav_atrribute 表:
eav_attribute 表的属性的具体设置
4、eav_entity_attribute 表:
作为 eav_entity_type 和 eav_attribute 的中间表
5、XXX_entity 表:
记录一条数据
6、XXX_entity_{type} 表:
记录 XXX_entity 数据的各个属性(字段)值
1、2、3、4为表结构设置表;
5、6为对应的“数据—值”表
search
1、时间(时区)格式化
$timezone = ObjectManager::getInstance()->get('Magento\Framework\Stdlib\DateTime\TimezoneInterface');
var_dump($timezone->date($sourceData)->format('Y-m-d H:i:s'));
CRUD
app/code/重写目录/重写插件/Setup/
1、update
<?php

namespace MxGenki\ProductList\Setup;

use Magento\Eav\Setup\EavSetup;
use Magento\Framework\Setup\ModuleContextInterface;
use Magento\Framework\Setup\ModuleDataSetupInterface;
use Magento\Framework\Setup\UpgradeDataInterface;

class UpgradeData implements UpgradeDataInterface
{

    private $eavSetupFactory;

    public function __construct(EavSetup $eavSetupFactory)
    {
        $this->eavSetupFactory = $eavSetupFactory;
    }

    //改变属性值
    public function upgrade(ModuleDataSetupInterface $setup, ModuleContextInterface $context)
    {
        $setup->startSetup();
        $this->eavSetupFactory->updateAttribute(4,82,'is_visible', 0, null);
        $setup->endSetup();
    }
}
<?php


namespace MxGenki\ChooseStore\Setup;

use Magento\Framework\Setup\UpgradeSchemaInterface;
use Magento\Framework\Setup\ModuleContextInterface;
use Magento\Framework\Setup\SchemaSetupInterface;
class UpgradeSchema implements UpgradeSchemaInterface
{
	// 改变表字段类型
    public function upgrade(SchemaSetupInterface $setup, ModuleContextInterface $context)
    {
        $setup->startSetup();

        if (version_compare($context->getVersion(), '2.0.2', '<')) {
            $setup->getConnection()->changeColumn(
                $setup->getTable('inventory_source'),
                'email',
                'email',
                [
                    'type' => \Magento\Framework\DB\Ddl\Table::TYPE_TEXT,
                    'nullable' => false,
                    'default' => '',
                    'comment' => 'email'
                ]
            );
        }
        $setup->endSetup();

    }

}
2、add\delete
<?php
namespace MxGenki\Menu\Setup;

use Magento\Eav\Setup\EavSetupFactory;
use Magento\Framework\Exception\LocalizedException;
use Magento\Framework\Setup\{
    ModuleContextInterface,
    ModuleDataSetupInterface,
    InstallDataInterface
};

class InstallData implements InstallDataInterface
{
    private $eavSetupFactory;

    public function __construct(EavSetupFactory $eavSetupFactory) {
        $this->eavSetupFactory = $eavSetupFactory;
    }

    /**
     * @throws \Zend_Validate_Exception
     * @throws LocalizedException
     */
    public function install(ModuleDataSetupInterface $setup, ModuleContextInterface $context)
    {
        $eavSetup = $this->eavSetupFactory->create(['setup' => $setup]);

		// 删除属性
        $eavSetup->removeAttribute(\Magento\Catalog\Model\Category::ENTITY, 'jpa_name');
        // 增加属性
        $eavSetup->addAttribute(\Magento\Catalog\Model\Category::ENTITY, 'jpa_name', [
            'group' => 'Display Settings',
            'type' => 'varchar',
            'backend' => '',
            'frontend' => '',
            'sort_order' => 10,
            'label' => 'Jpa name',
            'input' => 'text',
            'class' => '',
            'source' => '',
            'global' => \Magento\Eav\Model\Entity\Attribute\ScopedAttributeInterface::SCOPE_STORE,
            'visible' => true,
            'required' => false,
            'user_defined' => false,
            'default' => '',
            'searchable' => false,
            'filterable' => false,
            'comparable' => false,
            'visible_on_front' => false,
            'used_in_product_listing' => true,
            'apply_to' => ''
        ]);
    }
}
<?php
/**
 * Magezon
 *
 * This source file is subject to the Magezon Software License, which is available at https://www.magezon.com/license
 * Do not edit or add to this file if you wish to upgrade the to newer versions in the future.
 * If you wish to customize this module for your needs.
 * Please refer to https://www.magezon.com for more information.
 *
 * @category  Magezon
 * @package   Magezon_Newsletter
 * @copyright Copyright (C) 2020 Magezon (https://www.magezon.com)
 */

namespace MxGenki\ChooseStore\Setup;

use Magento\Framework\Setup\InstallSchemaInterface;
use Magento\Framework\Setup\ModuleContextInterface;
use Magento\Framework\Setup\SchemaSetupInterface;
use Magento\Framework\DB\Ddl\Table;

class InstallSchema implements InstallSchemaInterface
{
	// 增加表字段
    public function install(SchemaSetupInterface $setup, ModuleContextInterface $context)
    {
        $installer = $setup;

        $installer->startSetup();
        $setup->getConnection()->addColumn(
            $setup->getTable('inventory_source'),
            'name_hk',
            [
                'type'    => Table::TYPE_TEXT,
                'length'  => 255,
                'comment' => 'Chinese Store Name'
            ]
        );
        $installer->endSetup();
    }
}
常用命令
在/magento目录下执行
1、数据库/模块变更
php bin/magento setup:upgrade
2、di.xml 依赖关系变更
php bin/magento setup:di:compile
3、强制部署静态文件(清楚缓存后)
php bin/magento setup:static-content:deploy -f
// 合并执行
rm -rf ./pub/static/*/* && sudo rm -rf ./var/view_preprocessed/* && sudo php bin/magento setup:static-content:deploy -f && sudo php bin/magento cache:clean && sudo chmod 777 var -R && sudo chmod 777 pub -R
清缓存
php bin/magento cache:clean
刷新缓存
php bin/magento cache:flush
删除缓存文件
sudo rm -rf ./pub/static/*/* && sudo rm -rf ./var/view_preprocessed/*
4、修改为开发模式
php bin/magento deploy:mode:set developer
5、禁用二重验证
php bin/magento module:disable Magento_TwoFactorAuth
layout
1、联动隐藏节点
	<!-- File Path: /ui_component/inventory_source_form.xml -->
		<field name="is_pickup_location_active" formElement="checkbox" sortOrder="65">
            <argument name="data" xsi:type="array">
                <item name="config" xsi:type="array">
                    <item name="default" xsi:type="number">0</item>
                </item>
            </argument>
            <settings>
                <dataScope>extension_attributes.is_pickup_location_active</dataScope>
                <dataType>boolean</dataType>
                <label translate="true">Use as Pickup Location</label>
                <notice translate="true">The Default Source can not be used for In-Store Pickup Delivery.</notice>
                <!-- 配置联动 -->
                <switcherConfig>
                    <rules>
                    	<!-- name: rule 序号-->
                        <rule name="0">
                        	<!-- is_pickup_location_active 属性的值为1时的情况 -->
                            <value>1</value>
                            <actions>
                            	<!-- name: action 序号 -->
                                <action name="0">
                                	<!-- 目标节点,是否隐藏 -->
                                	<!-- 当前xml文件的namespace:"inventory_source_form", 需重复两次;
                                		 当前field的fieldset: "general";
                                		 目标节点:"pickup_locations_unused_start_time" -->
                                    <target>inventory_source_form.inventory_source_form.general.pickup_locations_unused_start_time</target>
                                    <callback>hide</callback>
                                </action>
                                <action name="1">
                                    <target>inventory_source_form.inventory_source_form.general.pickup_locations_unused_end_time</target>
                                    <callback>hide</callback>
                                </action>
                            </actions>
                        </rule>
                        <rule name="1">
                            <value>0</value>
                            <actions>
                                <action name="0">
                                    <target>inventory_source_form.inventory_source_form.general.pickup_locations_unused_start_time</target>
                                    <callback>show</callback>
                                </action>
                                <action name="1">
                                    <target>inventory_source_form.inventory_source_form.general.pickup_locations_unused_end_time</target>
                                    <callback>show</callback>
                                </action>
                            </actions>
                        </rule>
                    </rules>
                    <enabled>true</enabled>
                </switcherConfig>
            </settings>
            <formElements>
                <checkbox>
                    <settings>
                        <valueMap>
                            <map name="false" xsi:type="number">0</map>
                            <map name="true" xsi:type="number">1</map>
                        </valueMap>
                        <prefer>toggle</prefer>
                    </settings>
                </checkbox>
            </formElements>
        </field>
        <field name="pickup_locations_unused_start_time" formElement="date" sortOrder="71">
            <argument name="data" xsi:type="array">
                <item name="config" xsi:type="array">
                    <item name="source" xsi:type="string">menu</item>
                    <item name="options" xsi:type="array">
                        <item name="dateFormat" xsi:type="string">yyyy-MM-dd</item>
                        <item name="timeFormat" xsi:type="string">HH:mm:ss</item>
                        <item name="showsTime" xsi:type="boolean">true</item>
                    </item>
                </item>
            </argument>
            <settings>
                <dataType>text</dataType>
                <label translate="true">Start Time</label>
                <visible>true</visible>
            </settings>
        </field>
        <field name="pickup_locations_unused_end_time" formElement="date" sortOrder="72">
            <argument name="data" xsi:type="array">
                <item name="config" xsi:type="array">
                    <item name="source" xsi:type="string">menu</item>
                    <item name="options" xsi:type="array">
                        <item name="dateFormat" xsi:type="string">yyyy-MM-dd</item>
                        <item name="timeFormat" xsi:type="string">HH:mm:ss</item>
                        <item name="showsTime" xsi:type="boolean">true</item>
                    </item>
                </item>
            </argument>
            <settings>
                <dataType>text</dataType>
                <label translate="true">End Time</label>
                <visible>true</visible>
            </settings>
        </field>
重写插件

1、模块声明
app/code/重写目录/重写插件/etc/module.xml
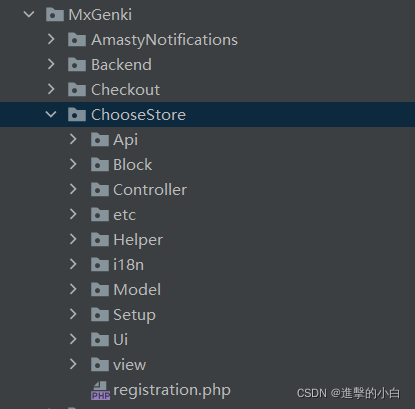
File: app/code/MxGenki/ChooseStore/etc/module.xml
<?xml version="1.0"?>
<config xmlns:xsi="http://www.w3.org/2001/XMLSchema-instance" xsi:noNamespaceSchemaLocation="urn:magento:framework:Module/etc/module.xsd">
    <module name="MxGenki_ChooseStore" setup_version="1.0.0">
    </module>
</config>
- name:module的名称
- setup_version: module的版本号
2、注册模块
app/code/重写目录/重写插件/registration.php
File: app/code/MxGenki/ChooseStore/registration.php
<?php
\Magento\Framework\Component\ComponentRegistrar::register(
    \Magento\Framework\Component\ComponentRegistrar::MODULE,
    'MxGenki_ChooseStore',
    __DIR__
);
执行php bin/magento setup:upgrade命令后,可在app/etc/config.php查看到该激活模块
3、路由声明
app/code/重写目录/重写插件/etc/(adminhtml | frontend)/routes.xml
File: app/code/MxGenki/ChooseStore/etc/adminhtml/routes.xml
<?xml version="1.0"?>
<config xmlns:xsi="http://www.w3.org/2001/XMLSchema-instance" xsi:noNamespaceSchemaLocation="urn:magento:framework:App/etc/routes.xsd">
    <router id="admin">
        <route id="admin_choose_store" frontName="admin_choose_store">
            <module name="MxGenki_ChooseStore"/>
        </route>
    </router>
</config>
<router>标签说明:
id = standard 表示前端路由;
<route>标签说明:
id : 对于router的唯一标识名;
frontName : 前端URL的控制名称;
<module>标签说明:
name : 声明module的名称;
before : 表示在定义module之前加载;
after : 表示在定义moduel之后加载;
备注:“before” et “after” 在创建module时不是必须的
4、创建控制器
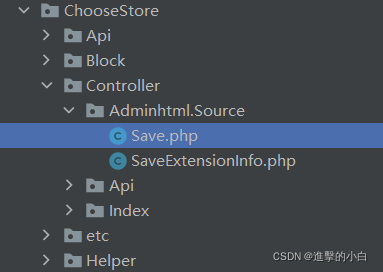
app/code/重写目录/重写插件/Controller/(Adminhtml | Index)/xxx.php

<?php
namespace MxGenki\ChooseStore\Controller\Adminhtml\Source;

use Magento\Framework\Controller\ResultInterface;

class Save extends \Magento\InventoryAdminUi\Controller\Adminhtml\Source\Save
{
    const ADMIN_RESOURCE = 'Magento_InventoryApi::source_save';

    public function execute(): ResultInterface
    {
    	// ...
    }
}
再将di.xml的依赖关系改写,调用原有save方法时,将改调新的save方法
<config xmlns:xsi="http://www.w3.org/2001/XMLSchema-instance" xsi:noNamespaceSchemaLocation="../../../../../lib/internal/Magento/Framework/ObjectManager/etc/config.xsd">
    <preference for="Magento\InventoryAdminUi\Controller\Adminhtml\Source\Save" type="MxGenki\ChooseStore\Controller\Adminhtml\Source\Save" />
</config>
注意: 若改写的class文件在其他文件的__construct()构造方法中,则不能直接改变依赖。需将上一层的class文件的__construct()拓展。
<?php

namespace MxGenki\AmastyNotifications\Model;

use Amasty\PushNotifications\Model\Builder\NotificationBuilder;

// 将NotificationProcessor在di.xml改写依赖
class NotificationProcessor extends \Amasty\PushNotifications\Model\Processor\NotificationProcessor
{
    /**
     * @var NotificationBuilder
     */
    private $newNotificationBuilder;

    public function __construct(
        NotificationBuilder $notificationBuilder
    ) {
        parent::__construct(
            $notificationBuilder
        );
        // 重写NotificationBuilder注入,该类不需要再在di.xml改写依赖
        $objectManager = \Magento\Framework\App\ObjectManager::getInstance();
        $this->newNotificationBuilder = $objectManager->get('MxGenki\AmastyNotifications\Model\NotificationBuilder');
    }
5、创建block
app/code/重写目录/重写插件/Block/(Adminhtml | Frontend)/xxx.php
真正与浏览器页面最相关的还是由对应的Block输出数据。
<?php
namespace MxGenki\ProductList\Block;

use Magento\Checkout\Model\Session;
use Magento\Framework\Exception\LocalizedException;
use Magento\Framework\Exception\NoSuchEntityException;
use Magento\Framework\View\Element\Template;

class IsInCart extends Template
{
    protected Session $_checkoutSession;
    public function __construct(
        Template\Context $context,
        Session $session,
        array $data = []
    )
    {
        $this->_checkoutSession = $session;
        parent::__construct($context, $data);
    }

    public function getCartProductQty($_product): int
    {
        $qty = 0;
        return $qty;
    }
}
第二种:单独引入js
<?php
namespace MxGenki\ChooseStore\Block\Adminhtml\Form;

class ApplyChange extends \Magento\Framework\View\Element\Template
{
    protected $_template = 'applyChange.phtml';
}
6、创建Layout布局文件
app/code/重写目录/重写插件/view(adminhtml | frontend)/layout/xxx.xml
布局文件的命名规则为:<Router Name>_<Controller Name>_<Action Name>
<page xmlns:xsi="http://www.w3.org/2001/XMLSchema-instance" xsi:noNamespaceSchemaLocation="urn:magento:framework:View/Layout/etc/page_configuration.xsd">
    <body>
    	<!-- template: module.xml配置的"name":: templates文件下的"路径"  -->
        <referenceBlock name="category.products.list" template="MxGenki_ProductList::product/list.phtml">
            <block class="MxGenki\ProductList\Block\IsInCart" name="genki_catalog_isincart" cacheable="false"/>
        </referenceBlock>
    </body>
</page>
第二种:单独引入js
		<container name="page_initialize" sortOrder="50">
            <htmlContent name="html_content">
                <block name="apply_change" class="MxGenki\ChooseStore\Block\Adminhtml\Form\ApplyChange"/>
            </htmlContent>
        </container>
7、创建模板文件
app/code/重写目录/重写插件/view(adminhtml | frontend)/templates/xxx/xxx.phtml
<?php
use Magento\Framework\App\Action\Action;
?>
<?php
// genki_catalog_isincart: layout.xml <block>注册的name
$isInCart = $block->getChildBlock('genki_catalog_isincart');

?>

<p>Qty: <?=$isInCart->getCartProductQty()?></p>
第二种:单独引入js
<?php
/**
 * @var $bolck \MxGenki\ChooseStore\Block\Adminhtml\Form\ApplyChange
 */

?>


<script>

require(['jquery'], function ($) {
    'use strict'
    $(function () {
        console.log("hello world");
    });
})
</script>
参考文献:https://segmentfault.com/a/1190000006198555#articleHeader11