
C++���ű��ѧϰ�ʼ�(��)
һ���������̽ṹ
- C++֧������������ֳ������нṹ:˳��ṹ��ѡ��ṹ��ѭ���ṹ
- ˳��ṹ:��������ִ��,��������ת
- ѡ��ṹ:���������Ƿ�����,��ѡ���ִ����Ӧ����
- ѭ���ṹ:���������Ƿ�����,ѭ�����ִ��ij�δ���
1.1 ѡ��ṹ
1.1.1 if ���
- if����������ִ���������������
- if�����������ʽ:���и�ʽif��䡢���и�ʽif��䡢��������if���
����:
/*********************************************************************
������:ѡ��ṹ
����: Sweitena
����: 2021-03-17 16:05
˵��:if�������ֽṹ
*********************************************************************/
#include <iostream>
using namespace std;
int main() {
//���и�ʽif���
//����ɼ�����90,����ɼ�����
cout << "�ٵ���if���" << endl;
int score1 = 0;
cout << "������һ������:" << endl;
cin >> score1;
if (score1 > 90) {
cout << "�ɼ�����" << endl;
}
//���и�ʽif���
//����ɼ�����60,�������;��֮,���������
cout << "��if - else�ṹ" << endl;
int score2 = 0;
cout << "������һ������:" << endl;
cin >> score2;
if (score2 < 60) {
cout << "������" << endl;
} else {
cout << "����" << endl;
}
//��������if���
/*����ɼ�С��60,����ɼ�������;60~80,����ɼ�һ��;
80~90,�ɼ�����;����90,�ɼ�����*/
cout << "��if - else if - else�ṹ" << endl;
int score3 = 0;
cout << "������һ������:" << endl;
cin >> score3;
if (score3 > 90)
{
cout << "�ɼ�����" << endl; //ע��:if����Ҳ�ǰ�˳������ִ�е�
}
else if (score3 > 80)
{
cout << "�ɼ�����" << endl; //�����ȰѴ��дǰ��
}
else if (score3 > 60)
{
cout << "�ɼ�һ��" << endl;
}
else
{
cout << "�ɼ�������" << endl;
}
system("pause");
return 0;
}
���н��ͼ:

1.1.2 Ƕ�� if ���
- �� if �����,����Ƕ��ʹ�� if ���,�ﵽ����ȷ�������ж�
��������:
- ��ʾ�û�����һ���߿����Է���,���ݷ������������ж�;
- �����������600��Ϊ����һ��,����500����Ϊ���϶���,����400��������,������Ϊδ���ϱ���;
- ��һ��������,�������700��,���ϱ���,����650��,�����廪,����600��,�����˴�
����:
/*********************************************************************
������:ѡ��ṹ
����: Sweitena
����: 2021-03-17 16:05
˵��:Ƕ��if���
*********************************************************************/
#include <iostream>
using namespace std;
int main() {
int score = 0;
cout << "������һ���߿�����:" << endl;
cin >> score;
cout << "������ķ�����:" << score << endl;
if (score > 600) //�������600 һ��
{
cout << "��ϲ������һ����ѧ" << endl;
if (score > 700)
{ cout << "��ϲ�����뱱��" << endl;}
else if (score > 650)
{ cout << "��ϲ�������廪" << endl;}
cout << "��ϲ�������˴�" << endl;
}
else if (score > 500) //�������500 ����
{
cout << "��ϲ�����������ѧ" << endl;
}
else if (score > 400) //�������400 ����
{
cout << "��ϲ������������ѧ" << endl;
}
else //������� δ���ϱ���
{
cout << "�ܱ�Ǹ,��δ���ϱ���" << endl;
}
system("pause");
return 0;
}
���н��ͼ:

?������ϰ:��ֻС��������
��������:
- ����ֻС��ABC,��ֱ�������ֻС��������,�����ж���ֻС������
����:
/*********************************************************************
������:ѡ��ṹ������ϰ01
����: Sweitena
����: 2021-03-18 09:15
˵��:��ֻС������
*********************************************************************/
#include <iostream>
using namespace std;
int main() {
//1.������ֻС�������ر���
int a, b, c;
a = 0;
b = 0;
c = 0;
//2.���û�������ֻС��������
cout <<"��������A������:"<< endl;
cin >> a;
cout <<"��������B������:"<< endl;
cin >> b;
cout <<"��������C������:"<< endl;
cin >> c;
//3.�ж���ֻ����
//���ж�A��B
if(a > b) //a>b
{
if(a > c) //a>c
{cout << "��A����" << a << endl;}
else //a<c
{cout << "��C����" << c << endl;}
}
else //a<b
{
if(b > c) //b>c
{cout << "��B����" << b << endl;}
else //b<c
{cout << "��c����" << c << endl;}
}
system("pause");
return 0;
}
���н��ͼ:

- ����:�Ƚ�������������Ĵ�С,�����ս�������
����:
/*********************************************************************
������: ѡ��ṹ������ϰ02
����: Sweitena
����: 2021-03-18 09:20
˵��: �Ƚ��������������С,����������
*********************************************************************/
#include <iostream>
using namespace std;
int main() {
int a, b, c, t;
a = 0;
b = 0;
c = 0;
t = 0;
cout << "��ֱ�������ֻС��������:" << endl;
cin >> a;
cin >> b;
cin >> c;
if (a > b)
{
t = a;
if (c > t)
{
t = c;
cout << "��> ��> ��" << endl;
}
else
{
//��֪a>c �� a>b ��ȷ��b��c�Ĺ�ϵ
if (b > c)
{cout << "��> ��> ��" << endl;}
else
{cout << "��> ��> ��" << endl;}
}
}
else
{ //��֪a<b ��ȷ��a��c�Ĺ�ϵ
t = b;
if (c > t)
{
t = c;
cout << "��> ��> ��" << endl;
}
else
{
//��֪c<b �� a<b ��ȷ��a��c�Ĺ�ϵ
if (a > c)
{cout << "��> ��> ��" << endl;}
else
{cout << "��> ��> ��" << endl;}
}
}
system("pause");
return 0;
}
���н��ͼ:

1.1.3 ��Ŀ�����
- ����:ͨ����Ŀ�����ʵ�ּ��ж�
����:
/*********************************************************************
������: ѡ��ṹ_��Ŀ�����
����: Sweitena
����: 2021-03-18 09:30
˵��: �����á�ͨ����Ŀ�����ʵ�ּ��ж�
*********************************************************************/
#include <iostream>
using namespace std;
int main() {
int a, b, c;
a = 10;
b = 20;
c = 0;
//ʹ����Ŀ������Ƚ�a��b,���ؽϴ�ֵ
c = a > b ? a : b;
cout << "c = " << c << endl;
//C++����Ŀ��������ص��DZ���,���Լ�����ֵ
( a > b ? a : b ) = 100;
cout << "a = " << a << endl;
cout << "b = " << b << endl;
system("pause");
return 0;
}
���н��ͼ:

1.1.4 switch �ṹ
- ����:switch�ṹ����ִ�ж�������֧���
��������:
- ����Ӱ���,�������ȼ�:
- A��:4.5~5.0��,��Ӱ�dz���
- B��:3.0~4.5��,��Ӱһ��
- C��:3.0��һ��,��Ƭ
����:
/*********************************************************************
������: ѡ��ṹ_switch�ṹ
����: Sweitena
����: 2021-04-01 09:35
˵��: �����á�ִ�ж�������֧���
������������Ӱ���,�������ȼ�,A��:4.5-5.0��;B��:3.0-4.5��;C��:3.0������
*********************************************************************/
#include <iostream>
using namespace std;
int main() {
//1.��ʾ�û�����Ӱ���
cout << "�����Ӱ���(0~5):" << endl;
//2.�û���ʼ���д��
float score;
char flag;
score = 0;
cin >> score;
cout << "����ķ���Ϊ:" << score << endl;
//3.�����û�����ķ�������ʾ�û����Ľ��
flag = (score > 4.5 || score == 4.5) ? 'A' : (score > 3.0 || score == 3.0) ? 'B' : 'C';
switch (flag) {
case 'A':
cout << "A��-����Ϊ��Ӱ�dz���" << endl;
break;
case 'B':
cout << "B��-����Ϊ��Ӱһ��" << endl;
break;
case 'C':
cout << "C��-����Ϊ�Ǹ���Ƭ" << endl;
break;
}
system("pause");
return 0;
}
���н��ͼ:

1.2 ѭ���ṹ
1.2.1 while ���
- while���:ֻҪѭ�������Ľ��Ϊ��,��ִ��ѭ��
- �:while (ѭ������){ ѭ����� }
- ����ѭ��:while(1) { ѭ����� }
��������:
- ʵ�ִ�0�ۼӵ�n,��Ͳ�����n�����ĺ�
����:
/*********************************************************************
������: ѭ���ṹ_while���
����: Sweitena
����: 2021-04-01 11:07
˵��: �����á�����ѭ������,ִ��ѭ�����
����������ʵ�ִ�0�ۼӵ�n,���
*********************************************************************/
#include <iostream>
using namespace std;
int main() {
int i, n, S;
i = 0;
n = 0;
S = 0;
cout << "������һ��n:" << endl;
cin >> n;
while (i < n) {
i = i + 1; // i++;
S = S + i;
}
cout << n << "��������Ϊ:" << S << endl;
system("pause");
return 0;
}
���н��ͼ

?������ϰ01:������
- ע��:���������ʱ,��������< ctime >ͷ�ļ�,�������������
��������:
- ϵͳ�������һ��1��100֮�������,��ҽ��в²�;
- ����´�,��ʾ������ֹ�����С;
- ����¶�,��ϲ���ʤ��,�����˳���Ϸ��
����:
/*********************************************************************
������: ѭ���ṹ������ϰ01
����: Sweitena
����: 2021-04-01 11:26
˵��: ������
*********************************************************************/
#include <iostream>
using namespace std;
#include <ctime>//ϵͳͷ�ļ�
int main() {
//�������������,����:���õ�ǰϵͳʱ�����������
srand((unsigned int)time(NULL));
int num;
int val;
val = 0;
num = rand() % 100 + 1; //����0-100�������
//cout << num << endl;
while (1) {
cout << "������һ����" << endl;
cin >> val;
if (val == num)
{
cout << "��ϲ���¶���!" << endl;
break; //����ѭ��,���˳���Ϸ
}
else if (val > num)
{
cout << "����" << endl;
}
else
{
cout << "��" << endl;
}
}
system("pause");
return 0;
}
���н��ͼ:

1.2.2 do��while ���
- �� while ����������do��while ����ִ��һ��ѭ�����,���ж�ѭ������
- �:do { ѭ����� } while (ѭ������) ;
- ����ѭ��:do { ѭ����� } while (1) ;
��������:
- ʵ�ִ�0�ۼӵ�n,��Ͳ�����n�����ĺ�
����:
/*********************************************************************
������: ѭ���ṹ_do...while
����: Sweitena
����: 2021-04-03 19:20
˵��: �����á�����ѭ������,ִ��ѭ�����
����������ʵ�ִ�0�ۼӵ�n,���
*********************************************************************/
#include <iostream>
using namespace std;
int main() {
int i, n, S;
i = 0;
n = 0;
S = 0;
cout << "������һ��n:" << endl;
cin >> n;
do {
i = i + 1;// i++;
S = S + i;
} while (i < n);
cout << n << "��������Ϊ:" << S << endl;
system("pause");
return 0;
}
���н��ͼ:

?������ϰ02:ˮ�ɻ���
��������:
- ˮ�ɻ�����ָһ��3λ��,����ÿ��λ�ϵ����ֵ�3����֮�͵���������
- ����:13+53+33=153
- ������ do��while ���,�������3λ���е�ˮ�ɻ���
��������:

����:
/*********************************************************************
������: ѭ���ṹ������ϰ02
����: Sweitena
����: 2021-04-03 19:36
˵��: �ҵ�����3λ��ˮ�ɻ���
*********************************************************************/
#include <iostream>
using namespace std;
int main() {
int bai, shi, ge, num;
bai = 0;
shi = 0;
ge = 0;
num = 100;
do
{
//cout << num <<endl;
ge = num % 10;
shi = (num / 10 ) % 10;
bai = num / 100;
if (ge * ge * ge + shi * shi * shi + bai * bai * bai == num)
{cout << num << endl;}
num++;
} while (num < 1000);
system("pause");
return 0;
}
���н��ͼ:

1.2.3 for ѭ�����
- �:for (��ʼ����ʽ; ��������ʽ; ĩβѭ����) { ѭ�����;}
- ����ѭ��:for ( ; ; ) { ѭ�����;}
����:
/*********************************************************************
������: ѭ���ṹ-for
����: Sweitena
����: 2021-04-03 20:30
˵��: �����á�����ѭ������,ִ��ѭ�����
����������ʵ�ִ�0�ۼӵ�n,���
*********************************************************************/
#include <iostream>
using namespace std;
int main() {
//for(��ʼ����ʽ; ��������ʽ; ĩβѭ����) {ѭ�����;}
int i, n, S;
i = 0;
n = 0;
S = 0;
cout << "������һ��n:" << endl;
cin >> n;
for (; i < n + 1; i++)
{
//ע��������ж��������n+1��
S = S + i;
}
cout << n << "��������Ϊ:" << S << endl;
system("pause");
return 0;
}
���н��ͼ:
?������ϰ03:������
��������:
- ��1��ʼ��������100,������ָ�λ����7,��������ʮλ����7,���߸�������7�ı���,���Ǵ�ӡ������,��������ֱ�Ӵ�ӡ�����
��������:

����:
/*********************************************************************
������: ѭ���ṹ������ϰ03
����: Sweitena
����: 2021-04-03 20:41
˵��: ��1��100,��λ������ʮλ������7,������7�ı����ʹ�ӡ������,��������ֱ�����
*********************************************************************/
#include <iostream>
using namespace std;
int main() {
int num, b, c;
num = 1;
b = 0;
c = 0;
for ( ; num < 101; num++ )
{
//cout << num << endl;
b = num / 10; //ʮλ������
c = num % 10; //�������
if ((num % 7 == 0 ) || (b == 7 ) || (c == 7))
{cout << "������" << endl;}
else
{cout << num << endl;}
}
system("pause");
return 0;
}
���н��ͼ:

1.2.4 Ƕ��ѭ��
- ����:��ѭ��������Ƕ��һ��ѭ��,���һЩʵ������
����:
/*********************************************************************
������: ѭ���ṹ-Ƕ��ѭ��
����: Sweitena
����: 2021-04-03 21:31
˵��: ��ӡ10*10�ľ�����ʽ������
*********************************************************************/
#include <iostream>
using namespace std;
int main() {
cout << "����һ:����forѭ��,�ȴ�ӡһ����ͼ,��Ƕ��" << endl;
int i, j;
//����forѭ��,�ȴ�ӡһ����ͼ
for (i = 0; i < 10; i++)
{ //���ѭ��
for (j = 0; j < 10; j++)
{ //�ڲ�ѭ��
cout << "* " ; //��ӡ����һ��
}
cout << endl;
} //Ȼ��������һ��ѭ���ѡ���ӡһ�С��Ĵ���,ѭ��10��
cout << "������:����Ƕ��Ҳ����ʵ����ͼ" << endl;
int k;
for (k = 0; k < 5; k++)
{cout << "* * * * * * " << endl; } //��ӡ����һ��
system("pause");
return 0;
}
���н��ͼ:

?������ϰ04:�˷��ھ���
��������:
- ����Ƕ��ѭ��,ʵ�־žų˷���
��������:

����:
/*********************************************************************
������: ѭ���ṹ������ϰ04
����: Sweitena
����: 2021-04-04 08:57
˵��: ��ӡ�˷��ھ���
*********************************************************************/
#include <iostream>
using namespace std;
int main() {
int r, c, product;
product = 0;
for (r = 1; r <= 9; r++)
{
//cout << r;
for (c = 1; c <= r; c++)
{
//cout << c;
product = c * r;
cout << c << "x" << r << "=" << product << " ";
}
cout << endl; //����
}
system("pause");
return 0;
}
���н��ͼ:

1.2.5 ��ת���:3��
- ����:����ִ�е��������С���ִ���뿪һ����Χʱ,�����ڸ÷�Χ�д������Զ����ᱻ���١�
1. break ���
- ����:��������ѡ��ṹ����ѭ���ṹ
- ������ switch ���������,��������ֹ case ������ switch
- ������ѭ�������,������������ǰ��ѭ�����
- ������Ƕ��ѭ����,����������ڲ�ѭ�����

2. continue ���
- ����:��ѭ�������,��������ѭ����������δִ�е����,����ִ����һ��ѭ��

3. goto ���
- ����:������������ת���
- �:goto ���;
- �����ǵ����ƴ���,ִ�е�goto���ʱ,����ת����ǵ�λ��
��ע�⡿���κα��������,��������ʹ�� goto ���
��������
- ��ν����,����һ������,����������ͬ���͵�����Ԫ��
- �ص�1:�����е�ÿ������Ԫ�ض�����ͬ����������
- �ص�2:���������������ڴ�λ����ɵ�
2.1 һά����
2.1.1 ����
һά���鶨������ַ�ʽ:
- �������� ������ [ ���鳤�� ] ;
- �������� ������ [ ���鳤�� ] = { ֵ1,ֵ2,�� };
- �������� ������ [ ] = { ֵ1,ֵ2,��};
����:
/*********************************************************************
������: һά����
����: Sweitena
����: 2021-04-04 14:33
˵��: ����Ķ���
*********************************************************************/
#include <iostream>
using namespace std;
int main() {
/********** ���ֶ�����ʽ:********************
1.�������� ������[���鳤��];
2.�������� ������[���ݳ���] = {ֵ1, ֵ2, ...};
3.�������� ������[ ] = {ֵ1, ֵ2, ...};
**********************************************/
//�ٵ�һ�ֶ��巽ʽ
cout << "��һ�ֶ��巽ʽ:" << endl;
int arr[5];
arr[0] = 10;// ������Ԫ�ظ�ֵ
arr[1] = 20;
arr[2] = 30;
arr[3] = 40;
arr[4] = 50;
cout << arr[0] << " "; // ��������Ԫ��
cout << arr[1] << " ";
cout << arr[2] << " ";
cout << arr[3] << " ";
cout << arr[4] << " ";
cout << endl;
//�ڵڶ��ֶ��巽ʽ
cout << "�ڶ��ֶ��巽ʽ:" << endl;
int arr2[5] = {10, 20, 30, 40};
int i;
for (i = 0; i < 5; i++)
{
cout << arr2[i] << " ";
}
cout << endl;
//�۵����ֶ��巽ʽ
cout << "�����ֶ��巽ʽ:" << endl;
int arr3[] = {10, 20, 30, 40, 50, 60, 70, 80, 90, 100};
int j;
for (j = 0; j < 10; j++)
{
cout << arr3[j] << " ";
}
cout << endl;
system("pause");
return 0;
}
���н��ͼ:

2.1.2 ��������;
һά�������Ƶ���;:
- ����ͳ�������������ڴ��еij���
- ���Ի�ȡ�������ڴ��е���ַ
����:
/*********************************************************************
������: һά����
����: Sweitena
����: 2021-04-04 14:38
˵��: ����������;
*********************************************************************/
#include <iostream>
using namespace std;
int main() {
//��������;:
int arr3[] = {10, 20, 30, 40, 50, 60, 70, 80, 90, 100};
//1.����ͨ��������ͳ�����������Ԫ��ռ���ڴ�Ĵ�С
cout << "��������ռ���ڴ��СΪ:" << sizeof(arr3) << endl;
cout << "Ԫ��ռ���ڴ��СΪ:" << sizeof(arr3[0]) << endl;
cout << "������Ԫ�صĸ���:" << sizeof(arr3) / sizeof(arr3[0]) << endl;
//2.�����ù��������鿴������ַ
cout << "������ַΪ:" << arr3 << endl;
cout << "������ַΪ:" << (int)arr3 << endl; //16����ת10����
cout << "�����е�һ��Ԫ�صĵ�ַΪ:" << &arr3[0] << endl;
cout << "�����е�һ��Ԫ�صĵ�ַΪ:" << (int)&arr3[0] << endl; //16����ת10����
cout << "�����еڶ���Ԫ�صĵ�ַΪ:" << (int)&arr3[1] << endl;
system("pause");
return 0;
}
���н��ͼ:

?������ϰ01:��ֻС��������
��������:
- ��һ�������м�¼����ֻС��������
- ����:int arr[5] = { 300 , 350 , 200 , 400 , 250 };
- �ҳ�����ӡ���ص�С������
����:
/*********************************************************************
������:һά���鰸����ϰ01
����: Sweitena
����: 2021-04-04 15:30
˵��: ��ֻС��������,�ҳ�����ӡ���ص�С��������
*********************************************************************/
#include <iostream>
using namespace std;
int main() {
int arr[] = {300, 350, 200, 400, 250};
int max = 0; //������һ�����ֵ
int num = 0;
for (int i = 0; i < 5; i++)
{
if (arr[i] > max)
{
max = arr[i]; //�������ֵ
num = i;
}
}
cout << "��" << num + 1 << "ֻС������,����Ϊ:" << max << endl;
system("pause");
return 0;
}
���н��ͼ:

?������ϰ02:Ԫ������
��������:
- ������һ��5��Ԫ�ص�����,���ҽ�Ԫ������
- ����:ԭ����Ԫ��Ϊ:1,3,2,5,4; ���ú�������Ϊ:4,5,2,3,1;
��������:

����:
/*********************************************************************
������: һά���鰸��02
����: Sweitena
����: 2021-04-04 16:11
˵��: ����Ԫ������,��βԪ�ؽ���
*********************************************************************/
#include <iostream>
using namespace std;
int main() {
/*****1.��������*****/
int arr[] = {1, 3, 2, 5, 4};
cout << "��������ǰ:" << endl;
for (int i = 0; i < 5; i++)
{
cout << arr[i] << " ";
}
cout << endl;
/*****2.ʵ������******/
//2.1��¼��ʼ�±�λ��
//2.2��¼ĩβ�±�λ��
//2.3��ʼ�±���ĩβ�±��Ԫ�ػ���
//2.4��ʼλ��++,ĩβλ��--
//ѭ��ִ��2.1-2.4����,ֱ����ʼλ��>=ĩβλ��
int start = 0; //��ʼԪ���±�
int end = sizeof(arr) / sizeof(arr[0]) - 1; //ĩβԪ���±�
//����һ����ʱ�ڴ�
int temp;
//������ʼԪ�غ�ĩβԪ��
while (start < end)
{
temp = arr[start]; //ʵ��Ԫ�ػ���
arr[start] = arr[end];
arr[end] = temp;
start++; //�±����,���м��£
end--;
}
/******3.��ӡ���ú������*******/
cout << "����Ԫ�����ú�:" << endl;
for (int i = 0; i < 5; i++)
{
cout << arr[i] << " ";
}
cout << endl;
system("pause");
return 0;
}
���н��ͼ:

?������ϰ03:ð������
��������:
- ����:��õ������㷨,��������Ԫ�ؽ�������
- �Ƚ����ڵ�Ԫ�ء������һ���ȵڶ�����,�ͽ�������������
- ��ÿһ������Ԫ����ͬ���Ĺ���,ִ����Ϻ�,�ҵ���һ�����ֵ��
- �ظ����ϵIJ���,ÿ�αȽϴ���-1,ֱ������Ҫ�Ƚϡ�
- ʾ��:������{ 4,2,8,0,5,7,1,3,9 }������������
��������:

����:
/*********************************************************************
������: һά���鰸��03
����: Sweitena
����: 2021-04-04 19:14
˵��: ð������ʵ������Ԫ����������
*********************************************************************/
#include <iostream>
using namespace std;
int main() {
//1.��������
int arr[] = {4, 2, 8, 0, 5, 7, 1, 3, 9};
int num = sizeof(arr) / sizeof(arr[0]); //ȷ��Ԫ���м���
cout << "����ǰ:" << endl;
for (int i = 0; i < num; i++)
{
cout << arr[i] << " ";
}
cout << endl;
//2.��ʼð������
//2.1 �ȶ����ڵ�����Ԫ�رȽϲ�����λ��:ÿ�ֶԱȴ��� = Ԫ�ظ��� - �������� - 1
//2.2 ���������� = Ԫ�ظ��� - 1
for (int j = 0; j < num - 1; j++) //���ѭ�� �����ֱȽ� 9��Ԫ�� ��Ҫ�Ƚ�8��
{
for (int i = 0; i < num - j - 1; i++) //�ڲ�ѭ�� ÿ����Ҫ�Ƚϼ���
{
if (arr[i] > arr[i + 1])
{
//��������Ԫ��λ��
int temp = arr[i];
arr[i] = arr[i + 1];
arr[i + 1] = temp;
}
}
}
//3.��ӡ����������
cout << "�����:" << endl;
for (int i = 0; i < num; i++)
{
cout << arr[i] << " ";
}
cout << endl;
system("pause");
return 0;
}
���н��ͼ:

2.2 ������
2.2.1 ����
-
��ά���������һά�����϶��һ��ά��
-
��ά���鶨������ַ�ʽ:
- �������� ������ [ ���� ] [ ���� ] ;
- �������� ������ [ ���� ] [ ���� ] = { {����1,����2},{����3,����4} };
- �������� ������ [ ���� ] [ ���� ] = {����1,����2,����3,����4};
- �������� ������ [ ] [ ���� ] = {����1,����2,����3,����4};
(����:����4�ֶ��巽ʽ,�����ڶ��ָ���ֱ��,��ߴ���Ŀɶ���)
����:
/*********************************************************************
������: ������
����: Sweitena
����: 2021-04-06 08:55
˵��: ����Ķ���
*********************************************************************/
#include <iostream>
using namespace std;
int main() {
//��ά����Ķ���
/****
1.�������� ������[ ���� ][ ���� ];
2.�������� ������[ ���� ][ ���� ] = { {����1,����2},{����3,����4} };
3.�������� ������[ ���� ][ ���� ] ={ ����1,����2,����3,����4 };
4.�������� ������[ ][ ���� ] = { ����1,����2,����3,����4 };
****/
//�ڢ��ֶ��巽ʽ
cout << "��һ�ֶ��巽ʽ:" << endl;
int arr[2][3]; //2��3��
arr[0][0] = 1;
arr[0][1] = 2;
arr[0][2] = 3;
arr[1][0] = 4;
arr[1][1] = 5;
arr[1][2] = 6;
for (int i = 0; i < 2; i++) //���ѭ����ʾ��
{
for (int j = 0; j < 3; j++) //�ڲ�ѭ����ʾ��
{
cout << arr[i][j] << " ";
}
cout << endl;
}
//�ڢ��ֶ��巽ʽ
cout << "�ڶ��ֶ��巽ʽ:" << endl;
int arr2[2][3] = {{1, 2, 3}, {4, 5, 6}};
for (int i = 0; i < 2; i++)
{
for (int j = 0; j < 3; j++)
{
cout << arr2[i][j] << " ";
}
cout << endl;
}
//�ڢ��ֶ��巽ʽ
cout << "�����ֶ��巽ʽ:" << endl;
int arr3[2][3] = {1, 2, 3, 4, 5, 6};
for (int i = 0; i < 2; i++)
{
for (int j = 0; j < 3; j++)
{
cout << arr3[i][j] << " ";
}
cout << endl;
}
//�ڢ��ֶ��巽ʽ
cout << "�����ֶ��巽ʽ:" << endl;
int arr4[ ][3] = {1, 2, 3, 4, 5, 6};
for (int i = 0; i < 2; i++)
{
for (int j = 0; j < 3; j++)
{
cout << arr4 [i][j] << " ";
}
cout << endl;
}
system("pause");
return 0;
}
���н��ͼ:

2.2.2 ��������;
��ά�������Ƶ���;:
- ����ͳ�������������ڴ��еij���
- ���Ի�ȡ�������ڴ��е���ַ
����:
/*********************************************************************
������: ������
����: Sweitena
����: 2021-04-06 08:58
˵��: ����������;
*********************************************************************/
#include <iostream>
using namespace std;
int main() {
//������������;
int arr4[ ][3] = {1, 2, 3, 4, 5, 6};
//1.���Բ鿴ռ���ڴ��С
cout << "��ά����ռ���ڴ�ռ�Ϊ:" << sizeof(arr4) << endl;
cout << "��ά�����һ��ռ���ڴ�Ϊ:" << sizeof(arr4[0]) << endl;
cout << "��ά�����һ��Ԫ��ռ���ڴ�Ϊ:" << sizeof(arr4[0][0]) << endl;
cout << "����������:" << sizeof(arr4) / sizeof(arr4[0]) << endl;
cout << "����������:" << sizeof(arr4[0]) / sizeof(arr4[0][0]) << endl;
//���Բ鿴��ά�������ַ
cout << "��ά�������ַΪ:" << arr4 << endl;
cout << "��ά�������ַΪ:" << (int)arr4 << endl;
cout << "��ά�����һ����ַΪ:" << arr4[0] << endl;
cout << "��ά�����һ����ַΪ:" << (int)arr4[0] << endl;
system("pause");
return 0;
}
���н��ͼ:

?������ϰ:���Գɼ�ͳ��
��������:
- ������ͬѧ(���������ġ�����),��һ�ο����еijɼ��ֱ����±�
- ��ֱ��������ͬѧ���ܳɼ�

����:
/*********************************************************************
������: ��ά���鰸��
����: Sweitena
����: 2021-04-06 11:00
˵��: ���Գɼ�ͳ��,�ֱ����ÿ��ͬѧ���ܳɼ�
*********************************************************************/
#include <iostream>
using namespace std;
#include <string>
int main() {
//����������
int scores[3][3] = {{100, 100, 100}, {90, 50, 100}, {60, 70, 80}} ; //�ڶ��ֶ��巽ʽ
int sum = 0;
string names[3] = {"����", "����", "����"}; //�������ֵ�һά����
//��ÿһ�е��������
for (int i = 0; i < 3; i++)
{
for (int j = 0; j < 3; j++)
{
sum = scores[i][j] + sum; //�൱��sum += score[i][j];
}
cout << names[i] << "���ܳɼ�Ϊ:" << sum << endl;
}
system("pause");
return 0;
}
���н��ͼ:

��������
- ����:��һ�ξ���ʹ�õĴ����װ����,�����ظ����롣
- һ���ϴ�ij���һ���Ϊ���ɸ������,ÿ��ģ��ʵ���ض��Ĺ��ܡ�
3.1 ��������
-
�����Ķ���һ����Ҫ��5������:
- ����ֵ����
- ������
- ��������
- ���������
- return����ʽ
-
�:
����ֵ���� ������(�����б�)
{
���������;
return ����ʽ;
}
- ��������:

3.2 ��������
-
����:���߱������������Ƽ���ε��ú���
-
�������������Զ��,���Ǻ���������ֻ����һ����
-
��������:
�������ļӷ�����add(),�����Ǻ�������:
int add(int num1, int num2);
�ں���������,���������Ʋ�����Ҫ,ֻ�в����������DZ����,�������Ҳ����Ч������:
int add(int, int);
3.3 ���ú���
- ����:ʹ�ö���õĺ�����
- �:
������ ( ���� )
����:
/*********************************************************************
������: �������塢����������
����: Sweitena
����: 2021-04-06 11:19
˵��: �Լӷ�����Ϊ��
*********************************************************************/
#include <iostream>
using namespace std;
//��������
int add(int num1, int num2); //�ӷ�����������
int main() {
int a, b, c;
a = 5;
b = 10;
//���ú���
c = add(a, b); //���üӷ�����
cout << c << endl;
system("pause");
return 0;
}
//��������
/****************ʵ��һ���ӷ�����****************/
/***����:����������������,������ӽ��������***/
int add(int num1, int num2)
{
int sum = num1 + num2;
return sum;
}
���н��ͼ:

3.4 ��������
3.4.1 �������ݲ����ķ�ʽ
-
�������Ҫʹ�ò���,������������ܲ���ֵ�ı�������Щ������Ϊ��������ʽ������
-
��ʽ�����������ڵ������ֲ�����,�ڽ��뺯��ʱ������,�˳�����ʱ�����١�
-
�����ú���ʱ,�������������ݲ����ķ�ʽ:
- ��ֵ����
�÷����Ѳ�����ʵ��ֵ��ֵ����������ʽ�����������������,�ĺ����ڵ���ʽ������ʵ�ʲ���û��Ӱ���� - ָ�����
�÷����Ѳ����ĵ�ַ��ֵ����ʽ�������ں�����,�õ�ַ���ڷ��ʵ�����Ҫ�õ���ʵ�ʲ���������ζ��,����ʽ������Ӱ��ʵ�ʲ����� - ���õ���
�÷����Ѳ��������ø�ֵ����ʽ�������ں�����,���������ڷ��ʵ�����Ҫ�õ���ʵ�ʲ���������ζ��,����ʽ������Ӱ��ʵ�ʲ�����
- ��ֵ����
��ע�⡿����ֻ���ܵ�һ��ֵ���ݷ�ʽ,��������ָ�������������������ϸ���͡�
3.4.1.1 ��ֵ����
����˵��:�ĺ����ڵ���ʽ������ʵ�ʲ���û��Ӱ����

����:
/*********************************************************************
������: ��������-ֵ����
����: Sweitena
����: 2021-04-09 19:54
˵��: ����һ��ʵ���������ֽ��н����ĺ���
*********************************************************************/
#include <iostream>
using namespace std;
//��������
void swap(int num1, int num2); //��������
int main()
{
int a, b;
a = 10;
b = 20;
cout << "a = " << a << endl;
cout << "b = " << b << endl;
/***********************************************************
��������ֵ����ʱ,�������βη����仯,����Ӱ��ʵ��
***********************************************************/
cout << "����swap()����" << endl;
swap(a, b); //���ú���
cout << "a = " << a << endl;
cout << "b = " << b << endl;
system("pause");
return 0;
}
//��������
/******************��������*******************/
/***����:����������������,����2����������***/
void swap(int num1, int num2) //��������Ҫ����ֵ,����дvoid
{
cout << "����ǰ:" << endl;
cout << "num1 = " << num1 << endl;
cout << "num2 = " << num2 << endl;
int temp = num1;
num1 = num2;
num2 = temp;
cout << "������:" << endl;
cout << "num1 = " << num1 << endl;
cout << "num2 = " << num2 << endl;
}
���н��ͼ:

3.4.1.2 ָ�����
��4.5.1�ڡ�
3.4.1.3 ���õ���
��5.3.1�ڡ�
3.4.2 �����ij�����ʽ
�����ĺ�����ʽ��4��:
- ����
- ���
- ���з�
- �в��з�
����:
/*********************************************************************
������: �����ij�����ʽ
����: Sweitena
����: 2021-04-09 20:09
˵��: 1���� 2�в��� 3���з� 4�в��з�
*********************************************************************/
#include <iostream>
using namespace std;
//1.����
void test01()
{
cout << "this is test01 for ����" << endl;
}
//2.���
void test02(int a)
{
cout << "this is test02 for ��� a =" << a << endl;
}
//3.���з�
int test03()
{
cout << "this is test03 for ���з�" << endl;
return 200;
}
//4.�в��з�
int test04(int b)
{
cout << "this is test04 for �в��з� b=" << b << endl;
return b;
}
int main()
{
test01(); //��������
test02(100); //�������
int num1 = test03(); //�������
int num2 = test04(3000); //������
system("pause");
return 0;
}
���н��ͼ:

3.5 Lambda ����
- C++11 �ṩ�˶�����������֧��,��Ϊ Lambda ����(Ҳ�� Lambda ����ʽ)��
- Lambda ����ʽ�Ѻ�����������Lambda ����ʽ���������һ��ʹ��,������Խ����Ǹ�����������Ϊ��������,����������һ��������ֵ��
- Lambda ����ʽ�������뺯�������dz����ơ�
- �� lambda �����Ķ���ʽ��,�����б��ͷ������Ͷ��ǿ�ѡ����,�����б��ͺ����嶼����Ϊ��,C++ ����� lambda ����ֻ��Ҫ����Ϊ:
[]{}; - �:
[ capture ]( parameters ) mutable -> return-type{ statement }
����:
- [capture]:���б������б����dz����� lambda ����ʽ�Ŀ�ʼ������ʵ��,[] �� lambda �����������������ݸ��������жϽ������Ĵ����Ƿ��� lambda ���������б��ܹ����������еı����� lambda ����ʹ�á�
- (parameters):�����б�������ͨ�����IJ����б�һ�¡��������Ҫ��������,�������ͬ���� () һ��ʡ�ԡ�
- mutable:mutable ���η���Ĭ�������,lambda ��������һ�� const ����,mutable ����ȡ���䳣���ԡ���ʹ�ø����η�ʱ,�����б�����ʡ��(��ʹ����Ϊ��)��
- ->return_type:�������͡����ٷ���������ʽ���������ķ������͡����ڷ���,����Ҫ����ֵ��ʱ��Ҳ������ͬ���� -> һ��ʡ�ԡ�����,�ڷ���������ȷ�������,Ҳ����ʡ�Ըò���,�ñ������Է������ͽ����Ƶ���
- {statement}:�����塣��������ͨ����һ��,�������˿���ʹ�ò���֮��,������ʹ�����в���ı�����
��ע�⡿��ϸ���ͽ��ں���ıʼǽ���,Ŀǰ���ڻ���֪ʶ�����е㳬���˰ɡ�
3.6 �����ķ��ļ���д
- ����:�ô���ṹ��������
- �������ļ���дһ����4������:
- ����.h������ͷ�ļ�
- ����.cpp������Դ�ļ�
- ��ͷ�ļ���д����������
- ��Դ�ļ���д�����Ķ���
- ���ļ���д�Ĺ��̾���,����3.4.1���ᵽ��swap()����:
step1: ������Ŀ��
- ����:�ļ� ���� �½��� ���� ��Ŀ�� ���� ���� ���� ����̨Ӧ�ó��� ���� C++��Ŀ ���� ����(���Է��ļ���дswap) ���� ȷ����
- �۲쵽��ʱ��Ŀ�������Ѿ�����main.cpp�ļ���

step2: ����swap.h��ͷ�ļ�,������������
- �Ҽ����������Է��ļ���дswap��(��Ŀ����) ���� �½���Ԫ ���� ���������ļ�������Ϊswap.h


step3: ����swap.cpp��Դ�ļ�,������������
- ����ͬ��:�Ҽ����������Է��ļ���дswap��(��Ŀ����) ���� �½���Ԫ ���� ���������ļ�������Ϊswap.cpp


step4: ��main.cpp�ļ���,���Ե���swap()����
- ע���ļ�֮��Ĺ�����ϵ��
- Դ�ļ�swap.cpp��main.cpp�ж���Ҫ����swap.h�ļ�,��
#include "swap.h" - ͷ�ļ�swap.h��Դ�ļ�main.cpp�ж���Ҫ����C++��ԭʼ���,��
#include <iostream>��using namespace std;

step5: ���,��������main.cpp

�ġ�ָ��
4.1 ָ��Ļ�������
- ����:����ͨ��ָ���ӷ����ڴ档
- ָ����һ������,��ֵΪ��һ�������ĵ�ַ,��:�ڴ�λ�õ�ֱ�ӵ�ַ��
- ��������Ϊ:ָ�����һ����ַ,����ͨ��ָ��������һ����ַ��
4.1.1 ָ������Ķ����ʹ��
- ָ����������:
�������� * ������;
����:
/*********************************************************************
������: ָ��Ķ����ʹ��
����: Sweitena
����: 2021-04-12 10:47
˵��: �����á�����ͨ��ָ���ӷ����ڴ�
*********************************************************************/
#include <iostream>
using namespace std;
int main()
{
/************************************************/
/************* 1.����ָ�� *******************/
/************************************************/
int a = 10; //ʵ�ʱ���������:һ�����͵ı���
int *p; //ָ�����������:һ�����͵�ָ��
p = &a; //��ָ�����p�д洢����a�ĵ�ַ
cout << "a�ĵ�ַ &a = " << &a << endl;
cout << "ָ����� p = " << p << endl;
/************************************************/
/************* 2.ʹ��ָ�� *******************/
/************************************************/
cout << "����ָ���е�ַ��ֵ *p = " << *p << endl; //ͨ�������õķ�ʽ�ҵ�ָ��ָ����ڴ�
*p = 1000; //ָ��ǰ��*����������,�ҵ�ָ��ָ����ڴ��е�����
cout << "����֮��� *p = " << *p << endl;
cout << "����֮��� a = " << a << endl;
system("pause");
return 0;
}
���н��ͼ:

4.1.2 ָ����ռ�ڴ�ռ�
- ָ��Ҳ��һ���������͡�
- ����ָ���ֵ��ʵ����������,���������͡������͡��ַ���,������������������,����һ����,����һ�������ڴ��ַ�ij���ʮ������������ͬ�������͵�ָ��֮��Ψһ�IJ�ͬ��,ָ����ָ��ı����������������Ͳ�ͬ��
����:
/*********************************************************************
������: ָ����ռ���ڴ�ռ�
����: Sweitena
����: 2021-04-12 14:08
˵��: ����ָ����ָ��ı������������Ͷ��岻ͬ�������͵�ָ��;
��32λ����ϵͳ��,ָ����ռ���ڴ�ռ䶼��4���ֽڡ�
*********************************************************************/
#include <iostream>
using namespace std;
int main()
{
int a = 10;
int *p;
p = &a;
cout << "ָ��p��ռ�õ��ڴ�ռ�Ϊ:" << sizeof(p) << endl;
cout << "����ָ��int *��ռ�õ��ڴ�ռ�Ϊ:" << sizeof(int *) << endl;
cout << "������ָ��float *��ռ�õ��ڴ�ռ�Ϊ:" << sizeof(float *) << endl;
cout << "�ַ���ָ��char *��ռ�õ��ڴ�ռ�Ϊ:" << sizeof(char *) << endl;
system("pause");
return 0;
}
���н��ͼ:

4.2 const ����ָ��
- const����ָ�����������:
- const ����ָ�롪������ָ��(ָ��ָ���ֵ�����Ը�,ָ��ָ����Ը�);
- const ���γ�������ָ�볣��(ָ��ָ���ֵ���Ը�,ָ��ָ���Ը�);
- const������ָ��,�����γ���(ָ��ָ���ֵ�����Ը�,ָ��ָ���Ը�)��
4.2.1 ����ָ�� const int *p = &a
//��ʼ����:
int a = 10; //a�ĵ�ַ:0x0011
int b = 10; //b�ĵ�ַ:0x0022
int *p = &a; //��a�ĵ�ַ�洢��p��,��pָ��a

4.2.2 ָ�볣�� int *const p = &a
//��ʼ����:
int a = 10; //a�ĵ�ַ:0x0011
int b = 10; //b�ĵ�ַ:0x0022
int *p = &a; //��a�ĵ�ַ�洢��p��,��pָ��a

4.2.3 ������ָ�������γ��� const int *const p = &a;
//��ʼ����:
int a = 10; //a�ĵ�ַ:0x0011
int b = 10; //b�ĵ�ַ:0x0022
int *p = &a; //��a�ĵ�ַ�洢��p��,��pָ��a

4.3 ��ָ���Ұָ��
4.3.1 ��ָ��
- ����:��ָ��ָ���ڴ��б��Ϊ0�Ŀռ�
- ����:��ָ�����ڸ�ָ��������ʼ��
- ��ע�⡿��ָ��ָ����ڴ��Dz����Է��ʵ�
�ڴ�����IJ���ϵͳ��,�����������ʵ�ַΪ 0 ���ڴ�,��Ϊ���ڴ��Dz���ϵͳ�����ġ�Ȼ��,�ڴ��ַ 0 ���ر���Ҫ������,��������ָ�벻ָ��һ���ɷ��ʵ��ڴ�λ�á������չ���,���ָ�������ֵ(��ֵ),��ٶ�����ָ���κζ����� - C++11����,��nullptr����ʾ��ָ�롣
����:
/*********************************************************************
������: ��ָ��
����: Sweitena
����: 2021-04-12 14:15
˵��: NULL ָ����һ�������ڱ����е�ֵΪ��ij���
*********************************************************************/
#include <iostream>
using namespace std;
int main() {
/**********����һ������ָ��**********/
int a = 10;
int *g = &a; //����ָ�����gָ��a�ĵ�ַ
cout << "g��ֵΪ:" << g << endl;
/**********����һ����ָ��**********/
int *p = NULL; //ָ��p��ֵΪ0�ij���,��ָ�����ڸ�ָ��������г�ʼ��
cout << "p��ֵΪ:" << p << endl;
/*
//���ܷ��ʿ�ָ��,�ڴ���0-255Ϊϵͳռ���ڴ�,�������û�����
*p = 100;
cout << *p << endl;
*/
system("pause");
return 0;
}
���н��ͼ:

- ������һ����ָ��,����ʹ�� if ���,������ʾ:
if(p) /* ��� p �ǿ�,�����... */
if(!p) /* ��� p ��,�����... */
4.3.2 Ұָ��
- ����:ָ�����ָ��Ƿ����ڴ�ռ�,Ұָ��ָ���λ���Dz���֪�ġ�
/*********************************************************************
������: Ұָ��
����: Sweitena
����: 2021-04-12 14:22
˵��: �ڳ�����,�����������Ұָ��
*********************************************************************/
#include <iostream>
using namespace std;
int main()
{
//ָ�����pָ���ڴ��ַ���λ0x1100�Ŀռ�
int *p = (int *) 0x1100;
//����Ұָ��ᱨ��,����Ұָ�벻����������Ŀռ�,��˲�Ҫ����
//cout << *p << endl; //û�����,�ǿյ�
system("pause");
return 0;
}
4.4 ָ�������
4.4.1 ָ�����������
- ָ����һ������ֵ��ʾ�ĵ�ַ,���Զ�ָ��ִ���������㡣���Զ�ָ�����������������:++���C��+��-��
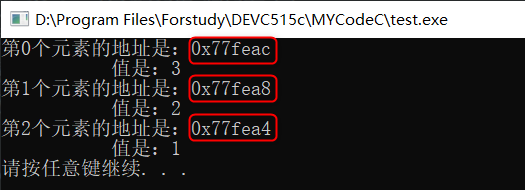
4.4.1.1 ����һ��ָ��
- ���� p ��һ��ָ����ַ1000 ������ָ��,��һ�� 32 λ������,�����ǶԸ�ָ��ִ�����е���������:
p++�� - ��ִ��������������֮��,p ��ָ��λ�� 1004,��Ϊ p ÿ����һ��,������ָ����һ������λ��,����ǰλ�������� 4 ���ֽ������������ڲ�Ӱ���ڴ�λ����ʵ��ֵ�������,�ƶ�ָ�뵽��һ���ڴ�λ�á���� p ָ��һ����ַΪ 1000 ���ַ�,���������ᵼ��ָ��ָ��λ�� 1001,��Ϊ��һ���ַ�λ������ 1001��
����:
/*********************************************************************
������: ָ���������
����: Sweitena
����: 2021-04-12 14:25
˵��: ϰ��ʹ��ָ���������,����ָ����Ե���,�����鲻�ܵ���
*********************************************************************/
#include <iostream>
using namespace std;
int main()
{
int arr[3] = {1, 2, 3}; //����һ����Ϊarr��һά����
int *p; //����һ����Ϊp������ָ��
p = &arr[0]; //������ָ��pָ��������ַ
/*** �����䡿���������������ַ,����Ҳ����д�� p = &arr ***/
for (int i = 0; i < 3; i++)
{
cout << "��" << i << "��Ԫ�صĵ�ַ��:" << p << endl;
cout << "\t ֵ��:" << *p << endl;
p++; //�ƶ�����һ��Ԫ�ص�λ��
}
system("pause");
return 0;
}
���н��ͼ:

4.4.1.2 �ݼ�һ��ָ��
- ͬ����,��ָ����еݼ�����,����ֵ��ȥ���������͵��ֽ�����
����:
/*********************************************************************
������: ָ��ݼ�����
����: Sweitena
����: 2021-04-12 14:28
˵��: ������෴��ȥ����,ָ��������
*********************************************************************/
#include <iostream>
using namespace std;
int main()
{
int arr[3] = {1, 2, 3}; //����һ����Ϊarr��һά����
int *p; //����һ����Ϊp������ָ��
p = &arr[3 - 1]; //������ָ��pָ���������һ��Ԫ�صĵ�ַ
/***�����䡿һ����3��Ԫ��,�á�Ԫ�ظ���-1����ʾȡ������������һ��Ԫ�� ***/
for (int i = 0; i < 3; i++)
{
cout << "��" << i << "��Ԫ�صĵ�ַ��:" << p << endl;
cout << "\t ֵ��:" << *p << endl;
p--; //�ƶ�����һ��Ԫ�ص�λ��
}
system("pause");
return 0;
}
���н��ͼ:
4.4.2 ָ��ıȽ�����
- ָ������ù�ϵ��������бȽ�,�� ==��< �� >��
- ��� p1 �� p2 ָ��������صı���,����:ͬһ�������еIJ�ͬԪ��,��ɶ� p1 �� p2 ���д�С�Ƚϡ�
����:
/*********************************************************************
������: ָ��Ƚ�����
����: Sweitena
����: 2021-04-12 14:29
˵��: ���ԱȽ�ָ���д洢�ĵ�ַ�Ĵ�С
*********************************************************************/
#include <iostream>
using namespace std;
int main()
{
int arr[3] = {1, 2, 3}; //����һ����Ϊarr��һά����
int *p1, *p2, *p3; //����������Ϊp1��p2��p3������ָ��
p1 = &arr[0]; //��ָ��p1ָ�������һ��Ԫ�صĵ�ַ
p2 = &arr[1]; //��ָ��p2ָ������ڶ���Ԫ�صĵ�ַ
p3 = &arr[2]; //��ָ��p2ָ�����������Ԫ�صĵ�ַ
if (p1 <= p3) //ָ��p1�еĵ�ַ�Ƿ�С��ָ��p3�еĵ�ַ
{
p1++; //ָ��ָ����һ��λ��,p1��ָ��ڶ���Ԫ��,�൱��p2
cout << "��ʱp1�ĵ�ַΪ:" << p1 << endl;
cout << "p1ָ���Ԫ��Ϊ:" << *p1 << endl;
}
system("pause");
return 0;
}
���н��ͼ:

4.5 ָ�������
4.5.1 ָ������
- ��������Ҫ������洢ָ�� int �������������͵�ָ��ʱ,����ʹ��ָ�����顣
- ָ��������:
�������� * ������ [ ���鳤�� ];
����Ƭ��:
//������һ��ָ��������ָ�����������:
int *p[max];
//������,�� p ����Ϊһ������,��max������ָ����ɡ����,p�е�ÿ��Ԫ��,����һ��ָ��intֵ��ָ�롣
//Ҳ����˵p[0]��ŵ���һ��ָ��,���ָ��ָ������ĵ�һ��Ԫ��,�����ý�����*p[0]�ó�Ԫ�ص�ֵ��
����:
/*********************************************************************
������: ָ������
����: Sweitena
����: 2021-04-16 10:08
˵��: �����������������������ָ��������
*********************************************************************/
#include <iostream>
using namespace std;
int main()
{
int arr[3] = {1, 2, 3}; //����һ����Ϊarr��һά����,����3��Ԫ��
int *p[3]; //����һ����Ϊp��ָ������,����Ϊ3
for (int i = 0; i < 3; i++) //��forѭ����������Ԫ�صĵ�ַ�����ָ����
{
p[i] = &arr[i];
}
for (int j = 0; j < 3; j++) //��forѭ����ӡ����
{
cout << "ԭ����:" << "arr[" << j << "]=" << arr[j] << endl;
cout << "��ַ:" << p[j] << endl;
cout << "ͨ��ָ��������ʾԭ����:" << "*p[" << j << "]=" << *p[j] << endl;
}
system("pause");
return 0;
}
���н��ͼ:

- Ҳ������һ��ָ���ַ���ָ���������洢һ���ַ����б�,�������¡�
�� ���Dz���̳�����ʼ�������:char *p[3]��ָ������,���ı����Ǵ洢ָ�������,���洢char���͵�ָ�������,�����ڵ�ÿ��Ԫ�ض���һ��ָ��,ָ��һ���洢char���͵ĵ�ַ����
����:
#include <iostream>
using namespace std;
int main()
{
const char *p[3] = {"zara", "hina", "nuha"}; //��һ��ָ���ַ���ָ���������洢һ���ַ����б�
cout << "���p[i]����:" << endl;
cout << "p[0]=" << p[0] << " ";
cout << "p[1]=" << p[1] << " ";
cout << "p[2]=" << p[2] << " ";
cout << endl;
cout << endl;
cout << "���&(p[i])����:" << endl;
cout << "&(p[0])=" << &(p[0]) << " ";
cout << "&(p[1])=" << &(p[1]) << " ";
cout << "&(p[2])=" << &(p[2]) << " ";
cout << endl;
cout << endl;
cout << "���*p[i]����:" << endl;
cout << "*p[0]=" << *p[0] << " ";
cout << "*p[1]=" << *p[1] << " ";
cout << "*p[2]=" << *p[2] << " ";
cout << endl;
cout << endl;
cout << "���&(*p[i])����:" << endl;
cout << "&(*p[0])=" << &(*p[0]) << " ";
cout << "&(*p[1])=" << &(*p[1]) << " ";
cout << "&(*p[2])=" << &(*p[2]) << " ";
cout << endl;
cout << endl;
cout << "���p[0][i]����:" << endl;
cout << "p[0][0]=" << p[0][0] << " ";
cout << "p[0][1]=" << p[0][1] << " ";
cout << "p[0][2]=" << p[0][2] << " ";
cout << "p[0][3]=" << p[0][3] << " ";
cout << endl;
cout << endl;
cout << "���&(p[0][i])����:" << endl;
cout << "&(p[0][0])=" << &(p[0][0]) << " ";
cout << "&(p[0][1])=" << &(p[0][1]) << " ";
cout << "&(p[0][2])=" << &(p[0][2]) << " ";
cout << "&(p[0][3])=" << &(p[0][3]) << " ";
cout << endl;
cout << endl;
cout << "���*p[0]+i����:" << endl;
cout << "*p[0] + 1 =" << *p[0] + 1 << " ";
cout << "*p[0] + 2 =" << *p[0] + 2 << " ";
cout << "*p[0] + 3 =" << *p[0] + 3 << " ";
cout << endl;
cout << endl;
system("pause");
return 0;
}
���н��ͼ:


4.5.2 ָ�������ָ��
- ����ָ���������Ԫ��,���������һ��ָ�� int �͵�ָ��,�����Դ洢һ�� int ���͵ı�����һ���������� p �еĵ�ַ,*p �������洢�� p ����Ӧ��ַ��ֵ��
����:
/*********************************************************************
������: ָ�������ָ��
����: Sweitena
����: 2021-04-16 10:12
˵��: �����á�����ָ���������Ԫ��
*********************************************************************/
#include <iostream>
using namespace std;
int main()
{
//1.��������
int arr[] = {1, 2, 3, 4, 5, 6, 7, 8, 9, 10};
//2.�����������Ԫ��
for (int i = 0; i < 10; i++)
{
cout << arr[i] << " ";
}
cout << endl;
//3.��ָ���������Ԫ��
int *p = arr; //arr���������ַ
for (int j = 0; j < 10; j++)
{
cout << *p << " " ;
p++; //ָ��ָ����һ��λ��
}
cout << endl;
system("pause");
return 0;
}
���н��ͼ:

- ʹ����������Ϊ����ָ���ǺϷ���,���,
*( arr + 4)��һ�ַ���arr[4]���ݵĺϷ���ʽ��һ���ѵ�һ��Ԫ�صĵ�ַ�洢��p��,����ʹ��*p �� *(p+1) �� *(p+2)������������Ԫ�ء�
����:
/*********************************************************************
������: ָ�������ָ��
����: Sweitena
����: 2021-04-16 10:14
˵��: �����������һ������5��double�ͱ���������,��ָ��ָ�������
*********************************************************************/
#include <iostream>
using namespace std;
int main()
{
//���� ���� �� ָ�������ָ��
double arr[] = {0.1, 3.14, 17.3, 102.4, 5.8};
double *p; //����һ����Ϊp��˫���ȸ�����ָ��
p = arr;
// ���ַ�ʽ���������ÿ��Ԫ�ص�ֵ
for (int i = 0; i < 5; i++)
{
cout << "*(p + " << i << ")" << "=" << *(p + i) << endl;
cout << "*(arr +" << i << ") " << "=" << *(arr + i) << endl;
}
system("pause");
return 0;
}
���н��ͼ:

4.6 ָ��ͺ���
4.6.1 ָ�����(��ַ����)
- ָ�����:�÷����Ѳ����ĵ�ַ��ֵ����ʽ�������ں�����,�õ�ַ���ڷ��ʵ�����Ҫ�õ���ʵ�ʲ���������ζ��,����ʽ������Ӱ��ʵ�ʲ�����
- ����:����ָ������������,������ʵ�ε�ֵ��
����:
/*********************************************************************
������: ֵ����vs��ַ����
����: Sweitena
����: 2021-04-16 10:25
˵��: ����ǵ�ַ����,������ʵ��
*********************************************************************/
#include <iostream>
using namespace std;
//��������
void swap01(int num1, int num2);//ʵ���������ֽ����ĺ���:ֵ����
void swap02(int *p1, int *p2); //ʵ���������ֽ����ĺ���:��ַ����
int main()
{
int a, b;
a = 10;
b = 20;
//1.ֵ����
cout << "entering ֵ���ݺ���:" << endl;
swap01( a, b );
cout << "swap01�е�a = " << a << endl;
cout << "swap01�е�b = " << b << endl;
//2.��ַ����
cout << "entering ��ַ���ݺ���:" << endl;
swap02( &a, &b );
cout << "swap02�е�a = " << a << endl;
cout << "swap02�е�b = " << b << endl;
system("pause");
return 0;
}
/********** ʵ���������ֽ����ĺ���:ֵ���� **********/
void swap01(int num1, int num2)
{
cout << "����ǰ:" << endl;
cout << "num1 = " << num1 << endl;
cout << "num2 = " << num2 << endl;
int temp = num1;
num1 = num2;
num2 = temp;
cout << "������:" << endl;
cout << "num1 = " << num1 << endl;
cout << "num2 = " << num2 << endl;
}
/********** ʵ���������ֽ����ĺ���:��ַ���� **********/
void swap02(int *p1, int *p2)
{
int temp = *p1;
*p1 = *p2;
*p2 = temp;
}
���н��ͼ:

4.7 ָ���������ͺ���
4.7.1 �Ӻ������������ָ��
- C++ ����������һ��������������Ϊ�����IJ�����(����������ʵ����ָ��,���Կ����ú�������ָ����ʵ��~)
- ����ͨ��ָ������������������������һ��ָ�������ָ�롣
- �����Ҫ�Ӻ�������һ��һά����,��������һ������ָ��ĺ���,����:
int * myFunction()
{
.
.
.
}
��������:
- ���� 10 �������,��ʹ���������������ǡ�
int *getRandom( )
{
static int arr[10];
srand( (unsigned)time( NULL ) ); //�������������,����:���õ�ǰϵͳʱ�����������
for (int i = 0; i < 10; ++i)
{
arr[i] = rand(); //����10�������,Ĭ����������ɵ���һ����λ��
cout << arr[i] << endl; //��ӡ���10�������
}
return arr; //����������
}
����:
/*********************************************************************
������: �Ӻ�����������
����: Sweitena
����: 2021-07-25 17:57
˵��: C++��֧���ں����ⷵ�ؾֲ������ĵ�ַ,���Ƕ���ֲ�����Ϊ static ������
*********************************************************************/
#include <iostream>
#include <ctime> //ϵͳͷ�ļ�
using namespace std;
/************************************************/
/************* ������:getRandom( ) ************/
/************ ����:���ɺͷ�������� ************/
/************************************************/
int *getRandom( )
{
static int arr[10];
srand( (unsigned)time( NULL ) ); //�������������,����:���õ�ǰϵͳʱ�����������
for (int i = 0; i < 10; ++i)
{
arr[i] = rand(); //����10�������,Ĭ����������ɵ���һ����λ��
cout << arr[i] << endl; //��ӡ���10�������
}
return arr; //����������
}
int main()
{
int *p; //����һ��ָ��������ָ��
p = getRandom(); //�൱�� p = arr; ͨ��ָ��,�ú�����������
for ( int i = 0; i < 10; i++ )
{
cout << "*(p + " << i << ") : " << *(p + i) << endl;
}
system("pause");
return 0;
}
���н��ͼ:

4.7.2 �������������
- C++ �п���ͨ��ָ������������������������һ��ָ�������ָ�롣
- �������һ������,���������Զ�ת��Ϊָ������,�������ʵ���ǵ�ַ��
- �����Ҫ�ں����д���һ��һά������Ϊ����,�������������ַ�ʽ������������ʽ����,������������ʽ�Ľ����һ����,��Ϊÿ�ַ�ʽ������߱�������Ҫ����һ������ָ�롣ͬ����,Ҳ���Դ���һ����ά������Ϊ��ʽ������
- ��ʽ1: ��ʽ������һ��ָ��
void myFunction(int *parameter)
{
.
.
.
}
- ��ʽ2: ��ʽ������һ���Ѷ����С������
void myFunction(int parameter[10])
{
.
.
.
}
- ��ʽ3: ��ʽ������һ��δ�����С������
void myFunction(int parameter[])
{
.
.
.
}
��������:
- ��������:��������Ϊ����,ͬʱ������һ������,���������IJ���,���������и�Ԫ�ص�ƽ��ֵ��
double getAverage(int arr[], int size) //��ʽ������һ��δ�����С������
{
int sum = 0;
double avg;
for (int i = 0; i < size; i++)
{
sum += arr[i]; //�൱��sum = sum + arr[i];
}
avg = double(sum) / size;
return avg; //����ƽ��ֵ
}
����:
/*********************************************************************
������:�������������
����: Sweitena
����: 2021-07-23 07:45
˵��: ���������е�ƽ��ֵ
*********************************************************************/
#include <iostream>
using namespace std;
/************************************************/
/************ ������:getAverage( ) ************/
/************ ����:���������ƽ��ֵ ************/
/************************************************/
double getAverage(int arr[], int size)
{
int sum = 0;
double avg;
for (int i = 0; i < size; i++)
{
sum += arr[i]; //�൱��sum = sum + arr[i];�ۼ������Ԫ��
}
avg = double(sum) / size;
return avg; //����ƽ��ֵ
}
int main ()
{
int balance[5] = {1000, 2, 3, 17, 50}; //����һ������5��Ԫ�ص���������
double avg; //����˫���ȵĸ����ͱ���avg,��Ϊ�����ƽ��ֵ
avg = getAverage( balance, 5 ) ; //����һ��ָ�������ָ����Ϊ����
cout << "ƽ��ֵ��:" << avg << endl; //�������ֵ
system("pause");
return 0;
}
���н��ͼ:

?������ϰ:ð������
��������:
- ��װһ������,����ð������,ʵ�ֶ������������������
- ��������:`int arr[] = {4, 3, 6, 9, 1, 2, 10, 8, 7, 5};
��������:
- ����,��������
- ��������,ʵ��ð������
- ��ӡ����������
����:
/*********************************************************************
������: ָ�롢���顢����
����: Sweitena
����: 2021-04-18 13:47
˵��: ��װһ������,����ð������,ʵ�ֶ������������������
*********************************************************************/
#include <iostream>
using namespace std;
//��������
void BubbleSort(int *arr, int num); //������
void PrintArray(int *arr, int num); //��ӡ���麯��
int main()
{
//1.�ȴ�������
int arr[] = {4, 3, 6, 9, 1, 2, 10, 8, 7, 5};
int num = sizeof(arr) / sizeof(arr[0]); //ȷ������ij���
cout << "����ǰ:" << endl; //��ӡԭʼ����
PrintArray(arr, num);
//2.��������,ʵ��ð������
BubbleSort(arr, num); //����������
//3.��ӡ����������
cout << "�����:" << endl; //��ӡ����������
PrintArray(arr, num);
system("pause");
return 0;
}
/************������:BubbleSort(int *arr, int num)*************/
/***********����:ð������,ʵ�ֶ������������������***********/
/*******��ʽ����:������1��������ַ,������2�����鳤��*******/
void BubbleSort(int *arr, int num)
{
for (int j = 0; j < num - 1; j++) //���ѭ�� �����ֱȽ� 9��Ԫ�� ��Ҫ�Ƚ�8��
{
for (int i = 0; i < num - j - 1; i++) //�ڲ�ѭ�� ÿ����Ҫ�Ƚϼ���
{
if (arr[i] > arr[i + 1])
{
//��������Ԫ��λ��
int temp = arr[i];
arr[i] = arr[i + 1];
arr[i + 1] = temp;
}
}
}
}
/************������:PrintArray(int *arr, int num)*************/
/***********************����:��ӡ����*************************/
/*******��ʽ����:������1��������ַ,������2�����鳤��*******/
void PrintArray(int *arr, int num)
{
for (int i = 0; i < num; i++)
{
cout << arr[i] << " ";
}
cout << endl;
}
���н��ͼ:

�塢����
5.1 ���õĻ�������
- ����:���ñ�����һ������,Ҳ����˵,����ij���Ѵ��ڱ�������һ�����֡�
- һ����������ʼ��Ϊij������,�Ϳ���ʹ�ø��������ƻ����������ָ�������
5.1.1 ���õĶ����ʹ��
- ���������:
�������� & ������;
����:
/*********************************************************************
������:���õĶ����ʹ��
����: Sweitena
����: 2021-08-01 20:56
˵��: �����ڴ���ʱ��Ҫ����ʼ��
*********************************************************************/
#include <iostream>
using namespace std;
int main()
{
//�����ı���
int i = 5;
double d = 11.7;
//��������
int & r1 = i;
double & r2 = d;
//���
cout << "i = " << i << endl;
cout << "& i = " << r1 << endl;
cout << "d = " << d << endl;
cout << "& d = " << r2 << endl;
system("pause");
return 0;
}
���н��ͼ:

5.2 ����vsָ��
-
���ú�������ָ�����,����֮����������Ҫ����ͬ:
- �����ڿ����á����ñ������ӵ�һ��Ϸ����ڴ档
- ���¸�ֵ����:һ�����ñ���ʼ��Ϊһ������,�����ܱ�ָ����һ��������ָ��������κ�ʱ��ָ����һ������
- ��ʼ������:���������ڴ���ʱ����ʼ��,ָ��������κ�ʱ�䱻��ʼ����
����Ƭ��1:
int a = 3;
int *p; //���Բ�����ʼ��
int &r = a; //�����ڴ���ʱ����ʼ��
�鿴������:

����Ƭ��2:
int a = 3, b = 6;
//ָ��
int *p = &a; //��ָ��ָ��a,p�����ŵ���a�ĵ�ַ
p = &b; //��ָ��ָ��b,p�����ŵ���b�ĵ�ַ
//����
int &r = a; //rָ��a,r��a������
r = b; //�൱��a = b;�ǰ�b��ֵ��a,rʼ����a������,һ�ж�r�IJ���ʵ�����Ƕ�a�IJ���
����Ƭ��3:
//�н�����Ĵ���2
p++; //��������,��ָ����һ��Ԫ��
r++; //�൱��a++,��ʱa��ֵΪ4
����Ƭ��4:
class A //����һ����
{
int a;
int b;
int c;
int d;
}
A a;
A *ap = a; //����һ��ָ��
A &ar = a; //����һ������
printf(sizeof(ap)); //ָ����ռ�ڴ���4���ֽ�
printf(sizeof(ar)); //������16���ֽ�,��Ϊ��A����4��int�͵ı���
5.3 ���úͺ���
5.3.1 ���õ���(��ַ����)
- ����:ʹ��������ʵ�ֵ��ú�����
- �÷����Ѳ��������ø�ֵ����ʽ�������ں�����,���������ڷ��ʵ�����Ҫ�õ���ʵ�ʲ���������ζ��,����ʽ������Ӱ��ʵ�ʲ�����
����:
/*********************************************************************
������:ʹ�����õ��ú���
����: Sweitena
����: 2021-08-03 18:27
˵��: �Ա�֮ǰѧ����ʹ��ָ����ú���
*********************************************************************/
#include <iostream>
using namespace std;
//��������
void swap03(int &r1, int &r2); //ʵ���������ֽ����ĺ���
int main()
{
int a, b;
a = 10;
b = 20;
//ʹ�����õ��ú���
swap03( a, b );
cout << "swap03�е�a = " << a << endl;
cout << "swap03�е�b = " << b << endl;
system("pause");
return 0;
}
/********** ʵ���������ֽ����ĺ���:��ַ���� **********/
void swap03(int &r1, int &r2)
{
int temp = r1;
r1 = r2;
r2 = temp;
}
���н��ͼ:

5.4 �����������ͺ���
5.4.1 �Ӻ����������������
- ͨ��ʹ�����������ָ��,��ʹ C++ ����������Ķ���ά����C++ �������Է���һ������,��ʽ�뷵��һ��ָ�����ơ�
- ����������һ������ʱ,��һ��ָ��ֵ����ʽָ��������,�����Ϳ��Է��ڸ�ֵ������ߡ�
����:
/*********************************************************************
������:�Ӻ����������������
����: Sweitena
����: 2021-08-03 19:06
˵��: ��4.7.2�ڶ�Ӧ��ȥ����,��ָ����÷�����
*********************************************************************/
#include <iostream>
using namespace std;
double vals[] = {10.1, 12.6, 33.1, 24.1, 50.0}; //����һ������������
/************************************************/
/************* ������:setValues( ) ************/
/********** ����:�ı������е�i��Ԫ�� ***********/
/************************************************/
double &setValues(int i)
{
double &ref = vals[i]; //ref��һ�����ñ���,ref����vals[i]
return ref;
}
int main()
{
//1��������ú���ǰ������
cout << "�ı�ǰ��ֵ" << endl;
for ( int i = 0; i < 5; i++ )
{
cout << "vals[" << i << "] = " << vals[i] << endl;
}
//2�����ú����ı�Ԫ�ص�ֵ
setValues(1) = 20.23; // �ı�� 2 ��Ԫ��
setValues(3) = 70.8; // �ı�� 4 ��Ԫ��
//3������ı�������
cout << "�ı���ֵ" << endl;
for ( int i = 0; i < 5; i++ )
{
cout << "vals[" << i << "] = " << vals[i] << endl;
}
system("pause");
return 0;
}
���н��ͼ:

�����ṹ��
6.1 �ṹ��Ļ�������
- ����:�ṹ�������û��Զ������������,�����û��洢��ͬ���������͡�
6.1.1 �ṹ��Ķ����ʹ��
- �:
struct �ṹ���� { �ṹ���Ա�б� }; - ͨ���ṹ�崴�������ķ�ʽ������:
- struct �ṹ���� ������
- struct �ṹ���� ������ = { ��Ա1ֵ,��Ա2ֵ��}
- ����ṹ��ʱ˳�㴴������
����:
/*********************************************************************
������: �ṹ�嶨���ʹ��
����: Sweitena
����: 2021-04-18 14:37
˵��: [����]�ṹ�������û��Զ������������,�����û��洢��ͬ����������
[ע��]��ʹ��ʱ���Բ�дstruct,ֱ��дStudent s1...
*********************************************************************/
#include <iostream>
using namespace std;
#include <string>
/******************�ṹ�嶨��*******************************/
//1. ����ѧ����������,����(���������䡢����)
struct Student
{
//��Ա�б�
string name; //ѧ������
int age; //ѧ������
int score; //ѧ������
} s3;
/******************�ṹ��ʹ��*******************************/
int main()
{
// 2.ͨ��ѧ�����ʹ�������ѧ��
// 2.1 ��һ�ַ�ʽ:struct Student s1
struct Student s1;
s1.name = "����";
s1.age = 18;
s1.score = 100;
cout << "����:" << s1.name << " ����:" << s1.age << " ����:" << s1.score << endl;
// 2.2 �ڶ��ַ�ʽ:struct Student s2 = { ..., ..., ... }
struct Student s2 = {"����", 19, 80};
cout << "����:" << s2.name << " ����:" << s2.age << " ����:" << s2.score << endl;
// 2.3 �����ַ�ʽ:�ڶ���ṹ��ʱ˳�㴴���ṹ�����
s3.name = "����";
s3.age = 20;
s3.score = 70;
cout << "����:" << s3.name << " ����:" << s3.age << " ����:" << s3.score << endl;
system("pause");
return 0;
}
���н��ͼ:

6.2 �ṹ������
- ����:���Զ���Ľṹ����뵽�����з���ά����
- �:
struct �ṹ���� ������ [ Ԫ�ظ��� ] = { { } , { } , . . . { } }
����:
/*********************************************************************
������: �ṹ������
����: Sweitena
����: 2021-05-09 15:56
˵��: ���нṹ�嶨��,��ȥ�����ṹ������
*********************************************************************/
#include <iostream>
using namespace std;
#include <string>
/******************�ṹ�嶨��*******************************/
//1. ����ѧ����������,����(���������䡢����)
struct Student
{
//��Ա�б�
string name;
int age ;
int score;
};
/******************�ṹ��ʹ��*******************************/
int main()
{
//2.�����ṹ������,��������ѧ��
struct Student stuarr[3] =
{
{"����", 18, 100},
{"����", 19, 80},
{"����", 20, 70}
};
//3.�����ṹ������,ʵ����Ϣ���
for (int i = 0; i < 3; i++)
{
cout << "����:" << stuarr[i].name << " ����:" << stuarr[i].age << " ����:" << stuarr[i].score << endl;
}
cout << endl;
//4.���ṹ�������е�Ԫ�ظ�ֵ
stuarr[2].name = "����";
cout << "��ijһԪ�غ����:" << endl;
for (int i = 0; i < 3; i++)
{
cout << "����:" << stuarr[i].name << " ����:" << stuarr[i].age << " ����:" << stuarr[i].score << endl;
}
cout << endl;
system("pause");
return 0;
}
���н��ͼ:

6.3 �ṹ��ָ��
- ����:ͨ��ָ����ʽṹ���еij�Ա��
- ������
->����ͨ���ṹ��ָ����ʽṹ�����ԡ�
����:
/*********************************************************************
������: �ṹ��ָ��
����: Sweitena
����: 2021-05-09 16:32
˵��:���ò�����" -> "����ͨ���ṹ��ָ����ʽṹ������
*********************************************************************/
#include <iostream>
using namespace std;
#include <string>
/******************�ṹ�嶨��*******************************/
//1. ����ѧ����������,����(���������䡢����)
struct Student
{
//��Ա�б�
string name;
int age ;
int score;
};
/******************�ṹ��ʹ��*******************************/
int main()
{
//2������ѧ���ṹ�����
Student s;
s = {"����", 18, 100};
//3��ֱ������ṹ������е�����
cout << "���������ʽ:" << endl;
cout << "����:" << s.name << " ����:" << s.age << " ����:" << s.score << endl;
//4��ͨ��ָ��ָ��ṹ�����
Student *p = &s;
//5��ͨ��ָ����ʽṹ������е�����
cout << "ʹ��ָ�����:" << endl;
cout << "����:" << p->name << " ����:" << p->age << " ����:" << p->score << endl;
system("pause");
return 0;
}
���н��ͼ:

6.4 �ṹ��Ƕ�ṹ��
- ����:�ṹ��ij�Ա��������һ���ṹ�塣
- ����:ÿ����ʦ����һ��ѧ��,��һ����ʦ�Ľṹ���м�¼һ��ѧ���Ľṹ�塣
����:
/*********************************************************************
������: �ṹ��Ƕ�ṹ��
����: Sweitena
����: 2021-05-09 16:45
˵��:�����á��ṹ���еij�Ա��������һ���ṹ��
�����ӡ�ÿ����ʦ����һ��ѧ��,һ����ʦ�Ľṹ���м�¼һ��ѧ���Ľṹ��
*********************************************************************/
#include <iostream>
using namespace std;
#include <string>
/******************�ṹ�嶨��*******************************/
//ѧ���ṹ�嶨��,����(���������䡢����)
struct Student
{
//��Ա�б�
string name;
int age ;
int score;
};
//��ʦ�ṹ�嶨��,����(ID������������)�Լ�ѧ���ṹ��
struct Teacher
{
//��Ա�б�
int id; //ְ�����
string name; //��ʦ����
int age ; //��ʦ����
struct Student stu; //�ӽṹ�� ѧ��
};
/******************�ṹ��ʹ��*******************************/
int main()
{
//1��������ʦ�ṹ�����
Teacher t1;
t1.id = 200112;
t1.name = "����";
t1.age = 75;
//2���ӽṹ�帳ֵ
t1.stu.name = "��";
t1.stu.age = 23;
t1.stu.score = 100;
//3�������ʦ�ṹ������е�����
cout << "��ʦ����:" << t1.name << endl;
cout << "��ʦ���:" << t1.id << endl;
cout << "��ʦ����:" << t1.age << endl;
cout << "��ʦ������ѧ������:" << t1.stu.name << endl;
cout << "ѧ������:" << t1.stu.age << endl;
cout << "ѧ������:" << t1.stu.score << endl;
system("pause");
return 0;
}
���н��ͼ:

6.5 �ṹ������������
- ����:���ṹ����Ϊ���������д��ݡ�
- ���ݷ�ʽ:
- ֵ����
- ��ַ����
����:
/*********************************************************************
������: �ṹ������������
����: Sweitena
����: 2021-05-12 10:10
˵��: ��ֵ����:�βθı�,ʵ�β���
�ڵ�ַ����:�βθı�,ʵ��Ҳ��
*********************************************************************/
#include <iostream>
using namespace std;
#include <string>
/******************�ṹ�嶨��*******************************/
//ѧ���ṹ��Ķ���,����(���������䡢����)
struct student
{
//��Ա�б�
string name;
int age;
int score;
};
/******************�ṹ��ʹ��*******************************/
/********* ������:Printstudent_1(struct student s) *********/
/************** ����:ֵ���ݷ�ʽ������ӡѧ����Ϣ **************/
/************ ��ʽ����:������1��ѧ���ṹ����� *************/
void Printstudent_1(struct student s)
{
cout << "ֵ���ݺ�����:" << endl;
cout << "����:" << s.name << " ����:" << s.age << " ����:" << s.score << endl;
}
/********* ������:Printstudent_2(struct student *p) **********/
/************** ����:��ַ���ݷ�ʽ������ӡѧ����Ϣ **************/
/******** ��ʽ����:������1��ָ��ѧ���ṹ�������ָ�� *********/
void Printstudent_2(struct student *p)
{
//p->age = 90; //��ı�ʵ��
cout << "��ַ���ݺ�����:" << endl;
cout << "����:" << p->name << " ����:" << p->age << " ����:" << p->score << endl;
}
int main()
{
//1������ѧ���ṹ�����,����ֵ
student s = {"����", 18, 100};
//2�����������д�ӡ�ṹ������е�����
cout << "��������:" << endl;
cout << "����:" << s.name << " ����:" << s.age << " ����:" << s.score << endl;
//3��ͨ��ֵ���ݷ�ʽ��ӡ
Printstudent_1(s); //ֵ����
//4��ͨ����ַ���ݷ�ʽ��ӡ
Printstudent_2(&s); //��ַ����
system("pause");
return 0;
}
���н��ͼ:

6.6 �ṹ����const��ʹ��
- ����:��const����ֹ�����
����:
/*********************************************************************
������: �ṹ����constʹ�ó���
����: Sweitena
����: 2021-05-12 10:47
˵��:�����á��ڵ�ַ���ݹ�����,Ϊ��ֹ�������ʵ��,���Լ���const
*********************************************************************/
#include <iostream>
using namespace std;
#include <string>
/******************�ṹ�嶨��*******************************/
//ѧ���ṹ��Ķ���,����(���������䡢����)
struct student
{
//��Ա�б�
string name;
int age;
int score;
};
/******************�ṹ��ʹ��*******************************/
/********* ������:Printstudent(const student *p) **********/
/*************** ����:��ӡ�ṹ���е����� ******************/
/***** ��ʽ����:������1��ָ��ѧ���ṹ������ij���ָ�� *****/
void Printstudent(const student *p)
{
//p->age = 90; //��ı�ʵ��,���Ǽ���const֮��,һ�����ĵIJ����ͻᱨ��,��ֹ�����
cout << "����:" << p->name << " ����:" << p->age << " ����:" << p->score << endl;
}
int main()
{
//1������ѧ���Ľṹ�����
struct student s = {"����", 18, 100};
//2�����ú�����ӡ�ṹ���е�����
Printstudent(&s);
system("pause");
return 0;
}
���н��ͼ:

?������ϰ01:Ƕ�ṹ��
��������:
- ѧУ������������Ŀ,ÿ����ʦ����5��ѧ��,�ܹ���3����ʦ��
- ����:���ѧ������ʦ�Ľṹ��,��������ʦ�Ľṹ����,��2����Ա:����������һ�����5��ѧ�������顣��ѧ���Ľṹ����,��2����Ա:���������ڿ��Է�����
- ����������3����ʦ,ͨ��������ÿ����ʦ��������ѧ����ֵ,���մ�ӡ����ʦ�����Լ���ʦ������ѧ�����ݡ�
��������:

����:
/*********************************************************************
������: �ṹ�尸��01
����: Sweitena
����: 2021-05-12 14:02
˵��: ������������ѧУ������������Ŀ,ÿ����ʦ����5��ѧ��,�ܹ���3����ʦ,
��������:���ѧ������ʦ�Ľṹ��,��������ʦ�Ľṹ����,����ʦ����
�ʹ��5��ѧ����������Ϊ��Ա,ѧ���ij�Ա�����������Է���,��������
���3����ʦ,ͨ��������ÿ����ʦ��������ѧ����ֵ,���մ�ӡ����ʦ����
�Լ���ʦ������ѧ�����ݡ�
*********************************************************************/
#include <iostream>
using namespace std;
#include <string> //�ַ���
#include <ctime> //ϵͳʱ��
/******************�ṹ�嶨��*******************************/
//ѧ���ṹ��Ķ���,����(���������Է���)
struct student
{
//��Ա�б�
string sname; //ѧ������
int score; //���Է���
};
//��ʦ�ṹ��Ķ���,����(���������5��ѧ��������)
struct teacher
{
//��Ա�б�
string tname; //��ʦ����
struct student sarr[5]; //ѧ������
};
/******************�ṹ��ʹ��*******************************/
/****************** ������:allocateSpace( ) *******************/
/*************** ����:����ʦ��ѧ����ֵ�ĺ��� ******************/
/****** ��ʽ����:������1����ʦ�����顢������2�����鳤�� *******/
void allocateSpace(struct teacher tarr[], int len) //�������������:����4.7.2���ᵽ�ķ�ʽ3
{
string nameSeed = "ABCDE";
for (int i = 0; i < len; i++) //���ѭ��:����ʦ��ֵ
{
tarr[i].tname = "Teacher_";
tarr[i].tname += nameSeed[i]; //�൱����Teacher_��,����һ��nameSeed
for (int j = 0; j < 5; j++) //�ڲ�ѭ��:��ÿ����ʦ������ѧ����ֵ
{
tarr[i].sarr[j].sname = "Student_";
tarr[i].sarr[j].sname += nameSeed[j];
int randomnum = rand() % 61 + 40; //����40~100�������
tarr[i].sarr[j].score = randomnum;
}
}
}
/******************** ������:printInfo( ) *********************/
/***************** ����:��ӡ������Ϣ�ĺ��� ********************/
/****** ��ʽ����:������1����ʦ�����顢������2�����鳤�� *******/
void printInfo(struct teacher tarr[], int len)
{
for (int i = 0; i < len; i++) //���ѭ��:�����ʦ����Ϣ
{
cout << "��ʦ������:" << tarr[i].tname << endl;
for (int j = 0; j < 5; j++) //�ڲ�ѭ��:�����ʦ����ѧ������Ϣ
{
cout << "\tѧ��������:" << tarr[i].sarr[j].sname << " ����:" << tarr[i].sarr[j].score << endl;
}
cout << endl;
}
}
int main()
{
srand((unsigned int)time(NULL)); //���������
//1������3����ʦ������
struct teacher tarr[3];
//2��ͨ��������3����ʦ����Ϣ��ֵ,������ʦ����ѧ����Ϣ��ֵ
int len = sizeof(tarr) / sizeof(tarr[0]); //�����ʦ�����鳤��
allocateSpace(tarr, len);
//3����ӡ������ʦ������ѧ������Ϣ
printInfo(tarr, len);
system("pause");
return 0;
}
���н��ͼ:

?������ϰ02:ð������
��������:
- ���һ��Ӣ�۵Ľṹ��,��Ա����:�������������䡢���Ա�;
- �����ṹ������,�����д��5��Ӣ��;
- ͨ��ð������,�������е�Ӣ�۰������������������,���մ�ӡ�����Ľ����
- ����:5��Ӣ����Ϣ�Ѹ���

����:
/*********************************************************************
������:�ṹ�尸��02
����: Sweitena
����: 2021-05-12 16:20
˵��: ���������������һ��Ӣ�۵Ľṹ��,������Ա����,����,�Ա�;
�����ṹ������,�����д��5��Ӣ�ۡ�ͨ��ð��������㷨,��
�����е�Ӣ�۰������������������,���մ�ӡ��������
*********************************************************************/
#include <iostream>
using namespace std;
#include <string>
/******************�ṹ�嶨��*******************************/
//Ӣ�۽ṹ��Ķ���,����(���������䡢�Ա�)
struct hero
{
//��Ա�б�
string name;
int age;
string sex;
};
/******************�ṹ��ʹ��*******************************/
/******************** ������:bubbleSort( ) *********************/
/************** ����:ð������-ʵ�������������� *****************/
/******* ��ʽ����:������1��Ӣ�۵����顢������2�����鳤�� *******/
void bubbleSort(struct hero arr[], int len) //ð������Ӧ��
{
for (int i = 0; i < len - 1; i++)
{
for (int j = 0; j < len - i - 1; j++)
{
if (arr[j].age > arr[j + 1].age)
{
//�����
struct hero temp = arr[j];
arr[j] = arr[j + 1];
arr[j + 1] = temp;
}
}
}
}
/******************** ������:printHero( ) *********************/
/***************** ����:��ӡ������Ϣ�ĺ��� ********************/
/****** ��ʽ����:������1��Ӣ�۵����顢������2�����鳤�� *******/
void printHero(struct hero arr[], int len)
{
for (int i = 0; i < len; i++)
{
cout << "\t����:" << arr[i].name << " ����:" << arr[i].age << " �Ա�:" << arr[i].sex << endl;
}
}
int main()
{
//1������������5��Ӣ��
struct hero arr[5] =
{
{"����", 23, "��"},
{"����", 22, "��"},
{"�ŷ�", 20, "��"},
{"����", 21, "��"},
{"����", 19, "Ů"}
};
int len = sizeof(arr) / sizeof(arr[0]); //���Ӣ������ij���
cout << "ԭ��������Ϣ:" << endl;
printHero(arr, len);
//2���������������,�������������������
bubbleSort(arr, len);
//3���������Ľ����ӡ���
cout << "�����������Ϣ:" << endl;
printHero(arr, len);
system("pause");
return 0;
}
���н��ͼ:
