文章目录
前言
本文主要介绍:
内存操作函数及部分模拟
一、memcpy函数
1.1 基本语法

1.2 注意事项
- 函数memcpy从from的位置开始向后复制count个字节的数据到to的内存位置;
- 这个函数在遇到 ‘\0’ 的时候并不会停下来;
- 如果from和to有任何的重叠,复制的结果都是未定义的,C语言规定该函数只处理不重叠的。
1.3 使用举例
#include <stdio.h>
#include <string.h>

int main()
{
	int from[] = { 1, 2, 3, 4, 5, 6, 7, 8, 9, 10 };
	int to[5] = { 0 };
	memcpy(to, from, 5 * sizeof(from[0]));

	int i = 0;
	for (i = 0; i < 5; i++) {
		printf("%d\n", to[i]);
	}

	return 0;
}

1.4 模拟实现memcpy函数
#include <stdio.h>
#include <string.h>
#include <assert.h>

// 模拟实现memcpy函数

void* My_Memcpy(void* to, const void* from, size_t count)
{
	assert(to && from);
	// mask为char类型指针,代替to指针去移动,最后返回to指针
	char* mask = (char*)to;
	while (count--) {
		*mask++ = *((char*)from)++;
	}

	// 写法2:
	//void* mask = to;
	//while (count--) {
	//	// 仅仅为 临时 将mask和from强转为char*,执行完毕后二者仍为void*类型
	//	*(char*)mask = *(char*)from;
	//	mask = (char*)mask + 1;
	//	from = (char*)from + 1;
	//}

	return to;
}

int main()
{
	int from[] = { 1, 2, 3, 4, 5, 6, 7, 8, 9, 10 };
	int to[5] = { 0 };
	// 用整形指针来接收返回指针,将内存的二进制看作整型
	int* ret = My_Memcpy(to, from, 5 * sizeof(from[0]));

	int i = 0;
	for (i = 0; i < 5; i++) {
		printf("%d\n", to[i]);
	}

	return 0;
}
二、memmove函数(和memcpy相比可处理重叠问题)
2.1 基本语法

2.2 注意事项
- 和memcpy的差别就是memmove函数处理的源内存块和目标内存块是可以重叠的;
- 如果源空间和目标空间出现重叠,就得使用memmove函数处理;
- memcpy能干的memmove也能干,那为什么还会存在memcpy?
因为memcpy先于memmove实现,之后被大量使用,随着语言进一步发展,优化版本memmove出现,但因为memcpy已经被大量使用,也不能将之前的抛弃掉。实际使用,我们使用memmove即可。
2.3 使用举例
#include <stdio.h>
#include <string.h>

int main()
{
	int from[] = { 1, 2, 3, 4, 5, 6, 7, 8, 9, 10 };
	int to[5] = { 0 };
	// 用整形指针来接收返回指针,将内存的二进制看作整型
	int* ret = memmove(from + 2, from, 5 * sizeof(from[0]));

	int i = 0;
	for (i = 0; i < 10; i++) {
		printf("%d\n", from[i]);
	}

	return 0;
}

如果是memcpy,则打印结果为:(因为在复制的过程中先复制的已经将后面的内容覆盖)

2.4 模拟实现memmove函数
#include <stdio.h>
#include <string.h>
#include <assert.h>

// 模拟实现memmove函数

// (重叠部分和from的关系分为三种:from在重叠部分左侧,中间,右侧)
void* My_Memmove(void* to, const void* from, size_t count)
{
	assert(to && from);
	// mask为char类型指针,代替to指针去移动,最后返回to指针
	char* mask = (char*)to;

	if (to < from) {
		// 从前向后复制
		while (count--) {
			*mask++ = *((char*)from)++;
		}
	}
	else {
		// 从后向前复制
		while (count--) {
			// 第一次进循环count已经变为count-1,所有不会越界
			*(mask + count) = *((char*)from + count);
		}
	}

	return to;
}

int main()
{
	int from[] = { 1, 2, 3, 4, 5, 6, 7, 8, 9, 10 };
	int to[5] = { 0 };
	int* ret = My_Memmove(from, from + 2, 5 * sizeof(from[0]));

	int i = 0;
	for (i = 0; i < 10; i++) {
		printf("%d\n", from[i]);
	}

	return 0;
}
具体思路:
根据to、from、重叠部分的位置不同,思考划分伪代码区间。

三、memcmp函数
3.1 基本语法

3.2 注意事项
- 比较从buffer1和buffer2指针开始的count个字节。
3.3 使用举例
#include <stdio.h>
#include <string.h>

int main()
{
	char buffer1[] = "DWgaOtP12df0";
	char buffer2[] = "DWGAOTP12DF0";
	int n = memcmp(buffer1, buffer2, sizeof(buffer1));
	if (n > 0)
		printf("'%s' is greater than '%s'.\n", buffer1, buffer2);
	else if
		(n < 0) printf("'%s' is less than '%s'.\n", buffer1, buffer2);
	else
		printf("'%s' is the same as '%s'.\n", buffer1, buffer2);

	return 0;
}

四、memset函数
4.1 基本语法

4.2 注意事项
- 函数拷贝ch 到buffer 从头开始的count 个字节里去, 并返回buffer指针。
4.3 使用举例
4.3.1 buffer为char类型字符数组
#include <stdio.h>
#include <string.h>

int main()
{
	char arr[10] = { 'a', 'b', 'c', 'd', 'e', 'f', 'g', 'h', 'i', 'j' };
	// 初始化字符数组所有字节为'\0'
	memset(arr, '\0', sizeof(arr));
	// memset(arr, '\0', 10); //一个效果,因为arr一共占10byte
	//...

	return 0;
}
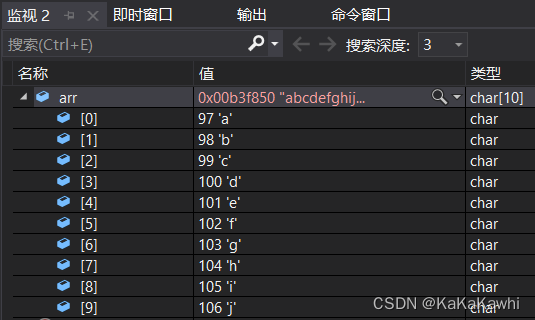
执行到首次初始化代码:

执行到memset函数:

4.3.2 buffer为int类型数组(每个元素占4个字节)
代码①:
#include <stdio.h>
#include <string.h>

int main()
{
	int arr[10] = { 1, 2, 3, 4, 5, 6, 7, 8, 9, 10 };
	memset(arr, 0, sizeof(arr));
	//memset(arr, 0, 10);

	return 0;
}
调试过程:


代码②:
#include <stdio.h>
#include <string.h>

int main()
{
	int arr[10] = { 1, 2, 3, 4, 5, 6, 7, 8, 9, 10 };
	//memset(arr, 0, sizeof(arr));
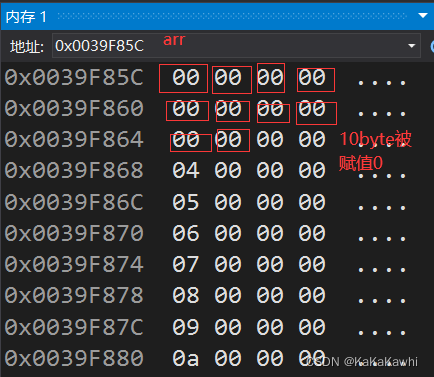
	memset(arr, 0, 10);

	return 0;
}
调试过程:


==为什么?==因为,memset的参数count是以字节为单位来赋值,我们观察内存(VS为内存小端存储):

总结
这里对文章进行总结:
以上就是今天总结的内容,本文包括了C语言内存操作函数及部分模拟,分享给大家。
真💙欢迎各位给予我更好的建议,欢迎访问!!!小编创作不易,觉得有用可以一键三连哦,感谢大家。peace
希望大家一起坚持学习,共同进步。梦想一旦被付诸行动,就会变得神圣。
欢迎各位大佬批评建议,分享更好的方法!!!🙊🙊🙊