Clion搭建刷题环境
目标
只新建一个Clion项目,在这个项目下可以有很多文件夹(比如leetcode、pat等等),这些文件夹下的每一个代码(.cpp文件)都可以单独执行,当然某些文件夹也可以是单独的大型项目(有.h头文件和.cpp源文件,有引用),还可以引入一些非官方库(如fmt等)给所有项目使用。
基本配置
下载Clion
基本上下载下来就能用,也不需要装什么插件。因为Clion是使用CMake配置的,所以接下来,会修改CMake来配置整个环境
配置CMakeList.txt

CMakeList.txt的初始内容如下
#最低要求
cmake_minimum_required(VERSION 3.21)
#项目名称
project(Demo)

#设置CMake变量
set(CMAKE_CXX_STANDARD 14)

#将main.cpp生成可执行程序Demo
add_executable(Demo main.cpp)
如果此时我们创建一个文件夹,比如叫做leetcode,为了管理这个文件夹下的所有可执行程序,我们需要在这个文件夹下创建一个CMakeLists.txt文件
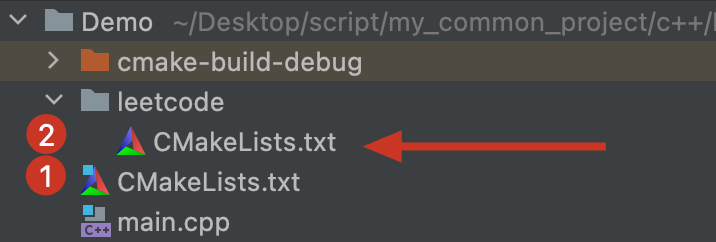
为了称呼方便,我们称父目录下的CMakeList.txt为CMakeList1,子目录下的CMakeList.txt为CMakeList2
由于CMakeList1的职能管理整个项目的,二CMakeList2的职能是管理子目录下的项目,所以
CMakeList2的内容应该能管理同级的所有文件(.cpp),并且每个文件都可以单独执行- leetcode这个文件夹应该在
CMakeList1中进行注册,以便进行统一管理(统一添加某些库的路径)
配置CMakeList1
#添加子目录
add_subdirectory(leetcode)
只需在CMakeList1末尾添加这句话即可
配置CMakeList2
cmake_minimum_required(VERSION 3.21)
project(leetcode)

set(CMAKE_CXX_STANDARD 14)

# 获取cpp文件相对于当前工作路径的相对路径,即文件名
# 工作路径${CMAKE_CURRENT_SOURCE_DIR}就是CMakeList.txt所在的文件夹
file(GLOB files RELATIVE ${CMAKE_CURRENT_SOURCE_DIR} *.cpp)
# 遍历每个文件名
foreach (file ${files})
    # 将去掉后缀的文件名存入exe变量(executable的缩写,不是代表.exe)
    string(REGEX REPLACE "(.+).cpp$" "\\1" exe ${file})
    # 分别生成add_executable(<name> <source>)命令
    add_executable(${exe} ${file})
endforeach ()
基本的逻辑是,获取工作路径下的所有.cpp文件,对于每个.cpp文件生成对应的可执行文件。对应的命令都写了注释,更具体的含义可以查阅官方文档
配置<bits/stdc++.h>
刷题中,这个头文件感觉是必备的,而并不是所有的c编译器都有这个头文件,如mac下默认使用Clang,所以可能需要进行配置。
使用g++
由于g++中默认是有<bits/stdc++.h>头文件的,所以我们可以在clion中配置g++的路径即可。
首先,我们需要先有g++,由于篇幅原因,这里不讲g++如何安装,推荐尝试使用homebrew进行安装(mac)。
安装完成后,我们需要知道g++的路径,由于我是使用homebrew进行安装的,所以我使用homebrew的命令查看g++的位置。
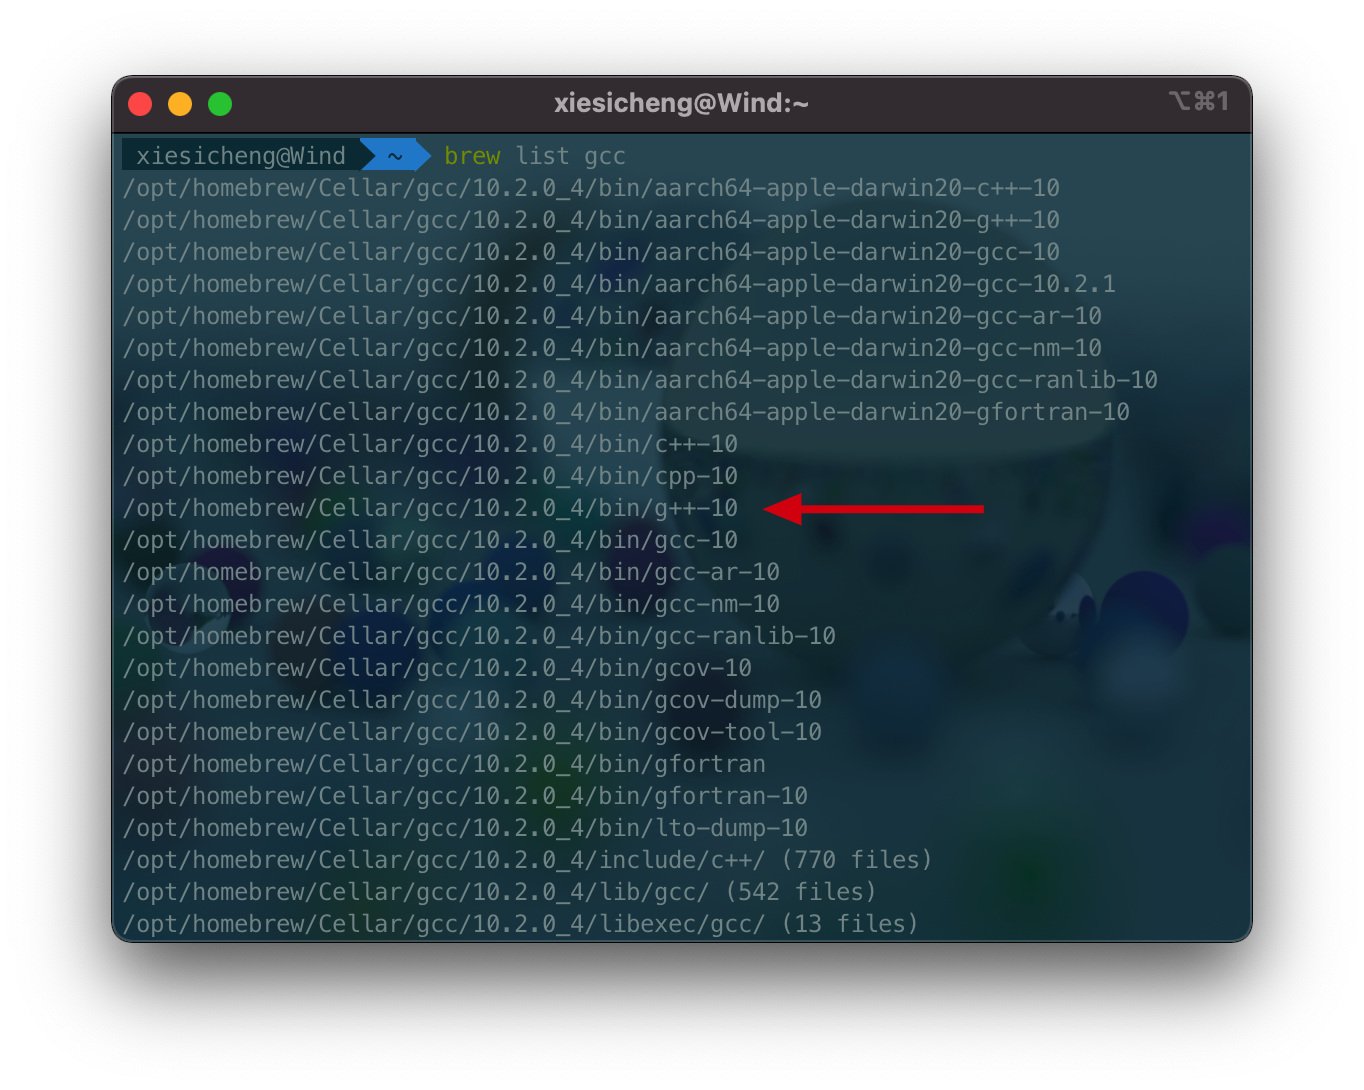
这个g+±10就是我们需要的路径,然后我们在clion中的执行构建部署>CMake中修改CMake options,格式如下:
-D CMAKE_CXX_COMPILER=你的路径
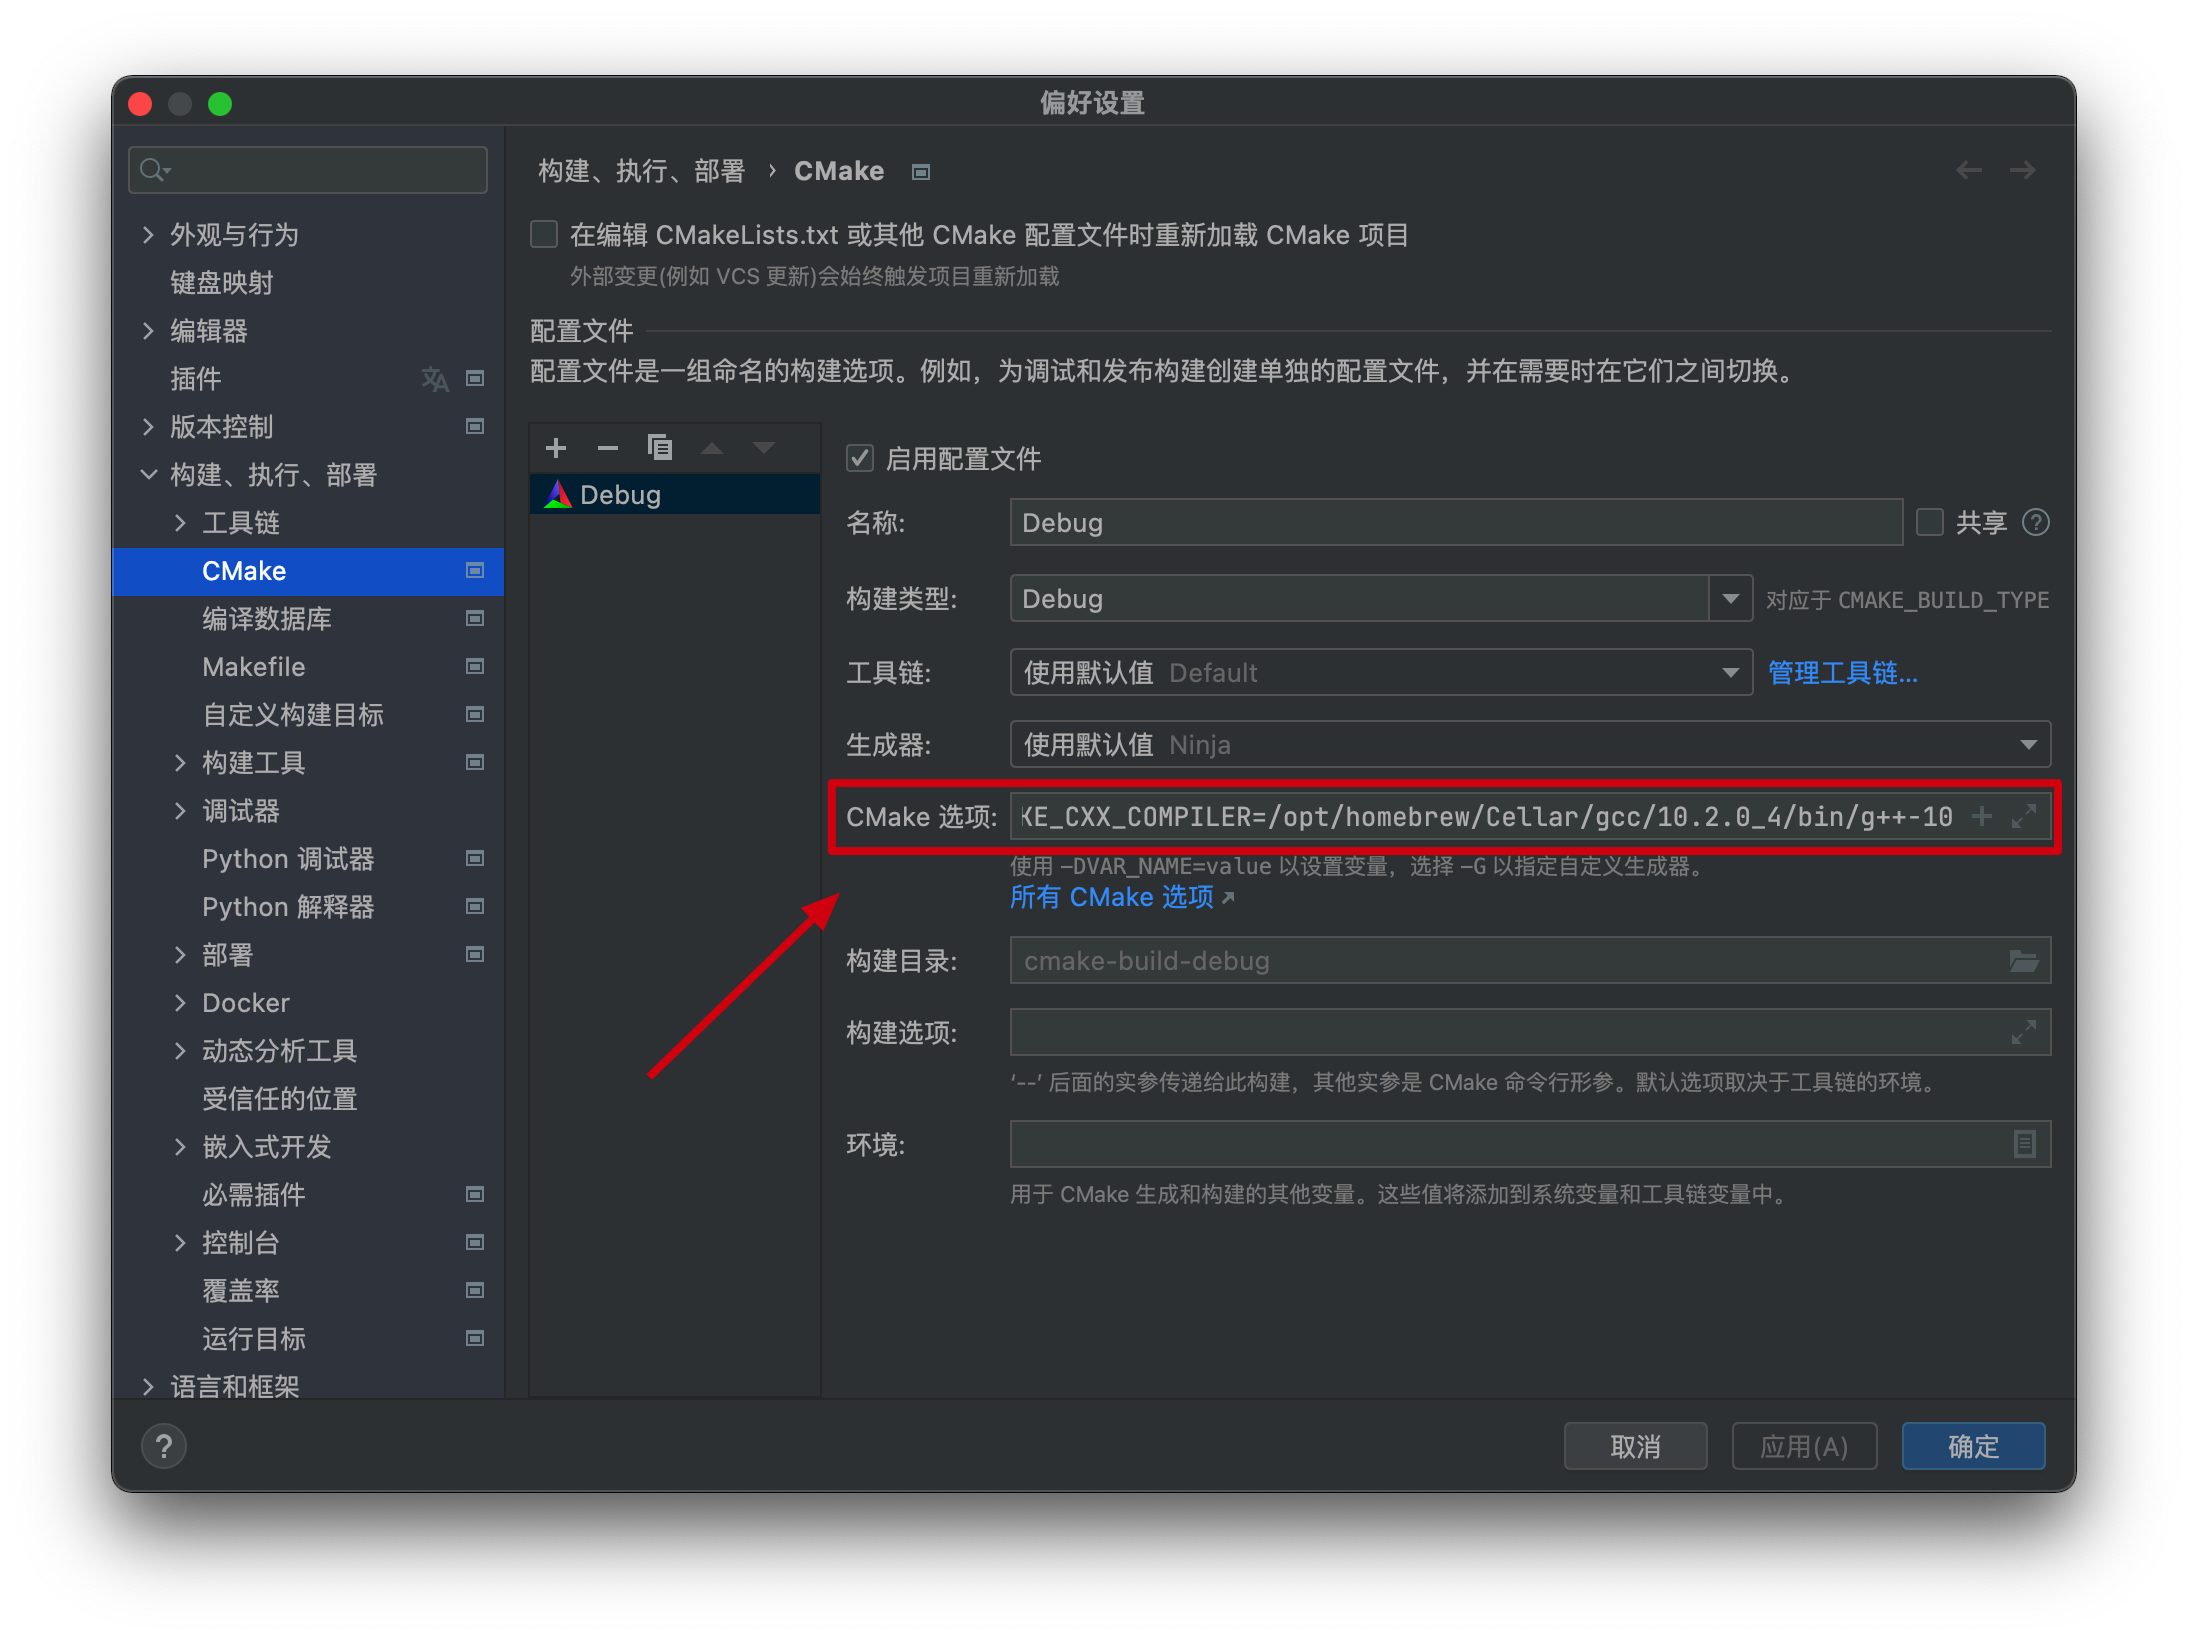
然后g++就被配置到clion环境里了,就可以快乐使用<bits/stdc++.h>了
添加<bits/stdc++.h>到对应环境中
这里不详细讲这种方式,只提供相关链接,因为后面我们有更好处理方式
更令我舒适的配置
fmt配置
fmt是c++ 的一个非官方的格式化的库,很强大,举个例子可以帮你直接输出vector、map等等,更多的功能请看官网说明。
项目地址
https://github.com/fmtlib/fmt
安装
- 下载源文件clone或者官方下载都可以
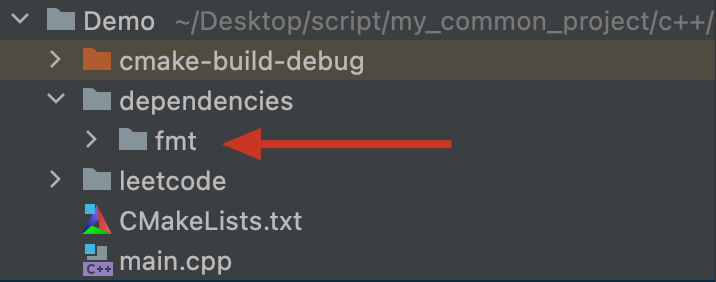
- 放到项目里,我放到了项目的dependencies下
-
在CMakeList配置对应环境
-
CMakeList1的配置需要把fmt放到项目下,接受项目管理。根据fmt官方说明,应该如此做
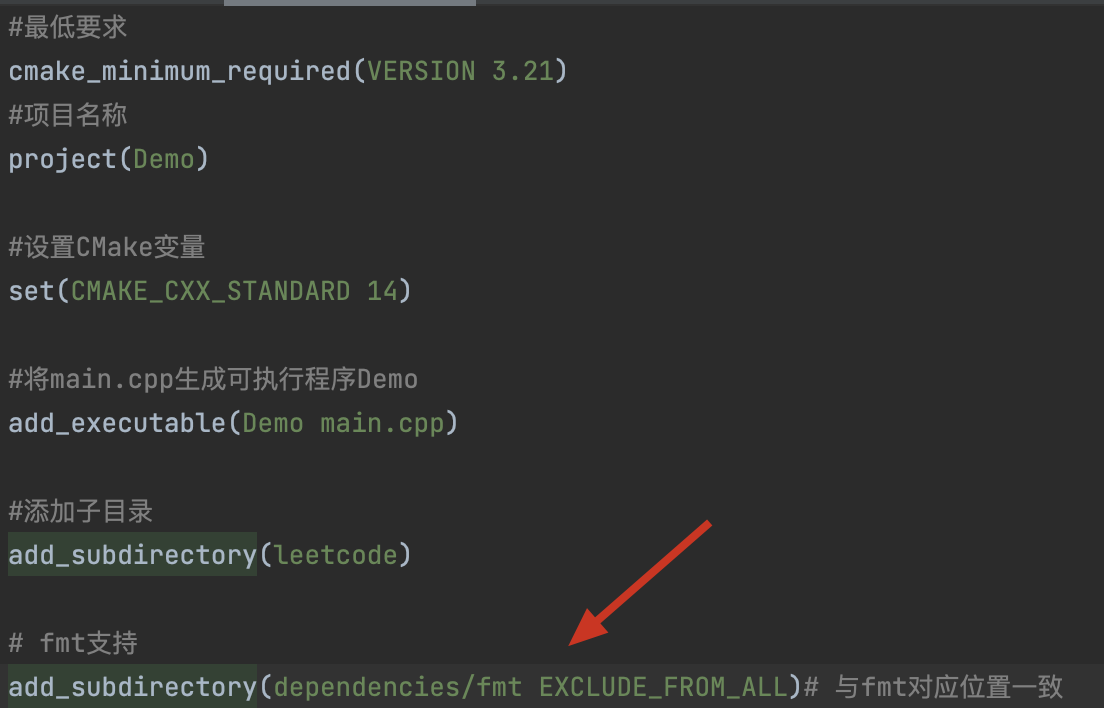
-
CMakeList2的配置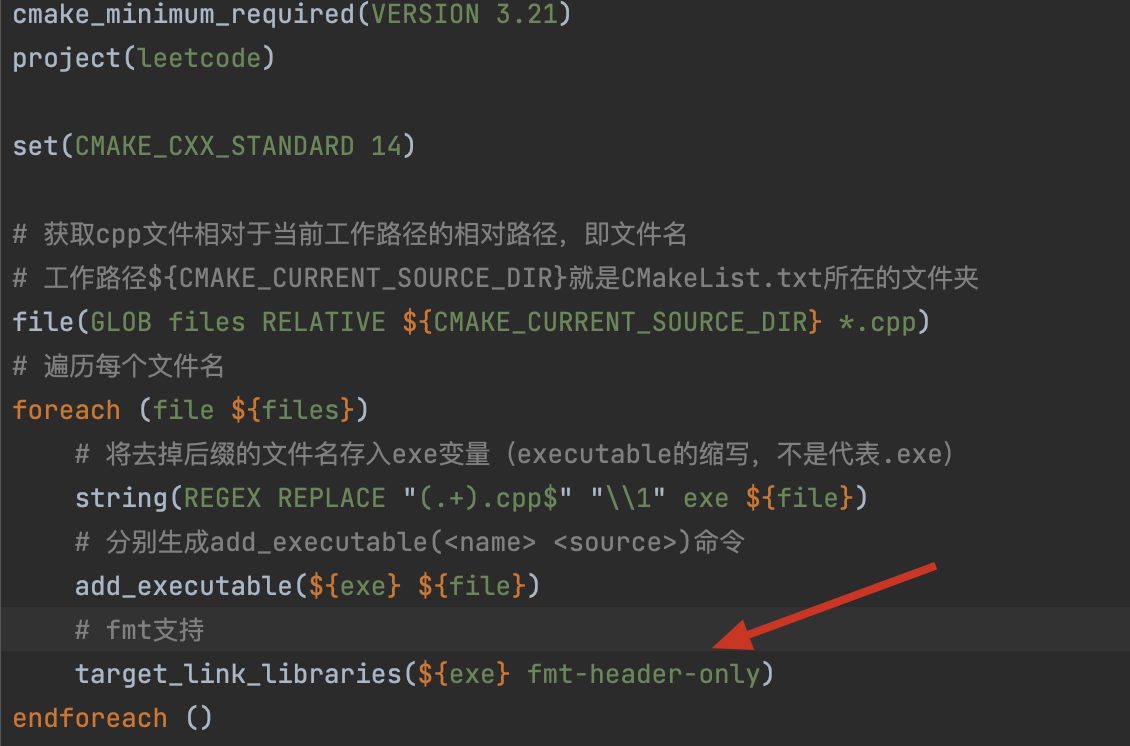
-
之后就可以正常引用fmt的库啦
配置自己的<bits/stdc++.h>
因为<bits/stdc++.h>的功能就是帮你把你可能引用到的库都先引用到这个头文件里了,所以就不再需要手动引用。因此,它也不会跟任何其他的库文件有耦合关系。所以,我们完全可以把它放到我们的项目下,以后都引用项目下的<bits/stdc++.h>
而之所以如此大费周折,是因为我们可以随心所欲地diy项目下的头文件,以实现更多的功能。
-
创建<bits/stdc++.h>头文件
在dependencies下创建include文件夹(就是以后用来存放公共头文件的地方),在include文件夹下创建bits文件夹,并在其下创建stdc++.h头文件,如图所示
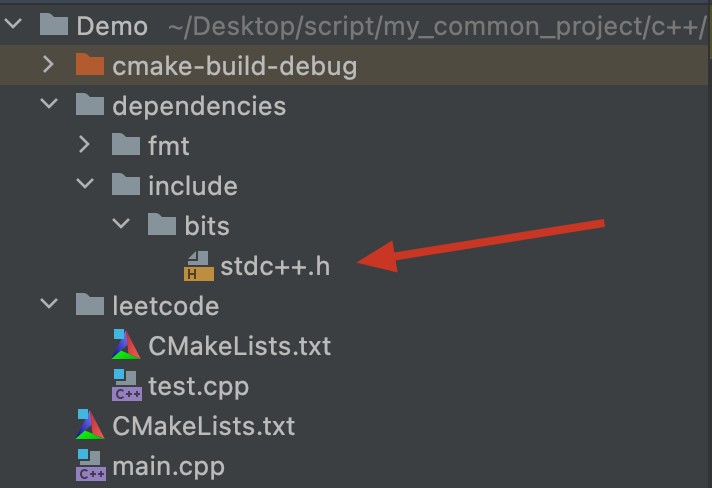
-
导入内容
将<bits/stdc++.h>的基本内容导入,内容如下
// C++ includes used for precompiling -*- C++ -*- // Copyright (C) 2003-2014 Free Software Foundation, Inc. // // This file is part of the GNU ISO C++ Library. This library is free // software; you can redistribute it and/or modify it under the // terms of the GNU General Public License as published by the // Free Software Foundation; either version 3, or (at your option) // any later version. // This library is distributed in the hope that it will be useful, // but WITHOUT ANY WARRANTY; without even the implied warranty of // MERCHANTABILITY or FITNESS FOR A PARTICULAR PURPOSE. See the // GNU General Public License for more details. // Under Section 7 of GPL version 3, you are granted additional // permissions described in the GCC Runtime Library Exception, version // 3.1, as published by the Free Software Foundation. // You should have received a copy of the GNU General Public License and // a copy of the GCC Runtime Library Exception along with this program; // see the files COPYING3 and COPYING.RUNTIME respectively. If not, see // <http://www.gnu.org/licenses/>. /** @file stdc++.h * This is an implementation file for a precompiled header. */ // 17.4.1.2 Headers // C #ifndef _GLIBCXX_NO_ASSERT #include <cassert> #endif #include <cctype> #include <cerrno> #include <cfloat> #include <ciso646> #include <climits> #include <clocale> #include <cmath> #include <csetjmp> #include <csignal> #include <cstdarg> #include <cstddef> #include <cstdio> #include <cstdlib> #include <cstring> #include <ctime> #if __cplusplus >= 201103L #include <ccomplex> #include <cfenv> #include <cinttypes> #include <cstdbool> #include <cstdint> #include <ctgmath> #include <cwchar> #include <cwctype> #endif // C++ #include <algorithm> #include <bitset> #include <complex> #include <deque> #include <exception> #include <fstream> #include <functional> #include <iomanip> #include <ios> #include <iosfwd> #include <iostream> #include <istream> #include <iterator> #include <limits> #include <list> #include <locale> #include <map> #include <memory> #include <new> #include <numeric> #include <ostream> #include <queue> #include <set> #include <sstream> #include <stack> #include <stdexcept> #include <streambuf> #include <string> #include <typeinfo> #include <utility> #include <valarray> #include <vector> #if __cplusplus >= 201103L #include <array> #include <atomic> #include <chrono> #include <condition_variable> #include <forward_list> #include <future> #include <initializer_list> #include <mutex> #include <random> #include <ratio> #include <regex> #include <scoped_allocator> #include <system_error> #include <thread> #include <tuple> #include <typeindex> #include <type_traits> #include <unordered_map> #include <unordered_set> #endif -
配置CMakeList.txt
在项目主CMakeList即
CMakeList1中添加路径,并设置为最先解析的路径,添加以下内容(注意,这句话一定要写在add_subdirectory之前,否则无法生效)#添加bits/stdc++的路径 include_directories(BEFORE dependencies/include)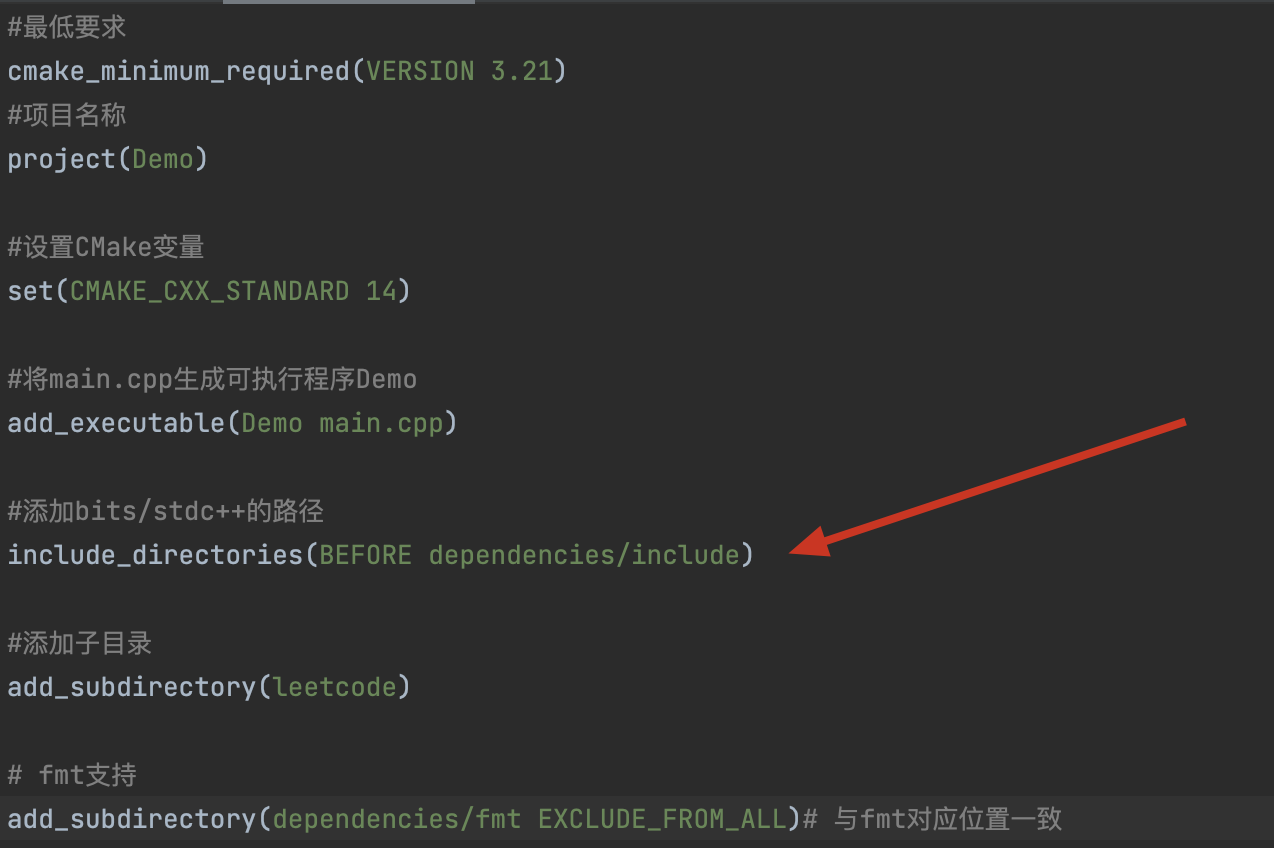
那么,现在你在本项目任何c++源文件中引用<bits/stdc++.h>都是引用本项目下的<bits/stdc++.h>。可以自己试一试
-
在<bits/stdc++.h>中配置fmt的引用
在<bits/stdc++.h>中的某个位置添加上你需要的引用即可。
//fmt #include <fmt/ranges.h> //你需要的引用... -
配置MY_SYSTEM宏
简单来说就是定义一个宏,这是为了接下来的配置,把下面这句话加到<bits/stdc++.h>的任意位置(最好是末位,这样比较好找hh)
//标识我的系统
#define MY_SYSTEM
配置简陋的日志输出
刷题的时候,尤其是写luogu或者pat的时候,因为这些平台是根据流输出的结果来判断正确,所以当我debug阶段写了很多输出语句再提交的时候就会报错。因此,我需要费很大的功夫去删这些测试时候的输出语句。但万一,结果还是不对,我又得加回来。除此之外,比如我使用了fmt库来帮我输出vector,而刷题平台上是没有这种非官方库的,就会报错(当然这个问题已经通过把引用放在项目里的<bits/stdc++.h>中解决了,但是在程序中使用fmt::print等fmt提供的函数的时候,仍然会报错)。所以我自己想了个办法配置一个简陋的日志输出。
目标
- 本地库使用之后,在刷题平台上测试的时候不会报错。
- 输出测试语句代码在刷题平台上不会执行
- 输出测试语句在本地运行的时候可以一键取消输出,也可以一键允许输出
- 以上需要配置的内容在创建文件(.cpp)的时候一键配置,不需要每次都重写一遍
实现
-
基本逻辑
代码如下
#include <bits/stdc++.h>

using namespace std;

#define DEBUG

#if defined(DEBUG) && defined(MY_SYSTEM)
#define MY_LOG(x) x
#else
#define MY_LOG(x)
#endif

int main() {
    MY_LOG(fmt::print("123"));
}
我设置了MY_LOG这个宏,他在MY_SYSTEM和DEBUG全部都有定义的时候让对应语句生效,否则不生效。
也就是说,只有在本项目下(因为只有在本项目下的<bits/stdc++.h>中才定义了MY_SYSTEM),并且在本个程序中定义了DEBUG才会执行对应语句。
需要一键取消输出,或者一键允许输出的时候只要注释或者取消注释
#define DEBUG即可这就满足了目标中的1、2、3。
-
配置Clion
打开
设置->编辑器->文件和代码模板,选中包含(include),打开C File Header,编辑里面的内容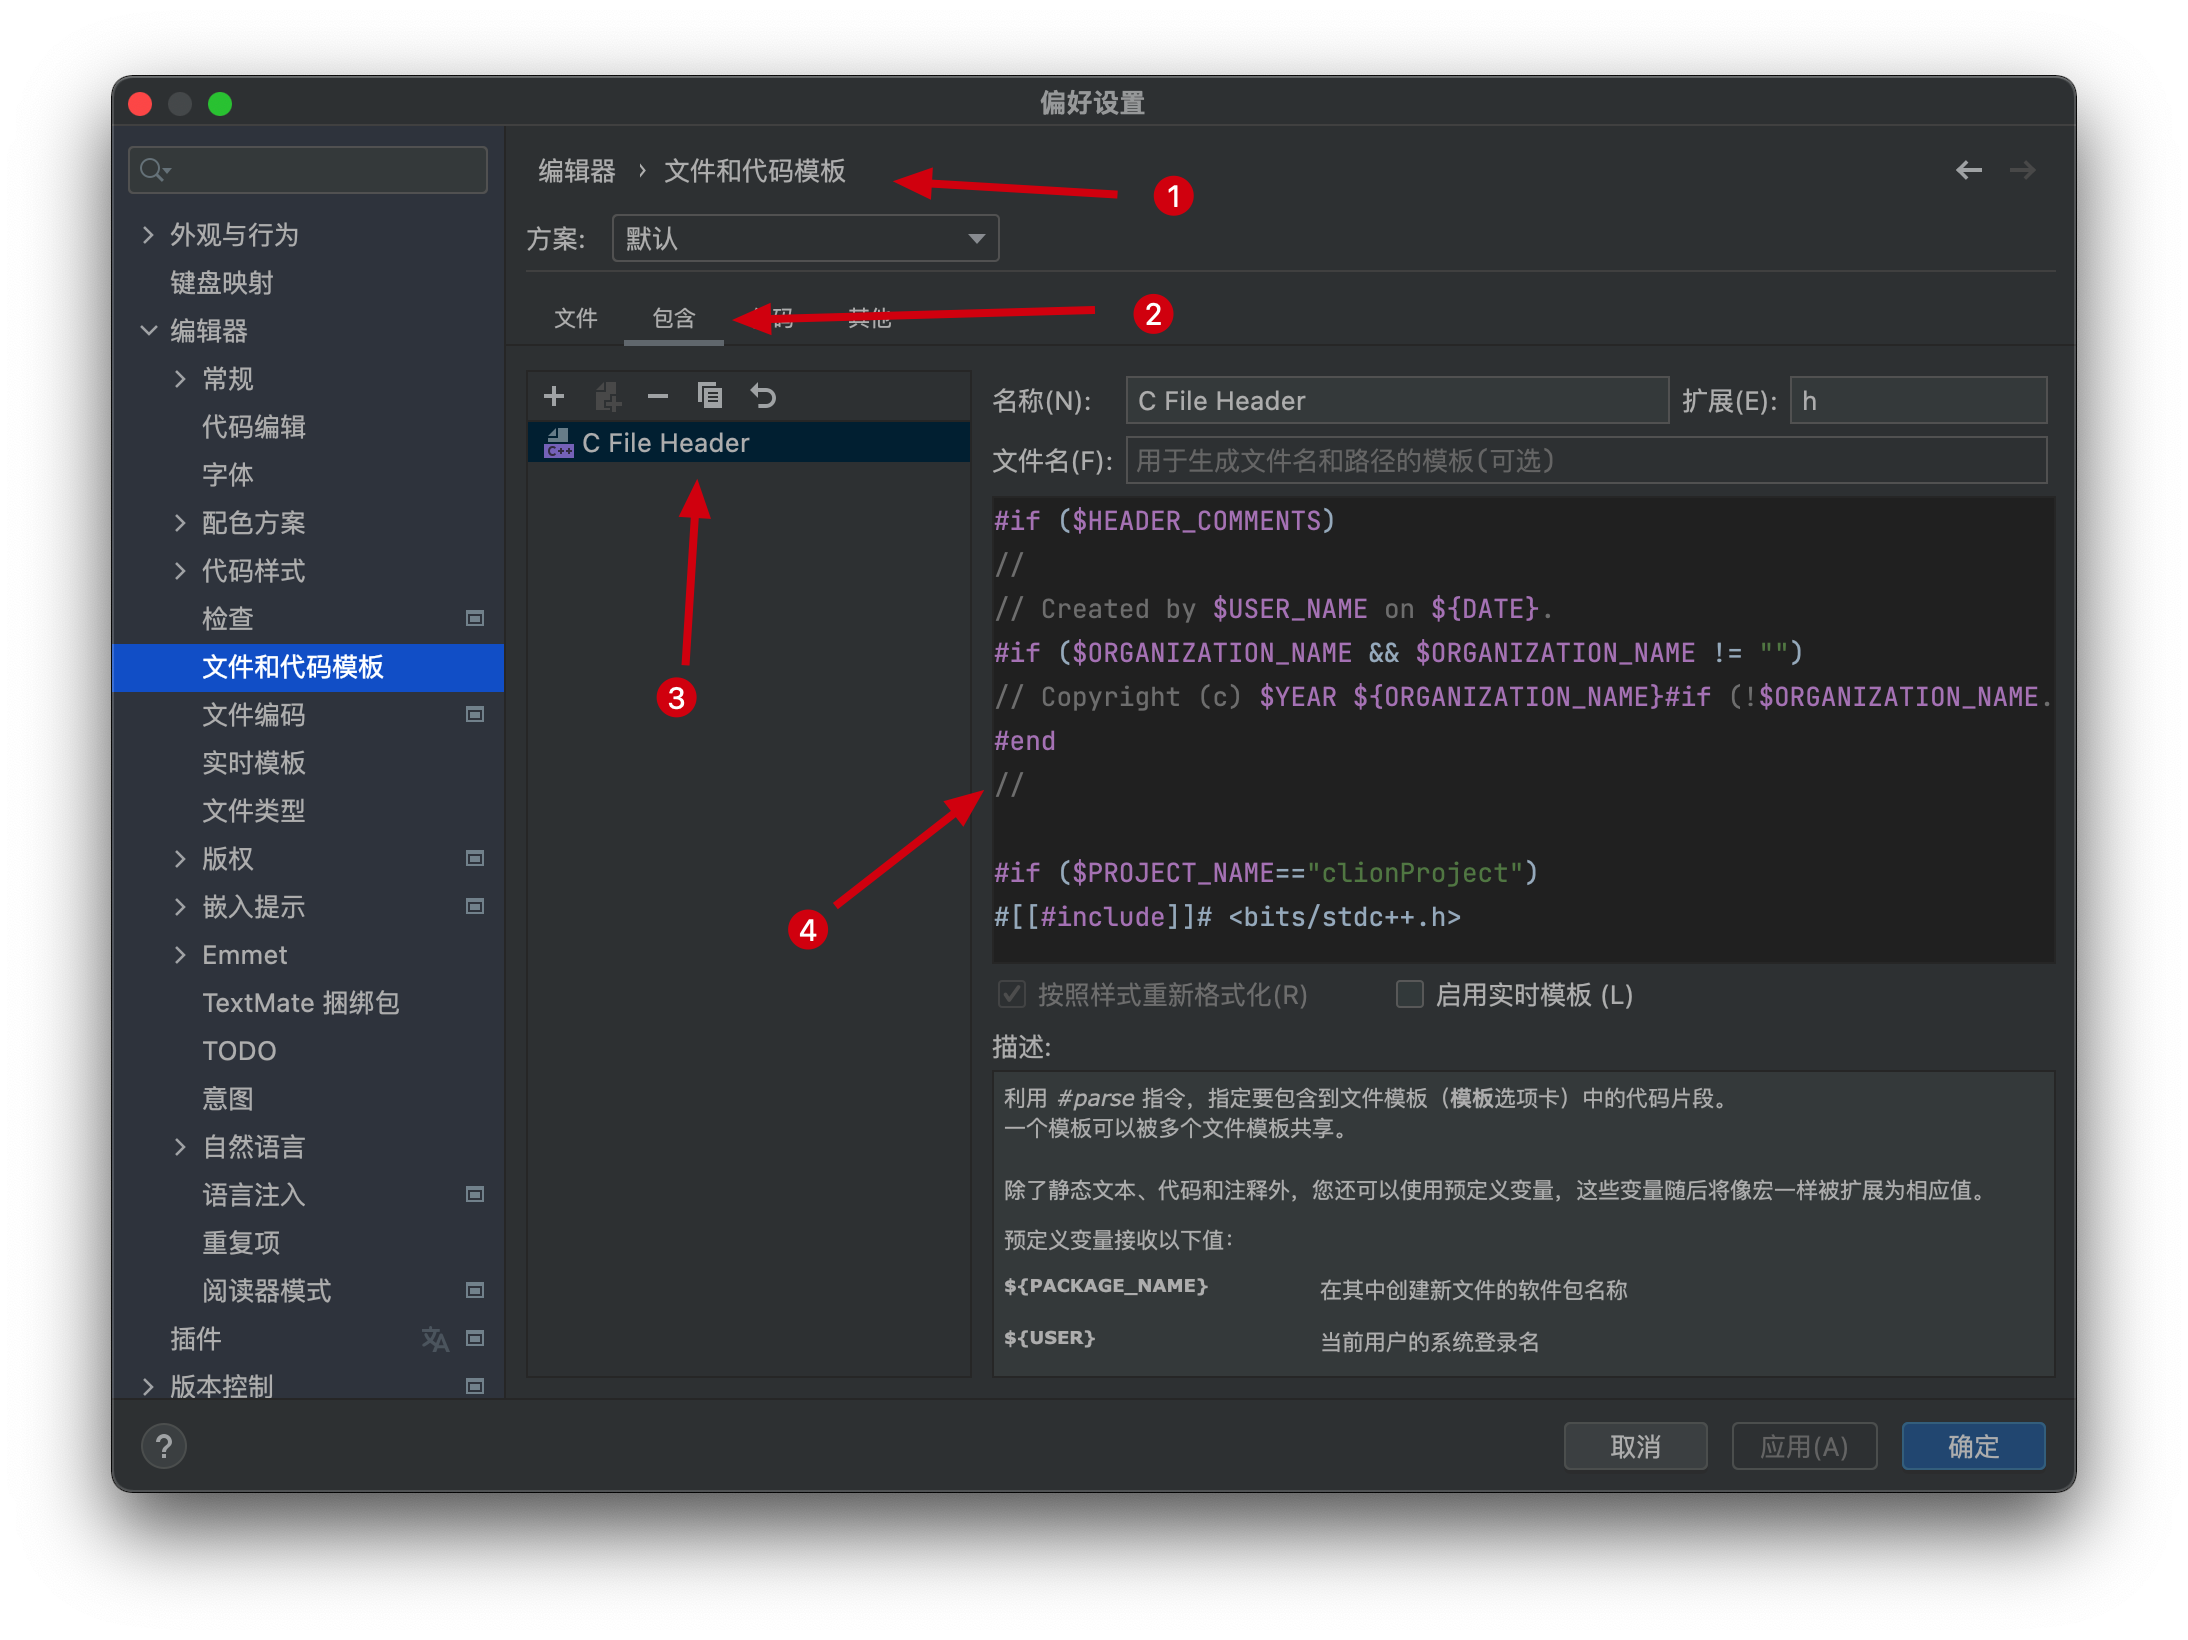
Clion的文件和代码模板用的是 Velocity Template Language (VTL),具体语法自己查吧,我给出我的模板
#if ($HEADER_COMMENTS)
//
// Created by $USER_NAME on ${DATE}.
#if ($ORGANIZATION_NAME && $ORGANIZATION_NAME != "")
// Copyright (c) $YEAR ${ORGANIZATION_NAME}#if (!$ORGANIZATION_NAME.endsWith(".")).#end All rights reserved.
#end
//

#if ($PROJECT_NAME=="你的项目名称")
#[[#include]]# <bits/stdc++.h>

using namespace std;

#[[#define]]# DEBUG

#[[#if]]# defined(DEBUG) && defined(MY_SYSTEM)
#[[#define]]# MY_LOG(x) x
#[[#else]]#
#[[#define]]# MY_LOG(x)
#[[#endif]]#
#end
#end
这样就可以在本项目下每次创建文件的时候,自动生成简陋的日志输出配置了