前言:
目前网上的
c++线程池资源多是使用老版本或者使用系统接口实现,使用c++ 11新特性的不多,最近研究了一下,实现一个简单版本,可实现任意任意参数函数的调用以及获得返回值。
0 前置知识
首先介绍一下用到的c++新特性
- 可变参数模板:利用这一特性实现任意参数的传递
- bind函数,lambda表达式: 用于将带参数的函数封装为不带形参和无返回值的函数,统一接口
- forward: 完美转发,防止在函数封装绑定时改变形参的原始属性(引用,常量等属性)
- shared_ptr, unique_ptr:智能指针,程序结束自动析构,不用手动管理资源,省心省力
- thread:c++11 引入的多线程标准库,完美跨平台
- future:期物,用于子线程结束后获取结果
- package_task: 异步任务包装模板,可以包装函数用于其它线程.有点类似与function
- function: 函数包装模板库,可以理解为将不同类型但形参和返回值相同的函数统一的接口
- queue,vecort: 向量,队列
- mutex: c++ 11引入的互斥锁对象
- condition_variable: c++ 11引入的条件变量,用于控制线程阻塞
- atmoic:原子变量,++,--,+=,-=这些操作时原子类型的,防止读取写于入失败
1 理论知识
问题0:线程运行完函数后自动就被系统回收了,怎么才能实现复用呢
答:刚开始我也是比较疑惑,以为有个什么状态方法可以调用,在线程结束被销毁前阻塞住,从而接取下一个任务,实现复用,其实并非如此,线程池实现的原理是,让线程执行一个死循环任务,当任务队列为空时,就让他阻塞防止资源浪费,当有任务时,解除阻塞,让线程向下执行,当执行完当前函数后,又会再次运行到死循环的的上方,继续向下执行,从而周而复始的不断接任务--完成任务--接任务的循环,这里可以设置一个变量来控制,当想销毁线程池的时候,让死循环不再成立,当该线程执行完当前函数后,退出循环,从而销毁线程,思路很精妙

问题1:传入的函数多种多样,怎么能实现一个统一调用的模式呢
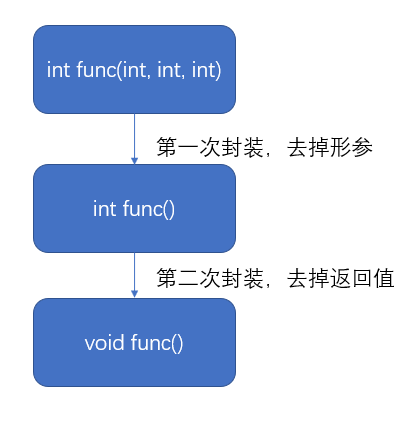
答:用过c++多线程的就应该知道,我们在创建线程时,需要给thread传递函数地址和参数,但是我们的任务参数是多种多样的,数量不一,这时候,我们就需要使用可变参数模板将函数经过两次封装,封装为统一格式,第一次封装,封装为不含有形参的函数,即参数绑定,但此时是有返回值的,第二次封装,将函数的返回值也去除,这样我们就能使用void()这种统一的形式去调用了。第一次封装我们使用bind()函数将多个参数的函数封装为没有形参的package_task对象,为什么呢,因为package_task对象可以通过get_future得到future对象,然后future对象可以通过get方法获取返回值,这样我们第二步,就能直接把返回值也去掉了。
说了这么多,有点绕,对于没怎么使用过新特性的同学来说,可能云雾缭绕,其实真正想明白这两个问题,线程池的理论问题就解决了
2代码实现
总共包含5个文件,两个头文件,3个源文件,
2.1 任务队列头文件和实现
这两个文件是实现任务队列的,其实很简单,两个方法,一个放入任务,一个取出任务,放入任务就放我们封装后的
/** Created by Jiale on 2022/3/14 10:19.
 *  Decryption: 任务队列头文件
**/

#ifndef THREADPOOL_TASKQUEUE_H
#define THREADPOOL_TASKQUEUE_H

#include <queue>
#include <functional>
#include <mutex>
#include <future>
#include <iostream>

class TaskQueue {

public:
    using Task = std::function<void()>; // 任务类
    template<typename F, typename ...Args>
    auto addTask(F &f, Args &&...args) -> std::future<decltype(f(args...))>;  // 添加任务
    Task takeTask(); // 取任务
    bool empty() {return taskQueue.empty();}

private:
    std::mutex taskQueueMutex;  // 任务队列互斥锁
    std::queue<Task> taskQueue; // 任务队列
};

template <typename F, typename ...Args> // 可变参数模板,模板必须在头文件定义
auto TaskQueue::addTask(F &f, Args &&...args)-> std::future<decltype(f(args...))> {
    using RetType = decltype(f(args...));  // 获取函数返回值类型
  // 将函数封装为无形参的类型 std::bind(f, std::forward<Args>(args)...):将参数与函数名绑定
  // packaged_task<RetType()>(std::bind(f, std::forward<Args>(args)...)); 将绑定参数后的函数封装为只有返回值没有形参的任务对象,这样就能使用get_future得到future对象,然后future对象可以通过get方法获取返回值了
  // std::make_shared<std::packaged_task<RetType()>>(std::bind(f, std::forward<Args>(args)...)); 生成智能指针,离开作用域自动析构
    auto task = std::make_shared<std::packaged_task<RetType()>>(std::bind(f, std::forward<Args>(args)...));
    std::lock_guard<std::mutex> lockGuard(taskQueueMutex);  // 插入时上锁,防止多个线程同时插入
    // 将函数封装为无返回无形参类型,通过lamdba表达式,调用封装后的函数,注意,此时返回一个无形参无返回值的函数对象
    taskQueue.emplace([task]{(*task)();});
    return task->get_future();
}


#endif //THREADPOOL_TASKQUEUE_H
/** Created by Jiale on 2022/3/14 10:19.
 *  Decryption: 任务队列源文件
**/

#include "include/TaskQueue.h"

/**
 * 从任务队列中取任务
 * @return 取出的任务
 */
TaskQueue::Task TaskQueue::takeTask() {
    Task task;
    std::lock_guard<std::mutex> lockGuard(taskQueueMutex);  // 上锁
    if (!taskQueue.empty()) {
        task = std::move(taskQueue.front());    // 取出任务
        taskQueue.pop();  // 将任务从队列中删除
        return task;
    }
    return nullptr;
}
可以看出,代码不多,就是一个简单的放入任务,取出任务,但是如果没接触过这种写法的时候还是比较难想的,我把那句难理解的代码拆成三部分
2.2 线程池代码实现
/** Created by Jiale on 2022/3/14 10:42.
 *  Decryption: 线程池头文件
**/

#ifndef THREADPOOL_THREADPOOL_H
#define THREADPOOL_THREADPOOL_H

#include <atomic>
#include <thread>
#include <condition_variable>
#include "TaskQueue.h"

class ThreadPool {
    std::atomic<int> threadNum{};  // 最小线程数
    std::atomic<int> busyThreadNum; // 忙线程数
    std::condition_variable notEmptyCondVar; // 判断任务队列是否非空
    std::mutex threadPoolMutex; // 线程池互斥锁
    bool shutdown;          // 线程池是否启动
    std::unique_ptr<TaskQueue> taskQueue;  // 任务队列
    std::vector<std::shared_ptr<std::thread>> threadVec;  // 线程池
public:
    explicit ThreadPool(int threadNum = 5);   // 创建线程池
    ~ThreadPool();          // 销毁线程池

    template <typename F, typename ...Args>
    auto commit(F &f, Args &&...args) -> decltype(taskQueue->addTask(f, std::forward<Args>(args)...)); // 提交一个任务
    void worker();
};

template <typename F, typename ...Args>  // 可变参数模板
auto ThreadPool::commit(F &f, Args &&...args) -> decltype(taskQueue->addTask(f, std::forward<Args>(args)...)){
    // 这个目的就是把接收的参数直接转发给我们上面写的addTask方法,这样,就可以对使用者隐藏TaskQueue的细节,只向用户暴露ThreadPool就行
    auto ret = taskQueue->addTask(f, std::forward<Args>(args)...);
    notEmptyCondVar.notify_one();
    return ret;
}


#endif //THREADPOOL_THREADPOOL_H
/** Created by Jiale on 2022/3/14 10:42.
 *  Decryption:线程池源文件
**/

#include "include/ThreadPool.h"

ThreadPool::ThreadPool(int threadNum) : taskQueue(std::make_unique<TaskQueue>()), shutdown(false), busyThreadNum(0) {
    this->threadNum.store(threadNum);
    for (int i = 0; i < this->threadNum; ++i) {
        threadVec.push_back(std::make_shared<std::thread>(&ThreadPool::worker, this)); // 创建线程
        threadVec.back()->detach();    // 创建线程后detach,与主线程脱离
    }
}

ThreadPool::~ThreadPool() {
    shutdown = true;  // 等待线程执行完,就不在去队列取任务
}

void ThreadPool::worker() {
    while (!shutdown) {
        std::unique_lock<std::mutex> uniqueLock(threadPoolMutex);
        notEmptyCondVar.wait(uniqueLock, [this] { return !taskQueue->empty() || shutdown; });  // 任务队列为空,阻塞在此,当任务队列不是空或者线程池关闭时,向下执行
        auto currTask = std::move(taskQueue->takeTask());  // 取出任务
        uniqueLock.unlock();
        ++busyThreadNum;
        currTask();  // 执行任务
        --busyThreadNum;
    }
}
2.3 测试
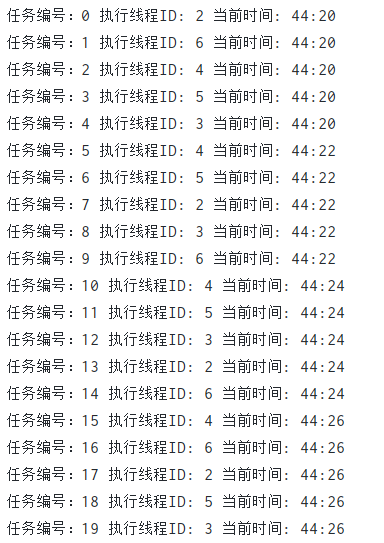
线程池设计好了,我们进行测试,如果我们开5个子线程,处理20个任务,那么,应该有5个线程ID,且是5个线程并发执行的,我们在测试函数里睡眠2秒,那么,总的时间应该是8秒执行完
#include <iostream>
#include <thread>
#include <future>
#include "ThreadPool.h"
using namespace std;

mutex mut;
int func(int x) {
    auto now = time(nullptr);
    auto dateTime = localtime(&now);
    mut.lock(); // 为了防止打印错乱,我们在这里加锁
    cout << "任务编号:" << x <<" 执行线程ID: " << this_thread::get_id() << " 当前时间: " << dateTime->tm_min << ":" << dateTime->tm_sec << endl;
    mut.unlock();
    this_thread::sleep_for(2s);
    return x;
}


int main() {
    ThreadPool threadPool;
    for (int i = 0; i < 20; ++i) auto ret = threadPool.commit(func, i);
    this_thread::sleep_for(20s);  // 主线程等待,因为现在子线程是脱离状态,如果主线程关闭,则看不到打印
}
2.4 测试结果

可以看到我们的线程是并发执行的,总共用时从44分20秒,到44分26秒,总共6秒,加上我们最后一次打印没有停留2秒,总共是8秒,每次打印的线程号也相同,可以看出,我们实现了线程的复用
总结
这只是多线程的一个简单实现,很多东西没有考虑到,比如任务超时,任务优先级等,当然,我们会了简单的之后就能慢慢摸索更复杂的功能。感谢阅读
转自博客园microDeLe
