前言和行文思路:
VScode、Clion、Pycharm都是集成环境的编辑器,他们在配置编译系统的时候的特点和不同,谁更方便呢?本文系列不准备泛泛而谈,所以,可能有一定的深度和参考的内容,也许需要读者有时间和耐心看一下。文章尽量归于一章,但是,发现一章节过于繁杂,所以,对应方便查阅的基础采用了【略去】的说明,读者可以自己查阅。
机器视觉中,大量的开源工程采用的是小型化的编译器,其中CLion的应用广泛性,不容置疑。
首先,本文对Clion的编译系统之CMake的应用支持的基本配置和编译方法进行了学习和实践:然后,利用Clion编译器,对Boost Test的项目进行编译和实践尝试:在对Boost Test的编译过程中,遇到了不少问题,其中对boost的库在不同的编译系统例如 vc 和 MinGW的编译遇到了不少实践问题,boost的安装也尝试了很多方法,分别采用在线安装,利用微软的vcpkg的安装包管理工具,和直接利用Boost的工具结合CLion的工具等,实践解决了很多问题,希望对大家有提示帮助。
本文同时对opencv的编译做了实践,结果是没有编译成功,由于章节的问题,将在下一节详细论述。
小结:【本文组织说明见思维导图】
本文主要是熟悉Clion的集成编译环境,为后续机器视觉的项目准备。文中,首先介绍了相关的基础知识和概念,

?然后,做了两个成功的实例:包括,
- CLion的基础项目编制实践
- CLion下编译boost test的项目实践

目标:
1 用Clion编译器在不同的编译环境下熟悉编译设定:
2?构建Clion的编译环境,并且成功编译Boost Test Frameworks
3 尝试编译OpenCV.
预备基础:【熟悉的可跳过】
本节介绍,本节任务完成所需要的基本的基础知识:
0 CMake:
什么是 CMake
All problems in computer science can be solved by another level of indirection.
David Wheeler
你或许听过好几种 Make 工具,例如?GNU Make?,QT 的?qmake?,微软的?MS nmake,BSD Make(pmake),Makepp,等等。这些 Make 工具遵循着不同的规范和标准,所执行的 Makefile 格式也千差万别。这样就带来了一个严峻的问题:如果软件想跨平台,必须要保证能够在不同平台编译。而如果使用上面的 Make 工具,就得为每一种标准写一次 Makefile ,这将是一件让人抓狂的工作。
CMake 就是针对上面问题所设计的工具:它首先允许开发者编写一种平台无关的 CMakeList.txt 文件来定制整个编译流程,然后再根据目标用户的平台进一步生成所需的本地化 Makefile 和工程文件,如 Unix 的 Makefile 或 Windows 的 Visual Studio 工程。从而做到“Write once, run everywhere”。显然,CMake 是一个比上述几种 make 更高级的编译配置工具。一些使用 CMake 作为项目架构系统的知名开源项目有?VTK、ITK、KDE、OpenCV、OSG?等?[1]。
【详细的CMake基础介绍,参考这个文章,写的不错】?
CMake 入门实战 | HaHack![]() https://www.hahack.com/codes/cmake/
https://www.hahack.com/codes/cmake/
1 编译器:MinGW
1.1 MinGW基础:
Mingw-w64 is an advancement of the original mingw.org project, created to support the GCC compiler on Windows systems. It has forked it in 2007 in order to provide support for 64 bits and new APIs. It has since then gained widespread use and distribution.
MinGW-w64![]() https://www.mingw-w64.org/
https://www.mingw-w64.org/
?提到MinGW的选择,必然想到Cygwin和他的区别,读者可以参考下面的链接获取更详细的知识。
【两个编译器的主要区别,Cygwin可以说是UNIX 或者 linux 移植到windows平台上,而MigGW直接是依据windws API做的设计,不过用了GUN的工具。所以,在对windows的应用开发上,我觉得没有太大的根本区别】
Windows下MinGW-w64的安装 - 知乎 (zhihu.com)![]() https://zhuanlan.zhihu.com/p/355510947
https://zhuanlan.zhihu.com/p/355510947
?【案,在本章的实际讨论中,由于在CLion中,我们默认配置的编译器就是windows版本的MinGW,这一变化,将导致很多设置,尤其是编译设置的相关变化,将在后续小节讨论】
1.2 MinGW的安装:
如果有外网访问权限和资源的话,按照下面的就可以:
?


?【按照提示配置一下,安装即可】
------------------------------------------------------------------------------------------------------------------------------
如果不行,可以参照我的这篇博文:MinGW 64的安装 - 官网sourceforge安装失败非翻墙解决办法_Franklin的博客-CSDN博客![]() https://dimensionspacex.blog.csdn.net/article/details/124314331?spm=1001.2014.3001.5502
https://dimensionspacex.blog.csdn.net/article/details/124314331?spm=1001.2014.3001.5502
3 Boost
本节出现Boost,完全是一个意外,因为,编译Opencv本来和他没关系,可是在寻求CLion的官方说明的时候,Boost是被Clion特意拿出来的例子,在执行Boost编译于Clion的例子里面,我们遇到了一个库的问题,围绕这个问题的解决,笔者花了很多时间,目的就是真的熟悉Clion的环境为将来未知的编译等问题打下基础。
---------------------------------------------------------
Boost是拓展的C++库的总称。Boost库由Boost社区组织开发、维护。其目的是为C++程序员提供免费、同行审查的、可移植的程序库。Boost社区的发起人Dawes本人就是C++标准委员会的成员之一。大部分boost库功能的使用只需包括相应头文件即可,少数(如正则表达式库,文件系统库等)需要链接库。里面有许多具有工业强度的库,如graph库。STL集中在算法部分,而boost包含了不少工具类,可以完成比较具体的工作。
boost(C++程序库的总称)_百度百科 (baidu.com)![]() https://baike.baidu.com/item/boost/69144本文引用到Boost,因为CLion的官网的动态库和测试的例子都是Boost的,所以,Boost的知识应该要了解一下。
https://baike.baidu.com/item/boost/69144本文引用到Boost,因为CLion的官网的动态库和测试的例子都是Boost的,所以,Boost的知识应该要了解一下。
Boost Getting Started - 1.78.0![]() https://www.boost.org/doc/libs/1_78_0/more/getting_started/index.html
https://www.boost.org/doc/libs/1_78_0/more/getting_started/index.html
Boost Getting Started on Windows - 1.78.0![]() https://www.boost.org/doc/libs/1_78_0/more/getting_started/windows.html【案,理解Boost和STL的区别,可以看下面这个博客,看一下format的使用情况,这里不累述了,比如:format没有snprintf快,但它是类型安全的。它使用streams构建输出】
https://www.boost.org/doc/libs/1_78_0/more/getting_started/windows.html【案,理解Boost和STL的区别,可以看下面这个博客,看一下format的使用情况,这里不累述了,比如:format没有snprintf快,但它是类型安全的。它使用streams构建输出】
2 CMake BuildSystem【Clion的默认编译系统】
Clion默认是采用CMake的编译系统,该系统主要的配置文件的格式比较固定,文件的名称也一般固定为CMakeList.txt.CMakeList,是整个CMake构建复杂编译系统的要素,本文在【预备基础】小节里面做了比较仔细阐述。Clion采用CMake系统,官网包括了对Boost和Boost Test![]() https://www.boost.org/doc/libs/1_45_0/libs/test/doc/html/tutorials/intro-in-testing.html的支持部分。
https://www.boost.org/doc/libs/1_45_0/libs/test/doc/html/tutorials/intro-in-testing.html的支持部分。
CMakeList.txt的作用域在该list的目录内,作用域这个概念对编译系统组织非常重要。
2.1 CMake system 快速例子
【案,以下例子熟悉CMake系统可以跳过,就是构建一个CMake系统的步骤】
CMake 是一个辅助性标签的编译系统。用脚本CMakeList去生成特定环境的编译文件。在Clion里面,CMake看起来是一个默认的设定,因为只要你启动一个新的项目,默认会生成CMake的各种配置:
When you create a new CMake project in CLion, a?CMakeLists.txt?file is automatically generated under the project root.
?【案,其实这个CMake的定义可以忽略,只要是C++都是这个结果】
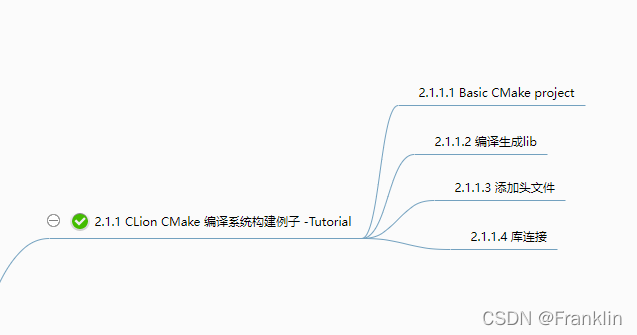
2.1.1 CLion?CMake 编译系统构建例子 01-Tutorial
【第一个简单的案例来自于官网的Sample,这边实践了一下,熟悉的略过】
官网连接如下:
2.1.1.1?Basic CMake project
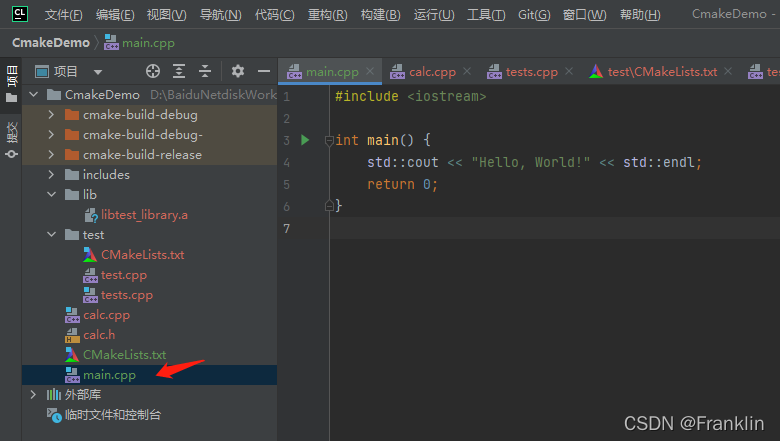
我们现在用CLion自动生成一个C++的项目看看情况:【File | New Project?and choose?C++ Executable.?】
【我们把他命名为CmakeDemo后面用,这里的图是之前忘记改名字的默认是untitled】
【默认】生成的CMakelists.txt 如下:

cmake_minimum_required(VERSION 3.21)
project(untitled)
set(CMAKE_CXX_STANDARD 14)
add_executable(CmakeBuildDemo01 main.cpp)
【上图是CLion2022,自动生成的编译系统】?
这几个文件的意义,这里贴一下,方便理解:

?【案,最后这个项要说一下,理解一下,一个是目标Target,一个是这个目标从哪里编译来】
再看一下,我们前面这个自动生成的例子,

?【案,这个地方非常重要,后面我们编译比较复杂的系统要依据这个原则】
?现在,我们改一下名称,

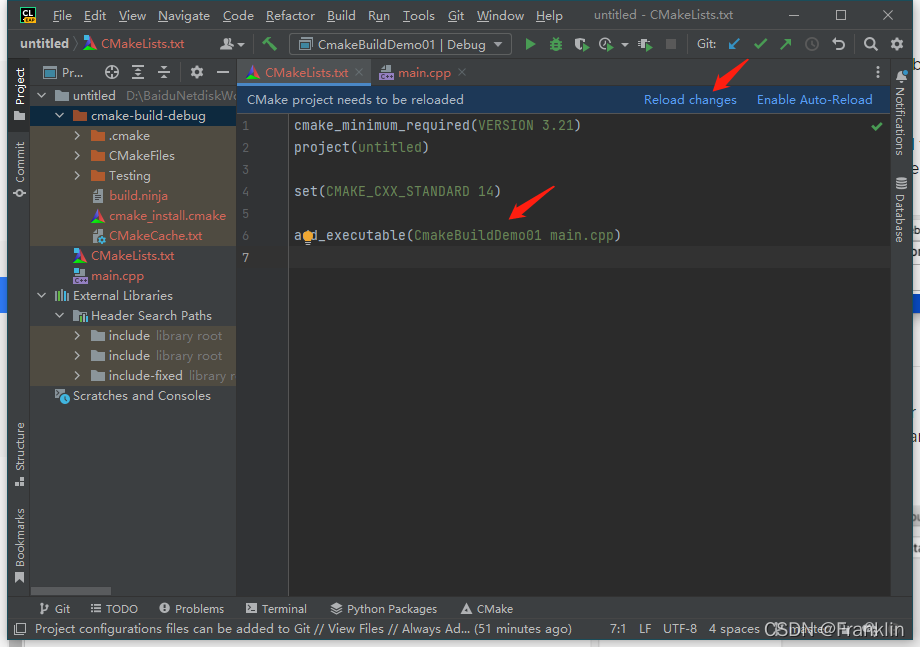
?【案,这样改动还不行,还是需要在CMakeList.txt里面去改】
?

?然后,我们【build】一下,成功了。
-------------------------------以上是生成EXE的方法--------------------------------------------------------------------
2.1.1.2 编译生成lib
- ?官网给出生成LIB的方法。参考附件官网help链接:
add_library(test_library STATIC calc.cpp)
2.1.1.3 添加头文件
- ?添加include文件方法,
include_directories(includes/math)
include_directories(includes/general)
2.1.1.4 库连接
- ?链接库的方法:

CLion 通过上图两个命令,把目标和静态库连接起来:【案,官网说需要将库连接放置在exe编译后面】?
上述案例我们用到的根目录的CMakeList.txt贴如下:
cmake_minimum_required(VERSION 3.21)
message("frank testing")
project(CmakeDemo)

set(CMAKE_CXX_STANDARD 14)

add_executable(CmakeDemo main.cpp)
add_executable(CmakeDemo_calc calc.cpp)
add_library(test_library STATIC calc.cpp)

include_directories(includes/math)
include_directories(includes/general)

find_library(TEST_LIBRARY test_library lib)
target_link_libraries(CmakeDemo LINK_PUBLIC ${TEST_LIBRARY})
========================================================================
3 编译和运行Boost Test库
动态库【Boost 库】【我们在前面的预备小节已经对Boost进行了介绍,就是在这里笔者遇到了不少编译问题】【动态库的Boost库的编译,稍微有一点复杂,具体可以参考官网的连接,这不是CLion的问题,
【首先你要下载一个boost的版本到本地,然后,这个本地地址保存在变量:$BOOST_ROOT,编译任何? ? ?Boost的东西,你需要在boost的文件夹下,添加一个子目录,同时在你的?#include 路径添加这个子目录路径,主要文件后缀一般是,*.hpp】?

【Franklin案】再把CLion的官网的图贴一下:?Quick CMake tutorial | CLion (jetbrains.com)![]() https://www.jetbrains.com/help/clion/quick-cmake-tutorial.html#boost
https://www.jetbrains.com/help/clion/quick-cmake-tutorial.html#boost
【Franklin案,我们下面接着2.1.1.1?Basic CMake project的项目继续做Boost test的项目构建】 、在2.1.1.1?Basic CMake project的基础上,
3.1 【步骤1】构建测试文件
继续在项目的一个test子目录里面,构建一个Cmake的小编译系统去编译boost库
- 新建calc.cpp和calc.h文件备用:
//
// Created by frank_sj on 2022/3/24.
//

#include "header_math.h"
int add_values (int a, int b)
{
    return a+b;
}
calc.cpp 如上,就是做了一个简单的加法的函数
//
// Created by frank_sj on 2022/4/20.
//

#ifndef CMAKEDEMO_CALC_H
#define CMAKEDEMO_CALC_H
int add_values (int a, int b);
#endif //CMAKEDEMO_CALC_H
calc.h 如上,做了这个加法的函数声明:
- 构建一个【test】的子目录方便管理

?照着做,得到下面的结果?【注意,新建的文件不要勾选Add to targets,否则,无法插入模板】

- ?在【test/】文件夹下构建一个子目录下的CMakeList.txt 方便配置

【这时候,这个子目录下面的CMakeList是空的】 【我们需要关掉这个默认打开的文件】
【官网展示了一个用模板的方法,构建这个小编译系统的内容,现在下面建了一个目录,然后,在这个子目录里面去配置动态库】
在菜单选,【?click?Code | Insert Live Template】


?【上图,展示插入了一个CMakeList的模板给Boost库,这些都看看就好,都要修改的】?
然后,修改成如下的代码:【案,这是在子目录里面需要添加的代码】
set(Boost_USE_STATIC_LIBS ON) #enable dynamic linking
set (Boost_DEBUG ON)

set(BOOST_ROOT "C:/Boost/")
set(BOOST_LIBRARY_DIR "C:/Boost/lib")

message("Franklin Testing ---------------01-------------- ")


# search for unit_test_framework
find_package(Boost REQUIRED COMPONENTS unit_test_framework)

if(NOT Boost_FOUND)
     message("not found boost package")
else()
    message("found boost package")
    include_directories(${Boost_INCLUDE_DIR})
    LINK_DIRECTORIES(${CMAKE_LIBRARY_PATH})
  ## ADD_DEFINITIONS("-DHAS_BOOST")

    message("includes: ${Boost_INCLUDE_DIRS}") # 这个可以打印出值来
    message("libs: ${Boost_LIBRARIES}") #这个变量在windows下找不到,为空
endif()
【案,这种方法比较方便比较复杂的系统进行管理,这样可以把不同的功能的库放置在不同的子目录下面,上面的文件我们加载了一个boost的静态库声明,也就是我们先要准备boost test的静态库,准备的方法在后面解决编译的部分说明了这里不累述。然后,已经我们boost的生成的地址,这里我们用migwin+x86+64编译的库的地址是c:/boost/,我们指定好地址和库的头文件位置,然后,调用find_package的方法去寻找我们需要的unit_test_framework库,这里REQUIRED的参数是测试等级的定义,后面比较好理解,找到了库就设定到他的位置,否则报错】
- 测试工具分为"WARN”,“CHECK"和"REQUIRE"三个等级。“CHECK"与"REQUIRE"差别为:前者即使失败,也仍然继续;后者则认为是必须的,为严重错误,直接退出当前测试。
【加了子目录,就需要再添加一个子目录说明,在根目录的CMakeList.txt里面】
add_subdirectory(test)【案,test是刚才增加的子目录】

?做完CMakeList的修改后,

项目的目录结构如上,这时候,我们需要?【重新加载CMake项目】这时候会已经我们写的CMakeList.txt文件进行预编译,生成makefile,然后,用编译器MigWin进行编译,这里回出现很多编译问题,所有的问题都详细记录在后面的章节【为了保持行文连续,这里先跳过】:

?一个成功的环境预编译结果如下:
"D:\Program Files\JetBrains\CLion 2022.1\bin\cmake\win\bin\cmake.exe" -DCMAKE_BUILD_TYPE=Debug "-DCMAKE_MAKE_PROGRAM=D:/Program Files/JetBrains/CLion 2022.1/bin/ninja/win/ninja.exe" -G Ninja -S D:\BaiduNetdiskWorkspace\3DStructure\StereoCalibrationClion\CmakeDemo -B D:\BaiduNetdiskWorkspace\3DStructure\StereoCalibrationClion\CmakeDemo\cmake-build-debug
frank testing
Franklin Testing ---------------01--------------?
-- Found Boost 1.78.0 at C:/Boost/lib/cmake/Boost-1.78.0
-- ? Requested configuration: QUIET REQUIRED COMPONENTS unit_test_framework
-- BoostConfig: find_package(boost_headers 1.78.0 EXACT CONFIG REQUIRED QUIET HINTS C:/Boost/lib/cmake)
-- Found boost_headers 1.78.0 at C:/Boost/lib/cmake/boost_headers-1.78.0
-- BoostConfig: find_package(boost_unit_test_framework 1.78.0 EXACT CONFIG REQUIRED QUIET HINTS C:/Boost/lib/cmake)
-- Found boost_unit_test_framework 1.78.0 at C:/Boost/lib/cmake/boost_unit_test_framework-1.78.0
-- Boost toolset is mgw8 (GNU 8.1.0)
-- Scanning C:/Boost/lib/cmake/boost_unit_test_framework-1.78.0/libboost_unit_test_framework-variant*.cmake
-- ? Including C:/Boost/lib/cmake/boost_unit_test_framework-1.78.0/libboost_unit_test_framework-variant-mgw8-mt-d-x32-1_78-static.cmake
-- ? [ ] libboost_unit_test_framework-mgw8-mt-d-x32-1_78.a
-- ? Including C:/Boost/lib/cmake/boost_unit_test_framework-1.78.0/libboost_unit_test_framework-variant-mgw8-mt-d-x64-1_78-shared.cmake
-- ? [ ] libboost_unit_test_framework-mgw8-mt-d-x64-1_78.dll.a
-- ? Including C:/Boost/lib/cmake/boost_unit_test_framework-1.78.0/libboost_unit_test_framework-variant-mgw8-mt-x32-1_78-static.cmake
-- ? [ ] libboost_unit_test_framework-mgw8-mt-x32-1_78.a
-- ? Including C:/Boost/lib/cmake/boost_unit_test_framework-1.78.0/libboost_unit_test_framework-variant-mgw8-mt-x64-1_78-shared.cmake
-- ? [ ] libboost_unit_test_framework-mgw8-mt-x64-1_78.dll.a
-- ? Including C:/Boost/lib/cmake/boost_unit_test_framework-1.78.0/libboost_unit_test_framework-variant-mgw8-mt-x64-1_78-static.cmake
-- ? [x] libboost_unit_test_framework-mgw8-mt-x64-1_78.a
-- Adding boost_unit_test_framework dependencies: headers
found boost package
includes: C:/Boost/include/boost-1_78
libs: Boost::unit_test_framework
-- Configuring done
-- Generating done
-- Build files have been written to: D:/BaiduNetdiskWorkspace/3DStructure/StereoCalibrationClion/CmakeDemo/cmake-build-debug[已完成]
?环境做好后,我们可以对boost test相关的测试案例进行编写,然后,再编译exe的测试文件执行。
?3.2?【步骤2】构建一个boost test的测试案做完例和主程序
3.2.1 构建boost Unit test
- 下载boost test【参考:资源小节】
- 在【boost_1_78_0\tools\build\src\engine】下,执行【build.sh gcc】
【Franklin案,笔者用微软的windows PowerShell】执行命令格式:
boost_1_78_0\tools\build\src\engine> .\build.bat gcc【Franklin案,在根目录下执行bootstrap.bat gcc】 结果是一样的。
FrankDeg Enter to Build.bat
Frank StartEnter
FrankClearError
Test_Empty
FrankClearError
FrankClearError
FrankClearError
FrankClearError
FrankClearError
Test_Empty
FrankClearError
FrankClearError
###
### Using 'gcc' toolset.
###D:\BaiduNetdiskWorkspace\3DStructure\StereoCalibrationClion\boost_1_78_0\tools\build\src\engine>"g++" -x c++ -std=c++11 -s -O3 -o b2.exe -D_GNU_SOURCE ? -DNDEBUG ?builtins.cpp class.cpp command.cpp compile.cpp constants.cpp cwd.cpp debug.cpp debugger.cpp execcmd.cpp execnt.cpp execunix.cpp filent.cpp filesys.cpp fileunix.cpp frames.cpp function.cpp glob.cpp hash.cpp hcache.cpp hdrmacro.cpp headers.cpp jam.cpp jamgram.cpp lists.cpp make.cpp make1.cpp md5.cpp mem.cpp modules.cpp native.cpp object.cpp option.cpp output.cpp parse.cpp pathnt.cpp pathsys.cpp pathunix.cpp regexp.cpp rules.cpp scan.cpp search.cpp jam_strings.cpp startup.cpp subst.cpp sysinfo.cpp timestamp.cpp variable.cpp w32_getreg.cpp modules/order.cpp modules/path.cpp modules/property-set.cpp modules/regex.cpp modules/sequence.cpp modules/set.cpp
'"g++"' 不是内部或外部命令,也不是可运行的程序
或批处理文件。D:\BaiduNetdiskWorkspace\3DStructure\StereoCalibrationClion\boost_1_78_0\tools\build\src\engine>dir *.exe
?驱动器 D 中的卷是 Data
?卷的序列号是 DA67-8C75?D:\BaiduNetdiskWorkspace\3DStructure\StereoCalibrationClion\boost_1_78_0\tools\build\src\engine 的目录
2022/04/20 ?16:11 ? ? ? ? ? 530,944 b2.exe
2022/04/20 ?16:11 ? ? ? ? ? 530,944 bjam.exe
? ? ? ? ? ? ? ?2 个文件 ? ? ?1,061,888 字节
? ? ? ? ? ? ? ?0 个目录 108,444,409,856 可用字节D:\BaiduNetdiskWorkspace\3DStructure\StereoCalibrationClion\boost_1_78_0\tools\build\src\engine>copy /b .\b2.exe .\bjam.exe
已复制 ? ? ? ? 1 个文件。
生成命令如上:
- 生成执行文件
boost_1_78_0\tools\build\src\engine>copy /b .\b2.exe .\bjam.exe
- 把这两个生成的文件,拷贝到boost的根目录:
- 在根目录下,执行【bjam "toolset=gcc" install】
boost b2/bjam 参数说明_章志强的博客-CSDN博客_.\b2 boost
https://blog.csdn.net/zhangzq86/article/details/90030094
【Franklin案,要提高编译效率,需要了解一下上述命令的其他可选参数,笔者这个编译安装的过程非常慢,我是等了半天才完成,原因是采用了参数install? 而不是stage,install 增加了生成头文件的时间,编译选项address-model没有选择,会同时编译64和32的库,也会增加时间。】
【Franklin案,同时,由于link参数没有指定,这样造成生成的是静态库,如需生成动态库,需要加 link=shared的编译设置】
命令会在【C:\Boost\lib】下产生mgw8的库文件。
?【Franklin案,这些生成的boost库里面有我们本章目标:boost Unit test 所需要的测试框架】
?贴一下完成最后的几句话:
common.copy C:\Boost\lib\cmake\boost_unit_test_framework-1.78.0\libboost_unit_test_framework-variant-mgw8-mt-x64-1_78-static.cmake
bin.v2\libs\test\build\gcc-8\release\link-static\threading-multi\visibility-hidden\libboost_unit_test_framework-variant-mgw8-mt-x64-1_78-static.cmake
已复制         1 个文件。
gcc.compile.c++ bin.v2\libs\coroutine\build\gcc-8\debug\address-model-32\link-static\threading-multi\visibility-hidden\windows\stack_traits.o
gcc.archive bin.v2\libs\coroutine\build\gcc-8\debug\address-model-32\link-static\threading-multi\visibility-hidden\libboost_coroutine-mgw8-mt-d-x32-1_78.a
boost-install.generate-cmake-variant- bin.v2\libs\coroutine\build\gcc-8\debug\address-model-32\link-static\threading-multi\visibility-hidden\libboost_coroutine-variant-mgw8-mt-d-x32-1_78-static.cmake
common.copy C:\Boost\lib\libboost_coroutine-mgw8-mt-d-x32-1_78.a
bin.v2\libs\coroutine\build\gcc-8\debug\address-model-32\link-static\threading-multi\visibility-hidden\libboost_coroutine-mgw8-mt-d-x32-1_78.a
已复制         1 个文件。
common.copy C:\Boost\lib\cmake\boost_coroutine-1.78.0\libboost_coroutine-variant-mgw8-mt-d-x32-1_78-static.cmake
bin.v2\libs\coroutine\build\gcc-8\debug\address-model-32\link-static\threading-multi\visibility-hidden\libboost_coroutine-variant-mgw8-mt-d-x32-1_78-static.cmake
已复制         1 个文件。
...failed updating 2 targets...
...skipped 10 targets...
...updated 19053 targets...
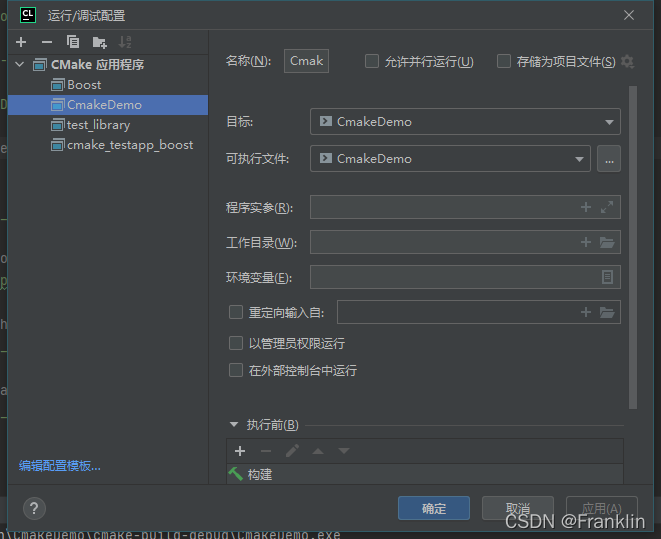
3.2.2 先构建一个运行的主程序:
?【选择,上图内的【编辑和配置】,打开后如下图:】
?3.2.3?构建一个Boost test的测试案例:
目录结构如下:
CLion 对boost的支持还是不错的,全部多少自动填充
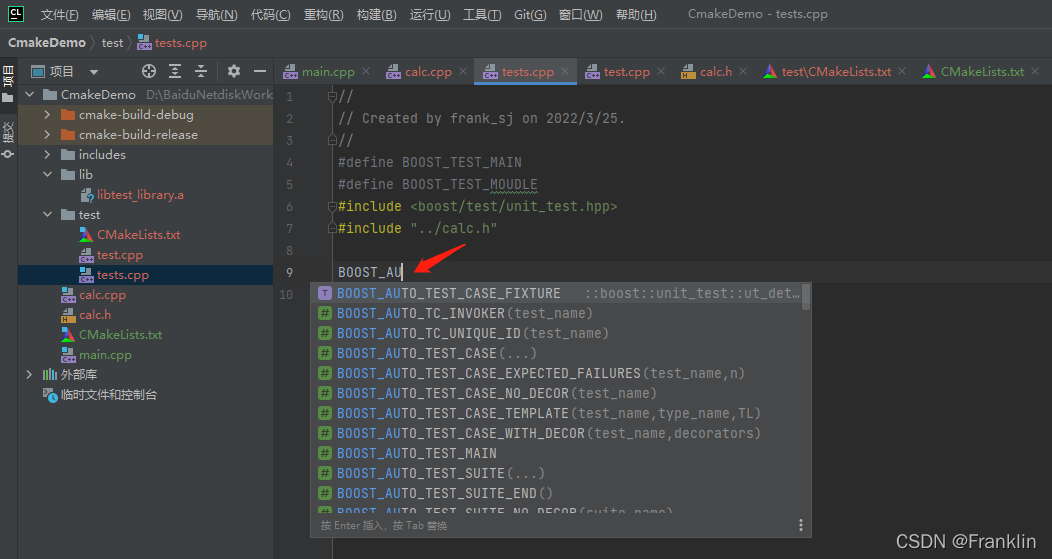
这里测试案例贴出来:?
//
// Created by frank_sj on 2022/3/25.
//
#define BOOST_TEST_MAIN
#define BOOST_TEST_MODULE example
#include <boost/test/unit_test.hpp>
#include "../calc.h"
BOOST_AUTO_TEST_SUITE(BoostDemo)
BOOST_AUTO_TEST_CASE(add_0)
{
BOOST_CHECK(add_values(0,0) == 2);
BOOST_CHECK(add_values(-5,5) == 0);
}
BOOST_AUTO_TEST_CASE(addvalue_negpos)
{
BOOST_CHECK(add_values(-5,10) == 5);
BOOST_CHECK(add_values(-10,5) == -5);
BOOST_CHECK(add_values(5,-10) == -5);
}
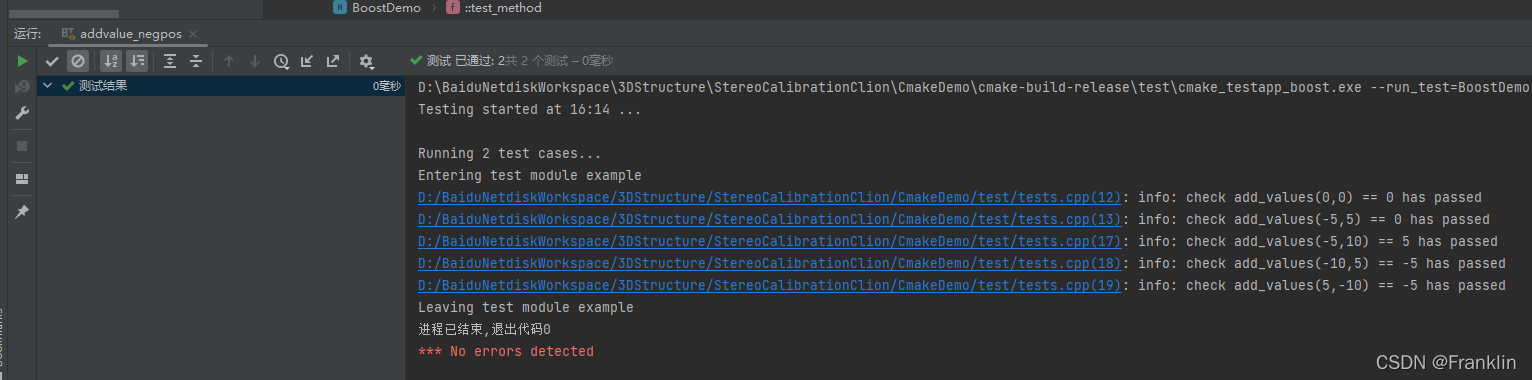
BOOST_AUTO_TEST_SUITE_END()【Franklin案,这里是做了一个单元测试的集BoostDemo,然后里面有两个测试案例,一个叫add_0,一个叫addvalue_negpos,这两个单元测试案例,就是测试一下刚才我们在前面定义的的计算函数的正确性的】?
?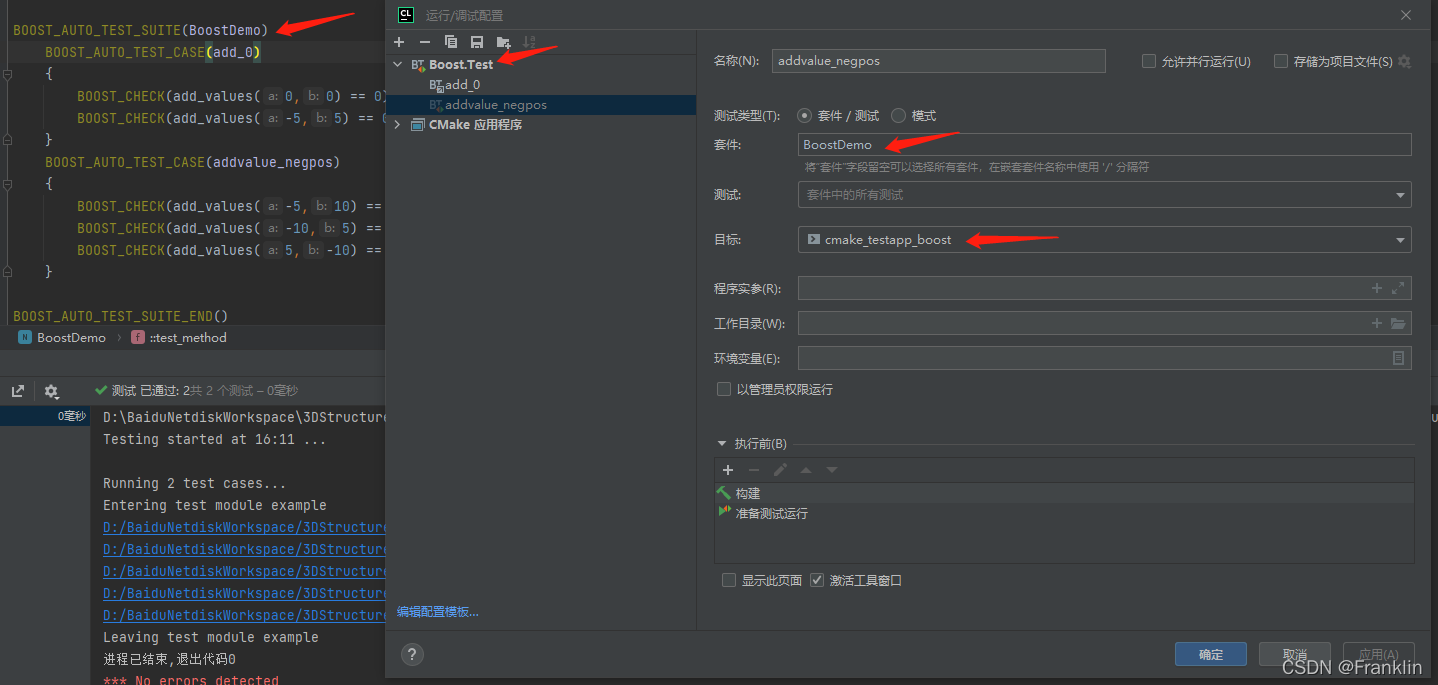
?【CLION的boost配置已经有预定义的配置,所以写好之后,自动会出现,就按照上面这个配置思路,配置一下,运行的时候选取正确的执行文件即可】

?【正确运行结果如下】
?如果修改一下定义,故意搞个错的结果

Boost 测试系统会自动报错,并指出哪里的错误:?
【以上,就是实现了一个简单的Boost Unit Test的项目】
2.2 CMake 编译系统知识
2.2.1?cmake-commands
-
?include_directories【这段说明放在后面参考的小节里面了】
- ?get_property
CMake 手册详解(十七) - SirDigit - 博客园 (cnblogs.com)![]() https://www.cnblogs.com/coderfenghc/archive/2012/07/29/2614253.htmlget_property可参考上面这篇博文的介绍。
https://www.cnblogs.com/coderfenghc/archive/2012/07/29/2614253.htmlget_property可参考上面这篇博文的介绍。
2.2.2?CMakeLists的调试
-
set (Boost_DEBUG ON)
打开Debug选项后, 有关Boost的信息更多了

2.3?CMake的默认选项:
4 Vcpkg
?Vcpkg 可帮助您在 Windows、 Linux 和 MacOS 上管理 C 和 C++ 库
4.1 Vcpkg的安装:
【两种方法一种是命令行窗口进行安装,一种用github 桌面的版本安装】【笔者两个都做了尝试,还是命令行的方式比较简洁。桌面版本的方式比较繁复然后容易出错】
【案,Vcpkg的官网安装如下,就是git clone,然后执行他的一个bat文件,这个bat文件其实就是生成一个exe文件,后面我列一下步骤】
> git clone https://github.com/microsoft/vcpkg
> .\vcpkg\bootstrap-vcpkg.bat
?【按照官网的方法,就是进入CMD然后安装】
?先执行:
> git clone https://github.com/microsoft/vcpkgCloning into 'vcpkg'...
remote: Enumerating objects: 145974, done.
remote: Counting objects: 100% (94/94), done.
remote: Compressing objects: 100% (21/21), done.
Receiving objects: 100% (145974/145974), 54.73 MiB | 54.00 KiB/s, done.
Resolving deltas: 100% (91359/91359), done.
Updating files: 100% (8697/8697), done.?【从github clone这个模块,速度真的是慢】
然后,执行:
.\vcpkg\bootstrap-vcpkg.bat【案,因为是下载exe文件,所以,一定要把你的病毒防护墙关掉,否则会出现下面的问题:】?
Downloading https://github.com/microsoft/vcpkg-tool/releases/download/2022-03-09/vcpkg.exe -> D:\BaiduNetdiskWorkspace\vcpkg-master\vcpkg\vcpkg.exe...While calling Windows API function WinHttpSendRequest got error 0x00002EE2:
The operation timed out
D:\BaiduNetdiskWorkspace\vcpkg-master\vcpkg\scripts\bootstrap.ps1 : Downloading vcpkg.exe failed. Please check your int
ernet connection, or consider downloading a recent vcpkg.exe from https://github.com/microsoft/vcpkg-tool with a browse
r.
所在位置 行:1 字符: 4
+ & {& 'D:\BaiduNetdiskWorkspace\vcpkg-master\vcpkg\scripts\bootstrap.p ...
+ ? ?~~~~~~~~~~~~~~~~~~~~~~~~~~~~~~~~~~~~~~~~~~~~~~~~~~~~~~~~~~~~~~~~~~
? ? + CategoryInfo ? ? ? ? ?: NotSpecified: (:) [Write-Error], WriteErrorException
? ? + FullyQualifiedErrorId : Microsoft.PowerShell.Commands.WriteErrorException,bootstrap.ps1ScriptHalted
所在位置 D:\BaiduNetdiskWorkspace\vcpkg-master\vcpkg\scripts\bootstrap.ps1:60 字符: 5
+ ? ? throw
+ ? ? ~~~~~
? ? + CategoryInfo ? ? ? ? ?: OperationStopped: (:) [], RuntimeException
? ? + FullyQualifiedErrorId : ScriptHalted
?去掉防火墙后,就可以下载成了:
Downloading https://github.com/microsoft/vcpkg-tool/releases/download/2022-03-09/vcpkg.exe -> D:\BaiduNetdiskWorkspace\vcpkg-master\vcpkg\vcpkg.exe... done.
Validating signature... done.

Telemetry
---------
vcpkg collects usage data in order to help us improve your experience.
The data collected by Microsoft is anonymous.
You can opt-out of telemetry by re-running the bootstrap-vcpkg script with -disableMetrics,
passing --disable-metrics to vcpkg on the command line,
or by setting the VCPKG_DISABLE_METRICS environment variable.

Read more about vcpkg telemetry at docs/about/privacy.md
【这样,Vcpkg就安装好了】
对于github 桌面版本的方法,笔者就省略了。
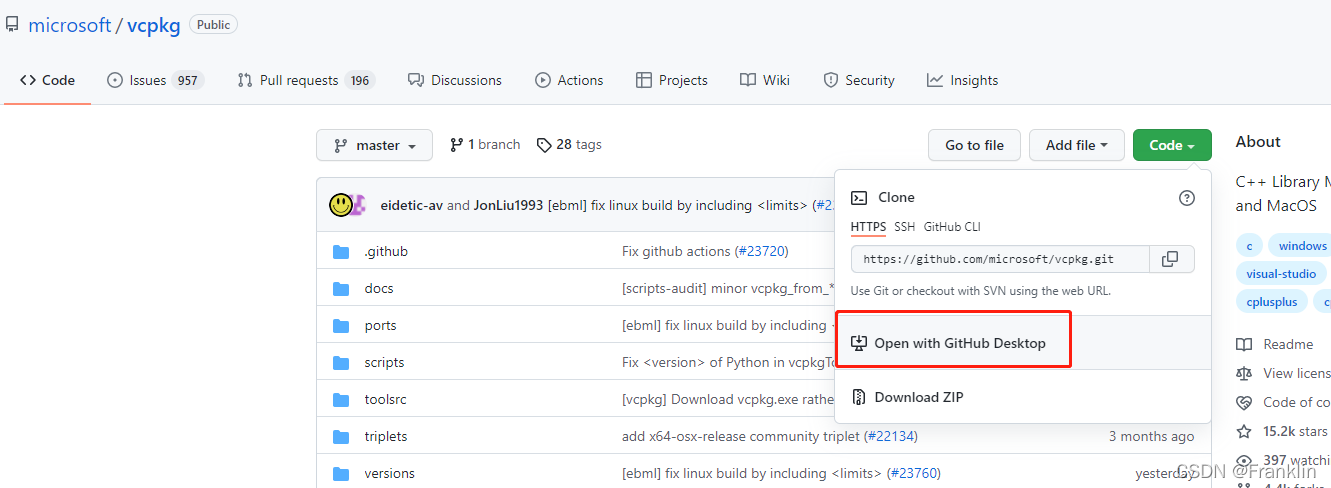
Installing Vcpkg
- Clone?vcpkg?into a directory that won’t bother you in your day to day life
- For me, that would be?
C:\Users\maste\Documents\GitHub\vcpkg - Use?
git clone https://github.com/microsoft/vcpkg.git?or GitHub desktop
- For me, that would be?
- Run the Vcpkg bootstrap script

- Windows:?
"./bootstrap-vcpkg" -disableMetrics - Unix:?
./bootstrap-vcpkg.sh -disableMetrics
- Windows:?
- Modify environment variables
- Add the vcpkg cloned directory to PATH
- On Windows, use Windows search for “envir”
- On Linux, open your?
.bashrc?file and add?export PATH=$PATH:~/vcpkg?to your?.bashrc?file
- Set?
VCPKG_DEFAULT_TRIPLET?to?x64-windows?on Windows, or your computers triplet- Valid architectures are: x86, x64, arm, arm64 and wasm32.
- Valid OS names are?
'windows', 'linux', 'macos'?(I’m unsure about the macos part)
- Add the vcpkg cloned directory to PATH
- Enable vcpkg packages to be used in VS/MSBuild:
vcpkg integrate install- copy the path to vcpkg.cmake for use later
4.2?CLion 中使用 vcpkg
?CLion 中使用 vcpkg
打开 Toolchains 设置 (File > Settings on Windows and Linux, CLion > Preferences on macOS), 并打开 CMake 设置 (Build, Execution, Deployment > CMake)。 最后在?
CMake options?中添加以下行:-DCMAKE_TOOLCHAIN_FILE=[vcpkg root]/scripts/buildsystems/vcpkg.cmake遗憾的是,您必须手动将此选项加入每个项目配置文件中。
4.3 install boost-test 【利用 vcpkg的命令】
- depend-info 查询编译的互相依赖关系:
D:\BaiduNetdiskWorkspace\vcpkg-master\vcpkg>vcpkg depend-info boost-test 
【案,windows command 和 windows Powershell的命令操作格式不同,一个是DOS的方式,一个是UNIX的方式】下面是powershell的模式:
PS D:\BaiduNetdiskWorkspace\vcpkg-master\vcpkg> ./vcpkg depend-info boost-test
5 BAT基础(略)
6 Ninjia(略)
阐述:
1 先构建Opencv的C++编译系统
本文实例步骤:
-------------------------------------------------------------------------------------------------------------------
2 在Clion里面配置opencv的编译环境
2.1 新建一个编译C++的项目:

?【案,这时候系统会自动打开:README.md makedown的标记语言文件文件,如果有的话。
同时会,自动开始编译cpp的项目文件:】
[案,既然会自动开始编译,所以,我们在一开始的源码里面,应该先设定编项目的路径]
2.2 进行编译器配置:
在[ File/Settings】里面打开设定,
?
?这时候,打开[Build,Execution,Deployment】这时候,
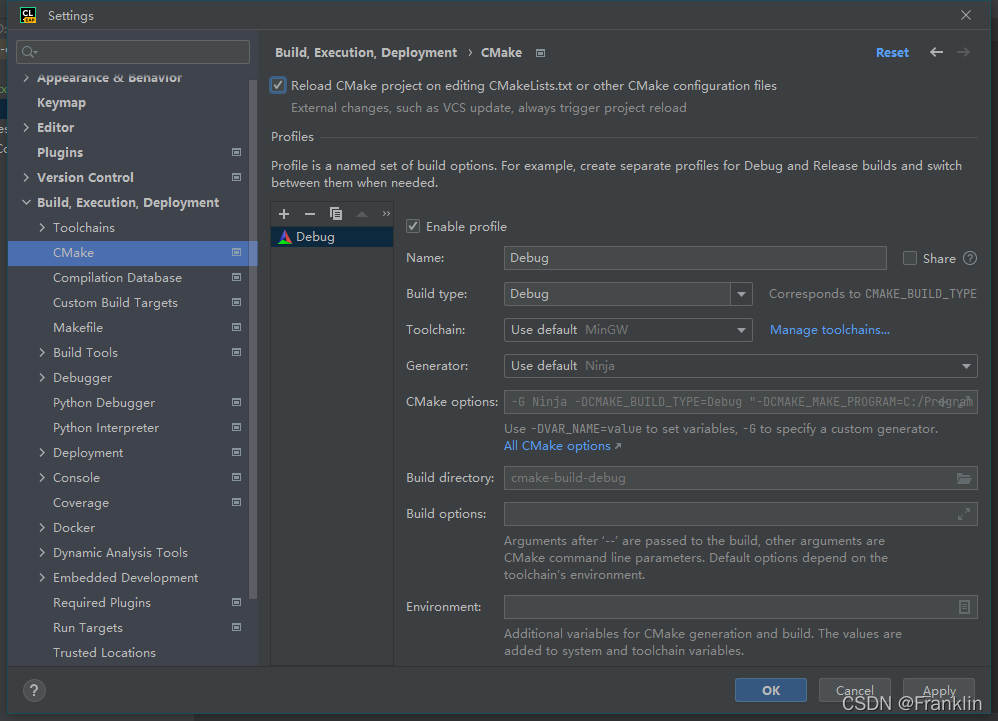
系统会自动推荐你一个工具链MinGW,【案,也许笔者之前已经安装了】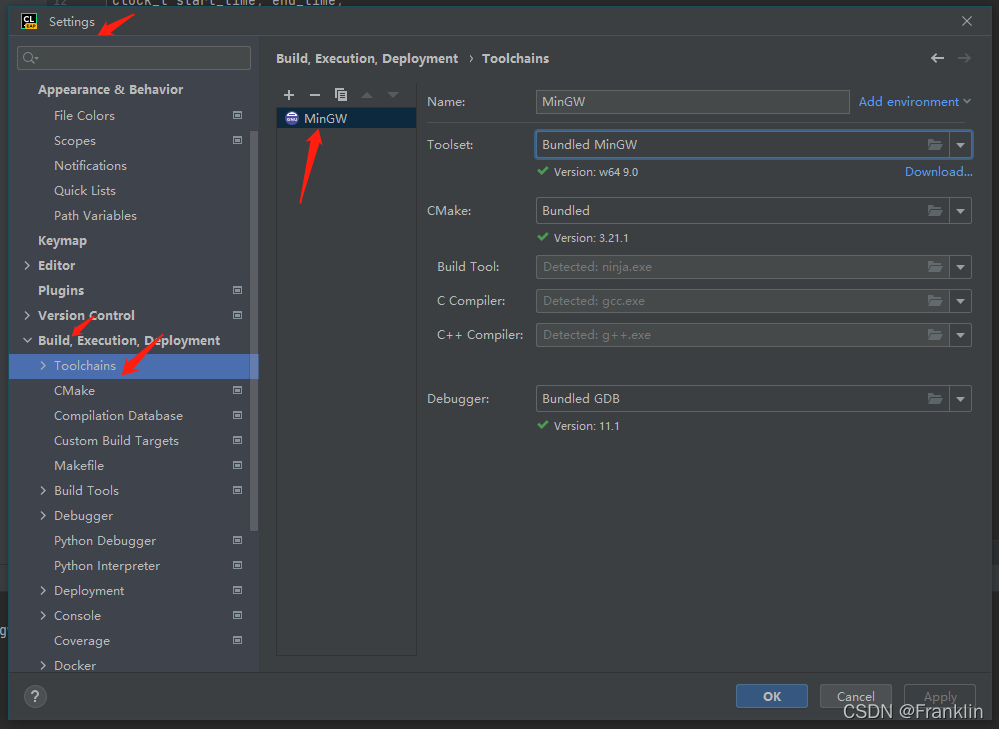
应该可以直接【Download...】但是,这里笔者还是选择之前下载的版本地址,直接配置安装。?
选择好后,系统会自动对工具链进行探测:Detecting...
 ?找到后,会显示出来:

?2.1.1.2?Basic CMake project
编译出现的问题:
1 Clion:
1.1 构建Boost的时候出现的错误:
依据Clion的官网教程,配置一个Boost的动态库:
CMakeLists.txt 设定如下:
set(Boost_USE_STATIC_LIBS OFF) #enable dynamic linking

# search for unit_test_framework
find_package(Boost REQUIRED COMPONENTS unit_test_framework)

include_directories(${Boost_INCLUDE_DIR})

# create a cmake_testapp_boost target from test.cpp
add_executable(cmake_testapp_boost tests.cpp)

# link Boost libraries to the new target
target_link_libraries(cmake_testapp_boost ${Boost_LIBRARIES})

# link Boost with code library
target_link_libraries(cmake_testapp_boost test_library)
报错如下:
====================[ Build | CmakeDemo | Debug ]===============================
"C:\Program Files\JetBrains\CLion 221.5080.1\bin\cmake\win\bin\cmake.exe" --build D:\CmakeDemo\cmake-build-debug --target CmakeDemo
[0/1] Re-running CMake...
CMake Error at C:/Program Files/JetBrains/CLion 221.5080.1/bin/cmake/win/share/cmake-3.21/Modules/FindPackageHandleStandardArgs.cmake:230 (message):
? Could NOT find Boost (missing: Boost_INCLUDE_DIR unit_test_framework)
Call Stack (most recent call first):
? C:/Program Files/JetBrains/CLion 221.5080.1/bin/cmake/win/share/cmake-3.21/Modules/FindPackageHandleStandardArgs.cmake:594 (_FPHSA_FAILURE_MESSAGE)
? C:/Program Files/JetBrains/CLion 221.5080.1/bin/cmake/win/share/cmake-3.21/Modules/FindBoost.cmake:2345 (find_package_handle_standard_args)
? test/CMakeLists.txt:4 (find_package)
【案,这里应该是boost没找到,需要配置一下boost的路径】?
【解决】在CMakeLists里面添加boost的绝对路径
set(BOOST_ROOT "D:/boost_1_78_0")
-----------------------------------------------------------------------------------------------------------------------?
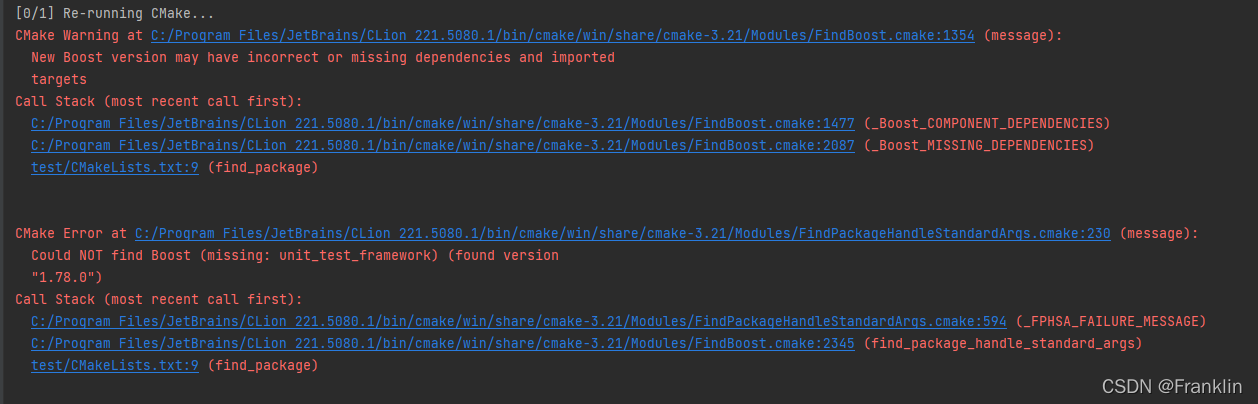
?1.2 构建Boost UTS的时候报错:
unit_test_framework
CMake Warning at C:/Program Files/JetBrains/CLion 221.5080.1/bin/cmake/win/share/cmake-3.21/Modules/FindBoost.cmake:1354 (message):
? New Boost version may have incorrect or missing dependencies and imported
? targets
Call Stack (most recent call first):
? C:/Program Files/JetBrains/CLion 221.5080.1/bin/cmake/win/share/cmake-3.21/Modules/FindBoost.cmake:1477 (_Boost_COMPONENT_DEPENDENCIES)
? C:/Program Files/JetBrains/CLion 221.5080.1/bin/cmake/win/share/cmake-3.21/Modules/FindBoost.cmake:2087 (_Boost_MISSING_DEPENDENCIES)
? test/CMakeLists.txt:9 (find_package)
-- [ C:/Program Files/JetBrains/CLion 221.5080.1/bin/cmake/win/share/cmake-3.21/Modules/FindBoost.cmake:2279 ] Searching for UNIT_TEST_FRAMEWORK_LIBRARY_DEBUG: boost_unit_test_framework-mgw8-mt-d-1_78;boost_unit_test_framework-mgw8-mt-d;boost_unit_test_framework-mgw8-mt-d;boost_unit_test_framework-mt-d-1_78;boost_unit_test_framework-mt-d;boost_unit_test_framework-mt-d;boost_unit_test_framework-mt;boost_unit_test_framework
CMake Error at C:/Program Files/JetBrains/CLion 221.5080.1/bin/cmake/win/share/cmake-3.21/Modules/FindPackageHandleStandardArgs.cmake:230 (message):
? Could NOT find Boost (missing: unit_test_framework) (found version
? "1.78.0")
Call Stack (most recent call first):
? C:/Program Files/JetBrains/CLion 221.5080.1/bin/cmake/win/share/cmake-3.21/Modules/FindPackageHandleStandardArgs.cmake:594 (_FPHSA_FAILURE_MESSAGE)
? C:/Program Files/JetBrains/CLion 221.5080.1/bin/cmake/win/share/cmake-3.21/Modules/FindBoost.cmake:2345 (find_package_handle_standard_args)
? test/CMakeLists.txt:9 (find_package)
-- Configuring incomplete, errors occurred!
【案,这个问题有一定复杂,就是要在CLion里面,通过CMake系统构建一个Boost的Unit test的frameworks框架】
【解决】
【解决思路,有3个:
1 利用微软的VCPKG来安装boost
2 利用Boost官网的建议来安装
3在CLion里面构建Makelist直接进行编译】
?方案1 利用微软的VCPKG来安装boost?
【案,引用VCPKG的原因,是因为上面这个问题的解决办法,网上搜索的一篇博客说这个能解决,而VCPKG又是微软的组名的安装包管理工具,所以,也想尝试一下,所以就那这个工具看看能不能解决这个问题就,在vcpk的github的官网上,有如何用vcpkg来安装boost的说明,博客里面的方法,我贴在下面,步骤也是在下面】
Some one suggested to use vcpkg mananger?https://github.com/microsoft/vcpkg
And So I gave it a try, I faced couple of issues but after that It worked so what I did is:
install vcpkg?https://github.com/microsoft/vcpkg?(Follow the instructions)
You migh have the error when setting up (Fatal error, could not do post-extract operation renaming 'File' to 'Different name' ) You need to rename the manually.【这个在介绍vcpkg的时候讲过了,这里略过,】install boost-test lib (you will see instruction on how to install packages) on the home page of vcpkg【第二步,我我查了vcpkg的官网,里面只有对所有安装包的大致说明,然后,在仔细查询了一下boost的其他安装说明,在Vs的一份帮助介绍里面,提到了用vcpkg来协助visual studio的boost的测试框架的安装,步骤2的细节我写到下面的小节里面:】
you need to set these variables for cmake:
-DVCPKG_TARGET_TRIPLET=x86-windows (x86-windows in my case)
"-DCMAKE_TOOLCHAIN_FILE='root to vcpkg'/scripts/buildsystems/vcpkg.cmake" (in my case root to vcpkg = F:/Files/vcpkg
so the variable will be:
"-DCMAKE_TOOLCHAIN_FILE=F:/Files/vcpkg/scripts/buildsystems/vcpkg.cmake"in your test/cmakelists.txt file you need to add the following:
find_package (Boost REQUIRED COMPONENTS unit_test_framework)
target_link_libraries (your_test_exe Boost::unit_test_framework)
in my case I have my test/cmakelists.txt like this:
cmake_minimum_required(VERSION 3.15)
project(My_String)set(CMAKE_CXX_STANDARD 17)
set(CMAKE_CXX_FLAGS "--coverage" )
set(SOURCE_FILES MyStringTest.cpp)
set(Boost_DEBUG ON)find_package (Boost REQUIRED COMPONENTS unit_test_framework)
include_directories(../Src)
add_executable (Boost_Tests_run ${SOURCE_FILES})
target_link_libraries (Boost_Tests_run Boost::unit_test_framework)
- In your test.cpp you need to include:
#include <boost/test/included/unit_test.hpp> as it is!
in addition to the classes you are testing.
in my case it looks like this:
#define BOOST_TEST_DYN_LINK
#define BOOST_TEST_MAIN
#define BOOST_TEST_MODULE MyString_Test_Suite#include
#include "MyString.h"
#include "MyString.cpp"
#include <boost/test/included/unit_test.hpp>After more than a week of googling, trial and error this finally worked for me!
Hope it helps if any one face the same issue.
Thank you raffienficiaud for your support!
- ?步骤1 安装Vcpkg实践
首先,参照本章的【4.1 Vcpkg的安装】
笔者安装如下:包含,安装好的的vcpkg.exe文件
 D:\BaiduNetdiskWorkspace\vcpkg-master\vcpkg 的目录

2022/03/28 15:51 4,540,304 vcpkg.exe- 步骤2,用vcpkg安装boost-test 包
本文,【参考3里面有链接:】这里贴出来一部分,这里install boost for VC有两种选择,动态库或者静态库,本节用编译静态库做一个实践的例子。

?【案,如果仔细研究vcpkg的用法,估计要再开两个贴,在参考里面我贴出了链接,github上的md文件比较详细】
不过,我还是贴一下vcpkg的command的列表,估计,方便哪个哥们以后可以参考一下,这个列表包括vcpkg的commands和options的参数表,都放在【参考】小结了。
Commands:
  vcpkg search [pat]              Search for packages available to be built
  vcpkg install <pkg>...          Install a package
先用[search]看一下,boost的可以安装的情况。
D:\BaiduNetdiskWorkspace\vcpkg-master\vcpkg>vcpkg search boost-test
boost-test               1.78.0           Boost test module
The result may be outdated. Run `git pull` to get the latest results.

If your port is not listed, please open an issue at and/or consider making a pull request:
    https://github.com/Microsoft/vcpkg/issues
然后,可以让vcpkg下载下来:
D:\BaiduNetdiskWorkspace\vcpkg-master\vcpkg>vcpkg install boost-test?【或者,强调动态或者静态库,参数的定义可看参考部分】
D:\BaiduNetdiskWorkspace\vcpkg-master\vcpkg>vcpkg install boost-test:x64-windows-static在这个过程里面,会遇到不少其他问题,大多数是工具库的问题,vcpkg 执行文件大多数都可以处理,只是有一些复杂的要手动做一下。
- 问题1:缺cmake,自动直接下载:
Computing installation plan... A suitable version of cmake was not found (required v3.22.2). Downloading portable cmake v3.22.2... Downloading cmake... https://github.com/Kitware/CMake/releases/download/v3.22.2/cmake-3.22.2-windows-i386.zip -> D:\BaiduNetdiskWorkspace\vcpkg-master\vcpkg\downloads\cmake-3.22.2-windows-i386.zip Extracting cmake... - 问题2:缺?Visual Studio instance就,需要手动下载
? * vcpkg-cmake[core]:x64-windows -> 2022-01-19
Additional packages (*) will be modified to complete this operation.
Error: in triplet x64-windows: Unable to find a valid Visual Studio instance
Could not locate a complete Visual Studio instance
【案,笔者手动下了社区版本的vs2022解决了这个问题】
- ?问题3:缺7zip,也是手动??
A suitable version of 7zip was not found (required v21.7.0). Downloading portable 7zip v21.7.0...
Downloading 7zip...
? https://www.7-zip.org/a/7z2107-extra.7z -> D:\BaiduNetdiskWorkspace\vcpkg-master\vcpkg\downloads\7z2107-extra.7z
Error: Failed to download from mirror set:
https://www.7-zip.org/a/7z2107-extra.7z: WinHttpReceiveResponse() failed: 12002
File does not have the expected hash:
? ? ? ? ? ? ?url : [ https://www.7-zip.org/a/7z2107-extra.7z ]
? ? ? ?File path : [ D:\BaiduNetdiskWorkspace\vcpkg-master\vcpkg\downloads\7z2107-extra.7z.34296.part ]
? ?Expected hash : [ 648d894940bcc29951752d7a8fd18c770ee8d4fd944e17f1a52588e51ca8f58375ba48514538f2e1387786fd812bb86f75fd6bdd0892685cdcafb2989942c848 ]
? ? ?Actual hash : [ 8d94deca0bee95df6c2363e391f5803348e0bf81172953301b4e01517aa5be51e1e73412332a3bd5a37930908bb67a3a7ec1e1d5575999be19ae6cdc5b7412b5 ]
- ?问题4:没有更新版本原因:
D:\BaiduNetdiskWorkspace\vcpkg-master\vcpkg>git pull
remote: Enumerating objects: 280, done.
remote: Counting objects: 100% (187/187), done.

Receiving objects: 100% (280/280), 152.21 KiB | 40.00 KiB/s, done.
Resolving deltas: 100% (208/208), completed with 103 local objects.
From https://github.com/microsoft/vcpkg
   9ff4659a0..773516ecf  master     -> origin/master
Updating 9ff4659a0..773516ecf
Fast-forward
 ports/armadillo/portfile.cmake                     |   2 +-
 ports/armadillo/vcpkg.json                         |   2 +-
 ports/bullet3/portfile.cmake                       |   6 +-
 ports/bullet3/uwp-deltav-fix.patch                 |  26 --
 ports/bullet3/vcpkg.json                           |   4 +-
 ports/bullet3/windows-arm64-sse-fix.patch          |  27 --
 ports/directxmesh/portfile.cmake                   |  12 +-
D:\BaiduNetdiskWorkspace\vcpkg-master\vcpkg>vcpkg update Using local portfile versions. To update the local portfiles, use `git pull`. No packages need updating. - 问题5:镜像服务器无法访问,LICENSE文件无法访问的原因
?【案,这个原因,看到网上有不少解决办法,】
Starting package 1/157: boost-vcpkg-helpers:x64-windows
Building package boost-vcpkg-helpers[core]:x64-windows...
-- Installing: D:/BaiduNetdiskWorkspace/vcpkg-master/vcpkg/packages/boost-vcpkg-helpers_x64-windows/share/boost-vcpkg-helpers/boost-modular-headers.cmake
-- Installing: D:/BaiduNetdiskWorkspace/vcpkg-master/vcpkg/packages/boost-vcpkg-helpers_x64-windows/share/boost-vcpkg-helpers/usage
-- Downloading https://raw.githubusercontent.com/boostorg/boost/boost-1.78.0/LICENSE_1_0.txt -> boost_LICENSE_1_0.txt...[DEBUG] Feature flag 'binarycaching' unset
[DEBUG] Feature flag 'manifests' = off
[DEBUG] Feature flag 'compilertracking' unset
[DEBUG] Feature flag 'registries' unset
[DEBUG] Feature flag 'versions' unset
[DEBUG] Downloading https://raw.githubusercontent.com/boostorg/boost/boost-1.78.0/LICENSE_1_0.txt
[DEBUG] Download failed -- retrying after 1000 ms.
[DEBUG] Download failed -- retrying after 2000 ms.
[DEBUG] Download failed -- retrying after 4000 ms.
Error: Failed to download from mirror set:
https://raw.githubusercontent.com/boostorg/boost/boost-1.78.0/LICENSE_1_0.txt: WinHttpSendRequest() failed: 12007
https://raw.githubusercontent.com/boostorg/boost/boost-1.78.0/LICENSE_1_0.txt: WinHttpSendRequest() failed: 12007
https://raw.githubusercontent.com/boostorg/boost/boost-1.78.0/LICENSE_1_0.txt: WinHttpSendRequest() failed: 12007
https://raw.githubusercontent.com/boostorg/boost/boost-1.78.0/LICENSE_1_0.txt: WinHttpSendRequest() failed: 12007
Error: Building package boost-vcpkg-helpers:x64-windows failed with: BUILD_FAILED
?https://raw.githubusercontent.com/boostorg/boost/boost-1.74.0/boostcpp.jam
?
https://raw.githubusercontent.com/boostorg/boost/boost-1.74.0/LICENSE_1_0.txt
?【现在这两个文件,用VPN也无法下载,这两个地址是vcpkg默认的,应该也是可以更改,但是,尝试找了一下@vcpkg_download_distfile.cmake,里面复杂的编译系统定义,居然没有找到具体定义的地方,只能暂时作罢!】
【案,但是,如果在github上直接下载boost的完全的zip包,并且,解包以后再根目录下有这两个文件,如果,我把这两个文件copy到vcpkg的【vcpkg-master\vcpkg\downloads】的文件夹里】
【案,注意!!!一定要根据你目前boost的版本重新命名,原因是cmake的设计都是根据版本信息直接自动搞得】
[DEBUG] Downloading https://raw.githubusercontent.com/boostorg/boost/boost-1.78.0/LICENSE_1_0.txt
-- Downloading https://raw.githubusercontent.com/boostorg/boost/boost-1.78.0/boostcpp.jam -> boost-1.78.0-boostcpp.jam...
?【Franklin案,笔者这里就需要依据下载的boost版本号,重新命名一下】
![]()
?【Franklin案,然后,再执行安装的命令】唉,居然sometimes还有报错:
-- Downloading https://github.com/boostorg/type_index/archive/boost-1.78.0.tar.gz -> boostorg-type_index-boost-1.78.0.tar.gz...
[DEBUG] Feature flag 'binarycaching' unset
[DEBUG] Feature flag 'manifests' = off
[DEBUG] Feature flag 'compilertracking' unset
[DEBUG] Feature flag 'registries' unset
[DEBUG] Feature flag 'versions' unset
[DEBUG] Downloading https://github.com/boostorg/type_index/archive/boost-1.78.0.tar.gz
[DEBUG] Download failed -- retrying after 1000 ms.
[DEBUG] Download failed -- retrying after 2000 ms.
[DEBUG] Download failed -- retrying after 4000 ms.
【Franklin案,用迅雷直接把地址弄出来下载了】再复制到:downloads目录里面:顺利解决了问题,依此类推,后面好几次也是这样解决了。

?【最终,编译成功是这样的,可以作为参考:】
Building package boost-numeric-conversion[core]:x64-windows-static...
-- Downloading https://github.com/boostorg/numeric_conversion/archive/boost-1.78.0.tar.gz -> boostorg-numeric_conversion-boost-1.78.0.tar.gz...
-- Extracting source D:/BaiduNetdiskWorkspace/vcpkg-master/vcpkg/downloads/boostorg-numeric_conversion-boost-1.78.0.tar.gz
-- Using source at D:/BaiduNetdiskWorkspace/vcpkg-master/vcpkg/buildtrees/boost-numeric-conversion/src/ost-1.78.0-0d515e9a6d.clean
-- Copying headers
-- Copying headers done
-- Installing: D:/BaiduNetdiskWorkspace/vcpkg-master/vcpkg/packages/boost-numeric-conversion_x64-windows-static/share/boost-numeric-conversion/usage
-- Installing: D:/BaiduNetdiskWorkspace/vcpkg-master/vcpkg/packages/boost-numeric-conversion_x64-windows-static/share/boost-numeric-conversion/copyright
-- Performing post-build validation
-- Performing post-build validation done
Stored binary cache: C:\Users\frank_sj\AppData\Local\vcpkg\archives\80\809a7fbf5725cbbbee2221cb2eb367a926a77b2c5a054588a19dfd1a3ee26ee7.zip
Installing package boost-numeric-conversion[core]:x64-windows-static...
Elapsed time for package boost-numeric-conversion:x64-windows-static: 22.54 s
Starting package 19/19: boost-test:x64-windows-static
Building package boost-test[core]:x64-windows-static...
-- Downloading https://github.com/boostorg/test/archive/boost-1.78.0.tar.gz -> boostorg-test-boost-1.78.0.tar.gz...
-- Extracting source D:/BaiduNetdiskWorkspace/vcpkg-master/vcpkg/downloads/boostorg-test-boost-1.78.0.tar.gz
-- Using source at D:/BaiduNetdiskWorkspace/vcpkg-master/vcpkg/buildtrees/boost-test/src/ost-1.78.0-6361abf029.clean
-- Found external ninja('1.10.2').
-- Configuring x64-windows-static
-- Building x64-windows-static-dbg
-- Building x64-windows-static-rel
-- Copying headers
-- Copying headers done
-- Installing: D:/BaiduNetdiskWorkspace/vcpkg-master/vcpkg/packages/boost-test_x64-windows-static/share/boost-test/usage
-- Installing: D:/BaiduNetdiskWorkspace/vcpkg-master/vcpkg/packages/boost-test_x64-windows-static/share/boost-test/copyright
-- Performing post-build validation
-- Performing post-build validation done
Stored binary cache: C:\Users\frank_sj\AppData\Local\vcpkg\archives\1c\1c25564b7a6df03b9549bb681bf24db92c16e22f5187469a601474b66d075be3.zip
Installing package boost-test[core]:x64-windows-static...
Elapsed time for package boost-test:x64-windows-static: 2.83 minTotal elapsed time: 17.78 min
The package boost is compatible with built-in CMake targets:
? ? find_package(Boost REQUIRED [COMPONENTS <libs>...])
? ? target_link_libraries(main PRIVATE Boost::boost Boost::<lib1> Boost::<lib2> ...)
?最后生成的库,放的地址在【\vcpkg\packages\boost-test_x64-windows-static\lib】

?然后,vcpkg的编译默认选的是visutal station的编译器vc140.所以,编译后的包的名称为vc140.【案,对应Mgwin的编译系统,也许我们换个名字也是兼容的?】
【案,OK,这样就做好了用vcpkg + vc编译器 对boost-test的安装工作】
-------------------------------------------------------------------------------------------------------------------------------
【方案2,按照Clion的官网解决
上面的例子都是通过微软的visual station进行编译的,但是,Opencv等编译很多是通过mingwin的编译系统,所以,我们重新用CLION这个编译环境再试试看】
- 编译问题1:
- [ D:/Program Files/JetBrains/CLion 2022.1/bin/cmake/win/share/cmake-3.22/Modules/FindBoost.cmake:2069 ] _boost_LIBRARY_SEARCH_DIRS_DEBUG = "D:/BaiduNetdiskWorkspace/3DStructure/StereoCalibrationClion/boost_1_78_0/lib;D:/BaiduNetdiskWorkspace/3DStructure/StereoCalibrationClion/boost_1_78_0/stage/lib;D:/BaiduNetdiskWorkspace/3DStructure/StereoCalibrationClion/boost_1_78_0/lib;D:/BaiduNetdiskWorkspace/3DStructure/StereoCalibrationClion/boost_1_78_0/../lib;D:/BaiduNetdiskWorkspace/3DStructure/StereoCalibrationClion/boost_1_78_0/stage/lib;PATHS;C:/boost/lib;C:/boost;/sw/local/lib"
-- [ D:/Program Files/JetBrains/CLion 2022.1/bin/cmake/win/share/cmake-3.22/Modules/FindBoost.cmake:2254 ] Searching for UNIT_TEST_FRAMEWORK_LIBRARY_RELEASE: boost_unit_test_framework-mgw8-mt-1_78;boost_unit_test_framework-mgw8-mt;boost_unit_test_framework-mgw8-mt;boost_unit_test_framework-mt-1_78;boost_unit_test_framework-mt;boost_unit_test_framework-mt;boost_unit_test_framework-mt;boost_unit_test_framework
-- [ D:/Program Files/JetBrains/CLion 2022.1/bin/cmake/win/share/cmake-3.22/Modules/FindBoost.cmake:2309 ] Searching for UNIT_TEST_FRAMEWORK_LIBRARY_DEBUG: boost_unit_test_framework-mgw8-mt-d-1_78;boost_unit_test_framework-mgw8-mt-d;boost_unit_test_framework-mgw8-mt-d;boost_unit_test_framework-mt-d-1_78;boost_unit_test_framework-mt-d;boost_unit_test_framework-mt-d;boost_unit_test_framework-mt;boost_unit_test_framework
CMake Error at D:/Program Files/JetBrains/CLion 2022.1/bin/cmake/win/share/cmake-3.22/Modules/FindPackageHandleStandardArgs.cmake:230 (message):
? Could NOT find Boost (missing: unit_test_framework) (found version? "1.78.0")
Call Stack (most recent call first):
? D:/Program Files/JetBrains/CLion 2022.1/bin/cmake/win/share/cmake-3.22/Modules/FindPackageHandleStandardArgs.cmake:594 (_FPHSA_FAILURE_MESSAGE)
? D:/Program Files/JetBrains/CLion 2022.1/bin/cmake/win/share/cmake-3.22/Modules/FindBoost.cmake:2375 (find_package_handle_standard_args)
? test/CMakeLists.txt:14 (find_package)
【Franklin案,编译报错,提示找到了对应的boost的版本,但是,Searching for boost的库的时候,应该是找不到】
前一节,同VCPKG的应用做的编译库,因为用的都是vc的编译器,所以,生成的库的名称都是vc143等vc的编译器名称,例如:
在路径:【set(BOOST_LIBRARY_DIR "C:\Program Files\Boost\boost_1_78_0\stage\lib")】
libboost_unit_test_framework-vc143-mt-gd-x32-1_78.lib
?【Franklin案,也就是问题的根源应该是转化为用MinGW的编译器来做,而且应该最好是MinGW的最新版本,这里Search显然是因为版本不对报错的】
-- [ D:/Program Files/JetBrains/CLion 2022.1/bin/cmake/win/share/cmake-3.22/Modules/FindBoost.cmake:2309 ] Searching for UNIT_TEST_FRAMEWORK_LIBRARY_DEBUG: boost_unit_test_framework-mgw8-mt-d-1_78;boost_unit_test_framework-mgw8-mt-d;boost_unit_test_framework-mgw8-mt-d;boost_unit_test_framework-mt-d-1_78;boost_unit_test_framework-mt-d;boost_unit_test_framework-mt-d;boost_unit_test_framework-mt;boost_unit_test_framework
【那么如何编译出MigGW的版本的库呢?本章,【本文实例步骤\1 熟悉Clion\1.1 构建boost Unit test】章节,其实就是用MigGW也就是gcc去编译boost库,也就是我们再CLion中现在需要的库】
然后,之前的?【本文实例步骤\1 熟悉Clion\1.1 构建boost Unit test】是编译了所有的boost的静态库,我们现在需要一个boost Unit test的动态库,通过bjam编译器的编译参数选择,可以单独配置实现:
先用下面的命令查询下,boost test 的库的名字:?
\boost_1_78_0>bjam --show-libraries?Component configuration:
? ? - atomic ? ? ? ? ? ? ? ? ? : not building
? ? - chrono ? ? ? ? ? ? ? ? ? : not building
? ? - container ? ? ? ? ? ? ? ?: not building
? ? - context ? ? ? ? ? ? ? ? ?: not building
? ? - contract ? ? ? ? ? ? ? ? : not building
? ? - coroutine ? ? ? ? ? ? ? ?: not building
? ? - date_time ? ? ? ? ? ? ? ?: not building
? ? - exception ? ? ? ? ? ? ? ?: not building
? ? - fiber ? ? ? ? ? ? ? ? ? ?: not building
? ? - filesystem ? ? ? ? ? ? ? : not building
? ? - graph ? ? ? ? ? ? ? ? ? ?: not building
? ? - graph_parallel ? ? ? ? ? : not building
? ? - headers ? ? ? ? ? ? ? ? ?: not building
? ? - iostreams ? ? ? ? ? ? ? ?: not building
? ? - json ? ? ? ? ? ? ? ? ? ? : not building
? ? - locale ? ? ? ? ? ? ? ? ? : not building
? ? - log ? ? ? ? ? ? ? ? ? ? ?: not building
? ? - math ? ? ? ? ? ? ? ? ? ? : not building
? ? - mpi ? ? ? ? ? ? ? ? ? ? ?: not building
? ? - nowide ? ? ? ? ? ? ? ? ? : not building
? ? - program_options ? ? ? ? ?: not building
? ? - python ? ? ? ? ? ? ? ? ? : not building
? ? - random ? ? ? ? ? ? ? ? ? : not building
? ? - regex ? ? ? ? ? ? ? ? ? ?: not building
? ? - serialization ? ? ? ? ? ?: not building
? ? - stacktrace ? ? ? ? ? ? ? : not building
? ? - system ? ? ? ? ? ? ? ? ? : not building
? ? - test ? ? ? ? ? ? ? ? ? ? : building
? ? - thread ? ? ? ? ? ? ? ? ? : not building
? ? - timer ? ? ? ? ? ? ? ? ? ?: not building
? ? - type_erasure ? ? ? ? ? ? : not building
? ? - wave ? ? ? ? ? ? ? ? ? ? : not building
?【编译动态库命令执行记录如下:】
D:\BaiduNetdiskWorkspace\3DStructure\StereoCalibrationClion\boost_1_78_0>bjam install --toolset=gcc --with-test address-model=64 link=shared
Performing configuration checks
? ? - default address-model ? ?: 64-bit (cached) [1]
? ? - default architecture ? ? : x86 (cached) [1]
? ? - BOOST_COMP_GNUC >= 4.3.0 : yes [2]
? ? - BOOST_COMP_GNUC >= 4.3.0 : yes (cached) [3]
? ? - BOOST_COMP_GNUC >= 4.3.0 : yes [4]
? ? - BOOST_COMP_GNUC >= 4.3.0 : yes (cached) [5][1] gcc-8
[2] gcc-8/debug/python-3.9/threadapi-win32/threading-multi/visibility-hidden
[3] gcc-8/debug/link-static/python-3.9/threadapi-win32/threading-multi/visibility-hidden
[4] gcc-8/release/python-3.9/threadapi-win32/threading-multi/visibility-hidden
[5] gcc-8/release/link-static/python-3.9/threadapi-win32/threading-multi/visibility-hiddenComponent configuration:
? ? - atomic ? ? ? ? ? ? ? ? ? : not building
? ? - chrono ? ? ? ? ? ? ? ? ? : not building
? ? - container ? ? ? ? ? ? ? ?: not building
? ? - context ? ? ? ? ? ? ? ? ?: not building
? ? - contract ? ? ? ? ? ? ? ? : not building
? ? - coroutine ? ? ? ? ? ? ? ?: not building
? ? - date_time ? ? ? ? ? ? ? ?: not building
? ? - exception ? ? ? ? ? ? ? ?: not building
? ? - fiber ? ? ? ? ? ? ? ? ? ?: not building
? ? - filesystem ? ? ? ? ? ? ? : not building
? ? - graph ? ? ? ? ? ? ? ? ? ?: not building
? ? - graph_parallel ? ? ? ? ? : not building
? ? - headers ? ? ? ? ? ? ? ? ?: not building
? ? - iostreams ? ? ? ? ? ? ? ?: not building
? ? - json ? ? ? ? ? ? ? ? ? ? : not building
? ? - locale ? ? ? ? ? ? ? ? ? : not building
? ? - log ? ? ? ? ? ? ? ? ? ? ?: not building
? ? - math ? ? ? ? ? ? ? ? ? ? : not building
? ? - mpi ? ? ? ? ? ? ? ? ? ? ?: not building
? ? - nowide ? ? ? ? ? ? ? ? ? : not building
? ? - program_options ? ? ? ? ?: not building
? ? - python ? ? ? ? ? ? ? ? ? : not building
? ? - random ? ? ? ? ? ? ? ? ? : not building
? ? - regex ? ? ? ? ? ? ? ? ? ?: not building
? ? - serialization ? ? ? ? ? ?: not building
? ? - stacktrace ? ? ? ? ? ? ? : not building
? ? - system ? ? ? ? ? ? ? ? ? : not building
? ? - test ? ? ? ? ? ? ? ? ? ? : building
? ? - thread ? ? ? ? ? ? ? ? ? : not building
? ? - timer ? ? ? ? ? ? ? ? ? ?: not building
? ? - type_erasure ? ? ? ? ? ? : not building
? ? - wave ? ? ? ? ? ? ? ? ? ? : not building...found 32418 targets...
...updating 77 targets...
gcc.compile.c++ bin.v2\libs\test\build\gcc-8\release\threading-multi\visibility-hidden\execution_monitor.o...

在
"D:\Program Files\JetBrains\CLion 2022.1\bin\cmake\win\bin\cmake.exe" -DCMAKE_BUILD_TYPE=Debug "-DCMAKE_MAKE_PROGRAM=D:/Program Files/JetBrains/CLion 2022.1/bin/ninja/win/ninja.exe" -G Ninja -S D:\BaiduNetdiskWorkspace\3DStructure\StereoCalibrationClion\CmakeDemo -B D:\BaiduNetdiskWorkspace\3DStructure\StereoCalibrationClion\CmakeDemo\cmake-build-debug
frank testing
Frank Testing ---------------01--------------?
-- Found Boost 1.78.0 at C:/Boost/lib/cmake/Boost-1.78.0
-- ? Requested configuration: QUIET REQUIRED COMPONENTS unit_test_framework
-- BoostConfig: find_package(boost_headers 1.78.0 EXACT CONFIG REQUIRED QUIET HINTS C:/Boost/lib/cmake)
-- Found boost_headers 1.78.0 at C:/Boost/lib/cmake/boost_headers-1.78.0
-- BoostConfig: find_package(boost_unit_test_framework 1.78.0 EXACT CONFIG REQUIRED QUIET HINTS C:/Boost/lib/cmake)
-- Found boost_unit_test_framework 1.78.0 at C:/Boost/lib/cmake/boost_unit_test_framework-1.78.0
-- Boost toolset is mgw8 (GNU 8.1.0)
-- Scanning C:/Boost/lib/cmake/boost_unit_test_framework-1.78.0/libboost_unit_test_framework-variant*.cmake
-- ? Including C:/Boost/lib/cmake/boost_unit_test_framework-1.78.0/libboost_unit_test_framework-variant-mgw8-mt-d-x32-1_78-static.cmake
-- ? [ ] libboost_unit_test_framework-mgw8-mt-d-x32-1_78.a
-- ? Including C:/Boost/lib/cmake/boost_unit_test_framework-1.78.0/libboost_unit_test_framework-variant-mgw8-mt-d-x64-1_78-shared.cmake
-- ? [x] libboost_unit_test_framework-mgw8-mt-d-x64-1_78.dll.a
-- ? Including C:/Boost/lib/cmake/boost_unit_test_framework-1.78.0/libboost_unit_test_framework-variant-mgw8-mt-x32-1_78-static.cmake
-- ? [ ] libboost_unit_test_framework-mgw8-mt-x32-1_78.a
-- ? Including C:/Boost/lib/cmake/boost_unit_test_framework-1.78.0/libboost_unit_test_framework-variant-mgw8-mt-x64-1_78-shared.cmake
-- ? [x] libboost_unit_test_framework-mgw8-mt-x64-1_78.dll.a
-- ? Including C:/Boost/lib/cmake/boost_unit_test_framework-1.78.0/libboost_unit_test_framework-variant-mgw8-mt-x64-1_78-static.cmake
-- ? [ ] libboost_unit_test_framework-mgw8-mt-x64-1_78.a
-- Adding boost_unit_test_framework dependencies: headers
-- Configuring done
-- Generating done
-- Build files have been written to: D:/BaiduNetdiskWorkspace/3DStructure/StereoCalibrationClion/CmakeDemo/cmake-build-debug[已完成]
================编辑在这里====================未完成=================
- 编译问题2:?ninja 找不到:
解决步骤1:
(1条消息) ninja安装 - CSDN![]() https://www.csdn.net/tags/MtTakg2sODA1NzEtYmxvZwO0O0OO0O0O.html
https://www.csdn.net/tags/MtTakg2sODA1NzEtYmxvZwO0O0OO0O0O.html
?-------------------------------------------------------------------------------------------------------------------------
方案2 Boost官网安装的方法:
Boost.Test run/debug configuration
Although Boost.Test provides the?
main()?entry for your test program, and you can run it as a regular application, we recommend using the dedicated Boost.Test run/debug configuration. It includes test-related settings and let you benefit from the built-in?test runner, which is unavailable if you run tests as regular programs.尽管Boost.Test提供了测试的主程序的如何,而且你可以像运行其他的普通的应用一样。我们还是推荐用【专用】Boost.Test run/debug配置:
他包括配置测试相关的设定和其他普通应用没有的能方便你的内建测试运行器。
2.1 新建一个boost.Test的配置:
?-------------------------------------------------------------------------------------------------------------------------
方案2:
【Boost官网有安装的方法,可以安装这个方法来做】
1.1 构建项目时候,自动编译出现的问题:
"C:\Program Files\JetBrains\CLion 221.5080.1\bin\cmake\win\bin\cmake.exe" -DCMAKE_BUILD_TYPE=Debug "-DCMAKE_MAKE_PROGRAM=C:/Program Files/JetBrains/CLion 221.5080.1/bin/ninja/win/ninja.exe" -G Ninja -S D:\\cmake-build-debug
-- The C compiler identification is GNU 11.2.0
-- The CXX compiler identification is GNU 11.2.0
-- Detecting C compiler ABI info
-- Detecting C compiler ABI info - done
-- Check for working C compiler: C:/Program Files/JetBrains/CLion 221.5080.1/bin/mingw/bin/gcc.exe - skipped
-- Detecting C compile features
-- Detecting C compile features - done
-- Detecting CXX compiler ABI info
-- Detecting CXX compiler ABI info - done
-- Check for working CXX compiler: C:/Program Files/JetBrains/CLion 221.5080.1/bin/mingw/bin/g++.exe - skipped
-- Detecting CXX compile features
-- Detecting CXX compile features - done
CMake Error at CMakeLists.txt:12 (find_package):
? Could not find a configuration file for package "OpenCV" that is compatible
? with requested version "3".

? The following configuration files were considered but not accepted:

? ? D:/OASIS/sw_prj/VS/opencv/opencv/build/x64/vc15/lib/OpenCVConfig.cmake, version: 4.2.0

-- Configuring incomplete, errors occurred!
See also "D:/BaiduNetdiskWorkspace/3D结构光学习/ch04:双目立体匹配算法理论+OpenCV实践/StereoCalibMatch/cmake-build-debug/CMakeFiles/CMakeOutput.log".
参考:
1 CLion:
CLion官方HELP参考说明:
Project formats
Last modified: 14 September 2021
CLion incorporates a set of smart features, many of which depend on project-level information (included files, compiler flags, and linker options). This information allows CLion to parse/resolve your code correctly and therefore highlight, auto-complete, inspect, and navigate through it in an error-free and convenient way.
CLion does not provide its own project model for your code but supports the following formats:
【案,CLion我们理解为一个项目运行环境,具备很多优良的特性:Clion 之前是只支持CMake的系统,但是,后面的版本升级到支持四个不同的编译系统】
CLion超简单配置编译环境_Anoxic_的博客-CSDN博客_clion配置编译环境![]() https://blog.csdn.net/jjhhshhgg/article/details/106148758Projects | CLion (jetbrains.com)
https://blog.csdn.net/jjhhshhgg/article/details/106148758Projects | CLion (jetbrains.com)![]() https://www.jetbrains.com/help/clion/project.html
https://www.jetbrains.com/help/clion/project.html
?2 CMake
Documentation | CMake![]() https://cmake.org/documentation
https://cmake.org/documentation
? ? ? ? ? ? ? ? ? ? ? ? ? ? ? ? ? ? ? ? ? ? ? ? ? ? ? ? ? ? ? ? CMakeLists.txt 语法介绍与实例演练_阿飞__的博客-CSDN博客_cmakelist![]() https://blog.csdn.net/afei__/article/details/81201039
https://blog.csdn.net/afei__/article/details/81201039
CMake Reference Documentation ― CMake 3.23.0-rc5 Documentation![]() https://cmake.org/cmake/help/latest/cmake-commands(7) ― CMake 3.23.0-rc5 Documentation
https://cmake.org/cmake/help/latest/cmake-commands(7) ― CMake 3.23.0-rc5 Documentation![]() https://cmake.org/cmake/help/latest/manual/cmake-commands.7.htmlinclude_directories
https://cmake.org/cmake/help/latest/manual/cmake-commands.7.htmlinclude_directories![]() https://cmake.org/cmake/help/latest/command/include_directories.html
https://cmake.org/cmake/help/latest/command/include_directories.html
include_directories
Add include directories to the build.
include_directories([AFTER|BEFORE] [SYSTEM] dir1 [dir2 ...])Add the given directories to those the compiler uses to search for include files. Relative paths are interpreted as relative to the current source directory.
The include directories are added to the?INCLUDE_DIRECTORIES?directory property for the current?
CMakeLists?file. They are also added to the?INCLUDE_DIRECTORIES?target property for each target in the current?CMakeLists?file. The target property values are the ones used by the generators.By default the directories specified are appended onto the current list of directories. This default behavior can be changed by setting?CMAKE_INCLUDE_DIRECTORIES_BEFORE?to?
ON. By using?AFTER?or?BEFORE?explicitly, you can select between appending and prepending, independent of the default.If the?
SYSTEM?option is given, the compiler will be told the directories are meant as system include directories on some platforms. Signalling this setting might achieve effects such as the compiler skipping warnings, or these fixed-install system files not being considered in dependency calculations - see compiler docs.Arguments to?
include_directories?may use "generator expressions" with the syntax "$<...>". See the?cmake-generator-expressions(7)?manual for available expressions. See the?cmake-buildsystem(7)?manual for more on defining buildsystem properties.Note
Prefer the?target_include_directories()?command to add include directories to individual targets and optionally propagate/export them to dependents.
?这段英文的大致解释如下:
默认情况下,
include_directories命令会将目录添加到列表最后,可以通过命令设置CMAKE_INCLUDE_DIRECTORIES_BEFORE变量为ON来改变它默认行为,将目录添加到列表前面。也可以在每次调用include_directories命令时使用AFTER或BEFORE选项来指定是添加到列表的前面或者后面。如果使用SYSTEM选项,会把指定目录当成系统的搜索目录。该命令作用范围只在当前的CMakeLists.txt。
作者:Domibaba
链接:https://www.jianshu.com/p/e7de3de1b0fa
来源:简书
著作权归作者所有。商业转载请联系作者获得授权,非商业转载请注明出处。
?3 vcpkg
vcpkg/README_zh_CN.md at master ・ microsoft/vcpkg (github.com)
How to use Boost.Test for C++ - Visual Studio (Windows) | Microsoft Docs
commands & options
Commands:
  vcpkg search [pat]              Search for packages available to be built
  vcpkg install <pkg>...          Install a package
  vcpkg remove <pkg>...           Uninstall a package
  vcpkg remove --outdated         Uninstall all out-of-date packages
  vcpkg list                      List installed packages
  vcpkg update                    Display list of packages for updating
  vcpkg upgrade                   Rebuild all outdated packages
  vcpkg x-history <pkg>           (Experimental) Shows the history of CONTROL versions of a package
  vcpkg hash <file> [alg]         Hash a file by specific algorithm, default SHA512
  vcpkg help topics               Display the list of help topics
  vcpkg help <topic>              Display help for a specific topic

  vcpkg integrate install         Make installed packages available user-wide. Requires admin
                                  privileges on first use
  vcpkg integrate remove          Remove user-wide integration
  vcpkg integrate project         Generate a referencing nuget package for individual VS project use
  vcpkg integrate powershell      Enable PowerShell tab-completion

  vcpkg export <pkg>... [opt]...  Exports a package
  vcpkg edit <pkg>                Open up a port for editing (uses %EDITOR%, default 'code')
  vcpkg create <pkg> <url> [archivename]
                                  Create a new package
  vcpkg x-init-registry <path>    Initializes a registry in the directory <path>
  vcpkg format-manifest --all     Formats all vcpkg.json files. Run this before committing to vcpkg.
  vcpkg owns <pat>                Search for files in installed packages
  vcpkg depend-info <pkg>...      Display a list of dependencies for packages
  vcpkg env                       Creates a clean shell environment for development or compiling
  vcpkg version                   Display version information
  vcpkg contact                   Display contact information to send feedback
Options:
--triplet=<t> Specify the target architecture triplet. See 'vcpkg help triplet'
(default: %VCPKG_DEFAULT_TRIPLET%)
--host-triplet=<t> Specify the host architecture triplet. See 'vcpkg help triplet'
(default: %VCPKG_DEFAULT_HOST_TRIPLET%)
--overlay-ports=<path> Specify directories to be used when searching for ports
(also: %VCPKG_OVERLAY_PORTS%)
--overlay-triplets=<path> Specify directories containing triplets files
(also: %VCPKG_OVERLAY_TRIPLETS%)
--binarysource=<path> Add sources for binary caching. See 'vcpkg help binarycaching'
--x-asset-sources=<path> Add sources for asset caching. See 'vcpkg help assetcaching'
--downloads-root=<path> Specify the downloads root directory
(default: %VCPKG_DOWNLOADS%)
--vcpkg-root=<path> Specify the vcpkg root directory
(default: %VCPKG_ROOT%)
--x-buildtrees-root=<path> (Experimental) Specify the buildtrees root directory
--x-install-root=<path> (Experimental) Specify the install root directory
--x-packages-root=<path> (Experimental) Specify the packages root directory
--x-json (Experimental) Request JSON output
@response_file Specify a response file to provide additional parameters
For more help (including examples) see the accompanying README.md and docs folder.triplet 支持列表
PS D:\BaiduNetdiskWorkspace\vcpkg-master\vcpkg> .\vcpkg.exe help triplet
Available architecture triplets
VCPKG built-in triplets:
  arm-uwp
  arm64-windows
  x64-linux
  x64-osx
  x64-uwp
  x64-windows-static
  x64-windows
  x86-windows

VCPKG community triplets:
  arm-android
  arm-ios
  arm-linux
  arm-mingw-dynamic
  arm-mingw-static
  arm-neon-android
  arm-windows-static
  arm-windows
  arm64-android
  arm64-ios
  arm64-linux
  arm64-mingw-dynamic
  arm64-mingw-static
  arm64-osx-dynamic
  arm64-osx
  arm64-uwp
  arm64-windows-static-md
  arm64-windows-static
  armv6-android
  ppc64le-linux
  s390x-linux
  wasm32-emscripten
  x64-android
  x64-freebsd
  x64-ios
  x64-linux-release
  x64-mingw-dynamic
  x64-mingw-static
  x64-openbsd
  x64-osx-dynamic
  x64-osx-release
  x64-windows-release
  x64-windows-static-md
  x86-android
  x86-freebsd
  x86-ios
  x86-mingw-dynamic
  x86-mingw-static
  x86-uwp
  x86-windows-static-md
  x86-windows-static
  x86-windows-v120
4 boost
Boost C++ Libraries![]() https://www.boost.org/
https://www.boost.org/
boost 库的命名规则:
?
?Windows平台下boost库的编译和调用_哔哩哔哩_bilibili![]() https://www.bilibili.com/video/BV1JE411A7sM
https://www.bilibili.com/video/BV1JE411A7sM
资源:
1 Boost库的下载地址:
Version 1.78.0 (boost.org)![]() https://www.boost.org/users/history/version_1_78_0.html
https://www.boost.org/users/history/version_1_78_0.html
其他参考地址:
?(1条消息) CLion配置Boost_线上幽灵的博客-CSDN博客_clion配置boost
Boost Getting Started on Windows - 1.78.0?
?Unit testing tutorial | CLion (jetbrains.com)
?使用单元测试 Boost.test - zhihuichien - 博客园 (cnblogs.com)
boost单元测试框架 - youxin - 博客园 (cnblogs.com)
(3条消息) boost test学习(一)_dicuzhaoqin8950的博客-CSDN博客
(2条消息) CMake I 使用Boost Test进行单元测试_烫青菜的博客-CSDN博客
(2条消息) C++单元测试:boost.test_zhu2695的博客-CSDN博客
(2条消息) Boost C++测试组件test库_ve2102388688的博客-CSDN博客
Windows下Clion安装boost库_一身孤注掷温柔的博客-CSDN博客_clion 安装boost
Boost.Test support | CLion (jetbrains.com)
(1条消息) windows 安装ninja_如雾如电的博客-CSDN博客_ninja安装

