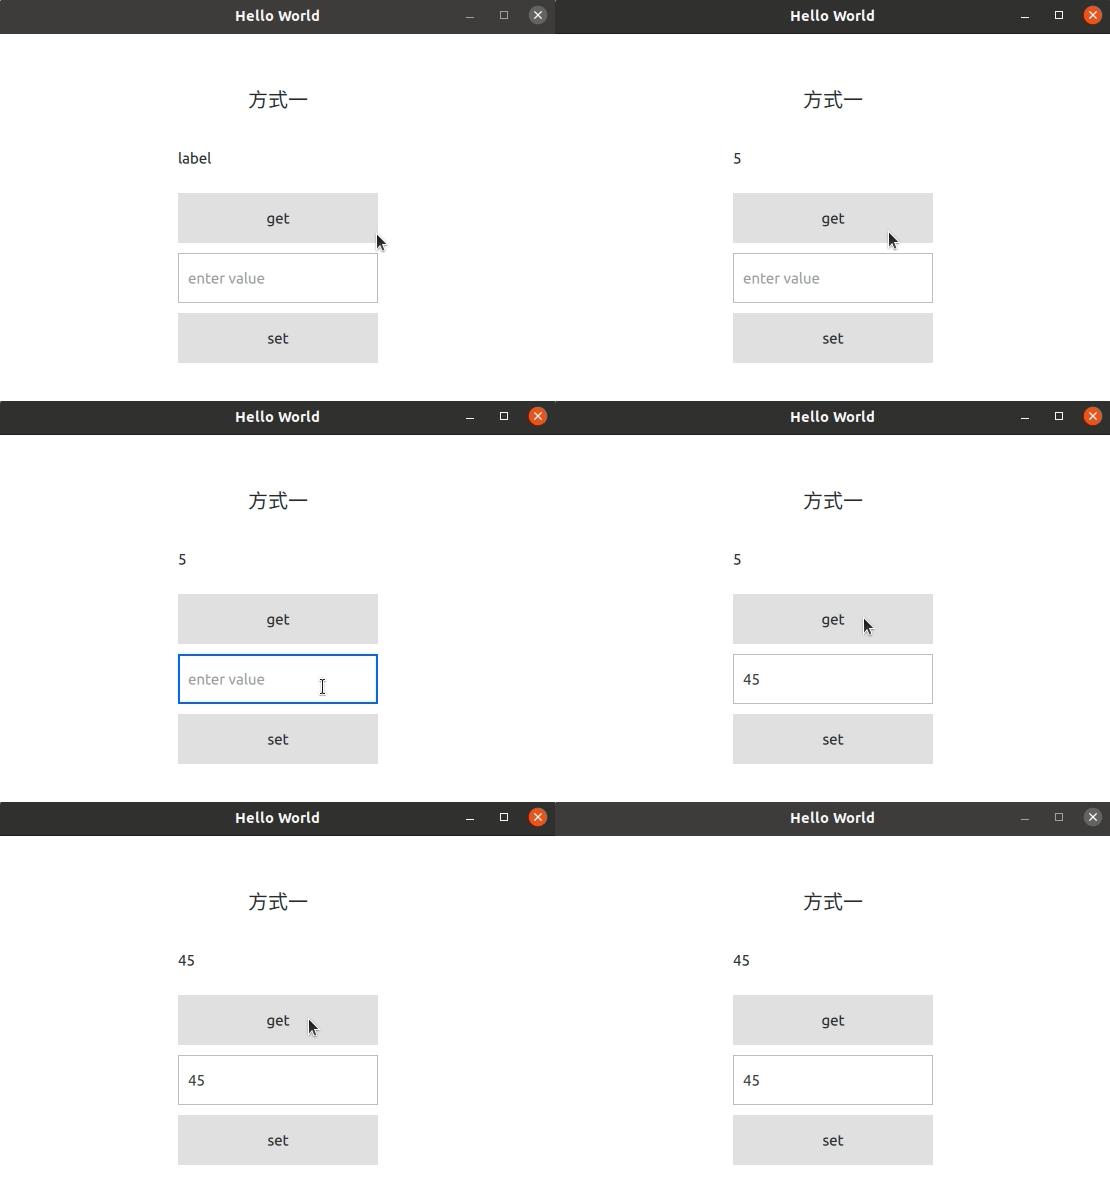
一、效果
qml文件中,可以调用C++类的公共函数

二、步骤
1、C++类文件
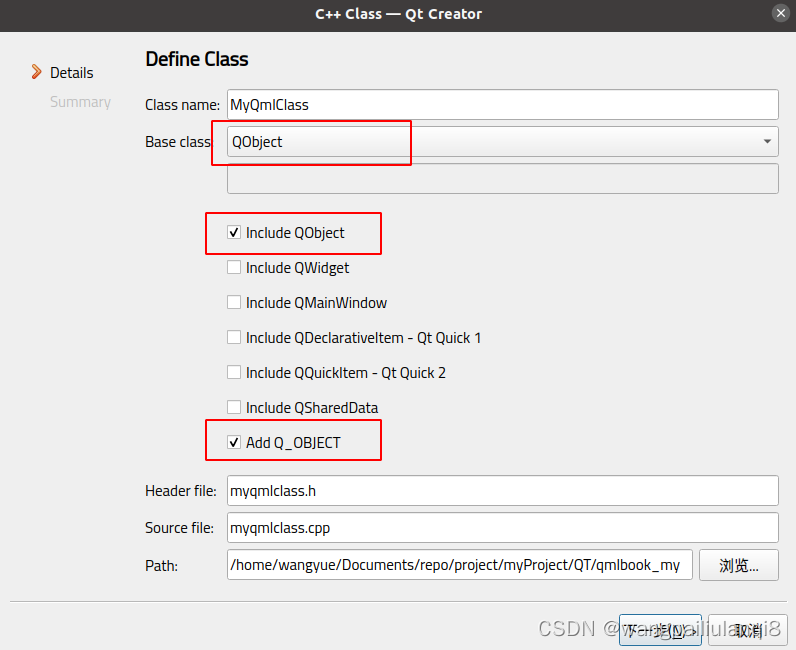
创建C++文件时,一定要勾选下面3项

MyQmlClass.h

#ifndef MYQMLCLASS_H
#define MYQMLCLASS_H

#include <QObject>

class MyQmlClass : public QObject {
  Q_OBJECT

 public:
  explicit MyQmlClass(QObject *parent = nullptr);

  // 【函数前加上Q_INVOKABLE】
  Q_INVOKABLE void setValue(int value);
  Q_INVOKABLE int getValue();

 private:
  int m_Value;

};

#endif  // MYQMLCLASS_H
MyQmlClass.cpp


#include "myqmlclass.h"
#include <QDebug>

MyQmlClass::MyQmlClass(QObject *parent)
    : QObject(parent), m_Value(0){}

void MyQmlClass::setValue(int value) { m_Value = value; }

int MyQmlClass::getValue() {
  qDebug() << "MyQmlClass::getValue";
  return m_Value;
}
2、注册
注册有两种方式
方式1:? engine.rootContext()->setContextProperty("myQml", &myQmlImp);
main.cpp


#include <QGuiApplication>
#include <QQmlApplicationEngine>
#include <QQmlContext>
#include "myqmlclass.h"

int main(int argc, char *argv[]) {
#if QT_VERSION < QT_VERSION_CHECK(6, 0, 0)
  QCoreApplication::setAttribute(Qt::AA_EnableHighDpiScaling);
#endif

  QGuiApplication app(argc, argv);

  QQmlApplicationEngine engine;

  //【 方式1:创建一个C++对象,注册给qml使用 】
  MyQmlClass myQmlImp;
  engine.rootContext()->setContextProperty("myQml", &myQmlImp);


  const QUrl url(QStringLiteral("qrc:/main.qml"));
  QObject::connect(
      &engine, &QQmlApplicationEngine::objectCreated, &app,
      [url](QObject *obj, const QUrl &objUrl) {
        if (!obj && url == objUrl) QCoreApplication::exit(-1);
      },
      Qt::QueuedConnection);
  engine.load(url);

  return app.exec();
}
方式2:qmlRegisterType<MyQmlClass>("MyClass.module", 1, 0, "MyQml");
main.cpp


#include <QGuiApplication>
#include <QQmlApplicationEngine>
#include <QQmlContext>

#include "myqmlclass.h"

int main(int argc, char *argv[]) {
#if QT_VERSION < QT_VERSION_CHECK(6, 0, 0)
  QCoreApplication::setAttribute(Qt::AA_EnableHighDpiScaling);
#endif

  QGuiApplication app(argc, argv);

  QQmlApplicationEngine engine;

  //【方式2: 把整个C++类注册到qml,作为qml的一个组件对象】
  qmlRegisterType<MyQmlClass>("MyClass.module", 1, 0, "MyQml");

  const QUrl url(QStringLiteral("qrc:/main.qml"));
  QObject::connect(
      &engine, &QQmlApplicationEngine::objectCreated, &app,
      [url](QObject *obj, const QUrl &objUrl) {
        if (!obj && url == objUrl) QCoreApplication::exit(-1);
      },
      Qt::QueuedConnection);
  engine.load(url);

  return app.exec();
}
3、qml中使用
3.1
如果注册时使用方式1,qml中可以直接使用?注册名.function()
使用这种方式时,IDE不会自动提示相关关键字,但是完成后运行实现了效果。
Register01.qml

import QtQuick 2.0
import QtQuick.Controls 2.15

Item {

    Column {
        anchors.centerIn: parent
        spacing: 10

        Label {
            id: title
            width: 200
            height: 50
            font.pixelSize: 20
            // Column中元素尺寸一定要固定,否则对齐也会失效!
            horizontalAlignment: Text.AlignHCenter
            verticalAlignment: Text.AlignVCenter
            text: "方式一"
        }

        Label {
            id: getLabel
            width: 200
            height: 50
            verticalAlignment: Text.AlignVCenter
            text: "label"
        }
        Button {
            id: getBtn
            width: 200
            height: 50
            text: "get"
            onClicked: {
                //【方式1 调用】
                getLabel.text = myQml.getValue()
            }
        }

        TextField {
            id: setLabel
            width: 200
            height: 50
            placeholderText: "enter value"
        }

        Button {
            id: setBtn
            width: getBtn.width
            height: getBtn.height
            text: "set"
            onClicked: {
                //【方式1 调用】
                myQml.setValue(setLabel.text)
            }
        }
    }
}
main.qml

import QtQuick 2.15
import QtQuick.Window 2.15
import QtQuick.Controls 2.15

Window {
    width: 640
    height: 480
    visible: true
    title: qsTr("Hello World")

    Loader {
        id: contentPane
        anchors.fill: parent
    }

    Component.onCompleted: contentPane.source = "qrc:/Register01.qml"
}
3.2
如果注册时使用方式2,使用C++类就像QML 的组件一样,需要导库,创建,调用
import QtQuick 2.0
import QtQuick.Controls 2.15
// 【方式2 导入库】
import MyClass.module 1.0

Item {

    // 【方式2 创建对象】
    MyQml {
        id: myQmlObj
    }
    Column {
        anchors.centerIn: parent
        spacing: 10

        Label {
            id: title
            width: 200
            height: 50
            font.pixelSize: 20
            // Column中元素尺寸一定要固定,否则对齐也会失效!
            horizontalAlignment: Text.AlignHCenter
            verticalAlignment: Text.AlignVCenter
            text: "方式二"
        }

        Label {
            id: getLabel
            width: 200
            height: 50
            verticalAlignment: Text.AlignVCenter
            text: "label"
        }

        Button {
            id: getBtn
            width: 200
            height: 50
            text: "get"
            onClicked: {
                // 【方式2 使用id名调用】
                getLabel.text = myQmlObj.getValue()
            }
        }

        TextField {
            id: setLabel
            width: getLabel.width
            height: getLabel.height
            placeholderText: "enter value"
        }

        Button {
            id: setBtn
            width: getBtn.width
            height: getBtn.height
            text: "set"
            onClicked: {
                myQmlObj.setValue(setLabel.text)
            }
        }
    }
}
main.qml

import QtQuick 2.15
import QtQuick.Window 2.15
import QtQuick.Controls 2.15

Window {
    width: 640
    height: 480
    visible: true
    title: qsTr("Hello World")

    Loader {
        id: contentPane
        anchors.fill: parent
    }

    Component.onCompleted: contentPane.source = "qrc:/Register01.qml"
}
