一、工厂的注册、创建和覆盖机制
工厂机制_知识回顾
- 背景:有时候无法直接修改验证平台的代码,比如①别人正在用,修改会影响别人使用;②验证IP你没有办法直接看到,所以也无法修改。
- 作用:为了更方便地替代验证环境中的实例或者注册类型
- 核心三要素:注册、创建、覆盖
1、注册:要用 uvm_component_utils()或者uvm_object_utils()注册
-
uvm_component常见的组件有:uvm_driver、uvm_monitor、uvm_sequencer、uvm_agent、uvm_scoreboard、uvm_env、uvm_test,凡是继承他们的组件都需要用
uvm_component_utils()进行注册;

-
除了上述提到的组件外,几乎所有的类都派生自uvm_object,常见的有uvm_sequence_item、uvm_sequence、config等
-
引用《UVM实战》里的一段话来加深对uvm_object的认识:
uvm_object是一个分子, 用这个分子可以搭建成 许许多多的东西, 如既可以搭建成动物, 还可以搭建成植物, 更加可以搭建成没有任何意识的岩石、 空气等。 uvm_component就 是由其搭建成的一种高级生命, 而sequence_item则是由其搭建成的血液, 它流通在各个高级生命( uvm_component) 之间, sequence则是众多sequence_item的组合, config则是由其搭建成的用于规范高级生命( uvm_component) 行为方式的准则。
2、创建:UVM中创建实例的方法有很多,常用xxx::type_id::create来创建;注意,如果用new()来创建则无法使用工厂的覆盖
3、覆盖
覆盖并不是工厂机制的发明,所有面向对象的语言都支持函数/任务重载。
采用工厂进行覆盖有以下条件:
- 原类型和新类型都需要注册到工厂里;
- 需要用工厂机制来创建;
- 覆盖的类和被覆盖的类有继承关系,并且被覆盖的方法要声明为virtual。不过有例外:component和object之间不能相互覆盖(虽然component是object的子类,但血缘关系太远了)
若有多层覆盖时,最终覆盖的类必须是最初被覆盖类的子类;多层覆盖,以最后一个覆盖结果为准
object_create
class object_create extends top;
    trans t1, t2, t3, t4;
    `uvm_component_utils(object_create)
    function new(string name = "object_create", uvm_component parent = null);
      super.new(name, parent);
    endfunction
    function void build_phase(uvm_phase phase);
      uvm_factory f = uvm_factory::get(); // get singleton factory
      super.build_phase(phase);
      t1 = new("t1");   // direct construction
      t2 = trans::type_id::create("t2", this);//common method
      f.create_object_by_type(trans::get_type, get_full_name,"t3");//factory method
      create_object("trans","t4");// pre-defined method inside component
    endfunction
  endclass
说明:
- get_full_name可以完整地得到当前component的路径
- void’可加可不加,加了就不打印出函数执行后的返回值。
- 参考代码里t3和t4加了动态转换cast,但好像没有什么必要,这里没有父类句柄指向子类对象的问题。这里加不加打印消息都一样。
void'($cast(t3,f.create_object_by_type(trans::get_type, get_full_name,"t3")));
void'($cast(t4,create_object("trans","t4")));
仿真命令:
vsim -novopt -classdebug +UVM_TESTNAME=object_create work.factory_mechanism
仿真结果:

问:这里使用工厂创建时为什么名称没有传进去? 在仿真结果那里依然是trans type[trans] created,而不是trans type[t2] created;
答:questasim添加的uvm版本为1.2,所以有这个问题。最新uvm的版本已经解决这个问题。
component_create
class component_create extends top;
    unit u1, u2, u3, u4;
    `uvm_component_utils(component_create)
    function new(string name = "component_create", uvm_component parent = null);
      super.new(name,parent);
    endfunction

    function void build_phase(uvm_phase phase);
      uvm_factory f = uvm_factory::get();
      super.build_phase(phase);
      u1 = new("u1");
      u2 = unit::type_id::create("u2", this);
      void'(f.create_component_by_type(unit::get_type(),get_full_name,"u3",this));
      void'(create_component("unit","u4"));
    endfunction
  endclass
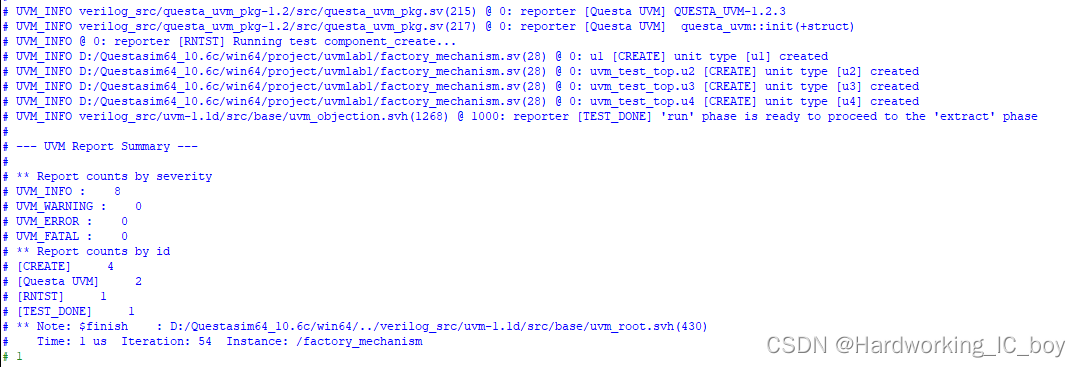
仿真命令:
vsim -novopt -classdebug +UVM_TESTNAME=component_create work.factory_mechanism
仿真结果
object_override
代码:
class object_override extends object_create;
    `uvm_component_utils(object_override)
    function new(string name = "object_override", uvm_component parent = null);
      super.new(name, parent);
    endfunction
    function void build_phase(uvm_phase phase);
      set_type_override_by_type(trans::get_type(),bad_trans::get_type());
      super.build_phase(phase);
    endfunction
  endclass
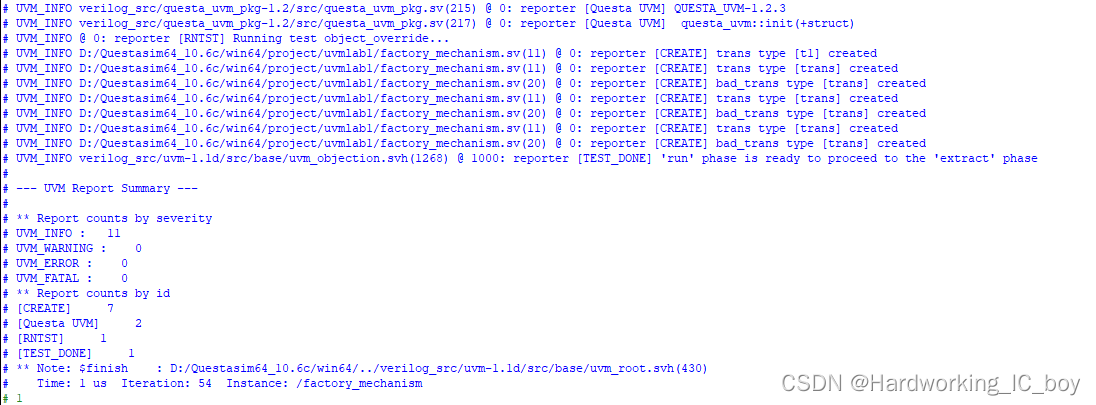
仿真命令:
vsim -novopt +UVM_TESTNAME=object_override work.factory_mechanism
仿真结果:
component_override
class component_override extends component_create;
    `uvm_component_utils(component_override)
    function new(string name = "component_override", uvm_component parent = null);
      super.new(name, parent);
    endfunction
    function void build_phase(uvm_phase phase);
      set_type_override("unit","big_unit");
      super.build_phase(phase);
    endfunction
  endclass
注意set_type_override_by_type()和set_type_override()的区别,前者函数内部要写类型,通过xx::get_type()获取,后者函数内部写类名,更方便。
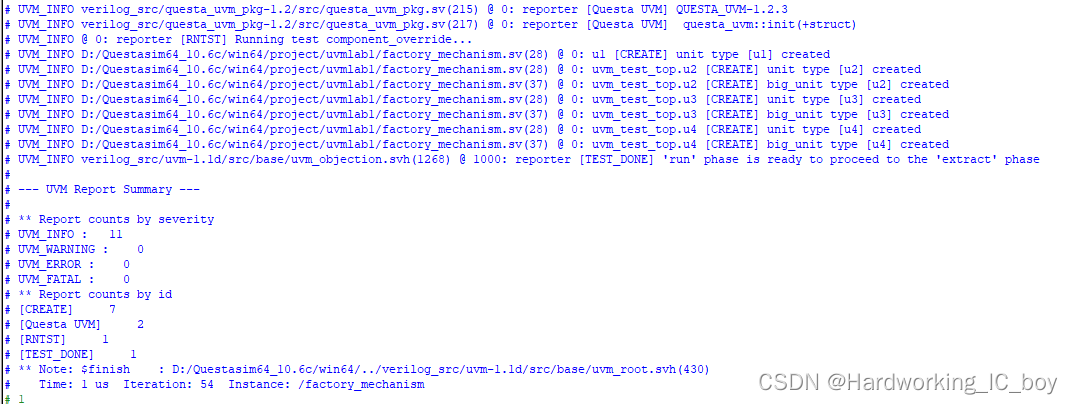
仿真命令:
vsim -novopt +UVM_TESTNAME=component_override work.factory_mechanism
仿真结果:
结果分析:
在实例化时, UVM会通过factory机制在自己内部的一张表格中查看是否有相关的重载(也就是覆盖)记录。 set_type_override_by_type或者set_type_override语句相当于在factory机制的表格中加入了一条记录。 当查到有重载记录时, 会使用新的类型来替代旧的类型。以u2的覆盖为例。借助《uvm实战》p611页的图进行修改得到下图:
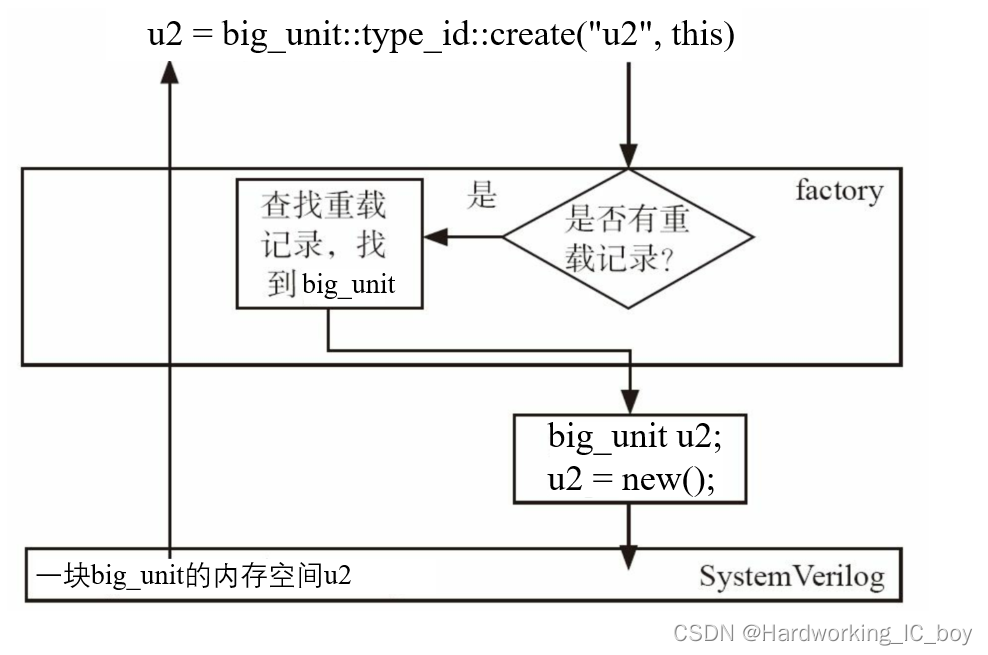
疑问:如果是按照上图进行判断的话,那感觉结果应该只会出现big_unit 类型,为什么还会出现unit类型的打印消息?

我在138、139行设了断点,并运行。

发现覆盖完,138行结束后,unit type和big_unit type是同时打印出来的,所以感觉真实的覆盖不是阻止unit类型的产生,而是通过将unit类型对应的句柄给到big_unit的对象来实现覆盖的。

二、域的自动化和uvm_object的常用方法
域的自动化_知识回顾
- 作用:通过将成员变量在下方代码中进行注册,可以直接赋予变量常用的操作,比如复制、克隆、打印、比较等,节省了用户的编码时间
    `uvm_object_utils_begin(trans)
      `uvm_field_int(ARG, FLAG)
      `uvm_field_enum(T, ARG, FLAG)
      `uvm_field_string(ARG, FLAG)
    `uvm_object_utils_end
- 问题:使用了宏,额外引入了上百行代码,对仿真造成了大量的隐形消耗
compare()
class object_methods_test extends uvm_test;
    `uvm_component_utils(object_methods_test)
    function new(string name = "object_methods_test", uvm_component parent = null);
      super.new(name, parent);
    endfunction
    function void build_phase(uvm_phase phase);
      super.build_phase(phase);
    endfunction

    task run_phase(uvm_phase phase);
      trans t1, t2;
      bit is_equal;
      // uvm_comparer cmpr;
      // cmpr = new();
      // cmpr.show_max = 10;
      phase.raise_objection(this);

      t1 = trans::type_id::create("t1");
      t1.data = 'h1FF;
      t1.addr = 'hF100;
      t1.op = WRITE;
      t1.name = "t1";
      t2 = trans::type_id::create("t2");
      t2.data = 'h2FF;
      t2.addr = 'hF200;
      t2.op = WRITE;
      t2.name = "t2";
      is_equal = t1.compare(t2);
      //TODO-2.2
      //Use function bit compare (uvm_object rhs, uvm_comparer comparer=null)
      //to compare t1 and t2, and check the message output
      if(!is_equal)  `uvm_info("COMPARE", "t1 is not equal to t2", UVM_LOW)
      else `uvm_info("COMPARE", "t1 is equal to t2", UVM_LOW)
      phase.drop_objection(this);
    endtask
  endclass
仿真命令:
vsim -novopt +UVM_TESTNAME=object_methods_test work.uvm_object_methods
注意,这里work后面的名称不是文件的名称,而是module的名称。直接同名会方便一些。
仿真结果:
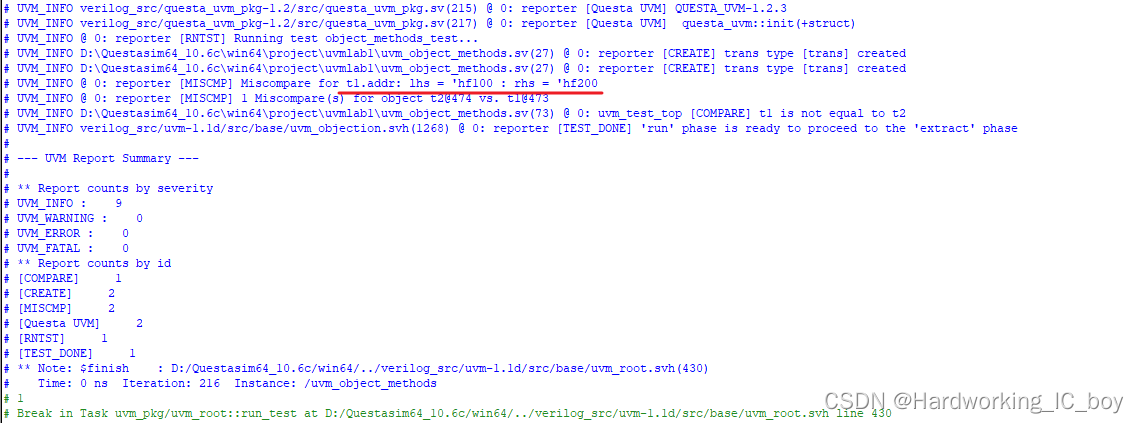
结果分析:
其实t1和t2的data也不一样,但是打印消息中却没有,只显示了addr比较错误。
这是因为比较器 uvm_package::uvm_default_comparer最大输出的错误比较信息默认是1。也就是说,发生了一个错误比较之后,就不再进行后续比较。可以通过创建一个uvm_comparer对象或者修改全局的uvm_comparer对象的show_max变量。下面采用第二种方法进行修改,也就是在run_phase(build_phase我试了也可以,不过放在比较的地方比较合适)中,比较之前加入下面这句:
uvm_default_comparer.show_max = 10;
注意,放在compare之后,则失效。
仿真结果:
可以看出打印出了全部的错误消息。
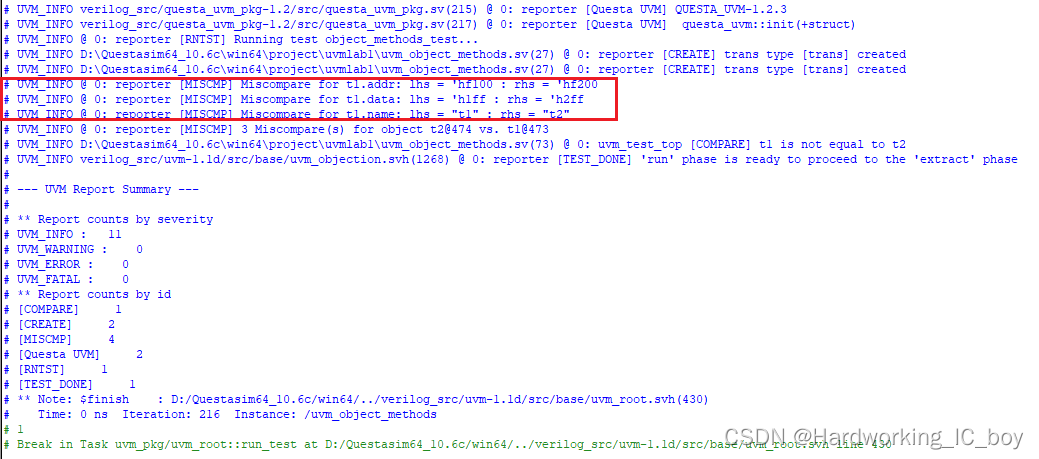
do_compare()
do_compare()是compare()的回调函数,也就是执行完compare()后会自动执行do_compare()。
代码:
function bit do_compare(uvm_object rhs, uvm_comparer comparer);
      //TODO-2.4
      //Please just try to compare all of properties of the two properties
      //and give detailed comparison messages
      trans t;
      do_compare = 1;
      void'($cast(t,rhs));
      if(addr != t.addr) begin
        do_compare = 0;
        `uvm_warning("CMPERR",$sformatf("addr %8x != %8x", addr, t.addr))
      end
      if(data != t.data) begin
        do_compare = 0;
        `uvm_warning("CMPERR",$sformatf("data %8x != %8x", data, t.data))
      end
      if(op != t.op) begin
        do_compare = 0;
        `uvm_warning("CMPERR",$sformatf("op %s != %s", op, t.op))
      end
      if(name != t.name) begin
        do_compare = 0;
        `uvm_warning("CMPERR",$sformatf("name %s != %s", name, t.name))
      end
    endfunction
结果:
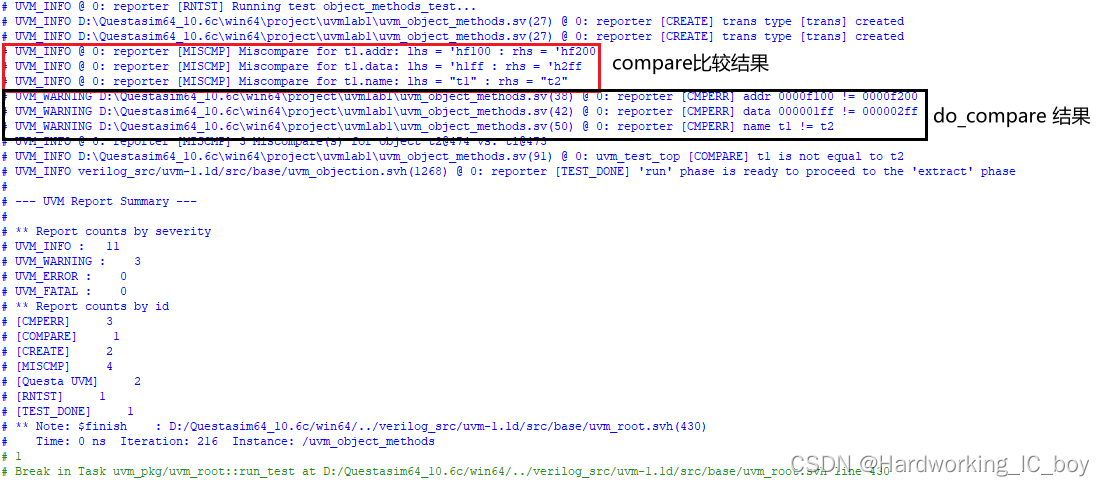
可以看出,do_compare在compare之后执行。
试着把is_equal = t1.compare(t2)给注释掉,看一下是不是compare没执行,do_compare也不会执行。结果如下:

答案是yes。
print() & copy()
代码
`uvm_info("COPY", "Before uvm_object copy() taken", UVM_LOW)
      //TODO-2.5
      //Use uvm_object::print() method to display all of fields before copy()
      t1.print();
      t2.print();
      `uvm_info("COPY", "After uvm_object t2 is copied to t1", UVM_LOW)
      //TODO-2.6
      //Call uvm_object::copy(uvm_object rhs) to copy t2 to t1
      //and use print() and compare() to follow steps above again for them
      t1.copy(t2);
      t1.print();
      t2.print();
      `uvm_info("CMP","Compare t1 with t2",UVM_LOW)
      is_equal = t1.compare(t2);
      if(!is_equal) `uvm_warning("CMP","t1 is not equal to t2")
      else  `uvm_info("CMPSUC","t1 is equal to t2", UVM_LOW)
      phase.drop_objection(this);
结果
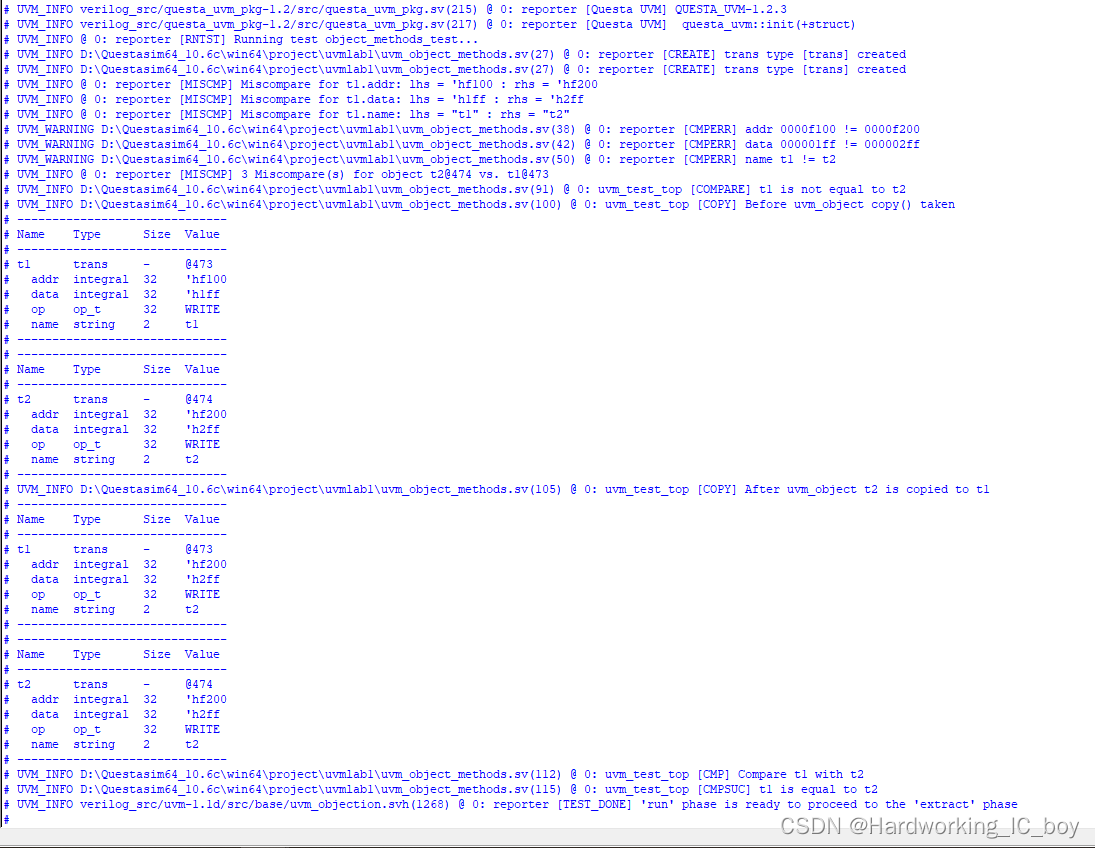
三、phase机制
知识回顾
在不同时间做不同的事情, 这就是UVM中phase的设计哲学。但是仅仅划分成phase是不够的, phase的自动执行功能才极大方便了用户。
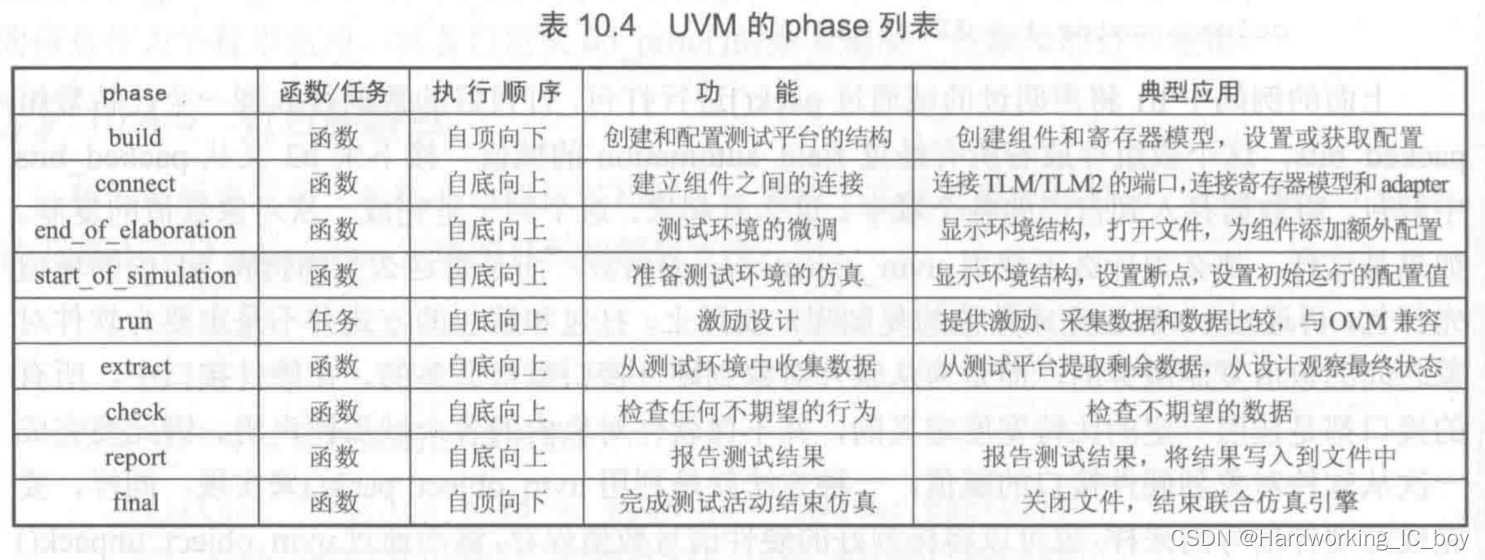
phase机制是component独有的,其引入原因为:
1、在验证环境实现层次化时保证例化的先后关系以及各组件之间的连接
在验证环境实现层次化时保证例化的先后关系以及各组件之间的连接 build自顶而下好理解,只有例化高层的组件,才能创建空间来容纳底层组件。 假如UVM不使用自上而下的方式执行build_phase, 那会是什么情况呢? UVM的设计哲学就是在build_phase中做实例化的工作, driver和monitor都是agent的成员变量, 所以它们的实例化都要在agent的build_phase中执行。 如果在agent的build_phase之前执行driver的build_phase, 此时driver还根本没有实例化, 所以调用driver.build_phase只会引发错误
2、将UVM仿真阶段层次化(各个phase之间有先后顺序,同一phase中的层次化组件之间的phase也有先后关系),很大程度上解决了因代码顺序杂乱可能会引发的问题。
比如connect要在new后面执行,如果反过来写,就会错误。phase机制就把new放在了build_phase里,connect放在connect_phase里,然后phase会自动执行,也就是先执行build后执行connect,这也就避免了因顺序带来的问题。
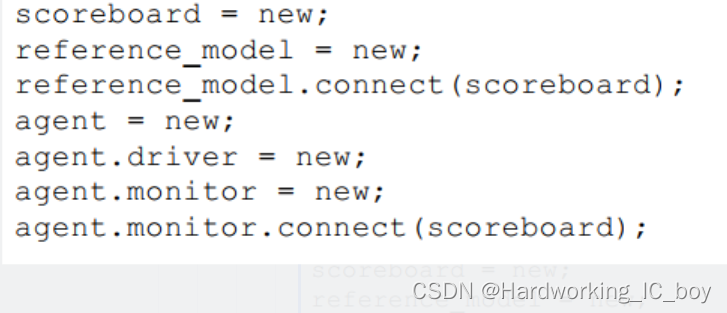
相当于把上面的代码顺序调整为下面的。

3、SV无法在底层组件例化之前完成对底层的配置,eg.在没例化前修改底层的一个变量
实验3.1
comp3和2类似,下面为comp2代码
class comp2 extends uvm_component;
    `uvm_component_utils(comp2)
    function new(string name = "comp2", uvm_component parent = null);
      super.new(name, parent);
      `uvm_info("CREATE", $sformatf("unit type [%s] created", name), UVM_LOW)
    endfunction
    //TODO-3.1
    function void build_phase(uvm_phase phase);
      super.build_phase(phase);
      `uvm_info("BUILD", "comp2 build phase entered", UVM_LOW)
      `uvm_info("BUILD", "comp2 build phase exited", UVM_LOW)
    endfunction
    function void connect_phase(uvm_phase phase);
      super.connect_phase(phase);
      `uvm_info("CONNECT", "comp2 connect phase entered", UVM_LOW)
      `uvm_info("CONNECT", "comp2 connect phase exited", UVM_LOW)
    endfunction
    task run_phase(uvm_phase phase);
      super.run_phase(phase);
      `uvm_info("RUN", "comp2 run phase entered", UVM_LOW)
      `uvm_info("RUN", "comp2 run phase exited", UVM_LOW)
    endtask
    function void report_phase(uvm_phase phase);
      super.report_phase(phase);
      `uvm_info("REPORT", "comp2 report phase entered", UVM_LOW)
      `uvm_info("REPORT", "comp2 report phase exited", UVM_LOW)
    endfunction
  endclass
仿真命令:
vsim -novopt -classdebug +UVM_TESTNAME=phase_order_test work.phase_order
运行结果:
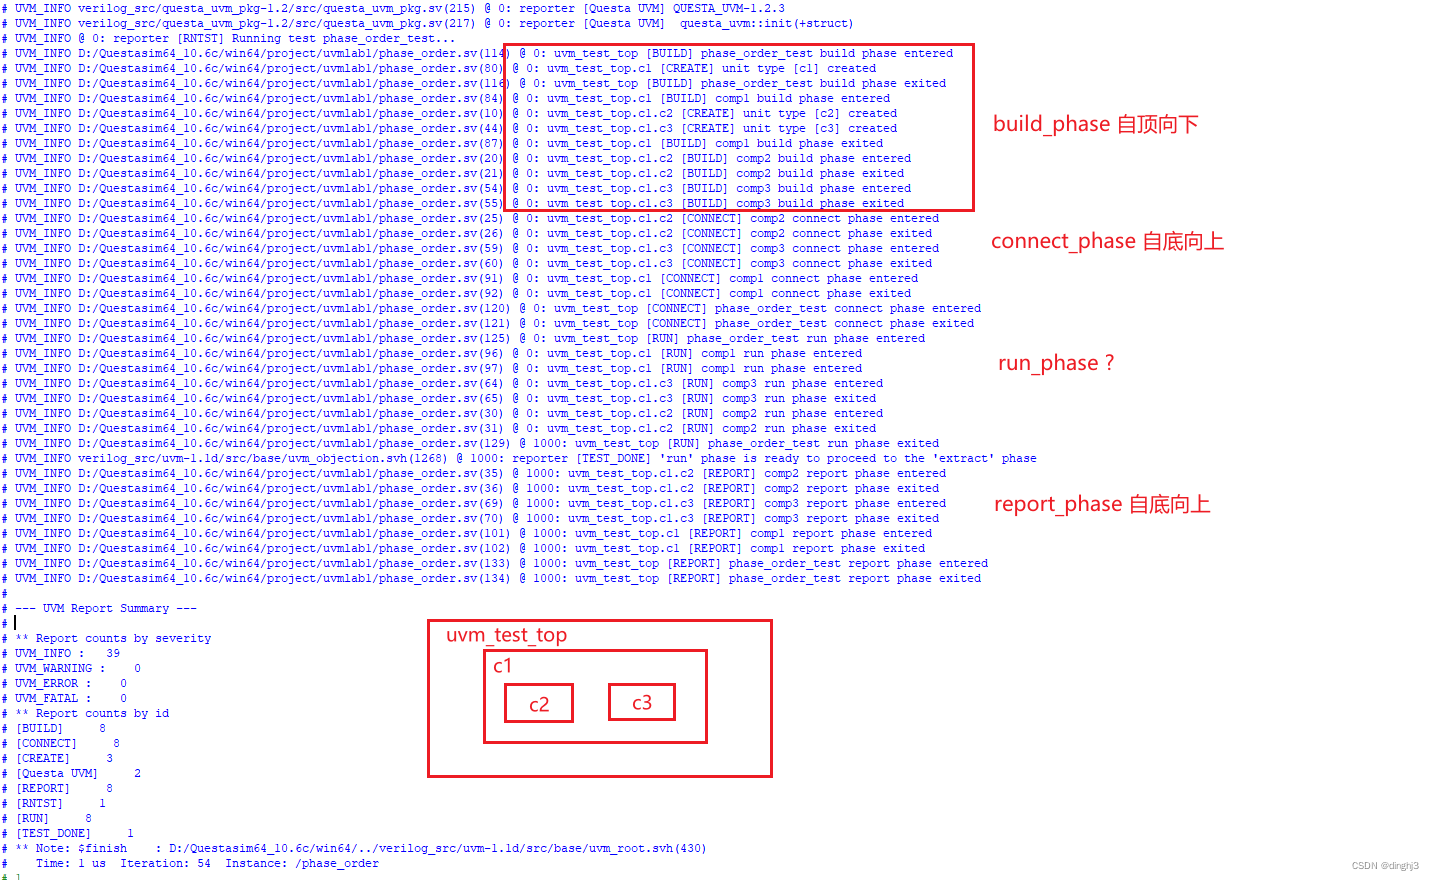
根据uvm_test_top、c1、c2、c3的验证结构层次以及打印信息可以看出,build_phase为自顶向下运行,connect_phase和report_phase为自底向上运行;
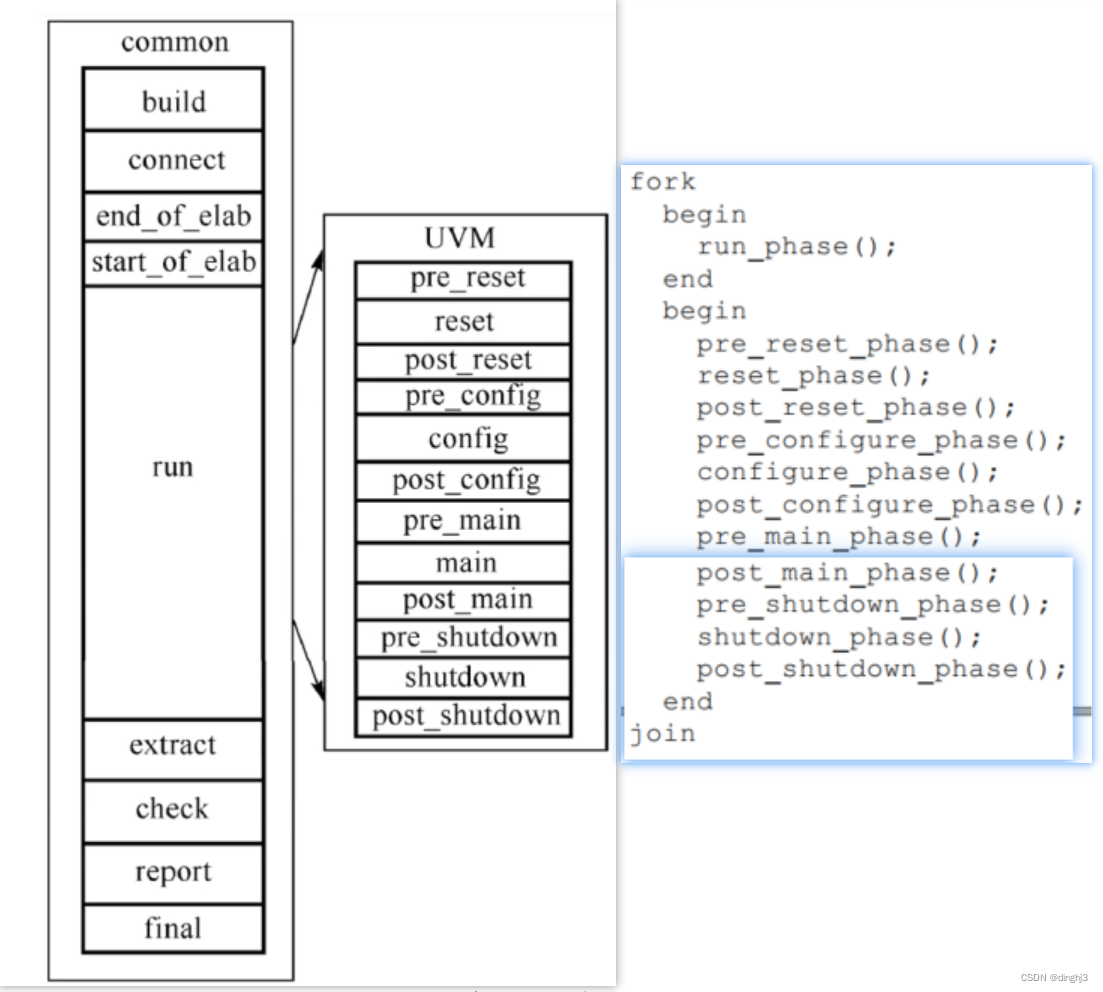
run_phase看着有点奇怪,查表是说自底向上,但是从打印消息上看和build_phase一样,感觉像是自顶向下运行的,这是咋回事咧?
《UVM实战》中有解释:
类似run_phase、 main_phase等task_phase也都是按照自下而上的顺序执行的。 但是与前面function phase自下而上执行不同的是, 这种task phase是耗费时间的, 所以它并不是等到“下面”的phase( 如driver的run_phase) 执行完才执行“上面”的phase( 如agent的run_phase) , 而是将这些run_phase通过fork…join_none的形式全部启动。 所以, 更准确的说法是自下而上的启动, 同时在运行。
实验3.2
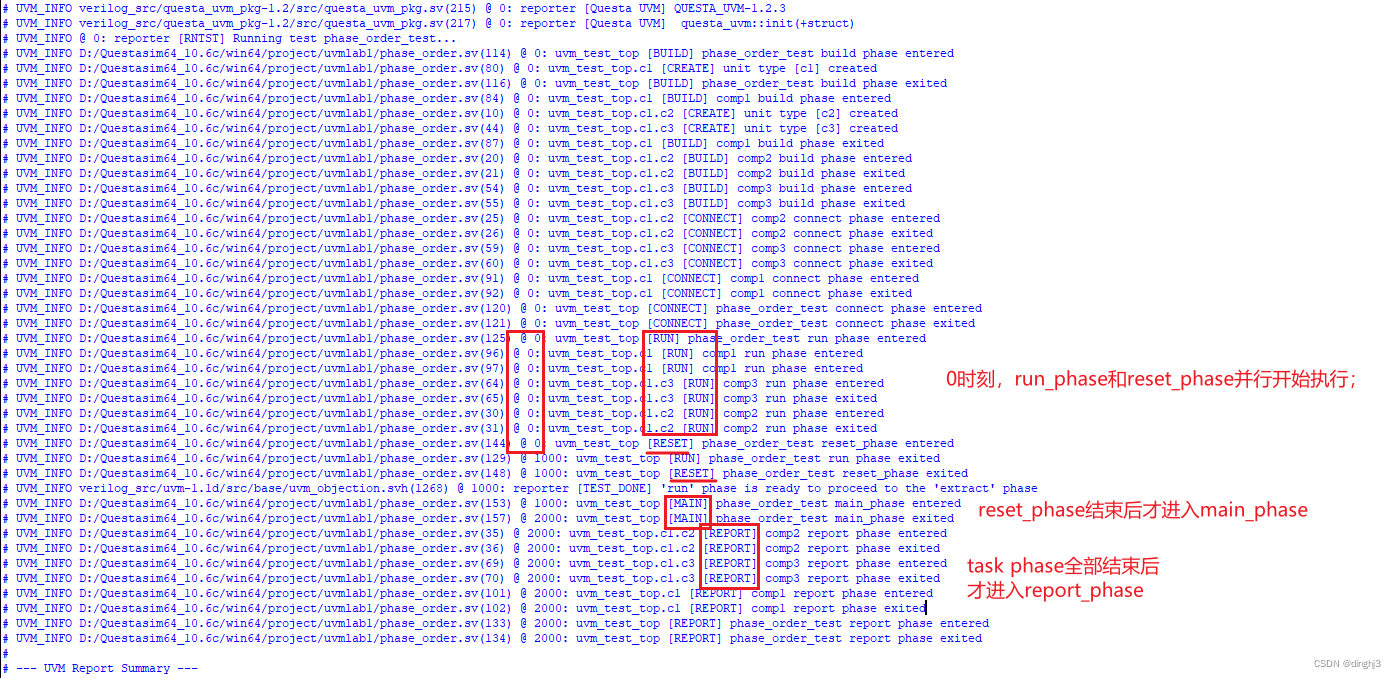
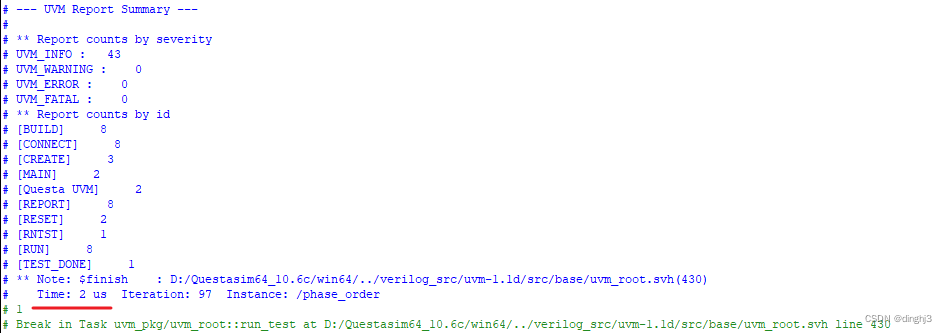
分析:
由于run_phase和12个task phase是并行执行的,所以他们同时开始,也就是run_phase和reset_phase同时开始,运行时长为1us。而12个task phase是按自上而下顺序执行的,所以main_phase在reset_phase执行完后才开始,开始时间为1us,运行1us后结束。因此仿真结束时间为2us。
四、config机制
知识回顾
引入原因:
- 以前修改配置需要修改参数然后重新编译,不够灵活;
- 简化了具有深层次结构的对象的配置:Config机制有助于基于使用它的验证环境轻松地配置不同的测试台组件,而无需担心测试台层次结构中任何组件的深度
uvm_config_db类的使用方式
1、传递virtual interface到环境中。
-
SV中接口传递的问题:环境准备好了后才能传递;每一层都要有set_interface,然后层层传递进去(好几个类中都要声明set_interface)这不利于软件环境的封装和复用。我们想要直接将接口传递一步到位,而不是层层传递。
-
通过config_db可以将接口的传递和获取彻底分开
-
接口传递要注意的问题:
- 在哪里set,哪里get:在顶层tb去set,在底层的build_phase中去get(传递变量和对象也一样)
- 接口传递(也就是set)要发生在run_test(在build phase里get,而build phase在run_test里)之前,保证在进入build phase之前virtual interface已经传到uvm_config_db里
2、设置单一变量值
- 在各个test中,可以在build_phase里对底层组件的变量加以配置(set),在底层组件例化前get配置信息,既实现了变量值的修改,又无需重新编译。
3、传递配置对象
- 如果在test配置里,需要配置的参数多,而且还分属于不同的组件,那么对多层次的变量还采用变量设置的方法,就需要更多的代码,容易出错,还不易于复用。甚至底层组件的变量被删除后,也无法通过uvm_config_db::set()得知配置是否成功。
- 这种情况下,可以将每个组件中的变量加以整合,放置到一个uvm_object中,再把这个对象进行传递,会更有利于整理环境的维护。具体一点,也就是把每个组件里需要配置的参数都放在一个对象里,然后把这个对象传递到需要的组件中去。组件get到对象之后,只选择自己需要的参数即可。
虚拟接口传递
接口:
interface uvm_config_if;
  logic [31:0] addr;
  logic [31:0] data;
  logic [ 1:0] op;
endinterface
接下来把上述接口传递到c1和c2里。
第一步,要在顶层tb里set:
module uvm_config;

  import uvm_pkg::*;
  `include "uvm_macros.svh"
  import uvm_config_pkg::*;

  uvm_config_if if0();

  //TODO-4.1
  //Please set interface to the c1 and c2 in the environment
  initial begin
  	//method 1
    uvm_config_db#(virtual uvm_config_if)::set(uvm_root::get(),"uvm_test_top.*","vif",if0);
    //method 2
    //uvm_config_db#(virtual uvm_config_if)::set(null,"uvm_test_top.*","vif",if0);
    run_test(""); // empty test name
  end
endmodule
在module中通过config_db机制的set函数设置virtual interface时, set函数的第一个参数如果为null,UVM会自动把第一个参数替换为uvm_root:: get(), 即uvm_top。因此存在两种写法。
第二步,在c1和c2的build_phase里get:
//TODO-4.1
//Please get the interface and check if it is got
  if(!uvm_config_db#(virtual uvm_config_if)::get(this,"","vif",vif))
    `uvm_error("GETVIF", "no virtual interface is assigned")
设置单一变量值、传递配置对象
代码
set:
class uvm_config_test extends uvm_test;
    comp1 c1;
    config_obj cfg;
    `uvm_component_utils(uvm_config_test)
    function new(string name = "uvm_config_test", uvm_component parent = null);
      super.new(name, parent);
    endfunction
    function void build_phase(uvm_phase phase);
      super.build_phase(phase);
      `uvm_info("BUILD", "uvm_config_test build phase entered", UVM_LOW)

      cfg = config_obj::type_id::create("cfg");
      cfg.comp1_var = 100;
      cfg.comp2_var = 200;
      //TODO-4.2
      //Please config the object to c1 and c2 by config_db
      uvm_config_db#(config_obj)::set(this,"c1","cfg",cfg);
      uvm_config_db#(config_obj)::set(this,"c1.c2","cfg",cfg);

      //TODO-4.3
      //Please config the c1.var1=10, c2.var2=20 by config_db
      uvm_config_db#(int)::set(this,"c1","var1",10);
      uvm_config_db#(int)::set(this,"c1.c2","var2",20);
      c1 = comp1::type_id::create("c1", this);
      `uvm_info("BUILD", "uvm_config_test build phase exited", UVM_LOW)
    endfunction
    task run_phase(uvm_phase phase);
      super.run_phase(phase);
      `uvm_info("RUN", "uvm_config_test run phase entered", UVM_LOW)
      phase.raise_objection(this);
      #1us;
      phase.drop_objection(this);
      `uvm_info("RUN", "uvm_config_test run phase exited", UVM_LOW)
    endtask
  endclass
get:
class comp1 extends uvm_component;
    int var1;
    comp2 c2;
    config_obj cfg;
    virtual uvm_config_if vif;
    `uvm_component_utils(comp1)
    function new(string name = "comp1", uvm_component parent = null);
      super.new(name, parent);
      var1 = 100;
      `uvm_info("CREATE", $sformatf("unit type [%s] created", name), UVM_LOW)
    endfunction
    function void build_phase(uvm_phase phase);
      super.build_phase(phase);
      `uvm_info("BUILD", "comp1 build phase entered", UVM_LOW)
      //TODO-4.1
      //Please get the interface and check if it is got
      if(!uvm_config_db#(virtual uvm_config_if)::get(this,"","vif",vif)) begin
        `uvm_error("GETVIF","no virtual interface is assigned")
      end
      `uvm_info("GETINT", $sformatf("before config get, var1 = %0d", var1), UVM_LOW)
      //TODO-4.3
      //Please get the var1 from config_db
      uvm_config_db#(int)::get(this,"","var1",var1);
      `uvm_info("GETINT", $sformatf("after config get, var1 = %0d", var1), UVM_LOW)

      //TODO-4.2
      //Please get the config object
      uvm_config_db#(config_obj)::get(this,"","cfg",cfg);

      `uvm_info("GETOBJ", $sformatf("after config get, cfg.comp1_var = %0d", cfg.comp1_var), UVM_LOW)

      c2 = comp2::type_id::create("c2", this);
      `uvm_info("BUILD", "comp1 build phase exited", UVM_LOW)
    endfunction
  endclass
仿真命令:
vsim -novopt -classdebug +UVM_TESTNAME=uvm_config_test work.uvm_config
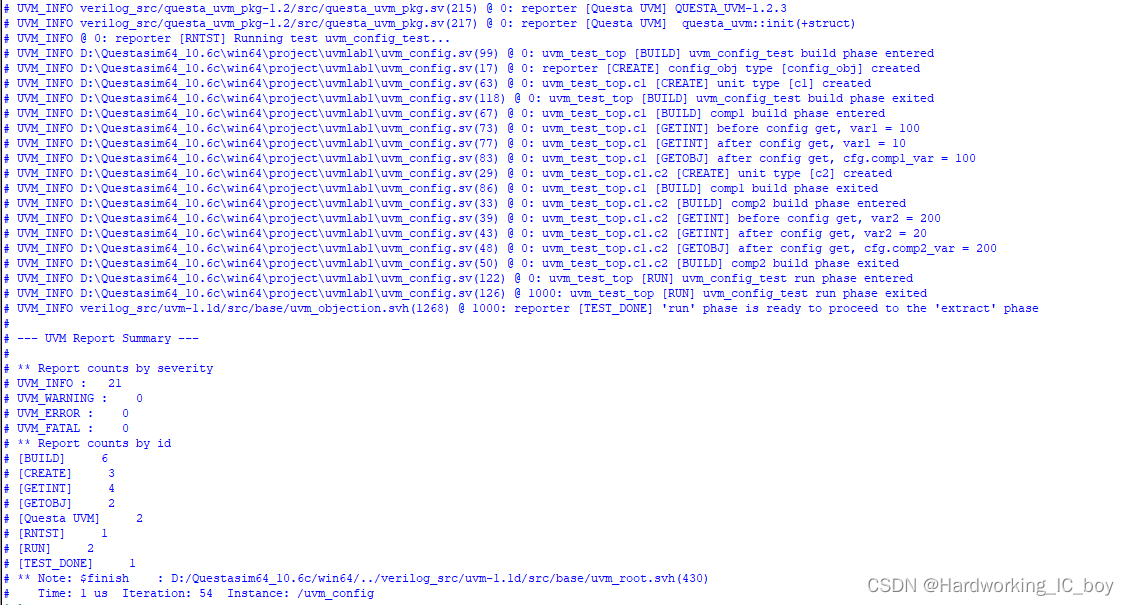
仿真结果:
特殊情况下get可以省略
set与get函数一般都是成对出现,但是在满足以下条件时,可以省略get语句(set语句无法省略)。以var2变量的修改为例。
- 使用uvm_field_int对成员变量var2进行注册
- build_phase中包含super.build_phase语句
满足这两点,那么就可以在build_phase中省略get语句。这里的关键是build_phase中的super.build_phase语句, 当执行到comp2的super.build_phase时, 会自动执行get语句。
当然,要满足以下的前提: - 第一, comp2必须使用uvm_component_utils宏注册;
- 第二, 在调用set函数的时候, set函数的第三个参数必须与要get函数中变量的名字相一致, 即必须是var2。
将get语句注释掉,代码如下:
class comp2 extends uvm_component;
    int var2;
    virtual uvm_config_if vif;
    config_obj cfg;
    `uvm_component_utils_begin(comp2)
      `uvm_field_int(var2, UVM_ALL_ON)  //注册var2可以省略get语句
    `uvm_component_utils_end
    function new(string name = "comp2", uvm_component parent = null);
      super.new(name, parent);
      var2 = 200;
      `uvm_info("CREATE", $sformatf("unit type [%s] created", name), UVM_LOW)
    endfunction
    function void build_phase(uvm_phase phase);
      super.build_phase(phase);
      `uvm_info("BUILD", "comp2 build phase entered", UVM_LOW)
      //TODO-4.1
      //Please get the interface and check if it is got
      if(!uvm_config_db#(virtual uvm_config_if)::get(this,"","vif",vif))
        `uvm_error("GETVIF", "no virtual interface is assigned")

      `uvm_info("GETINT", $sformatf("before config get, var2 = %0d", var2), UVM_LOW)
      //TODO-4.3
      //Please get the var2 from config_db
      // uvm_config_db#(int)::get(this,"","var2",var2);
      `uvm_info("GETINT", $sformatf("after config get, var2 = %0d", var2), UVM_LOW)

      //TODO-4.2
      //Please get the config object
      uvm_config_db#(config_obj)::get(this,"","cfg",cfg);
      `uvm_info("GETOBJ", $sformatf("after config get, cfg.comp2_var = %0d", cfg.comp2_var), UVM_LOW)

      `uvm_info("BUILD", "comp2 build phase exited", UVM_LOW)
    endfunction
  endclass
结果:省略get的情况下,var2的值依旧得到更新。

才怪。
before之前的值应该是200才对,怎么变成了20 了?

于是,我又把get给添加上
uvm_config_db#(int)::get(this,"","var2",var2);
结果还是老样子~

    `uvm_component_utils_begin(comp2)
       `uvm_field_int(var2, UVM_ALL_ON)  //注册var2可以省略get语句
    `uvm_component_utils_end
感觉是注册var2之后,它的值就是固定的了,就只和set的值保持一致了?
uvm_config_db#(int)::set(this,"c1.c2","var2",20);
有懂的兄弟麻烦指点一下我~
一个疑问
路桑在课件里讲到:应当尽量确保set方法在相关配置组件创建前调用。这是因为只有完成了配置,相关组件在例化前才可以得到配置值而正确地例化。
为了验证这一句话,我试着把c1的create放在set之前,发现两种结果是一样的。这是为啥?
 //TODO-4.3
 //Please config the c1.var1=10, c2.var2=20 by config_db
    c1 = comp1::type_id::create("c1", this);
    uvm_config_db#(int)::set(this,"c1","var1",10);
    uvm_config_db#(int)::set(this,"c1.c2","var2",20);
    //c1 = comp1::type_id::create("c1", this);
五、消息管理
在验证后期,验证环境较为稳定时,减少不必要的消息打印,可以提到仿真速度。
实验5.1 采用set_report_verbosity_level_hier()在uvm_message_test::build_phase()中屏蔽所有层次的消息。
仿真命令:
vsim -novopt -classdebug +UVM_TESTNAME=uvm_message_test work.uvm_message
在没有消息管理前,运行结果如下:
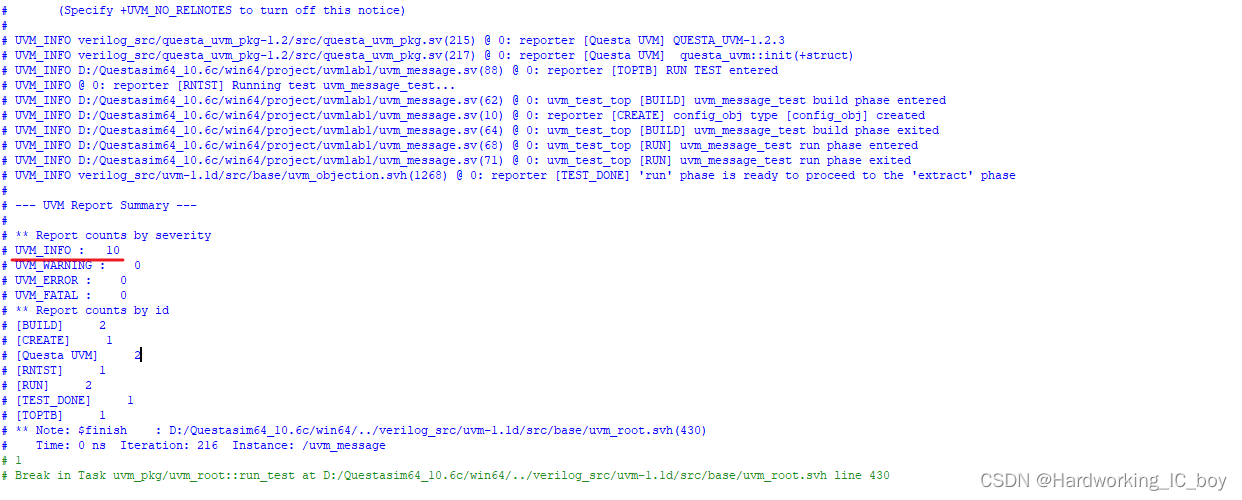
采用以下语句,可以屏蔽uvm_message_test及其以下组件的仿真消息。
set_report_verbosity_level_hier(UVM_NONE);
uvm_message_test 类
class uvm_message_test extends uvm_test;
    config_obj cfg;
    `uvm_component_utils(uvm_message_test)
    function new(string name = "uvm_message_test", uvm_component parent = null);
      super.new(name, parent);
    endfunction
    function void build_phase(uvm_phase phase);
      super.build_phase(phase);

      //TODO-5.1
      //Use set_report_verbosity_level_hier() to disable all of UVM messages
      //under the uvm_message_test
      set_report_verbosity_level_hier(UVM_NONE);

      `uvm_info("BUILD", "uvm_message_test build phase entered", UVM_LOW)
      cfg = config_obj::type_id::create("cfg");
      `uvm_info("BUILD", "uvm_message_test build phase exited", UVM_LOW)
    endfunction
    task run_phase(uvm_phase phase);
      super.run_phase(phase);
      `uvm_info("RUN", "uvm_message_test run phase entered", UVM_LOW)
      phase.raise_objection(this);
      phase.drop_objection(this);
      `uvm_info("RUN", "uvm_message_test run phase exited", UVM_LOW)
    endtask
  endclass
重新编译、仿真和运行,结果如下:

对比之后可发现,就是少了当前类中BUILD和RUN的uvm_info级别共4条消息。其他模块的打印消息还是和之前一样。
实验5.2 注释掉实验5.1的代码,采用set_report_id_verbosity_hier()来过滤以下ID的消息,即“BUILD”,“CREATE"和"RUN”。
代码如下:
set_report_id_verbosity_hier("BUILD",UVM_NONE);
set_report_id_verbosity_hier("CREATE",UVM_NONE);
set_report_id_verbosity_hier("RUN",UVM_NONE);
结果如下:
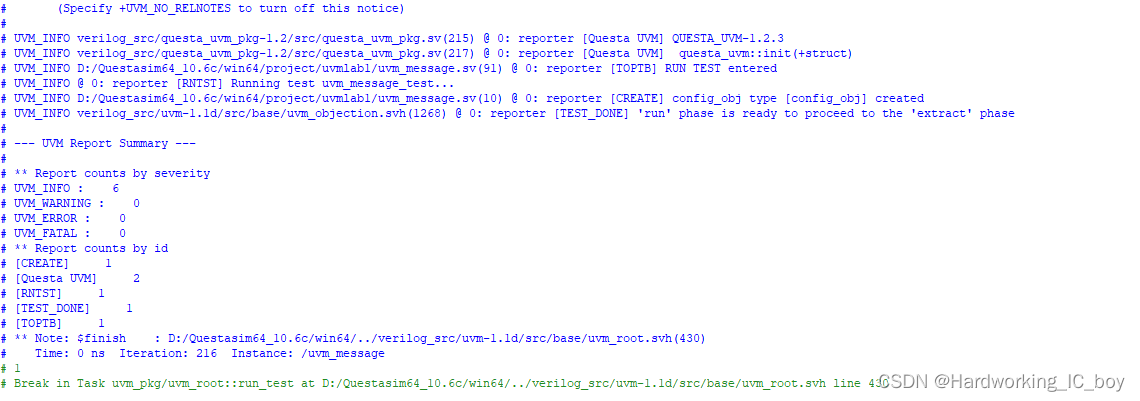
与实验5.1结果一样。
实验5.3 尝试通过使用uvm_root::get()来获取最顶层(即uvm_message_test的顶层)来控制过滤“CREATE”和“TOPTB”的消息。
可以采用下面方法进行。
uvm_root::get().set_report_id_verbosity_hier("ID", UVM_NONE);
uvm_message_test 最终版本
class uvm_message_test extends uvm_test;
    config_obj cfg;
    `uvm_component_utils(uvm_message_test)
    function new(string name = "uvm_message_test", uvm_component parent = null);
      super.new(name, parent);
    endfunction
    function void build_phase(uvm_phase phase);
      super.build_phase(phase);

      //TODO-5.1
      //Use set_report_verbosity_level_hier() to disable all of UVM messages
      //under the uvm_message_test
      // set_report_verbosity_level_hier(UVM_NONE);

      //TODO-5.2
      //Use set_report_id_verbosity_level_hier() to disable all of
      //'BUILD', "CREATE", “RUN” ID message under the uvm_message_test
      // set_report_id_verbosity_hier("BUILD", UVM_NONE);
      // set_report_id_verbosity_hier("CREATE", UVM_NONE);
      // set_report_id_verbosity_hier("RUN", UVM_NONE);

      //TODO-5.3
      //Why the UVM message from config_obj type and uvm_message module
      //could not be disabled? Please use the message filter methods
      //to disable them
      // uvm_root::get().set_report_id_verbosity_hier("CREATE", UVM_NONE);
      // uvm_root::get().set_report_id_verbosity_hier("BUILD", UVM_NONE);
      // uvm_root::get().set_report_id_verbosity_hier("RUN", UVM_NONE);

      `uvm_info("BUILD", "uvm_message_test build phase entered", UVM_LOW)
      cfg = config_obj::type_id::create("cfg");
      `uvm_info("BUILD", "uvm_message_test build phase exited", UVM_LOW)
    endfunction
    task run_phase(uvm_phase phase);
      super.run_phase(phase);
      `uvm_info("RUN", "uvm_message_test run phase entered", UVM_LOW)
      phase.raise_objection(this);
      phase.drop_objection(this);
      `uvm_info("RUN", "uvm_message_test run phase exited", UVM_LOW)
    endtask
  endclass
endpackage
module uvm_message;

  import uvm_pkg::*;
  `include "uvm_macros.svh"
  import uvm_message_pkg::*;

  initial begin
    //TODO-5.3
    //Why the UVM message from config_obj type and uvm_message module
    //could not be disabled? Please use the message filter methods
    //to disable them
    uvm_root::get().set_report_id_verbosity_hier("TOPTB", UVM_NONE);
    `uvm_info("TOPTB", "RUN TEST entered", UVM_LOW)
    run_test(""); // empty test name
    `uvm_info("TOPTB", "RUN TEST exited", UVM_LOW)
  end

endmodule
结果:
将文中提到的打印消息全部屏蔽了。

