- 官方文档:
- Vscode C++ tutorial - https://code.visualstudio.com/docs/cpp/config-mingw
- tasks.json (build instructions)
1. Variables Reference - https://code.visualstudio.com/docs/editor/variables-reference- launch.json (debugger settings)
- c_cpp_properties.json (compiler path and IntelliSense settings)
- 参考:
- 丙大
- 文章 - VSCode 配置 C++ 环境(Windows 篇) - https://subingwen.cn/vscode/cpp-windows/
- 视频 - 基于CMake的VSCode下的 C/C++环境搭建_Window篇 - https://www.bilibili.com/video/BV1vv4y1o7y5/
- 相关:
- C/C++ Linux - VScode配置C、C++环境 - https://lawsssscat.blog.csdn.net/article/details/108942869
在 windows 开发 c/c++ 一般是使用 visual studio 作为集成开发环境。但是它集成度非常高、包含的功能非常多;导致学习、使用成本非常高。
如果只是要一个编译、调试的环境,可以尝试 vscode 搭建其环境。
如果是初学者,相信成功搭建后,能对编译程序有一个新的理解。(而不是在 visual studio 中配置一堆+点击“启动/调试”按钮)
步骤总结:
- 安装 MinGW 编译套件
提供 编译程序所需的 如 gcc - 安装 CMake
分析项目生成 makefile 文件,然后通过编译套件(MinGW)中的 make 工具,基于 makefile 去构建当前的应用程序 - 安装 vscode、 安装 vscode 插件
- 对 vscode 中的文件进行相关的配置
文章目录
安装 MinGW 编译套件
MinGW安装教程 - https://lawsssscat.blog.csdn.net/article/details/103407137
安装 CMake 编译构建工具
CMake 是一个跨平台的编译工具,可以用简单的语句来描述所有平台的编译过程。它能够输出各样的 makefile 或者 project 文件。
CMake 并不直接构建出最终的软件,而是产生标准的项目构建文件(如 Linux 的 Makefile 或 Windows Visual C++ 的 projects/workspaces),然后再调用编译器按照构建文件规则编译整个项目。
现在越来越多的开源项目都支持使用 CMake 进行项目构建,如果想要在 VSCode 搭建的 C++ 开发环境中实现类似 IDE 的一键编译或者一键调试的效果,就可以依赖 CMake 来解决这个问题。
CMake 官方下载地址: https://cmake.org/download/

设置环境变量
无论是 MinGW 下载器下载到本地的编译套件,还是 CMake 的免安装版在对应的目录中都有一些可执行程序,需要配置环境变量,使这些程序全局可用:
# 根据个人情况配置
C:\MinGW\bin
C:\cmake\bin
> gcc --version
gcc (MinGW.org GCC-6.3.0-1) 6.3.0
Copyright (C) 2016 Free Software Foundation, Inc.
This is free software; see the source for copying conditions.  There is NO
warranty; not even for MERCHANTABILITY or FITNESS FOR A PARTICULAR PURPOSE.


> g++ --version
g++ (MinGW.org GCC-6.3.0-1) 6.3.0
Copyright (C) 2016 Free Software Foundation, Inc.
This is free software; see the source for copying conditions.  There is NO
warranty; not even for MERCHANTABILITY or FITNESS FOR A PARTICULAR PURPOSE.


> cmake --version
cmake version 3.24.2

CMake suite maintained and supported by Kitware (kitware.com/cmake).
安装 vscode 插件
插件:
- C/C++: 代码提示、代码调试、代码浏览
- cmake: 帮助我们将本地编写好的 cmakelist 文件生成 makefile,通过 makefile 就能通过 make 进行编译
- cmake tools: 编写 cmakelist 时的提示功能
单文件编译和调试
# 编译 tasks.json
演示通过 gcc/g++ 编译单独文件
随便打开个空项目目录,随便写个 main.c 文件
#include <stdio.h>

int main()
{
  int a = 20;
  int b = 12;
  printf("a = %d, b = %d\n", a, b);
  printf("a + b = %d\n", a+b);
  return 0;
}
随便打开 vscode 控制台输入下面命令既可生成可执行文件:
# (`.c` 用 gcc、`.cpp` 用 g++)
$ gcc main.c -o main.exe
执行
$ ./main.exe
a = 20, b = 12
a + b = 32
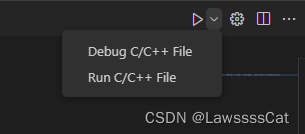
如果点击 vscode 左上角也能进行编译、测试
(但是,这会生成 vscode 文件tasks.json (build instructions))
配置说明:https://code.visualstudio.com/docs/editor/variables-reference{ "tasks": [ { "type": "cppbuild", "label": "C/C++: g++.exe 生成活动文件", "command": "C:\\MinGW\\bin\\g++.exe", "args": [ "-fdiagnostics-color=always", "-g", "${file}", "-o", "${fileDirname}\\${fileBasenameNoExtension}.exe" ], "options": { "cwd": "${fileDirname}" }, "problemMatcher": [ "$gcc" ], "group": { "kind": "build", "isDefault": true }, "detail": "调试器生成的任务。" } ], "version": "2.0.0" }
# 调试 launch.json
通过上面的 vscode 右上角按钮,已经能完成 单文件的 编译和调试。下面介绍如何 通过 launch.json 文件 自定义调试
创建 launch.json 文件
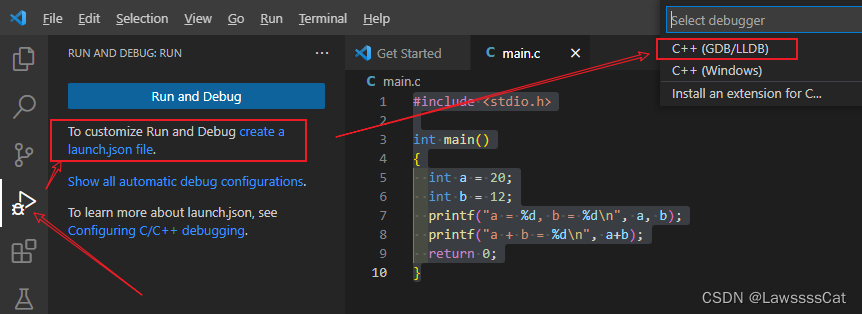
vscode 会帮我们生成 launch.json 和 tasks.json 两个文件,这两个文件描述了如何启动调试。目前不需要修改。
launch.json 文件大致如下
{
  "version": "0.2.0",
  "configurations": [
    {
      "name": "C/C++: g++.exe build and debug active file",
      "type": "cppdbg",
      "request": "launch",
      "program": "${fileDirname}\\${fileBasenameNoExtension}.exe",
      "args": [],
      "stopAtEntry": false,
      "cwd": "${fileDirname}",
      "environment": [],
      "externalConsole": false,
      "MIMode": "gdb",
      "miDebuggerPath": "C:\\msys64\\mingw64\\bin\\gdb.exe",
      "setupCommands": [
        {
          "description": "Enable pretty-printing for gdb",
          "text": "-enable-pretty-printing",
          "ignoreFailures": true
        }
      ],
      "preLaunchTask": "C/C++: g++.exe build active file"
    }
  ]
}
启动调试:在代码中打上断点,点击菜单 “Run > Start Debugging”(快捷键 F5) 既可开启调试。
启动调试会在文件当前目录生成可执行程序,文件名字与单文件一致。
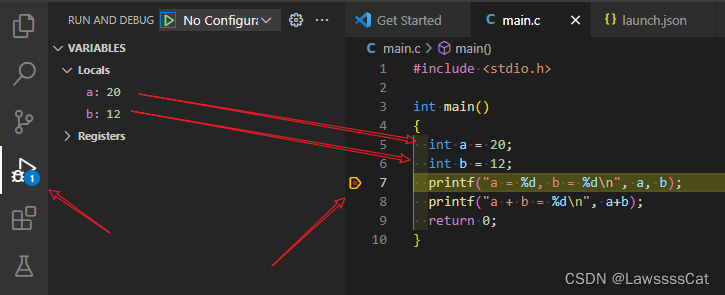
再看项目目录,在 .vscode 目录下会多出下面几个文件:
- tasks.json (build instructions)
- launch.json (debugger settings)
多文件的编译和调试
主要是应对实际项目中代码多目录存储的情况进行的多文件编译。
多文件编译这里列举两种方式: 基于命令行编译、基于 CMake 编译。
后者是习惯、常用的编译方式,但是最终也是调用的前者编译方式。所以这里就一并演示了。
# 搭建多文件的项目结构
首先,模拟生成一个多文件的目录结构:
# 目录结构

├─ /include                头文件
│  └─ sort.h
├─ /src                      实现
│  ├─ insert.cpp
│  └─ select.cpp
├─  test.cpp             测试代码
include/sort.h
#ifndef SORT_H_
#define SORT_H_
// 选择排序
void sort_selection(int *array, int len);
// 插入排序
void sort_insertion(int *array, int len);

#endif // SORT_H_
src/insert.cpp
// 插入排序算法(升序排列)
void sort_insertion(int *array, int len)
{
  int tmp = 0;     // 提起的值
  int index = 0;   // 提起后的坑
  // 遍历无序序列
  for (int i=1; i<len; ++i)
  {
    index = i;
    tmp = array[i];
    // 遍历有序序列(从后往前)
    for (int j=i-1; j>=0; --j)
    {
      // 小于提起的值的,往后移
      if (tmp<array[j])
      {
        array[j+1] = array[j]; // 往后移
        index = j; // 改变坑的位置
      }
      else
      {
        break;
      }
      // 填坑
      array[index] = tmp;
    }
  }
}
src/select.cpp
// 选择排序(升序序列)
void sort_selection(int *array, int len)
{
  // 最小值位置
  int min = 0;
  for (int i=0; i<len; ++i)
  {
    min = i;
    for(int j=i+1; j<len; ++j)
    {
      if(array[min]>array[j])
      {
        min = j;
      }
    }
    if(min!=i)
    {
      int tmp = array[min];
      array[min] = array[i];
      array[i] = tmp;
    }
  }
}
test.cpp
#include <iostream>
#include <stdio.h>
#include "sort.h"
using namespace std;

int main()
{
  int array1[] = {12, 2, 5, 22, 67, 32, 66, 45, 54, 89, 7, 6};
  int len1 = sizeof(array1)/sizeof(int);
  sort_insertion(array1, len1);
  // 遍历
  printf("insert sort result: ");
  for(int i=0; i<len1; i++)
  {
    cout <<  array1[i] << " ";
  }
  cout << endl;

  int array2[] = {12, 2, 5, 22, 67, 32, 66, 45, 54, 89, 7, 6};
  int len2 = sizeof(array2)/sizeof(int);
  sort_selection(array2, len2);
  // 遍历
  printf("select sort result: ");
  for(int i=0; i<len2; i++)
  {
    cout <<  array2[i] << " ";
  }
  cout << endl;
}
# 提示 c_cpp_properties.json
- c_cpp_properties.json (compiler path and IntelliSense settings)
如果引入了自己的头文件,并且文件目录不在项目根目录,会出现 #include 错误 的报错

这说明需要配置 C/C++ 提示插件的配置了

在里面指定 include 项目头的位置
{
  "configurations": [
    {
      "name": "GCC",
      "includePath": ["${workspaceFolder}/**"],
      "defines": ["_DEBUG", "UNICODE", "_UNICODE"],
      "windowsSdkVersion": "10.0.18362.0",
      "compilerPath": "C:/msys64/mingw64/bin/g++.exe",
      "cStandard": "c17",
      "cppStandard": "c++17",
      "intelliSenseMode": "windows-gcc-x64"
    }
  ],
  "version": 4
}
如果还有报错提示,就先不理了,后面配置好 tasks.json 大概率就消失了。
# 基于命令编译项目
# -I 指定头文件位置
$ g++ ./src/insert.cpp ./src/select.cpp test.cpp -o sort -I ./include/

$ ./sort.exe
insert sort result: 2 5 6 7 12 22 32 45 54 66 67 89
select sort result: 2 5 6 7 12 22 32 45 54 66 67 89
这样编译的问题很明显:如果文件比较多,且目录比较分散,命令将会非常臃肿难维护。
通过命令行调试则更麻烦,需要构建新的命令行重新生成可用于调试的可执行文件,再修改配置文件。不做开发工具开发的话,很少用到。所以就不(bu)介绍(dong)了。
# 基于 vscode 编译
这种编译方式其实就是配置 vscode,让它生成上述命令行,进行的编译。
同样,选择源码入口文件,点击右上角/左边的调试按钮
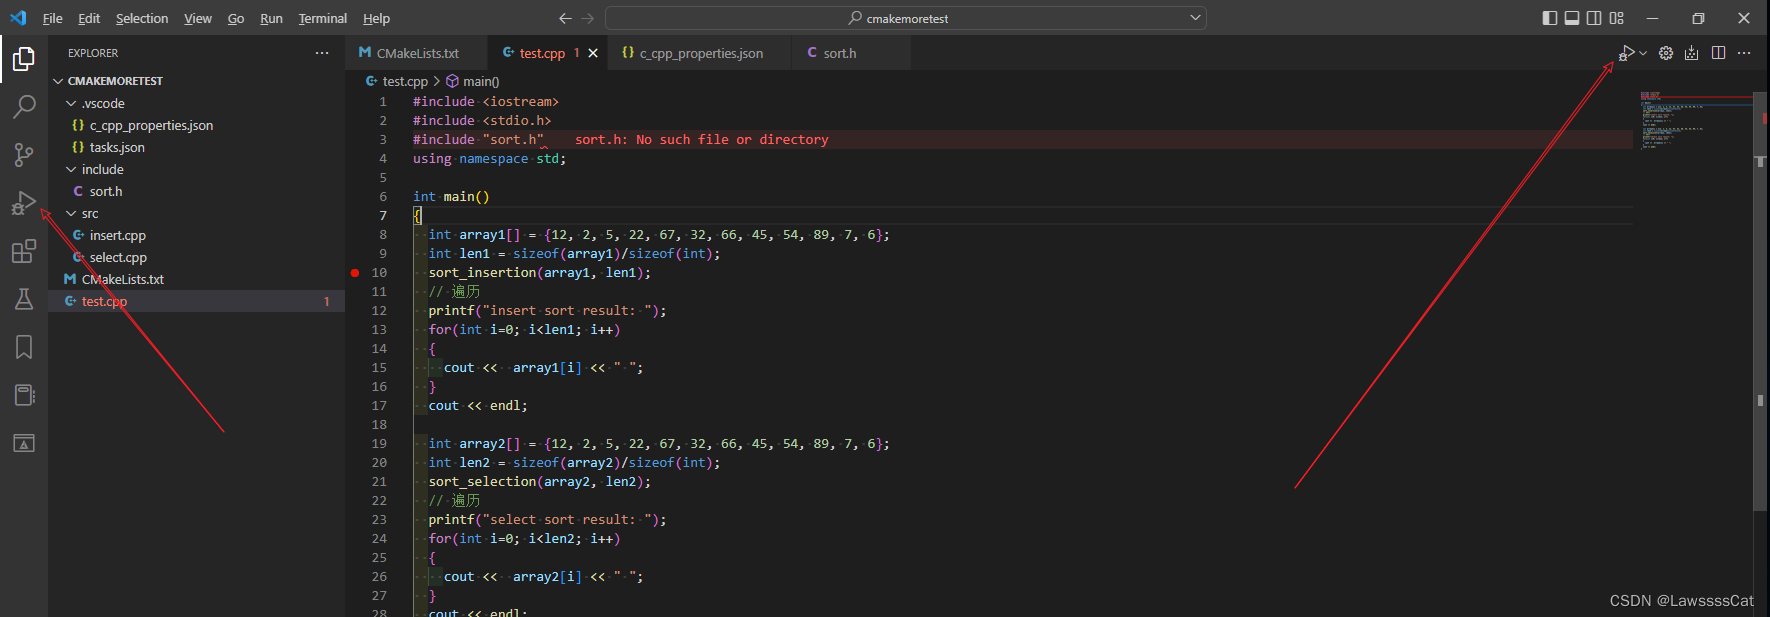
选择编译器:g++、gcc、… 自己看着办
然后,会生成 task.json 文件,然后,编译会报错,因为 tasks.json 文件需要修改:
{
  "tasks": [
    {
      "type": "cppbuild",
      "label": "C/C++: cpp.exe 生成活动文件",
      "command": "C:\\MinGW\\bin\\cpp.exe",
      "args": [
        "-fdiagnostics-color=always",
        "-g",
        "${file}",
        "-o",
        "${fileDirname}\\${fileBasenameNoExtension}.exe"
      ],
      "options": {
        "cwd": "${fileDirname}"
      },
      "problemMatcher": [
        "$gcc"
      ],
      "group": {
        "kind": "build",
        "isDefault": true
      },
      "detail": "调试器生成的任务。"
    }
  ],
  "version": "2.0.0"
}
在 args 上加上 头文件位置 和 源代码位置:
      "args": [
        "-fdiagnostics-color=always",
        "-g",
        "${file}",
        "${fileDirname}\\src\\*",
        "-o",
        "${fileDirname}\\${fileBasenameNoExtension}.exe",
        "-I",
        "${fileDirname}\\include\\"
      ],
然后,头文件的报错没了、再次点击调试按钮,也可以进入断点了。
如果还想自定义调试配置的话,就点击右上角的 ?? ,生成 launch.json 文件进行修改咯
# 基于 CMake 编译
编写 cmake 配置
首先,在源文件所在的工作区目录中添加一个 CMakeLists.txt 文件(这个文件名字是固定的,被 CMake 使用)
project(SortMake)
aux_source_directory(src SRC_SUB)
aux_source_directory(. SRC_CUR)
add_executable(sort ${SRC_SUB} ${SRC_CUR})
include_directories(include)
| 字段 | 解释 |
|---|---|
| project() | 设置项目名称,参数可以随意指定 |
| aux_source_directory(dir VAR) | 搜索 dir 目录下所有的源文件,并将结果列表存储在变量 VAR 中 |
| add_executable(target src) | 指定使用源文件 src,生成可执行程序 target, ${变量名} 是取变量的值 |
| include_directories(headDir) | 设置包含的头文件目录 |
生成 Makefile 配置
在 vscode 中配置 cmake:
- 快捷键
ctrl+shift+p,在窗口中搜索CMake configure - 指定编译器 gcc、g++ (选择上面自己配置号的编译器)
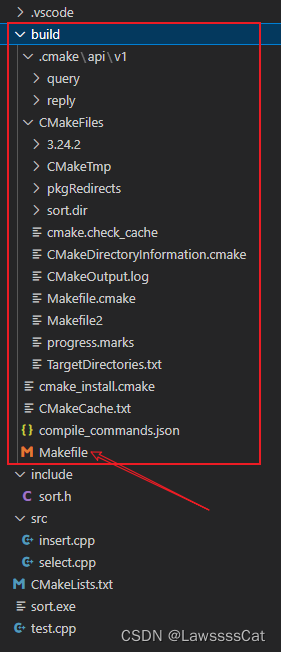
等待一段时间, buld 目录将会被生成:(主要留意 Makefile 文件)
执行编译指令
# 进入 build 目录
$ cd build/

# 检查 cmake 生成 Makefile 的情况,如果 Generating done,则可以 make 了
$ cmake ..
CMake Warning (dev) in CMakeLists.txt:
  No cmake_minimum_required command is present.  A line of code such as

    cmake_minimum_required(VERSION 3.24)

  should be added at the top of the file.  The version specified may be lower
  if you wish to support older CMake versions for this project.  For more
  information run "cmake --help-policy CMP0000".
This warning is for project developers.  Use -Wno-dev to suppress it.

-- Configuring done
-- Generating done
-- Build files have been written to: E:/temp/cmakemoretest/build

# 在 minggw 中 make 的名字如下
$ mingw32-make.exe
[ 25%] Building CXX object CMakeFiles/sort.dir/src/insert.obj
[ 50%] Building CXX object CMakeFiles/sort.dir/src/select.obj
[ 75%] Building CXX object CMakeFiles/sort.dir/test.obj
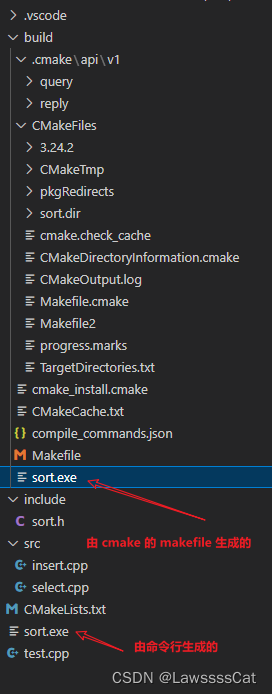
[100%] Linking CXX executable sort.exe
[100%] Built target sort
# 基于 CMake 调试
下面介绍如何基于 CMake 进行配置并调试:
先决条件是 CMakeList.txt 已经编写没问题了,才能考虑下面调试的步骤。
CMakeList.txt
project(SortMake)
aux_source_directory(src SRC_SUB)
aux_source_directory(. SRC_CUR)
add_executable(sort ${SRC_SUB} ${SRC_CUR})
include_directories(include)
首先配置编译方式: tasks.json
添加任务
{
    "version": "2.0.0",
    "options": {
        "cwd": "${workspaceFolder}/build/" // 工作区目录
    },

    "tasks": [
        {
            "label": "cmake",
            "type": "shell",
            "command": "cmake",
            "args": [
                ".."
            ]
        },
        {
            "label": "make",
            "group":{
                "kind":"build",
                "isDefault":true
            },
            "command": "mingw32-make.exe", // 全局配置 or 绝对路径
            "args":[
            ],
            "dependsOn":[
                "cmake"
            ]
        },
        {
            "label":"Build my project",
            "dependsOn":[
                "make"
            ]
        }
    ]
}
然后,配置 launch.json (下面两处有注释的地方,需要更改)
{
  "configurations": [
    {
      "name": "C/C++: launch by cmake",
      "type": "cppdbg",
      "request": "launch",
      "program": "${workspaceFolder}\\build\\sort.exe", // 程序路径
      "args": [],
      "stopAtEntry": false,
      "cwd": "${fileDirname}\\build",
      "environment": [],
      "externalConsole": false,
      "MIMode": "gdb",
      "miDebuggerPath": "C:\\MinGW\\bin\\gdb.exe",
      "setupCommands": [
        {
          "description": "为 gdb 启用整齐打印",
          "text": "-enable-pretty-printing",
          "ignoreFailures": true
        },
        {
          "description": "将反汇编风格设置为 Intel",
          "text": "-gdb-set disassembly-flavor intel",
          "ignoreFailures": true
        }
      ],
      "preLaunchTask": "Build by cmake" // tasks 的 label
    }
  ],
  "version": "2.0.0"
}
最后,通过 ctrl+shift+p 查找 cmake config 命令,生成 build 目录。
之后就可以在源码入口点击 调试按钮开始调试了。
当然,上述流程还是复杂的。
其实,cmake tool 插件能自动完成上述配置,我们只需要编写 CMakeList.txt,而不需要理会 vscode 的配置,一样能完成编译、调试。
这内容,在下面进行整理 ??
?? 【整理】 cmake 插件在 vscode 中生成配置的流程
还原 cmake 插件在 vscode 的初始状态
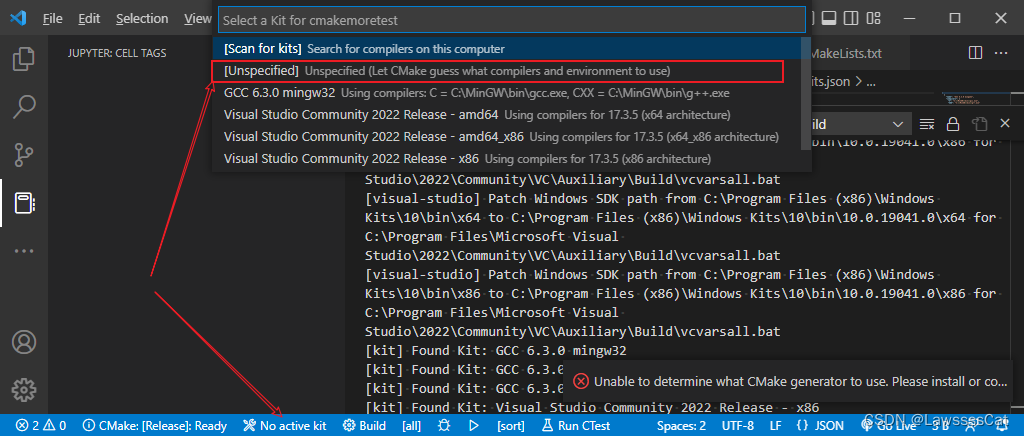
-
取消 kit 选择
-
删除 cmake 的用户配置的 kit

-
删除项目中的 build 目录
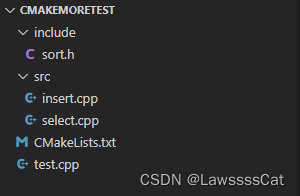
还原了之后,进行配置。
同样的,第一步配置 kit
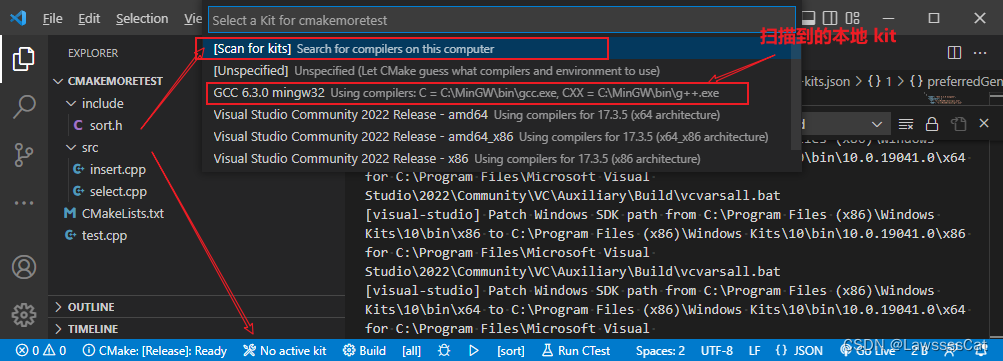

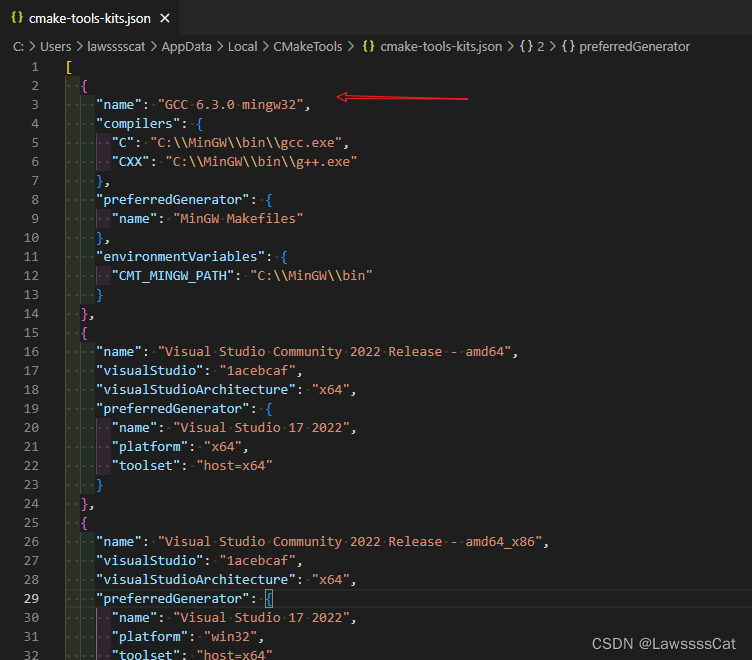
扫描完成后,再看用户本地 kits 配置多了很多节点
然后,编辑 CMakeLists.txt 文件,用 cmake 生成配置
CMakeLists.txt
project(SortMake)
aux_source_directory(src SRC_SUB)
aux_source_directory(. SRC_CUR)
add_executable(sort ${SRC_SUB} ${SRC_CUR})
include_directories(include)
生成配置

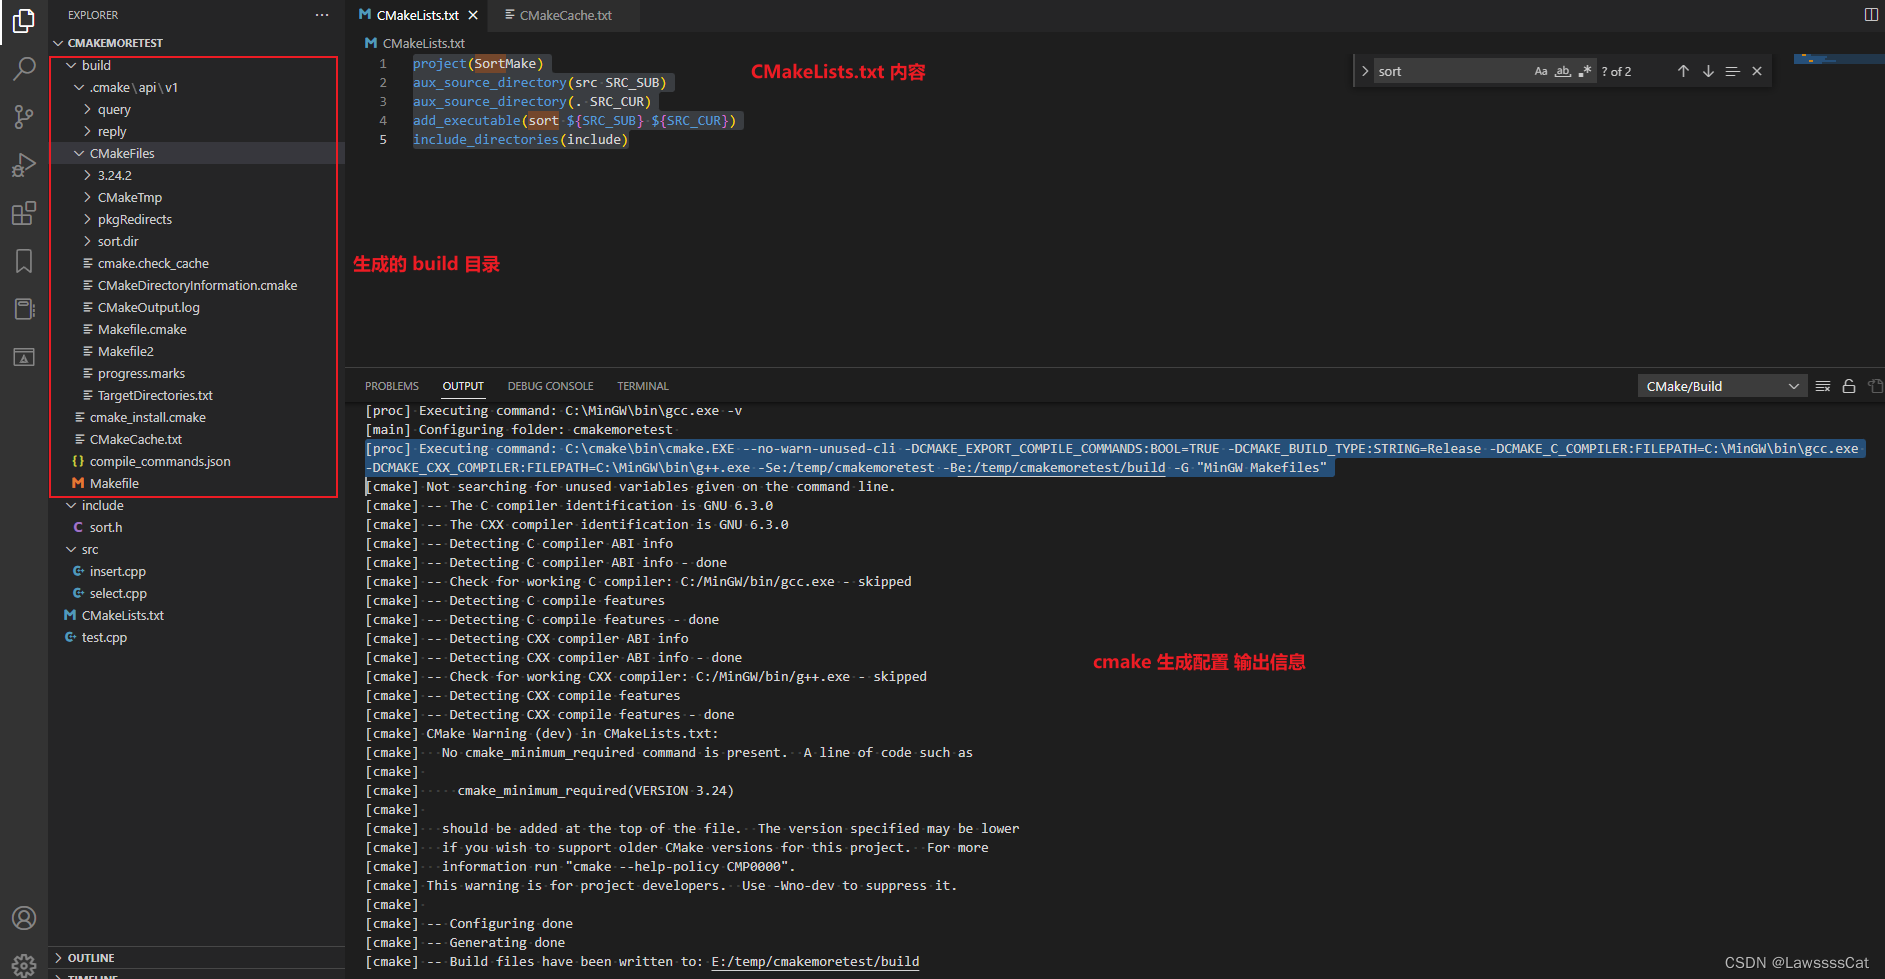
当输出信息显示 “[cmake] – Generating done“ 时,说明配置生成成功
同时,
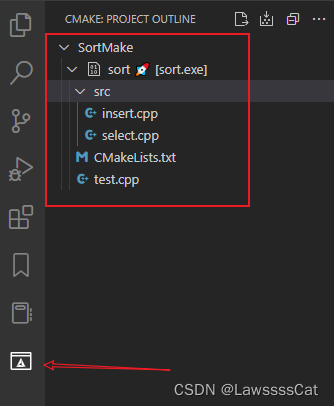
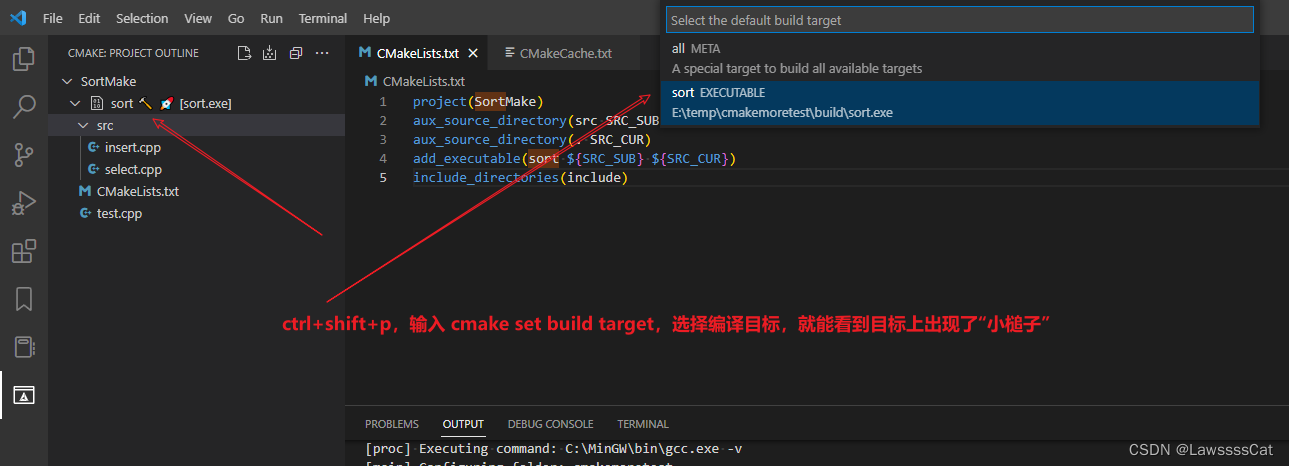
🔨:默认编译文件
🚀:默认调试文件
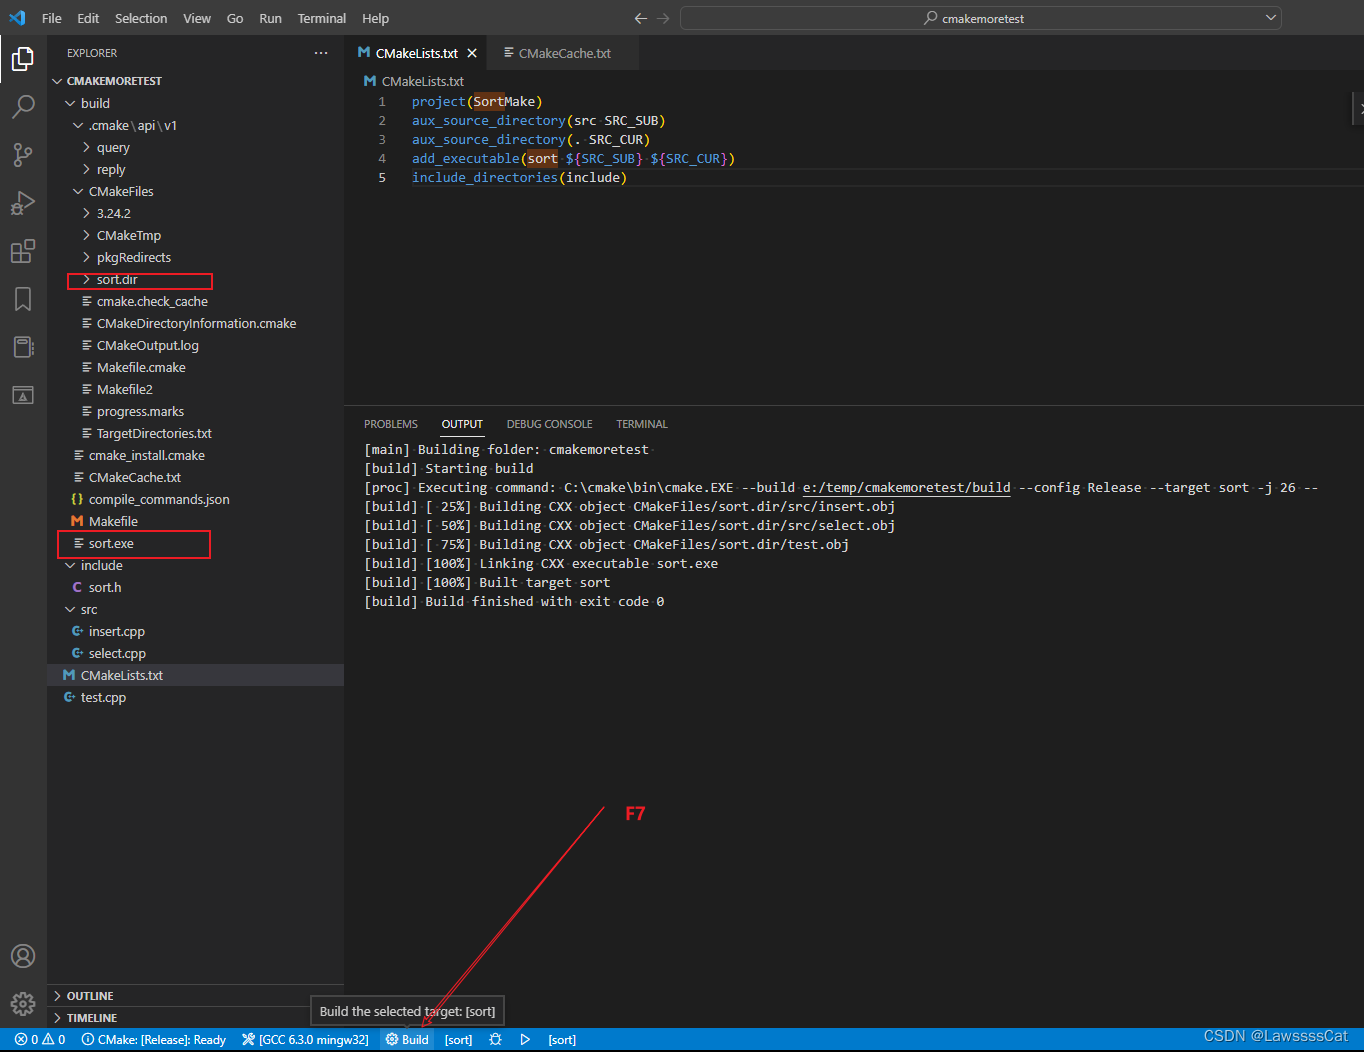
这时候点击编译,就能看到编译日志,和编译输出文件
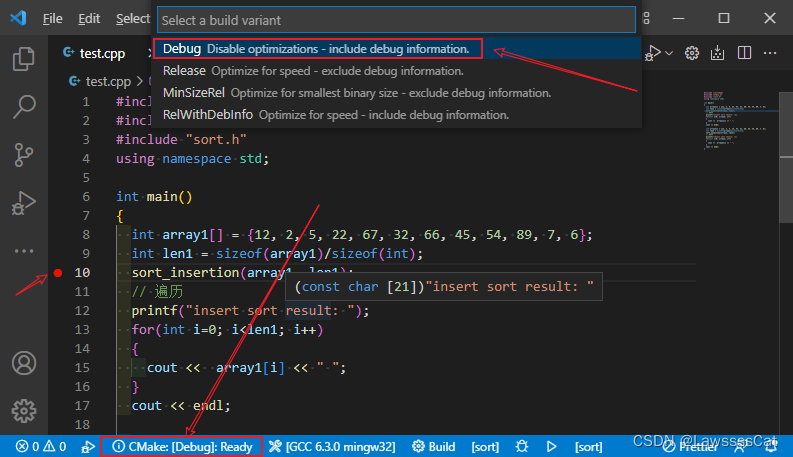
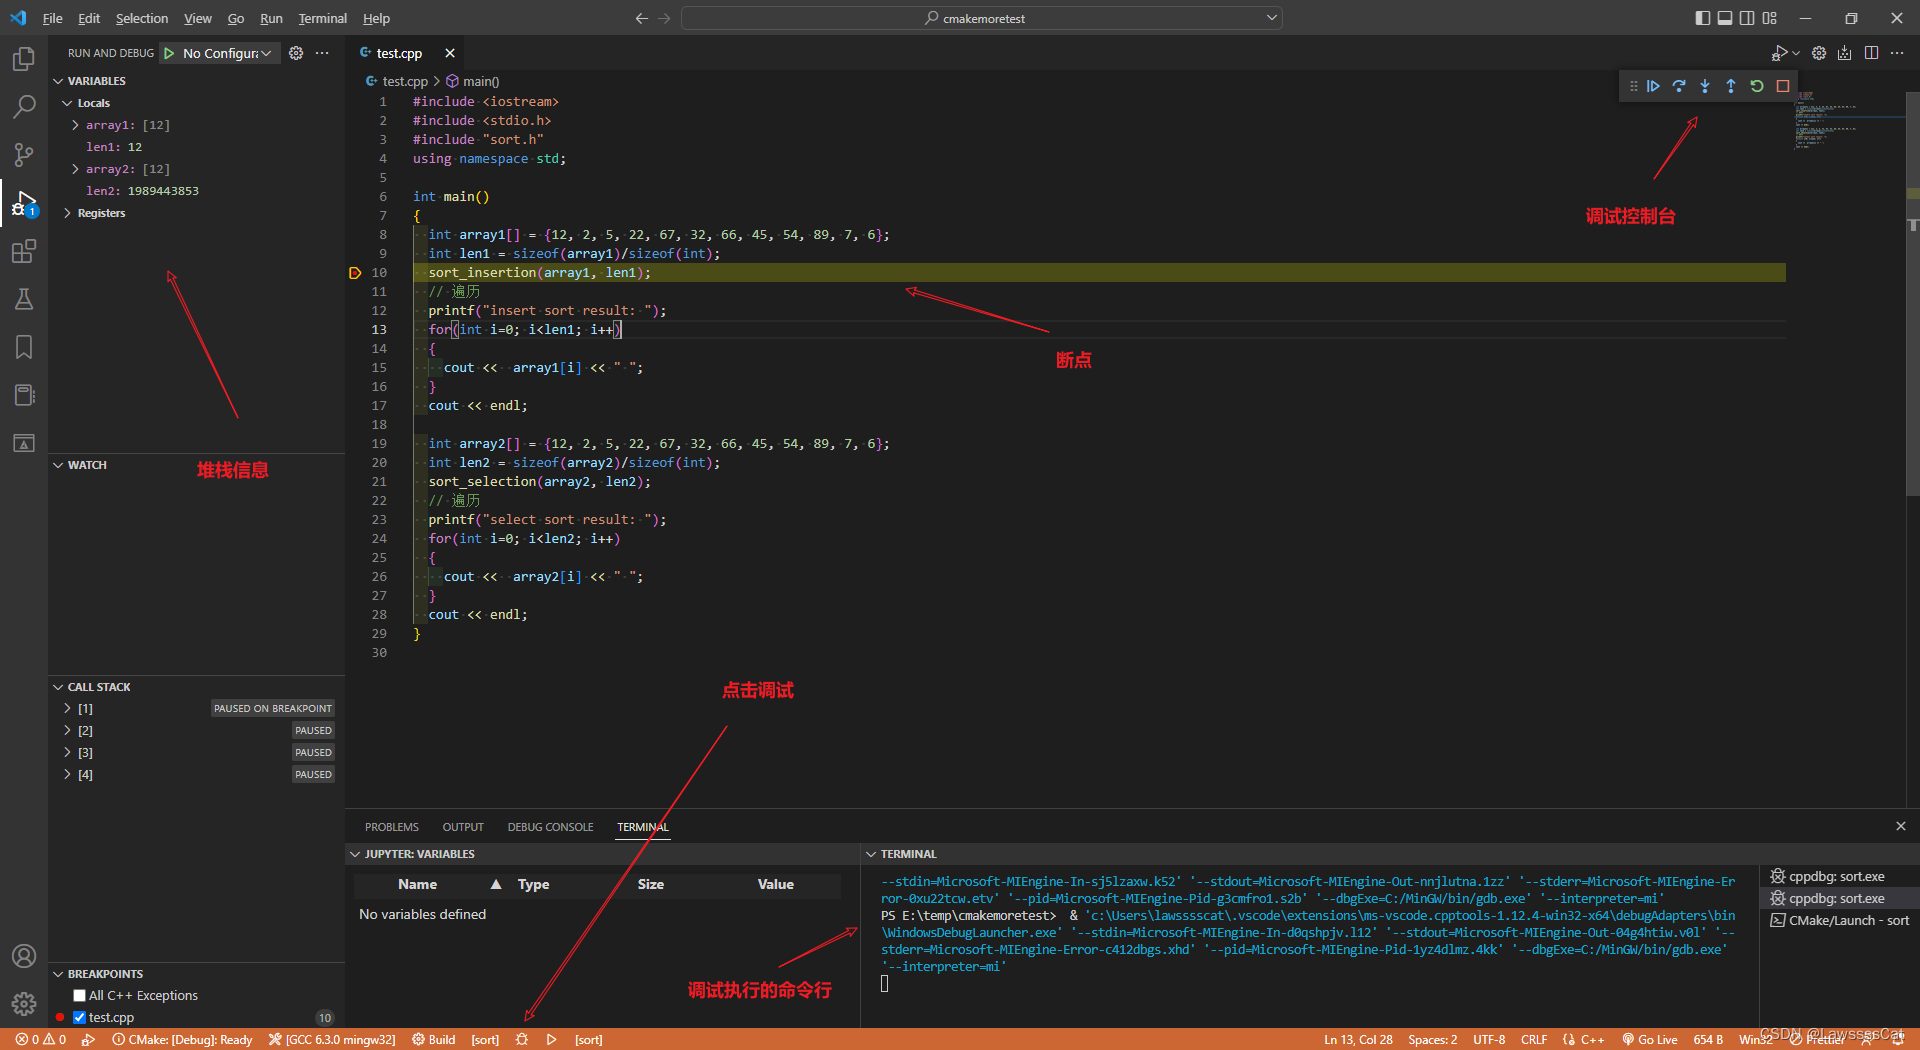
这时候在调试文件上打上断点,输入 cmake debug 可以尝试调试
💡 提示
不进入调试,可能是 cmake 生成的文件模式每选对,应该选择 debug 模式
