技术选型
关于延迟队列的概念还是其他技术选择请参考这个文章点我。由于系统中使用了Redisson我这里就用他实现一下。
说明:当时参考的不知道是哪位大佬的文章,没有保存住,在这里略表歉意。
好了开撸
引入 Redisson 依赖
<!--redisson-->
        <dependency>
            <groupId>org.redisson</groupId>
            <artifactId>redisson-spring-boot-starter</artifactId>
            <version>3.16.0</version>
        </dependency>
配置项
# 单节点配置
singleServerConfig:
  # 连接空闲超时,单位:毫秒
  idleConnectionTimeout: 10000
  # 连接超时,单位:毫秒
  connectTimeout: 10000
  # 命令等待超时,单位:毫秒
  timeout: 3000
  # 命令失败重试次数,如果尝试达到 retryAttempts(命令失败重试次数) 仍然不能将命令发送至某个指定的节点时,将抛出错误。
  # 如果尝试在此限制之内发送成功,则开始启用 timeout(命令等待超时) 计时。
  retryAttempts: 3
  # 命令重试发送时间间隔,单位:毫秒
  retryInterval: 1500
  #  # 重新连接时间间隔,单位:毫秒
  #  reconnectionTimeout: 3000
  #  # 执行失败最大次数
  #  failedAttempts: 3
  # 密码
  password: ********
  # 单个连接最大订阅数量
  subscriptionsPerConnection: 5
  # 客户端名称
  clientName: null
  #  # 节点地址
  address: redis://127.0.0.1:6379
  # 发布和订阅连接的最小空闲连接数
  subscriptionConnectionMinimumIdleSize: 1
  # 发布和订阅连接池大小
  subscriptionConnectionPoolSize: 50
  # 最小空闲连接数
  connectionMinimumIdleSize: 32
  # 连接池大小
  connectionPoolSize: 64
  # 数据库编号
  database: 0
  # DNS监测时间间隔,单位:毫秒
  dnsMonitoringInterval: 5000
# 线程池数量,默认值: 当前处理核数量 * 2
threads: 0
# Netty线程池数量,默认值: 当前处理核数量 * 2
nettyThreads: 0
# 编码
codec: !<org.redisson.codec.JsonJacksonCodec> {}
# 传输模式
transportMode : "NIO"
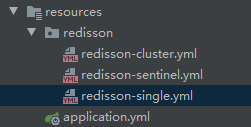
文件位置

加载数据
import org.redisson.Redisson;
import org.redisson.api.RedissonClient;
import org.redisson.config.Config;
import org.springframework.context.annotation.Bean;
import org.springframework.context.annotation.Configuration;
import org.springframework.core.io.ClassPathResource;

import java.io.IOException;

/**
 * @author ****
 * @date 2021/7/14
 */
@Configuration
public class RedissonConfig {


    @Bean(destroyMethod = "shutdown")
    public RedissonClient redissonClient() throws IOException {
        Config config = Config.fromYAML(new ClassPathResource("redisson/redisson-single.yml").getInputStream());
        return Redisson.create(config);
    }
}
编写工具类
import lombok.extern.slf4j.Slf4j;
import org.redisson.api.RBlockingDeque;
import org.redisson.api.RDelayedQueue;
import org.redisson.api.RedissonClient;
import org.springframework.beans.factory.annotation.Autowired;
import org.springframework.stereotype.Component;

import java.util.Map;
import java.util.concurrent.TimeUnit;

/**
 * @author *****
 * @date 2021/7/14
 * redis延迟队列工具
 */
@Slf4j
@Component
public class RedisDelayQueueUtil {

    @Autowired
    private RedissonClient redissonClient;

    /**
     * 添加延迟队列
     * @param value 队列值
     * @param delay 延迟时间
     * @param timeUnit 时间单位
     * @param queueCode 队列键
     * @param <T>
     */
    public <T> void addDelayQueue(T value, long delay, TimeUnit timeUnit, String queueCode){
        try {
            RBlockingDeque<Object> blockingDeque = redissonClient.getBlockingDeque(queueCode);
            RDelayedQueue<Object> delayedQueue = redissonClient.getDelayedQueue(blockingDeque);
            delayedQueue.offer(value, delay, timeUnit);
            log.info("(添加延时队列成功) 队列键:{},队列值:{},延迟时间:{}", queueCode, value, timeUnit.toSeconds(delay) + "秒");
        } catch (Exception e) {
            log.error("(添加延时队列失败) {}", e.getMessage());
            throw new RuntimeException("(添加延时队列失败)");
        }
    }

    /**
     * 获取延迟队列
     * @param queueCode
     * @param <T>
     * @return
     * @throws InterruptedException
     */
    public <T> T getDelayQueue(String queueCode) throws InterruptedException {
    	//Blocking Deque (阻塞双端队列)  没有消息时,会阻塞住当前线程,直到有新的消息到来
        RBlockingDeque<Map> blockingDeque = redissonClient.getBlockingDeque(queueCode);
        T value  = (T) blockingDeque.take();
        return value;
    }

}
关于Redisson的几种分布式队列可以参考这片文章点我
延迟队列执行器
/**
 * @author ***
 * @date 2021/7/14
 * 延迟队列执行器  消费类需要实现此接口
 */
public interface RedisDelayQueueHandle<T> {

    /**
     * 执行方法
     * @param t 执行类
     */
    void execute(T t);
}
业务消费类枚举
主要将你实际的消费类放到枚举中,系统启动的时候遍历枚举类将你的消费类加载到队列中
import lombok.AllArgsConstructor;
import lombok.Getter;
import lombok.NoArgsConstructor;

/**
 * @author *******
 * @date 2021/7/14
 */
@Getter
@NoArgsConstructor
@AllArgsConstructor
public enum  RedisDelayQueueEnum {

    CONSUME_ORDER_PAY_TIMEOUT("CONSUME_ORDER_PAY_TIMEOUT","订单支付超时,自动取消订单", "consumeOrderPayTimeout"),
    CONSUME_JOINT_TIMOUT("CONSUME_JOINT_TIMOUT", "拼团超时,取消拼团", "consumeJointTimout");

    /**
     * 延迟队列 Redis Key
     */
    private String code;

    /**
     * 中文描述
     */
    private String name;

    /**
     * 延迟队列具体业务实现的 Bean
     * 可通过 Spring 的上下文获取
     */
    private String beanId;
}
加载消费队列
注意: 这里有一点要注意一下。因为redisson在获取延迟队列时是调用getBlockingDeque,而Blocking Deque是阻塞双端队列,当该队列没有消息时会阻塞住当前线程,直到另一个线程将一个元素插入空队列,或者从完整队列中轮询第一个元素才会继续下步操作。为了防止各个消费队列相互阻塞影响,就每个消费类(消费队列)都单起一个线程去获取数据,这样大家各干各的,互不影响。
import cn.hutool.extra.spring.SpringUtil;
import lombok.extern.slf4j.Slf4j;
import org.springframework.beans.factory.annotation.Autowired;
import org.springframework.boot.CommandLineRunner;
import org.springframework.stereotype.Component;

/**
 *
 *@author ***
 *@date  2021/7/14
 *系统启动时加载消费队列
 */
@Slf4j
@Component
public class RedisDelayQueueRunner implements CommandLineRunner {

    @Autowired
    private RedisDelayQueueUtil redisDelayQueueUtil;

    @Override
    public void run(String... args) {

        RedisDelayQueueEnum[] queueEnums = RedisDelayQueueEnum.values();
        //每个消费者启动一个固定线程,以防止某个消费者在没有消息消费时调用getBlockingDeque(阻塞双端队列)一直被阻塞进而导致其他的消费者有消息消费也被阻塞住.
        for (RedisDelayQueueEnum queueEnum : queueEnums) {
            new Thread(() -> {
                while (true){
                    try {
                            Object value = redisDelayQueueUtil.getDelayQueue(queueEnum.getCode());
                            if (value != null) {
                                RedisDelayQueueHandle redisDelayQueueHandle = SpringUtil.getBean(queueEnum.getBeanId());
                                redisDelayQueueHandle.execute(value);
                            }
                            System.out.println();

                    }catch (Exception e) {
                        log.error("(Redis延迟队列异常中断) {}", e);
                    }
                    try {
                        Thread.sleep(1000);
                    } catch (InterruptedException e) {
                        e.printStackTrace();
                    }
                }
            }).start();
        }
        log.info("(Redis延迟队列启动成功)");
    }
}
消费者类
import com.civ.edu.service.order.ApiOrderService;
import lombok.extern.slf4j.Slf4j;
import org.springframework.beans.factory.annotation.Autowired;
import org.springframework.stereotype.Component;

import java.util.Map;

/**
 * @author ****
 * @date 2021/7/14
 * 订单支付超时处理类
 */
@Component
@Slf4j
public class ConsumeOrderPayTimeout implements RedisDelayQueueHandle<Map> {

    @Autowired
    ApiOrderService apiOrderService;

    @Override
    public void execute(Map map) {
        log.info("(收到订单支付超时延迟消息) {}", map);

        //你的业务逻辑代码

    }
}
测试类
    @Autowired
    RedisDelayQueueUtil redisDelayQueueUtil;

    @GetMapping("orderId")
    public Result orderId(){
        Map<String, Object> param = new HashMap<>(2);
        param .put("orderId", "1415626985311772674");
        param .put("remark", "订单支付超时,自动取消订单");
        // 添加订单支付超时,自动取消订单延迟队列。为了测试效果,延迟10秒钟
        redisDelayQueueUtil.addDelayQueue(map1, 10, TimeUnit.SECONDS, RedisDelayQueueEnum.CONSUME_ORDER_PAY_TIMEOUT.getCode());
        return Result.success();
    }
测试结果
2021-07-16 00:04:15.614 [http-nio-8081-exec-3] INFO  RedisDelayQueueUtil-(添加延时队列成功) 队列键:CONSUME_ORDER_PAY_TIMEOUT,队列值:{orderId=1415626985311772674, remark=订单支付超时,自动取消订单},延迟时间:10秒
2021-07-16 00:04:25.665 [Thread-36] INFO  ConsumeOrderPayTimeout-(收到订单支付超时延迟消息) {orderId=1415626985311772674, remark=订单支付超时,自动取消订单}