AndServer 如何使用(如何搭建一个基于安卓的服务器)
AndServer是什么
AndServer 是 Android 平台的 Web Server 和 Web Framework。 它基于编译时注解提供了类似 SpringMVC 的注解和功能,如果您熟悉 SpringMVC,则可以非常快速地掌握它。
AndServer的Demo
插件和依赖的配置
在project的build.gradle中添加插件
buildscript {
    repositories {
        google()
        jcenter()
    }
    dependencies {
        classpath "com.android.tools.build:gradle:4.1.3"
        classpath 'com.yanzhenjie.andserver:plugin:2.1.9'
    }
}
moudle 的 build.gradle 配置()
plugins {
    id 'com.android.application'
    id 'com.yanzhenjie.andserver'
}

dependencies {
    implementation 'com.yanzhenjie.andserver:api:2.1.9'
    annotationProcessor 'com.yanzhenjie.andserver:processor:2.1.9'
}
这里注意一定不要忘了plugins中的配置
代码编写
接下来我们就可以进行服务端的代码编写工作了,编写的语法和spring差不多,这里我们直接写一个restful风格的api
TestController.java
@RestController
@RequestMapping("/test")
public class TestController {
    @GetMapping("/login")
    public String login() {
        return "HelloWord";
    }
}
在工具类中写一个获取手机IP地址的方法方便后面使用
Util.java
public class Util {

    private static final Pattern IPV4_PATTERN = Pattern.compile("^(" +
            "([0-9]|[1-9][0-9]|1[0-9]{2}|2[0-4][0-9]|25[0-5])\\.){3}" +
            "([0-9]|[1-9][0-9]|1[0-9]{2}|2[0-4][0-9]|25[0-5])$");

    private static boolean isIPv4Address(String input) {
        return IPV4_PATTERN.matcher(input).matches();
    }

    //获取本机IP地址
    public static InetAddress getLocalIPAddress() {
        Enumeration<NetworkInterface> enumeration = null;
        try {
            enumeration = NetworkInterface.getNetworkInterfaces();
        } catch (SocketException e) {
            e.printStackTrace();
        }
        if (enumeration != null) {
            while (enumeration.hasMoreElements()) {
                NetworkInterface nif = enumeration.nextElement();
                Enumeration<InetAddress> inetAddresses = nif.getInetAddresses();
                if (inetAddresses != null)
                    while (inetAddresses.hasMoreElements()) {
                        InetAddress inetAddress = inetAddresses.nextElement();
                        if (!inetAddress.isLoopbackAddress() && isIPv4Address(inetAddress.getHostAddress())) {
                            return inetAddress;
                        }
                    }
            }
        }
        return null;
    }
}
在MainActivity中写启动服务器的代码(这里因为方便就直接讲代码放在onCreate,我们自己做项目的时候可以写一个类专门用来管理AndServer)
MainActivity.java
public class MainActivity extends AppCompatActivity {

    public static final String TAG = "MainActivity";
    private Server mServer;

    @Override
    protected void onCreate(Bundle savedInstanceState) {
        super.onCreate(savedInstanceState);
        setContentView(R.layout.activity_main);
        //注册AndServer
        mServer = AndServer.webServer(this)
                .port(8080)
                .inetAddress(Util.getLocalIPAddress())//获取手机的IP地址
                .timeout(10, TimeUnit.SECONDS)
                .listener(new Server.ServerListener() {
                    @Override
                    public void onStarted() {
                        // TODO The server started successfully.
                        Log.e(TAG, "onStarted: "+"服务器启动 Ip:"+Util.getLocalIPAddress());
                    }

                    @Override
                    public void onStopped() {
                        // TODO The server has stopped.
                        Log.e(TAG, "onStarted: "+"服务器停止");
                    }

                    @Override
                    public void onException(Exception e) {
                        // TODO An exception occurred while the server was starting.
                        Log.e(TAG, "onStarted: "+"服务器异常"+e.getMessage());
                    }
                })
                .build();
		//注册完以后调用启动Server的方法
        startServer();
    }

    /**
     * 启动 server.
     */
    public void startServer() {
        if (mServer.isRunning()) {
            // TODO The server is already up.
        } else {
            mServer.startup();
        }
    }

    /**
     * 停止server.
     */
    public void stopServer() {
        if (mServer.isRunning()) {
            mServer.shutdown();
        } else {
            Log.w("AndServer", "The server has not started yet.");
        }
    }
}
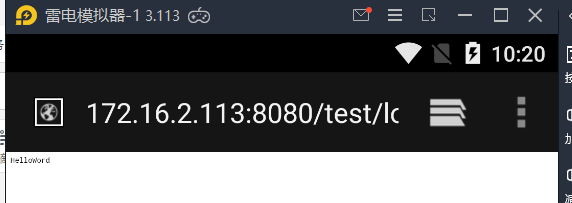
加下来就可以直接启动项目看一下我们的成果啦!
因为我们没有做UI界面所以启动后看到的是Helloword

在日志中查看ip地址


返回helloword 测试成功!!!
版权声明:文章为原创文章,转载请注明出处!