我们在使用spring cloud config的时候或者相关类似配置中心,都很想知道客户端是怎么实现将配置中心的配置注入到当前spring的上线文的。本文分析的spring clod版本是2.1.11
开始之前,先回顾以下之前写的这篇文章Spring cloud读取bootstrap配置过程
应该知道在spring中,是将所有的配置,抽象成了一个Enviroment类来承载这些配置的,所谓的配置中心其实都是在ApplicationContext实例化之后,将第三方的配置加载导入到environment中然后再去初始实例化bean的。
首先我们看下在spring-colud-context模块中,spring.factories中,有如下定义:
org.springframework.boot.autoconfigure.EnableAutoConfiguration=\
org.springframework.cloud.autoconfigure.ConfigurationPropertiesRebinderAutoConfiguration,\
org.springframework.cloud.autoconfigure.LifecycleMvcEndpointAutoConfiguration,\
org.springframework.cloud.autoconfigure.RefreshAutoConfiguration,\
org.springframework.cloud.autoconfigure.RefreshEndpointAutoConfiguration,\
org.springframework.cloud.autoconfigure.WritableEnvironmentEndpointAutoConfiguration
# Application Listeners
org.springframework.context.ApplicationListener=\
org.springframework.cloud.bootstrap.BootstrapApplicationListener,\
org.springframework.cloud.bootstrap.LoggingSystemShutdownListener,\
org.springframework.cloud.context.restart.RestartListener
# Bootstrap components
org.springframework.cloud.bootstrap.BootstrapConfiguration=\
org.springframework.cloud.bootstrap.config.PropertySourceBootstrapConfiguration,\
org.springframework.cloud.bootstrap.encrypt.EncryptionBootstrapConfiguration,\
org.springframework.cloud.autoconfigure.ConfigurationPropertiesRebinderAutoConfiguration,\
org.springframework.boot.autoconfigure.context.PropertyPlaceholderAutoConfiguration
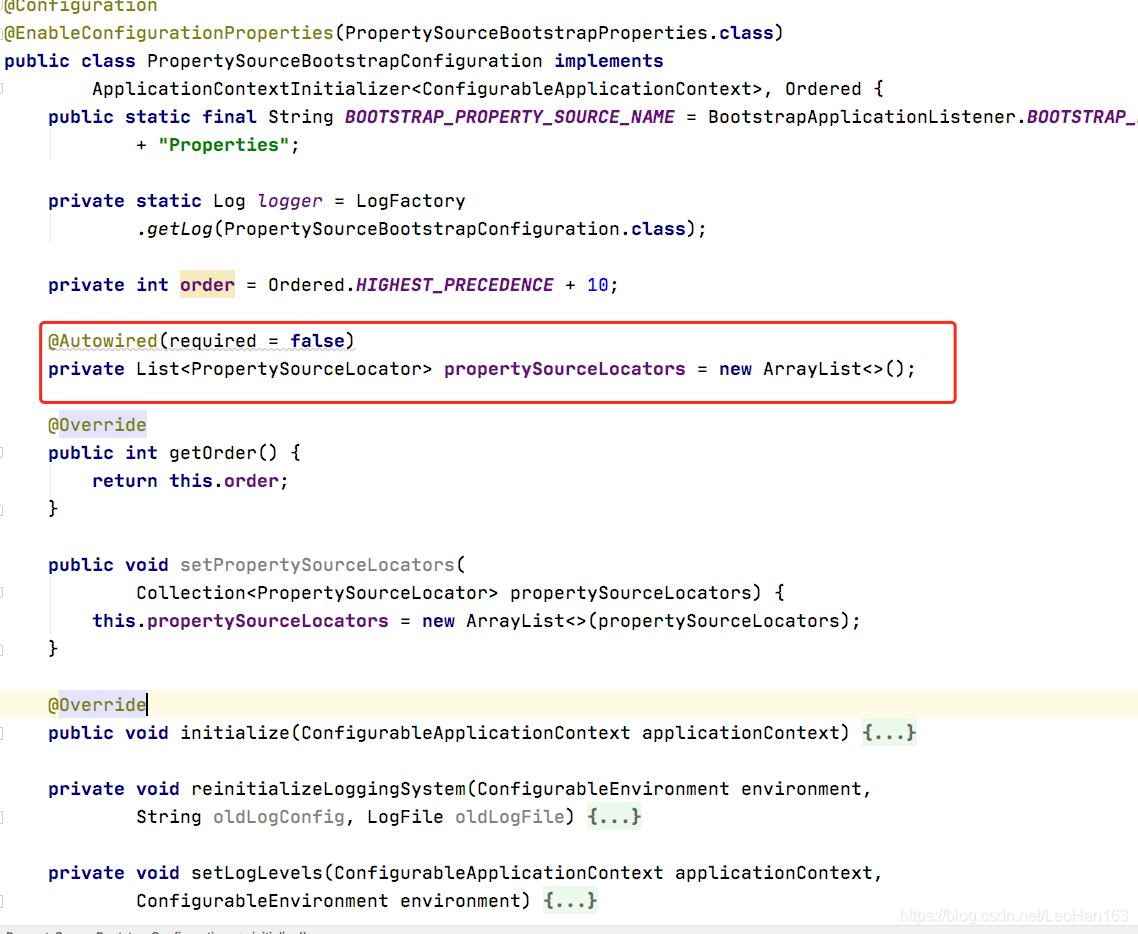
这其中PropertySourceBootstrapConfiguration是实现的关键。
这其中,标红出来的是具体去加载配置的类,我们后面说。
可以看到,该类实现了ApplicationContextInitializer接口,其主要方法:
public interface ApplicationContextInitializer<C extends ConfigurableApplicationContext> {

	/**
	 * Initialize the given application context.
	 * @param applicationContext the application to configure
	 */
	void initialize(C applicationContext);

}
也就是说这个方法里面传入的是一个已经实例化但是尚未完全初始化的ConfigurableApplicationContext,我们看下PropertySourceBootstrapConfiguration的具体实现,
public void initialize(ConfigurableApplicationContext applicationContext) {
		List<PropertySource<?>> composite = new ArrayList<>();
		AnnotationAwareOrderComparator.sort(this.propertySourceLocators);
		boolean empty = true;
		ConfigurableEnvironment environment = applicationContext.getEnvironment();
		for (PropertySourceLocator locator : this.propertySourceLocators) {
			Collection<PropertySource<?>> source = locator.locateCollection(environment);
			if (source == null || source.size() == 0) {
				continue;
			}
			List<PropertySource<?>> sourceList = new ArrayList<>();
			for (PropertySource<?> p : source) {
				sourceList.add(new BootstrapPropertySource<>(p));
			}
			logger.info("Located property source: " + sourceList);
			composite.addAll(sourceList);
			empty = false;
		}
		if (!empty) {
			MutablePropertySources propertySources = environment.getPropertySources();
			String logConfig = environment.resolvePlaceholders("${logging.config:}");
			LogFile logFile = LogFile.get(environment);
			for (PropertySource<?> p : environment.getPropertySources()) {
				if (p.getName().startsWith(BOOTSTRAP_PROPERTY_SOURCE_NAME)) {
					propertySources.remove(p.getName());
				}
			}
			insertPropertySources(propertySources, composite);
			reinitializeLoggingSystem(environment, logConfig, logFile);
			setLogLevels(applicationContext, environment);
			handleIncludedProfiles(environment);
		}
	}
可以看到,这里通过List<PropertySourceLocator> propertySourceLocators, PropertySourceLocator的locateCollection能够获取到相关的配置,然后放入到enviroment中:
private void insertPropertySources(MutablePropertySources propertySources,
			List<PropertySource<?>> composite) {
		MutablePropertySources incoming = new MutablePropertySources();
		List<PropertySource<?>> reversedComposite = new ArrayList<>(composite);
		// Reverse the list so that when we call addFirst below we are maintaining the
		// same order of PropertySources
		// Wherever we call addLast we can use the order in the List since the first item
		// will end up before the rest
		Collections.reverse(reversedComposite);
		for (PropertySource<?> p : reversedComposite) {
			incoming.addFirst(p);
		}
		PropertySourceBootstrapProperties remoteProperties = new PropertySourceBootstrapProperties();
		Binder.get(environment(incoming)).bind("spring.cloud.config",
				Bindable.ofInstance(remoteProperties));
		if (!remoteProperties.isAllowOverride() || (!remoteProperties.isOverrideNone()
				&& remoteProperties.isOverrideSystemProperties())) {
			for (PropertySource<?> p : reversedComposite) {
				propertySources.addFirst(p);
			}
			return;
		}
		if (remoteProperties.isOverrideNone()) {
			for (PropertySource<?> p : composite) {
				propertySources.addLast(p);
			}
			return;
		}
		if (propertySources.contains(SYSTEM_ENVIRONMENT_PROPERTY_SOURCE_NAME)) {
			if (!remoteProperties.isOverrideSystemProperties()) {
				for (PropertySource<?> p : reversedComposite) {
					propertySources.addAfter(SYSTEM_ENVIRONMENT_PROPERTY_SOURCE_NAME, p);
				}
			}
			else {
				for (PropertySource<?> p : composite) {
					propertySources.addBefore(SYSTEM_ENVIRONMENT_PROPERTY_SOURCE_NAME, p);
				}
			}
		}
		else {
			for (PropertySource<?> p : composite) {
				propertySources.addLast(p);
			}
		}
	}
而在spring-cloud-config-client中,通过ConfigServicePropertySourceLocator来读取config-server的配置,可以看到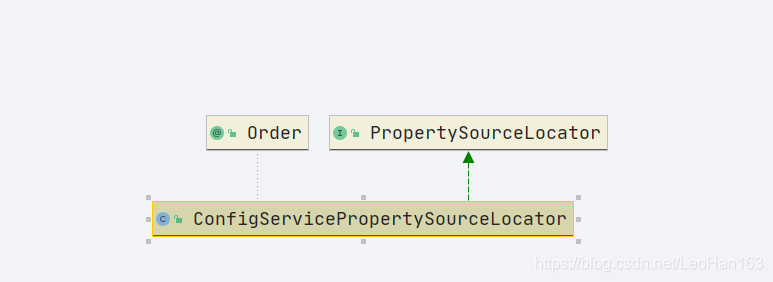
这个类实现了前面说的PropertySourceLocator,我们看这个类是怎么加载cofig-server的配置的:
		// Try all the labels until one works
			for (String label : labels) {
				Environment result = getRemoteEnvironment(restTemplate, properties,
						label.trim(), state);
				if (result != null) {
					log(result);

					if (result.getPropertySources() != null) { // result.getPropertySources()
																// can be null if using
																// xml
						for (PropertySource source : result.getPropertySources()) {
							@SuppressWarnings("unchecked")
							Map<String, Object> map = (Map<String, Object>) source
									.getSource();
							composite.addPropertySource(
									new MapPropertySource(source.getName(), map));
						}
					}

					if (StringUtils.hasText(result.getState())
							|| StringUtils.hasText(result.getVersion())) {
						HashMap<String, Object> map = new HashMap<>();
						putValue(map, "config.client.state", result.getState());
						putValue(map, "config.client.version", result.getVersion());
						composite.addFirstPropertySource(
								new MapPropertySource("configClient", map));
					}
					return composite;
				}
			}
		}
		catch (HttpServerErrorException e) {
			error = e;
			if (MediaType.APPLICATION_JSON
					.includes(e.getResponseHeaders().getContentType())) {
				errorBody = e.getResponseBodyAsString();
			}
		}
		catch (Exception e) {
			error = e;
		}
		if (properties.isFailFast()) {
			throw new IllegalStateException(
					"Could not locate PropertySource and the fail fast property is set, failing"
							+ (errorBody == null ? "" : ": " + errorBody),
					error);
		}
		logger.warn("Could not locate PropertySource: " + (errorBody == null
				? error == null ? "label not found" : error.getMessage() : errorBody));
		return null;

	}

	@Override
	@Retryable(interceptor = "configServerRetryInterceptor")
	public Collection<org.springframework.core.env.PropertySource<?>> locateCollection(
			org.springframework.core.env.Environment environment) {
		return PropertySourceLocator.locateCollection(this, environment);
	}

	private void log(Environment result) {
		if (logger.isInfoEnabled()) {
			logger.info(String.format(
					"Located environment: name=%s, profiles=%s, label=%s, version=%s, state=%s",
					result.getName(),
					result.getProfiles() == null ? ""
							: Arrays.asList(result.getProfiles()),
					result.getLabel(), result.getVersion(), result.getState()));
		}
		if (logger.isDebugEnabled()) {
			List<PropertySource> propertySourceList = result.getPropertySources();
			if (propertySourceList != null) {
				int propertyCount = 0;
				for (PropertySource propertySource : propertySourceList) {
					propertyCount += propertySource.getSource().size();
				}
				logger.debug(String.format(
						"Environment %s has %d property sources with %d properties.",
						result.getName(), result.getPropertySources().size(),
						propertyCount));
			}

		}
	}

	private void putValue(HashMap<String, Object> map, String key, String value) {
		if (StringUtils.hasText(value)) {
			map.put(key, value);
		}
	}

	private Environment getRemoteEnvironment(RestTemplate restTemplate,
			ConfigClientProperties properties, String label, String state) {
		String path = "/{name}/{profile}";
		String name = properties.getName();
		String profile = properties.getProfile();
		String token = properties.getToken();
		int noOfUrls = properties.getUri().length;
		if (noOfUrls > 1) {
			logger.info("Multiple Config Server Urls found listed.");
		}

		Object[] args = new String[] { name, profile };
		if (StringUtils.hasText(label)) {
			// workaround for Spring MVC matching / in paths
			label = Environment.denormalize(label);
			args = new String[] { name, profile, label };
			path = path + "/{label}";
		}
		ResponseEntity<Environment> response = null;

		for (int i = 0; i < noOfUrls; i++) {
			Credentials credentials = properties.getCredentials(i);
			String uri = credentials.getUri();
			String username = credentials.getUsername();
			String password = credentials.getPassword();

			logger.info("Fetching config from server at : " + uri);

			try {
				HttpHeaders headers = new HttpHeaders();
				addAuthorizationToken(properties, headers, username, password);
				if (StringUtils.hasText(token)) {
					headers.add(TOKEN_HEADER, token);
				}
				if (StringUtils.hasText(state) && properties.isSendState()) {
					headers.add(STATE_HEADER, state);
				}
				headers.setAccept(Collections.singletonList(MediaType.APPLICATION_JSON));

				final HttpEntity<Void> entity = new HttpEntity<>((Void) null, headers);
				response = restTemplate.exchange(uri + path, HttpMethod.GET, entity,
						Environment.class, args);
			}
			catch (HttpClientErrorException e) {
				if (e.getStatusCode() != HttpStatus.NOT_FOUND) {
					throw e;
				}
			}
			catch (ResourceAccessException e) {
				logger.info("Connect Timeout Exception on Url - " + uri
						+ ". Will be trying the next url if available");
				if (i == noOfUrls - 1) {
					throw e;
				}
				else {
					continue;
				}
			}

			if (response == null || response.getStatusCode() != HttpStatus.OK) {
				return null;
			}

			Environment result = response.getBody();
			return result;
		}

		return null;
	}

	public void setRestTemplate(RestTemplate restTemplate) {
		this.restTemplate = restTemplate;
	}

	private RestTemplate getSecureRestTemplate(ConfigClientProperties client) {
		SimpleClientHttpRequestFactory requestFactory = new SimpleClientHttpRequestFactory();
		if (client.getRequestReadTimeout() < 0) {
			throw new IllegalStateException("Invalid Value for Read Timeout set.");
		}
		if (client.getRequestConnectTimeout() < 0) {
			throw new IllegalStateException("Invalid Value for Connect Timeout set.");
		}
		requestFactory.setReadTimeout(client.getRequestReadTimeout());
		requestFactory.setConnectTimeout(client.getRequestConnectTimeout());
		RestTemplate template = new RestTemplate(requestFactory);
		Map<String, String> headers = new HashMap<>(client.getHeaders());
		if (headers.containsKey(AUTHORIZATION)) {
			headers.remove(AUTHORIZATION); // To avoid redundant addition of header
		}
		if (!headers.isEmpty()) {
			template.setInterceptors(Arrays.<ClientHttpRequestInterceptor>asList(
					new GenericRequestHeaderInterceptor(headers)));
		}

		return template;
	}

	private void addAuthorizationToken(ConfigClientProperties configClientProperties,
			HttpHeaders httpHeaders, String username, String password) {
		String authorization = configClientProperties.getHeaders().get(AUTHORIZATION);

		if (password != null && authorization != null) {
			throw new IllegalStateException(
					"You must set either 'password' or 'authorization'");
		}

		if (password != null) {
			byte[] token = Base64Utils.encode((username + ":" + password).getBytes());
			httpHeaders.add("Authorization", "Basic " + new String(token));
		}
		else if (authorization != null) {
			httpHeaders.add("Authorization", authorization);
		}

	}

	/**
	 * Adds the provided headers to the request.
	 */
	public static class GenericRequestHeaderInterceptor
			implements ClientHttpRequestInterceptor {

		private final Map<String, String> headers;

		public GenericRequestHeaderInterceptor(Map<String, String> headers) {
			this.headers = headers;
		}

		@Override
		public ClientHttpResponse intercept(HttpRequest request, byte[] body,
				ClientHttpRequestExecution execution) throws IOException {
			for (Entry<String, String> header : this.headers.entrySet()) {
				request.getHeaders().add(header.getKey(), header.getValue());
			}
			return execution.execute(request, body);
		}

		protected Map<String, String> getHeaders() {
			return this.headers;
		}

	}

}
可以看到,其locate方法,就是通过http请求,去加载了confgi-server端的配置的。
那么如果config-server端的配置发生了变化,config-cleint怎么感知、调整呢 ?
这里就要提到spring中actuator模块,会暴露一些Endpoint端点,可以看看这篇博客:
springboot源码研究actuator,自定义actuator路径
然后我们需要关注的是这个注解:
RefreshScope
@Target({ ElementType.TYPE, ElementType.METHOD })
@Retention(RetentionPolicy.RUNTIME)
@Scope("refresh")
@Documented
public @interface RefreshScope {
	ScopedProxyMode proxyMode() default ScopedProxyMode.TARGET_CLASS;
}

@Target({ElementType.TYPE, ElementType.METHOD})
@Retention(RetentionPolicy.RUNTIME)
@Documented
public @interface Scope {
	@AliasFor("scopeName")
	String value() default "";
	String scopeName() default "";
	ScopedProxyMode proxyMode() default ScopedProxyMode.DEFAULT;

}
这是spring cloud实现刷新的基础。
然后看下在spring容器启动扫描类的时候doScan方法:
protected Set<BeanDefinitionHolder> doScan(String... basePackages) {
		Assert.notEmpty(basePackages, "At least one base package must be specified");
		Set<BeanDefinitionHolder> beanDefinitions = new LinkedHashSet<>();
		for (String basePackage : basePackages) {
			Set<BeanDefinition> candidates = findCandidateComponents(basePackage);
			for (BeanDefinition candidate : candidates) {
				ScopeMetadata scopeMetadata = this.scopeMetadataResolver.resolveScopeMetadata(candidate);
				candidate.setScope(scopeMetadata.getScopeName());
				String beanName = this.beanNameGenerator.generateBeanName(candidate, this.registry);
				if (candidate instanceof AbstractBeanDefinition) {
					postProcessBeanDefinition((AbstractBeanDefinition) candidate, beanName);
				}
				if (candidate instanceof AnnotatedBeanDefinition) {
					AnnotationConfigUtils.processCommonDefinitionAnnotations((AnnotatedBeanDefinition) candidate);
				}
				if (checkCandidate(beanName, candidate)) {
					BeanDefinitionHolder definitionHolder = new BeanDefinitionHolder(candidate, beanName);
					definitionHolder =
							AnnotationConfigUtils.applyScopedProxyMode(scopeMetadata, definitionHolder, this.registry);
					beanDefinitions.add(definitionHolder);
					registerBeanDefinition(definitionHolder, this.registry);
				}
			}
		}
		return beanDefinitions;
	}
	public ScopeMetadata resolveScopeMetadata(BeanDefinition definition) {
		ScopeMetadata metadata = new ScopeMetadata();
		if (definition instanceof AnnotatedBeanDefinition) {
			AnnotatedBeanDefinition annDef = (AnnotatedBeanDefinition) definition;
			AnnotationAttributes attributes = AnnotationConfigUtils.attributesFor(
					annDef.getMetadata(), this.scopeAnnotationType);
			if (attributes != null) {
				metadata.setScopeName(attributes.getString("value"));
				ScopedProxyMode proxyMode = attributes.getEnum("proxyMode");
				if (proxyMode == ScopedProxyMode.DEFAULT) {
					proxyMode = this.defaultProxyMode;
				}
				metadata.setScopedProxyMode(proxyMode);
			}
		}
		return metadata;
	}
我们先研究这两个方法,这里会扫描类上是否有Scope注解,返回一个ScopeMetadata:
public class ScopeMetadata {
	private String scopeName = BeanDefinition.SCOPE_SINGLETON;
	private ScopedProxyMode scopedProxyMode = ScopedProxyMode.NO;
如果一个类被RefreshScope注解修饰,那么对应的这两属性分别为:
scopeName = "refresh";
scopedProxyMode = ScopedProxyMode.TARGET_CLASS;
然后关注下这个方法:
static BeanDefinitionHolder applyScopedProxyMode(
			ScopeMetadata metadata, BeanDefinitionHolder definition, BeanDefinitionRegistry registry) {
		ScopedProxyMode scopedProxyMode = metadata.getScopedProxyMode();
		if (scopedProxyMode.equals(ScopedProxyMode.NO)) {
			return definition;
		}
		boolean proxyTargetClass = scopedProxyMode.equals(ScopedProxyMode.TARGET_CLASS);
		return ScopedProxyCreator.createScopedProxy(definition, registry, proxyTargetClass);
	}
如果scopedProxyMode=copedProxyMode.NO则不作任何处理,原样返回,否则将生成代理:
	public static BeanDefinitionHolder createScopedProxy(
			BeanDefinitionHolder definitionHolder, BeanDefinitionRegistry registry, boolean proxyTargetClass) {

		return ScopedProxyUtils.createScopedProxy(definitionHolder, registry, proxyTargetClass);
	}
	public static BeanDefinitionHolder createScopedProxy(BeanDefinitionHolder definition,
			BeanDefinitionRegistry registry, boolean proxyTargetClass) {
		String originalBeanName = definition.getBeanName();
		BeanDefinition targetDefinition = definition.getBeanDefinition();
		String targetBeanName = getTargetBeanName(originalBeanName);
		RootBeanDefinition proxyDefinition = new RootBeanDefinition(ScopedProxyFactoryBean.class);
		proxyDefinition.setDecoratedDefinition(new BeanDefinitionHolder(targetDefinition, targetBeanName));
		proxyDefinition.setOriginatingBeanDefinition(targetDefinition);
		proxyDefinition.setSource(definition.getSource());
		proxyDefinition.setRole(targetDefinition.getRole());
		proxyDefinition.getPropertyValues().add("targetBeanName", targetBeanName);
		if (proxyTargetClass) {
			targetDefinition.setAttribute(AutoProxyUtils.PRESERVE_TARGET_CLASS_ATTRIBUTE, Boolean.TRUE);
		}
		else {
			proxyDefinition.getPropertyValues().add("proxyTargetClass", Boolean.FALSE);
		}
		proxyDefinition.setAutowireCandidate(targetDefinition.isAutowireCandidate());
		proxyDefinition.setPrimary(targetDefinition.isPrimary());
		if (targetDefinition instanceof AbstractBeanDefinition) {
			proxyDefinition.copyQualifiersFrom((AbstractBeanDefinition) targetDefinition);
		}
		targetDefinition.setAutowireCandidate(false);
		targetDefinition.setPrimary(false);
		registry.registerBeanDefinition(targetBeanName, targetDefinition);
		return new BeanDefinitionHolder(proxyDefinition, originalBeanName, definition.getAliases());
	}
这里会将beanName调整为:
private static final String TARGET_NAME_PREFIX = "scopedTarget.";
public static String getTargetBeanName(String originalBeanName) {
		return TARGET_NAME_PREFIX + originalBeanName;
}
返回的是一个ScopedProxyFactoryBean对象
我们聚焦到spring cloud中,其对外暴露刷新的端点是:
@Endpoint(id = "refresh")
public class RefreshEndpoint {

	private ContextRefresher contextRefresher;

	public RefreshEndpoint(ContextRefresher contextRefresher) {
		this.contextRefresher = contextRefresher;
	}

	@WriteOperation
	public Collection<String> refresh() {
		Set<String> keys = this.contextRefresher.refresh();
		return keys;
	}
}
@Configuration
@ConditionalOnClass({ EndpointAutoConfiguration.class, Health.class })
@AutoConfigureAfter({ LifecycleMvcEndpointAutoConfiguration.class,
		RefreshAutoConfiguration.class })
@Import({ RestartEndpointWithIntegrationConfiguration.class,
		RestartEndpointWithoutIntegrationConfiguration.class,
		PauseResumeEndpointsConfiguration.class })
public class RefreshEndpointAutoConfiguration {

	@Bean
	@ConditionalOnMissingBean
	@ConditionalOnEnabledHealthIndicator("refresh")
	RefreshScopeHealthIndicator refreshScopeHealthIndicator(
			ObjectProvider<RefreshScope> scope,
			ConfigurationPropertiesRebinder rebinder) {
		return new RefreshScopeHealthIndicator(scope, rebinder);
	}

	@Configuration
	@ConditionalOnBean(PropertySourceBootstrapConfiguration.class)
	protected static class RefreshEndpointConfiguration {

		@Bean
		@ConditionalOnBean(ContextRefresher.class)
		@ConditionalOnEnabledEndpoint
		@ConditionalOnMissingBean
		public RefreshEndpoint refreshEndpoint(ContextRefresher contextRefresher) {
			return new RefreshEndpoint(contextRefresher);
		}

	}

}
可以看到,当我们请求http://ip:port/acturator/refresh的时候,实际上是调用了ContextRefresher.refresh:
public synchronized Set<String> refresh() {
		Set<String> keys = refreshEnvironment();
		this.scope.refreshAll();
		return keys;
	}

	public synchronized Set<String> refreshEnvironment() {
		Map<String, Object> before = extract(
				this.context.getEnvironment().getPropertySources());
		addConfigFilesToEnvironment();
		Set<String> keys = changes(before,
				extract(this.context.getEnvironment().getPropertySources())).keySet();
		this.context.publishEvent(new EnvironmentChangeEvent(this.context, keys));
		return keys;
	}
 ConfigurableApplicationContext addConfigFilesToEnvironment() {
		ConfigurableApplicationContext capture = null;
		try {
			StandardEnvironment environment = copyEnvironment(
					this.context.getEnvironment());
			SpringApplicationBuilder builder = new SpringApplicationBuilder(Empty.class)
					.bannerMode(Mode.OFF).web(WebApplicationType.NONE)
					.environment(environment);
			// Just the listeners that affect the environment (e.g. excluding logging
			// listener because it has side effects)
			builder.application()
					.setListeners(Arrays.asList(new BootstrapApplicationListener(),
							new ConfigFileApplicationListener()));
			capture = builder.run();
			if (environment.getPropertySources().contains(REFRESH_ARGS_PROPERTY_SOURCE)) {
				environment.getPropertySources().remove(REFRESH_ARGS_PROPERTY_SOURCE);
			}
			MutablePropertySources target = this.context.getEnvironment()
					.getPropertySources();
			String targetName = null;
			for (PropertySource<?> source : environment.getPropertySources()) {
				String name = source.getName();
				if (target.contains(name)) {
					targetName = name;
				}
				if (!this.standardSources.contains(name)) {
					if (target.contains(name)) {
						target.replace(name, source);
					}
					else {
						if (targetName != null) {
							target.addAfter(targetName, source);
							// update targetName to preserve ordering
							targetName = name;
						}
						else {
							// targetName was null so we are at the start of the list
							target.addFirst(source);
							targetName = name;
						}
					}
				}
			}
		}
		finally {
			ConfigurableApplicationContext closeable = capture;
			while (closeable != null) {
				try {
					closeable.close();
				}
				catch (Exception e) {
					// Ignore;
				}
				if (closeable.getParent() instanceof ConfigurableApplicationContext) {
					closeable = (ConfigurableApplicationContext) closeable.getParent();
				}
				else {
					break;
				}
			}
		}
		return capture;
	}
addConfigFilesToEnvironment相当于是又启动了一个spring applicaiton程序去加载了一次配置,然后将新加载的配置加入到原有的配置中去:
如果原有配置对应的key存在,则替换,不存在则加入
这样就将变化后的配置重新加载进来了,然后调用 RefreshScope.refreshAll方法,这里的RefreshScope不是上面说的这个注解啊,而是一个类
// RefreshScope.java
public void refreshAll() {
		super.destroy();
		this.context.publishEvent(new RefreshScopeRefreshedEvent());
}
在研究这个方法之前,先看下这个类的层次:
public class RefreshScope extends GenericScope implements ApplicationContextAware,
		ApplicationListener<ContextRefreshedEvent>, Ordered {
		public void postProcessBeanDefinitionRegistry(BeanDefinitionRegistry registry)
			throws BeansException {
		this.registry = registry;
		super.postProcessBeanDefinitionRegistry(registry);
	}

	@Override
	public void onApplicationEvent(ContextRefreshedEvent event) {
		start(event);
	}

	public void start(ContextRefreshedEvent event) {
		if (event.getApplicationContext() == this.context && this.eager
				&& this.registry != null) {
			eagerlyInitialize();
		}
	}

	private void eagerlyInitialize() {
		for (String name : this.context.getBeanDefinitionNames()) {
			BeanDefinition definition = this.registry.getBeanDefinition(name);
			if (this.getName().equals(definition.getScope())
					&& !definition.isLazyInit()) {
				Object bean = this.context.getBean(name);
				if (bean != null) {
					bean.getClass();
				}
			}
		}
	}
}
一般如果spring中类继承或实现了spring的某个接口,你就得注意下了。
之前我们在处理带有RefreshScope注解的时候,bean的定义是用一个代理类,ScopedProxyFactoryBean,
而在这里如果类的scope=generic,则变成了:LockedScopedProxyFactoryBean,t同时将当前实例作为构造参数传递进去:
public static class LockedScopedProxyFactoryBean<S extends GenericScope>
			extends ScopedProxyFactoryBean implements MethodInterceptor {
		private final S scope;
		private String targetBeanName;
		public LockedScopedProxyFactoryBean(S scope) {
			this.scope = scope;
		}

		@Override
		public void setBeanFactory(BeanFactory beanFactory) {
			super.setBeanFactory(beanFactory);
			Object proxy = getObject();
			if (proxy instanceof Advised) {
				Advised advised = (Advised) proxy;
				advised.addAdvice(0, this);
			}
		}

		@Override
		public void setTargetBeanName(String targetBeanName) {
			super.setTargetBeanName(targetBeanName);
			this.targetBeanName = targetBeanName;
		}

		@Override
		public Object invoke(MethodInvocation invocation) throws Throwable {
			Method method = invocation.getMethod();
			if (AopUtils.isEqualsMethod(method) || AopUtils.isToStringMethod(method)
					|| AopUtils.isHashCodeMethod(method)
					|| isScopedObjectGetTargetObject(method)) {
				return invocation.proceed();
			}
			Object proxy = getObject();
			ReadWriteLock readWriteLock = this.scope.getLock(this.targetBeanName);
			if (readWriteLock == null) {
				if (logger.isDebugEnabled()) {
					logger.debug("For bean with name [" + this.targetBeanName
							+ "] there is no read write lock. Will create a new one to avoid NPE");
				}
				readWriteLock = new ReentrantReadWriteLock();
			}
			Lock lock = readWriteLock.readLock();
			lock.lock();
			try {
				if (proxy instanceof Advised) {
					Advised advised = (Advised) proxy;
					ReflectionUtils.makeAccessible(method);
					return ReflectionUtils.invokeMethod(method,
							advised.getTargetSource().getTarget(),
							invocation.getArguments());
				}
				return invocation.proceed();
			}
			// see gh-349. Throw the original exception rather than the
			// UndeclaredThrowableException
			catch (UndeclaredThrowableException e) {
				throw e.getUndeclaredThrowable();
			}
			finally {
				lock.unlock();
			}
		}

		private boolean isScopedObjectGetTargetObject(Method method) {
			return method.getDeclaringClass().equals(ScopedObject.class)
					&& method.getName().equals("getTargetObject")
					&& method.getParameterTypes().length == 0;
		}

	}
在我们getBean的时候会有这样的一个调用:
// AbstractBeanFactory.java
String scopeName = mbd.getScope();
final Scope scope = this.scopes.get(scopeName);
					if (scope == null) {
						throw new IllegalStateException("No Scope registered for scope name '" + scopeName + "'");
					}
					try {
						Object scopedInstance = scope.get(beanName, () -> {
							beforePrototypeCreation(beanName);
							try {
								return createBean(beanName, mbd, args);
							}
							finally {
								afterPrototypeCreation(beanName);
							}
						});
						bean = getObjectForBeanInstance(scopedInstance, name, beanName, mbd);
					}
这里的scope.get就会调用到GenericScope.put方法,这里相当于是增加了一个缓存,记录到了所有被RefreshScope注解修饰的类。
然后在destory的时候:
// RefreshScope.java
	public void refreshAll() {
		super.destroy();
		this.context.publishEvent(new RefreshScopeRefreshedEvent());
	}
// GenericScope.java
public void destroy() {
		List<Throwable> errors = new ArrayList<Throwable>();
		Collection<BeanLifecycleWrapper> wrappers = this.cache.clear();
		for (BeanLifecycleWrapper wrapper : wrappers) {
			try {
				Lock lock = this.locks.get(wrapper.getName()).writeLock();
				lock.lock();
				try {
					wrapper.destroy();
				}
				finally {
					lock.unlock();
				}
			}
			catch (RuntimeException e) {
				errors.add(e);
			}
		}
		if (!errors.isEmpty()) {
			throw wrapIfNecessary(errors.get(0));
		}
		this.errors.clear();
	}
// BeanLifecycleWrapper.java
public void destroy() {
			if (this.callback == null) {
				return;
			}
			synchronized (this.name) {
				Runnable callback = this.callback;
				if (callback != null) {
					callback.run();
				}
				this.callback = null;
				this.bean = null;
			}
		}
可以看到,最后是调用BeanLifecycleWrapper.callback.run方法,但是默认BeanLifecycleWrapper.callback是空的,那么什么时候设置的呢:
// BeanLifecycleWrapper.java
public void setDestroyCallback(Runnable callback) {
			this.callback = callback;
}
// GenericScope.java
public void registerDestructionCallback(String name, Runnable callback) {
		BeanLifecycleWrapper value = this.cache.get(name);
		if (value == null) {
			return;
		}
		value.setDestroyCallback(callback);
	}
// AbstractBeanFactory.java 在doCreateBean方法最后调用registerDisposableBeanIfNecessary
protected void registerDisposableBeanIfNecessary(String beanName, Object bean, RootBeanDefinition mbd) {
		AccessControlContext acc = (System.getSecurityManager() != null ? getAccessControlContext() : null);
		if (!mbd.isPrototype() && requiresDestruction(bean, mbd)) {
			if (mbd.isSingleton()) {
				// Register a DisposableBean implementation that performs all destruction
				// work for the given bean: DestructionAwareBeanPostProcessors,
				// DisposableBean interface, custom destroy method.
				registerDisposableBean(beanName,
						new DisposableBeanAdapter(bean, beanName, mbd, getBeanPostProcessors(), acc));
			}
			else {
				// A bean with a custom scope...
				Scope scope = this.scopes.get(mbd.getScope());
				if (scope == null) {
					throw new IllegalStateException("No Scope registered for scope name '" + mbd.getScope() + "'");
				}
				scope.registerDestructionCallback(beanName,
						new DisposableBeanAdapter(bean, beanName, mbd, getBeanPostProcessors(), acc));
			}
		}
	}
最后是实际调用了DisposableBeanAdapter.run:
// DisposableBeanAdapter.java
public void run() {
		destroy();
	}

	@Override
	public void destroy() {
		if (!CollectionUtils.isEmpty(this.beanPostProcessors)) {
			for (DestructionAwareBeanPostProcessor processor : this.beanPostProcessors) {
				processor.postProcessBeforeDestruction(this.bean, this.beanName);
			}
		}

		if (this.invokeDisposableBean) {
			if (logger.isTraceEnabled()) {
				logger.trace("Invoking destroy() on bean with name '" + this.beanName + "'");
			}
			try {
				if (System.getSecurityManager() != null) {
					AccessController.doPrivileged((PrivilegedExceptionAction<Object>) () -> {
						((DisposableBean) this.bean).destroy();
						return null;
					}, this.acc);
				}
				else {
					((DisposableBean) this.bean).destroy();
				}
			}
			catch (Throwable ex) {
			}
		}

		if (this.destroyMethod != null) {
			invokeCustomDestroyMethod(this.destroyMethod);
		}
		else if (this.destroyMethodName != null) {
			Method methodToInvoke = determineDestroyMethod(this.destroyMethodName);
			if (methodToInvoke != null) {
				invokeCustomDestroyMethod(ClassUtils.getInterfaceMethodIfPossible(methodToInvoke));
			}
		}
	}
其实说白了就是,如果是DisposableBean或者配置了声明了destroy对应的放啊,那么就调用他的destroy方法。
这里需要说明的一点是,对于默认的scope=singleton级别,其实例化的bean是被容器保存的,但是对于RefreshScope注解修饰过的bean,其实例化后,是直接给Scope保存的,在这里上面的GenericScope的缓存里保存了这些实例化后的bean,然后destroy中,全部clear了。
到这里,所有的RefreshScope注解修饰的bean如果有对应destroy方法(DisposableBean或者配置了对应销毁方法),然后直接clear了已经实例化的bean,然后:
// RefreshScope.java
	public void refreshAll() {
		super.destroy();
		this.context.publishEvent(new RefreshScopeRefreshedEvent());
	}
这里的this.context.publishEvent(new RefreshScopeRefreshedEvent());很重要,相应感知配置刷新的处理依靠这个事件通知。
在这里,例如spring cloud config ,当我们刷新的时候,
ContextRefresher.refresh时,会重新生成一个新的spring application,会再一次加载配置- 调用到spring cloud config 中
ConfigServicePropertySourceLocator方法重新加载配置,把新的配置加载到新生成的SpringApplication中,然后会比较这个新的application的enviroment和当前的enviroment的不同,把更新的配置复制过去 - 然后会把当前有
RefreshScope注解修饰的类destroy掉(实现DisposableBean接口或者指定destroy方法会被调用),运用配置生成新的对应bean
这样,就达到了一次完美的配置刷新