SpringMVC入门第四部分
- 自定义类型对象和请求参数的数据绑定流程
- 自定义类型转换器
- annotation-driven介绍
- mvc:annotation-driven和mvc:default对动态和静态资源的影响
- 数据格式化之日期格式化
- 数据校验:只做前端校验是不安全的,在重要的数据一定要加上后端校验
- 普通表单将请求信息放在请求域中去页面获取
- 自定义国际化错误消息的显示,Hibernate Validator已经实现了默认的国际化错误消息显示格式
- 步骤1:编写国际化文件,起名要规范,放在conf资源文件夹下面
- 步骤2:编写国际化配置资源文件
- 步骤3:让SpringMVC管理国际化资源文件
- 可以通过注解上的message属性来指定错误消息,如果配置了国际化,先走国际化中配置的
- SpringMVC支持ajax
- 导入jquery的依赖
- 导入JackSon的依赖
- @JsonIgnore 输出数据的时候,不将当前数据发送给前端
- @JsonFormat与@DateTimeFormat注解的配合使用
- jQuery的each()函数补充知识点
- @ResponseBody注解将服务器端将对象以json对象形式返回,前端收到数据,显示在页面上
- @ReuqestBody获取请求体----只有Post请求才有请求体
- 将请求体中的数据直接封装为自定义类型对象---@RequestBody
- 在参数位置写HttpEntity< String>,比@RequestBody更强,可以拿到请所有请求头和请求体数据
- @ResponseBody加在方法上---》本质是将返回的数据直接塞在请求体重
- 设置方法返回类型为: ResponseEntity< T >:泛型是响应体数据的类型,可以自定义响应
- SpringMVC中提供的文件下载---较为鸡肋--->ResponseEntity方式
- SpringMVC的文件上传
- 拦截器
- 国际化
- 异常处理
- @ExceptionHandler()注解使用演示
- 里面参数可以填数组,每一个参数代表当前处理异常的方法能够处理的异常类型,返回值可以跳转到定制的错误页面
- 注意事项:
- 如果有多个@ExceptionHandler都能处理一个异常,那么精确优先
- @ControllerAdvice注解----》表明当前类是集中处理异常的类,可以全局处理异常
- 全局异常处理与本类异常处理同时存在,那么本类异常处理优先,不论精确与否
- @ResponseStatus标注在自定义异常上,返回一个服务器错误页面,省去做错误页面
- @ResponseStatus注解工作的前提是,上面没有@ExceptionHandler标注的异常处理方法能处理该异常,否则走@ExceptionHandler标注的异常处理方法
- Spring默认的异常如果没人处理,就使用默认的处理方法来进行处理---->DefaultHandlerExceptionResolver
- 基于SpringMVC.xml配置的异常处理方式-----在处理异常的顺序上,优先级最低
- SpringMVC运行流程总结
- SpringMVC和Spring整合
自定义类型对象和请求参数的数据绑定流程
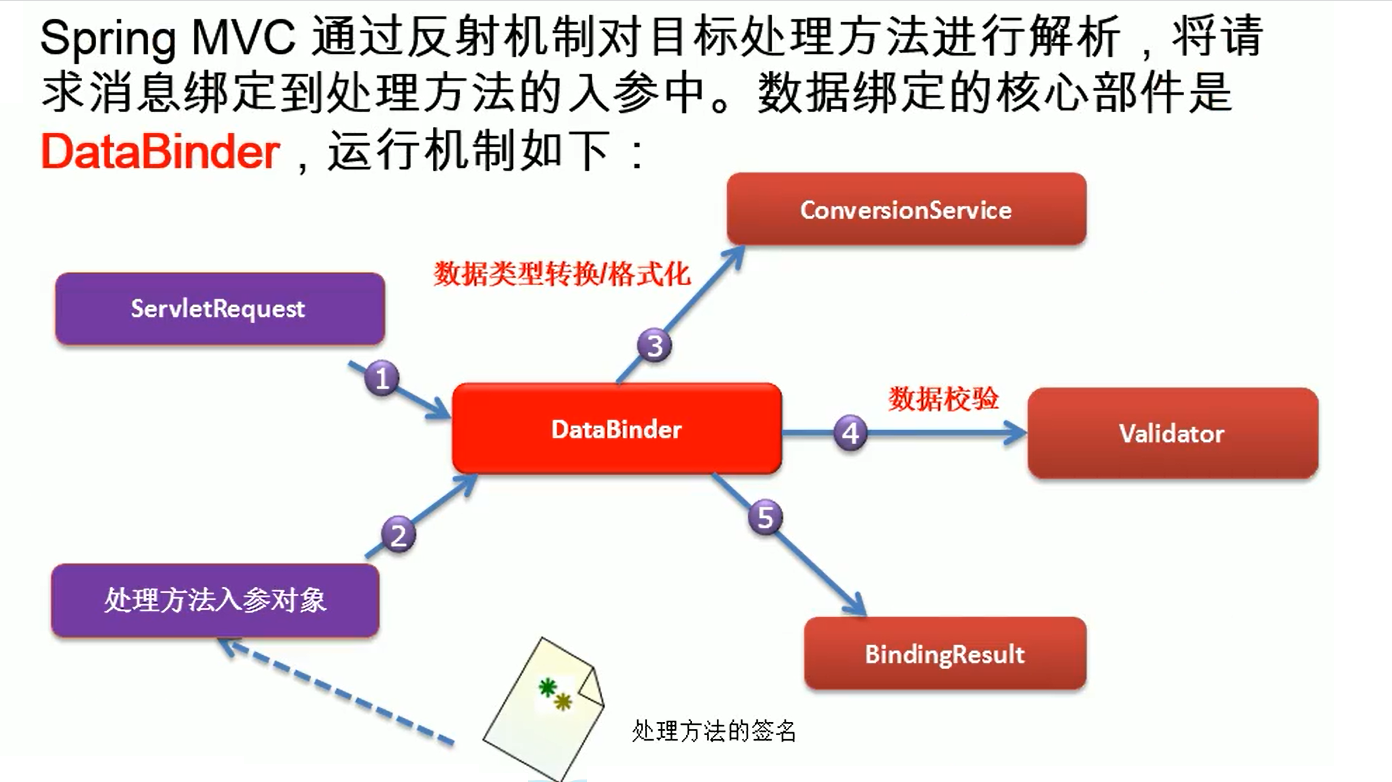

自定义类型转换器
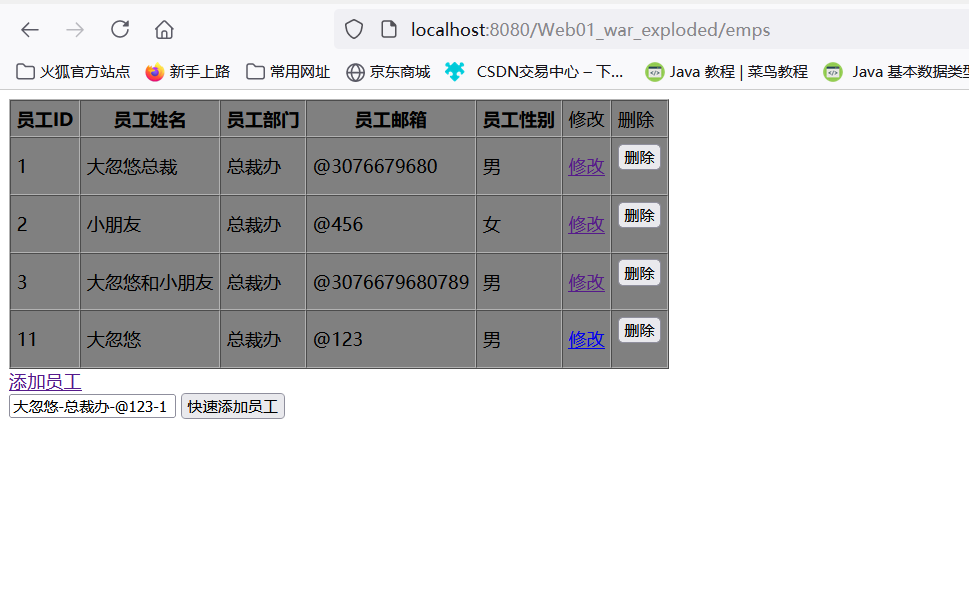
自定义类型转换器,实现String----->employee对象的转换和封装
<form action="${ctp}/quickAdd">
    <%--将员工所有信息都写上,自动封装对象--%>
     <input type="text" name="empInfo" value="大忽悠-总裁办-@123-1"/>
   <input type="submit" value="快速添加员工"/>
</form>
快速添加员工的方法:
    @RequestMapping("quickAdd")
    //获取请求参数empInfo
    //employee=request.getParame("empInfo")---->大忽悠-总裁办-@123-1
    public String quickAdd(@RequestParam("empInfo") Employee employee)
    {
        employeeDao.save(employee);
      return  "redirect:/emps";
    }
ConversionService是一个接口,里面通过一个Converter转换器进行工作

步骤1:实现Converter接口,写一个自定义类型转换器
/*
* 两个泛型S,T
* S:source
* T:target
* 把s转换为t
* */
//自定义类型转换器
public class MyConverter implements Converter<String, Employee> {
    //自定义转换规则
    public Employee convert(String source) {
        System.out.println("要转换的字符串:"+source);
        Employee employee=new Employee();
        if(source.contains("-"))
        {
            //大忽悠-总裁办-@123-1
            String[] ret=source.split("-");
            employee.setName(ret[0]);
            employee.setDepartment(ret[1]);
            employee.setEamil(ret[2]);
            employee.setGender(Integer.parseInt(ret[3]));
        }
        return employee;
    }
}
步骤2:Converter是ConversionService中的一个组件,我们需要把Converter放入到ConversionService中
步骤3:将WebDataBinder中的ConversionService设置成我们这个加了自定义类型ConversionService
步骤4:让SpringMVC使用我们的ConversionService
配置文件中实现步骤1:配置出ConversionService
converters在源码中是一个set集合

    <!--告诉SpringMVC别用默认的ConversionService,
    而是使用自定义的ConversionService
    ,里面有我们自定义的converter-->
    <bean id="conversionService"
          class="org.springframework.context.support.ConversionServiceFactoryBean">
        <!--在converters转换器中添加我们自定义的类型转换器-->
        <property name="converters">
            <set>
                <bean class="com.Converter.MyConverter"/>
            </set>
        </property>
    </bean>
    <!--使用我们自己的配置的类型转换组件-->
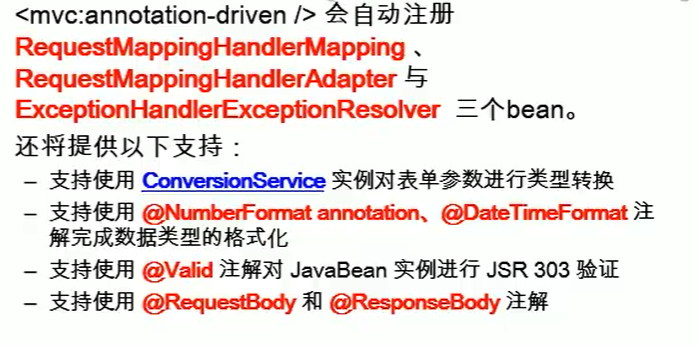
    <mvc:annotation-driven conversion-service="conversionService"></mvc:annotation-driven>
总结三步


annotation-driven介绍
mvc:annotation-driven和mvc:default对动态和静态资源的影响
当mvc:annotation-driven和mvc:default-servlet-handler都没配置时,只有动态资源能够访问,静态资源访问不了


常见动态资源: @RequestMapping映射的资源,.jsp
常见的静态资源: .html , .js , .img
只加mvc:default-servlet-handler,那么静态资源能访问,动态资源不能访问


只配置mvc:annotation-driven,那么只能访问动态资源,不能访问静态资源
mvc:default-servlet-handler和mvc:annotation-driven都配置后,那么静态资源和动态资源都可以访问了
数据格式化之日期格式化
ConversionServiceFactoryBean创建的ConversionService组件是没有格式化器存在的
解决方法1:不使用自定义类型的转换器

解决方法2:将自定义类型转换器注册到FormattingConversionServiceFactoryBean,这样就有格式化功能了
以后写自定义数据类型转换器的时候,就使用FormattingConversionServiceFactoryBean来注册自定义类型转换器,这样就既具有类型转换,又具有格式化功能
    <bean id="conversionService"
          class="org.springframework.format.support.FormattingConversionServiceFactoryBean">
        <!--在converters转换器中添加我们自定义的类型转换器-->
        <property name="converters">
            <set>
                <bean class="com.Converter.MyConverter"/>
            </set>
        </property>
    </bean>
    <!--使用我们自己的配置的类型转换组件-->
    <mvc:annotation-driven conversion-service="conversionService"></mvc:annotation-driven>
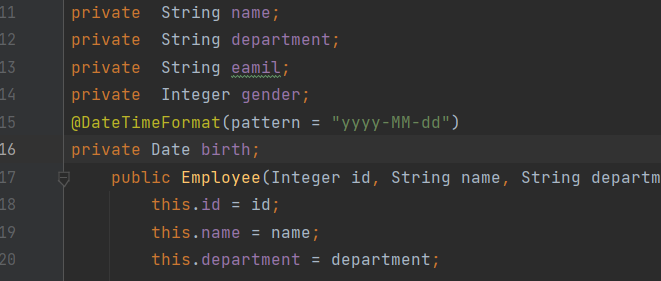
后端规定提交的日期格式,不对就报错
//规定提交的日期格式
@DateTimeFormat(pattern = "yyyy-MM-dd")
private Date birth;
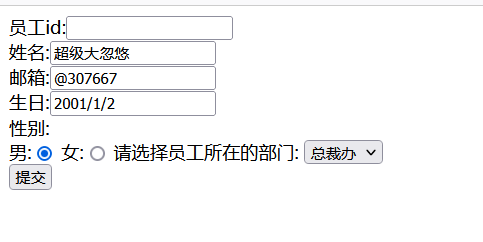

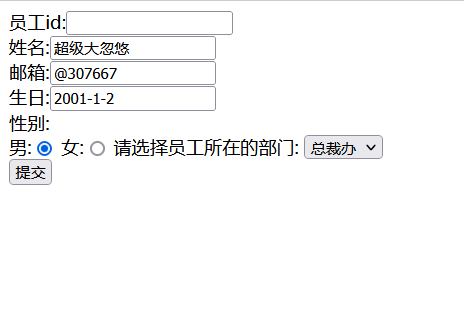
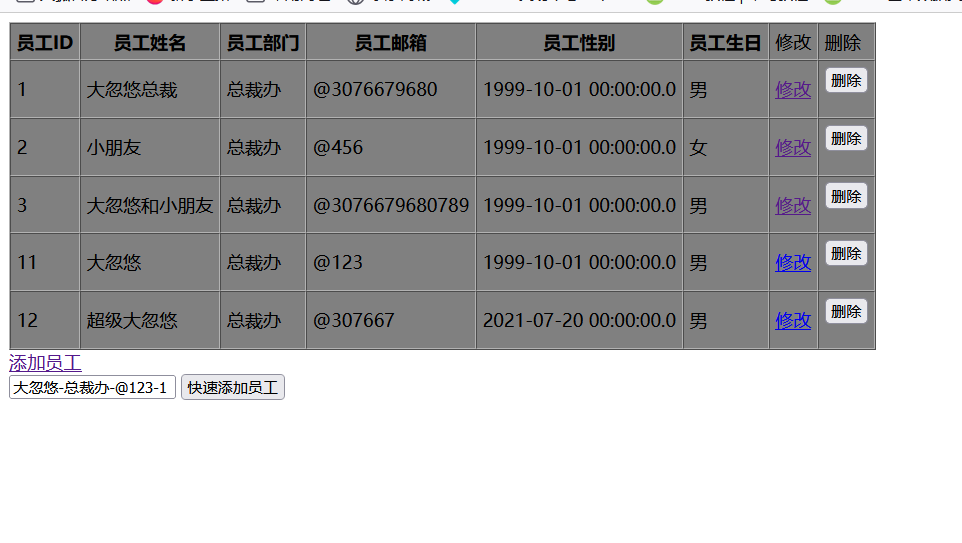
后端规定提交的数字格式
@NumberFormat(pattern = "#,###,###.##")//类似这样的数字格式: 1,000,000.98
private double salary;
数据校验:只做前端校验是不安全的,在重要的数据一定要加上后端校验
SpingMVC可以使用JSR303来做数据校验

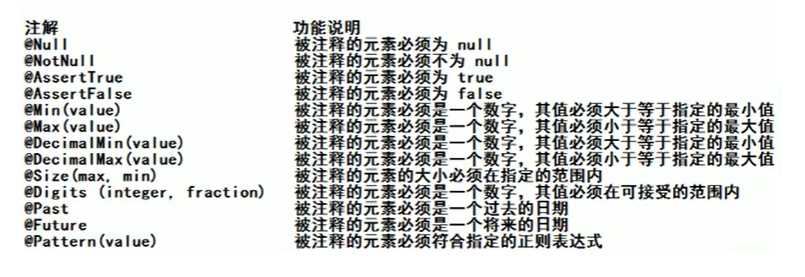
Hibernate Validator是第三方框架实现了JSR303规范
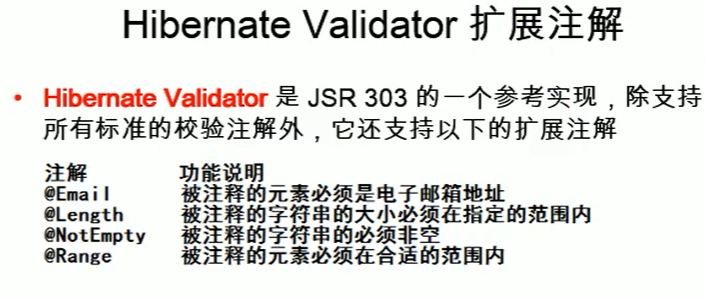
实现步骤:
1.maven管理引入springmvc注解数据校验所需jar包:
   <!-- maven管理引入springmvc注解数据校验所需jar包:-->
    <dependency>
      <groupId>javax.validation</groupId>
      <artifactId>validation-api</artifactId>
      <version>1.1.0.Final</version>
    </dependency>
    <dependency>
      <groupId>org.hibernate</groupId>
      <artifactId>hibernate-validator</artifactId>
      <version>5.1.0.Final</version>
    </dependency>
2.只需要给javaBean的属性上加上校验注解
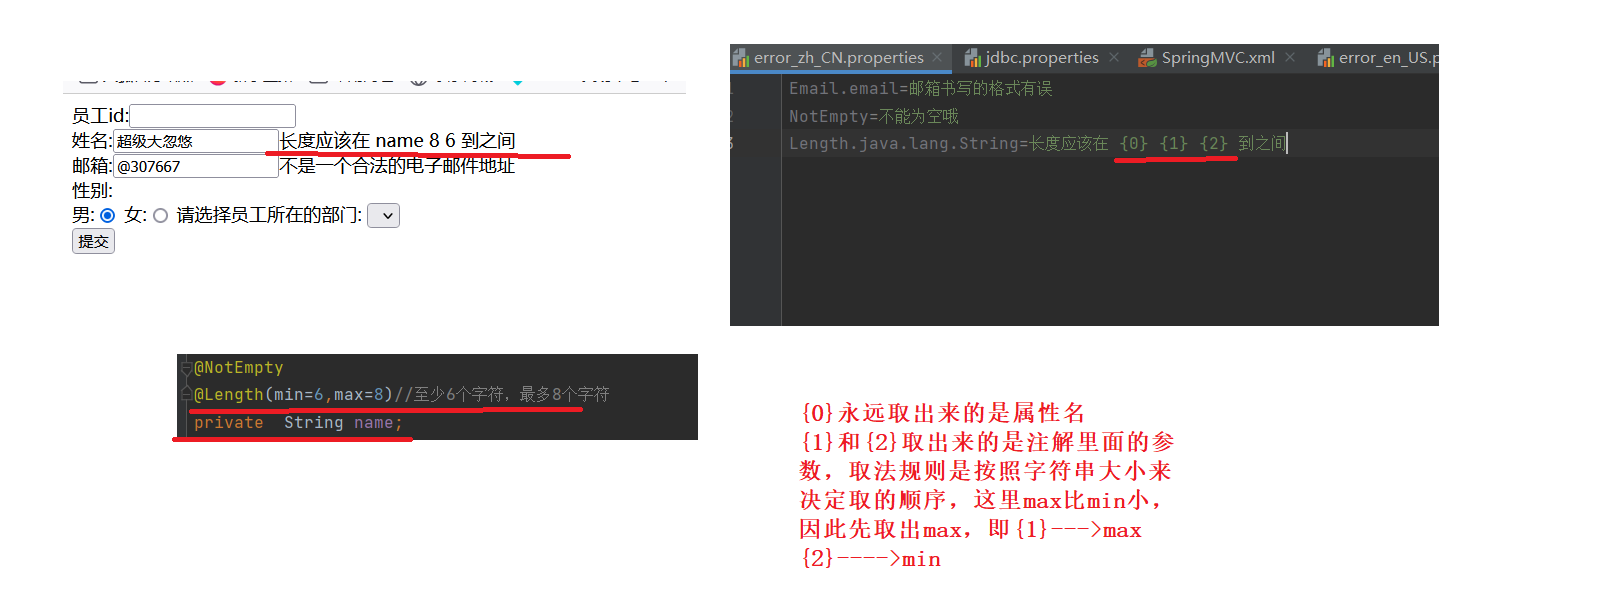
@NotEmpty
@Length(min=6,max=8)//至少6个字符,最多8个字符
private  String name;
private  String department;
@Email
private  String eamil;
3.在SpringMVC封装对象的时候,告诉SpringMVC这个javaBean对象需要校验----@Valid注解
   //只接收Post请求
    @RequestMapping(value = "/emp",method = RequestMethod.POST)
    //@Valid注解,告诉SpringMVC,封装这个javabean对象时,按照这个对象里面变量规定的校验规则进行校验
    public String addEmp(@Valid Employee employee)//这里会自动赋值
    {
        System.out.println("要添加的员工信息:"+employee);
            employeeDao.save(employee);
            //返回列表页面,直接重定向到查询所有员工的请求
            return  "redirect:/emps";
    }
4.如何知道校验结果,给需要校验的javaBean后面紧跟一个BindingResult,这个BindingResult就是封装前一个bean的校验结果
    //只接收Post请求
    @RequestMapping(value = "/emp",method = RequestMethod.POST)
    //@Valid注解,告诉SpringMVC,封装这个javabean对象时,按照这个对象里面变量规定的校验规则进行校验
    public String addEmp(@Valid Employee employee,BindingResult res)//这里会自动赋值
    {
        System.out.println("要添加的员工信息:"+employee);
            employeeDao.save(employee);
            //返回列表页面,直接重定向到查询所有员工的请求
            return  "redirect:/emps";
    }
5.根据不同的校验结果决定怎么做
    //只接收Post请求
    @RequestMapping(value = "/emp",method = RequestMethod.POST)
    //@Valid注解,告诉SpringMVC,封装这个javabean对象时,按照这个对象里面变量规定的校验规则进行校验
    public String addEmp(@Valid Employee employee,BindingResult res)//这里会自动赋值
    {
        System.out.println("要添加的员工信息:"+employee);
        //获取是否有校验错误
        boolean hasErrors = res.hasErrors();
        if(hasErrors)
        {
            System.out.println("有校验错误");
            return "addPage";
        }
        else
        {
            employeeDao.save(employee);
            //返回列表页面,直接重定向到查询所有员工的请求
            return  "redirect:/emps";
        }
    }
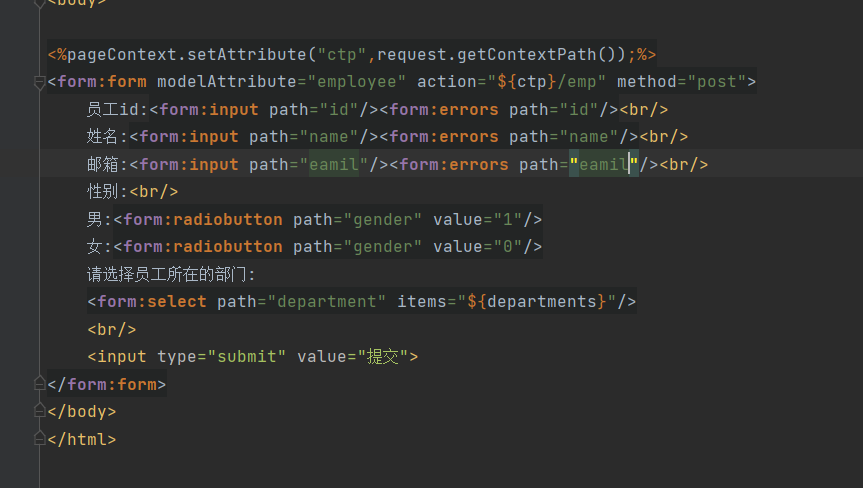
6.将错误信息回显在页面上
<%pageContext.setAttribute("ctp",request.getContextPath());%>
<form:form modelAttribute="employee" action="${ctp}/emp" method="post">
    <%--显示错误信息,有默认的错误信息,也可也自己写显示的错误西信息--%>
    员工id:<form:input path="id"/><form:errors path="id"></form:errors><br/>
    姓名:<form:input path="name"/><form:errors path="name"></form:errors><br/>
    邮箱:<form:input path="eamil"/><form:errors path="eamil"></form:errors><br/>
    性别:<br/>
    男:<form:radiobutton path="gender" value="1"/>
    女:<form:radiobutton path="gender" value="0"/>
    请选择员工所在的部门:
    <form:select path="department" items="${departments}"/>
    <br/>
    <input type="submit" value="提交">
</form:form>
普通表单将请求信息放在请求域中去页面获取
通过BindingResult的res对象的 getFieldErrors方法,可以获得当前属性值出现的全部错误,然后通过一个Model对象存储错误信息,放到隐含模型中
    //只接收Post请求
    @RequestMapping(value = "/emp",method = RequestMethod.POST)
    //@Valid注解,告诉SpringMVC,封装这个javabean对象时,按照这个对象里面变量规定的校验规则进行校验
    public String addEmp(@Valid Employee employee,BindingResult res,Model model)//这里会自动赋值
    {
        System.out.println("要添加的员工信息:"+employee);
        //获取是否有校验错误
        boolean hasErrors = res.hasErrors();
        Map<String,String> errorMap=new HashMap<String, String>();
        if(hasErrors)
        {
            List<FieldError> fieldErrors = res.getFieldErrors();
            for(FieldError fieldError:fieldErrors)
            {
                System.out.println("错误消息提示:"+fieldError.getDefaultMessage());
                System.out.println("错误的字段:"+fieldError.getField());
                System.out.println(fieldError);
                System.out.println("----------------------------------------");
                errorMap.put(fieldError.getField(),fieldError.getDefaultMessage());
            }
            model.addAttribute("errorInfo",errorMap);
            System.out.println("有校验错误");
            return "addPage";
        }
        else
        {
            employeeDao.save(employee);
            //返回列表页面,直接重定向到查询所有员工的请求
            return  "redirect:/emps";
        }
    }
jsp页面通过${},从请求域中拿出之前存放的错误信息,显示在页面上
<%@ page contentType="text/html;charset=UTF-8" language="java" %>
<%@ taglib prefix="c" uri="http://java.sun.com/jsp/jstl/core" %>
<%@ taglib prefix="form" uri="http://www.springframework.org/tags/form" %>
<html>
<head>
    <title>员工添加页面</title>
</head>
<body>

<%pageContext.setAttribute("ctp",request.getContextPath());%>
<form:form modelAttribute="employee" action="${ctp}/emp" method="post">
    员工id:<form:input path="id"/>${errorInfo.id}<br/><%--取不出来就为空--%>
    姓名:<form:input path="name"/>${errorInfo.name}<br/>
    邮箱:<form:input path="eamil"/>${errorInfo.eamil}<br/>
    性别:<br/>
    男:<form:radiobutton path="gender" value="1"/>
    女:<form:radiobutton path="gender" value="0"/>
    请选择员工所在的部门:
    <form:select path="department" items="${departments}"/>
    <br/>
    <input type="submit" value="提交">
</form:form>
</body>
</html>
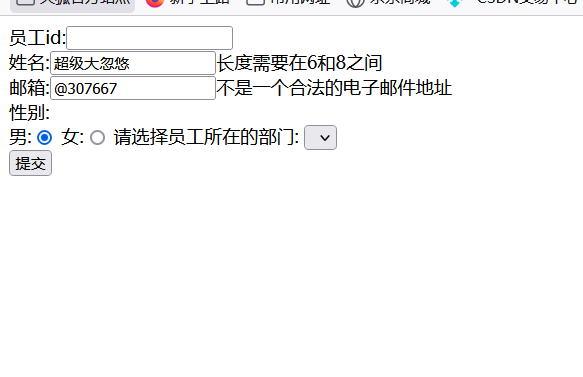

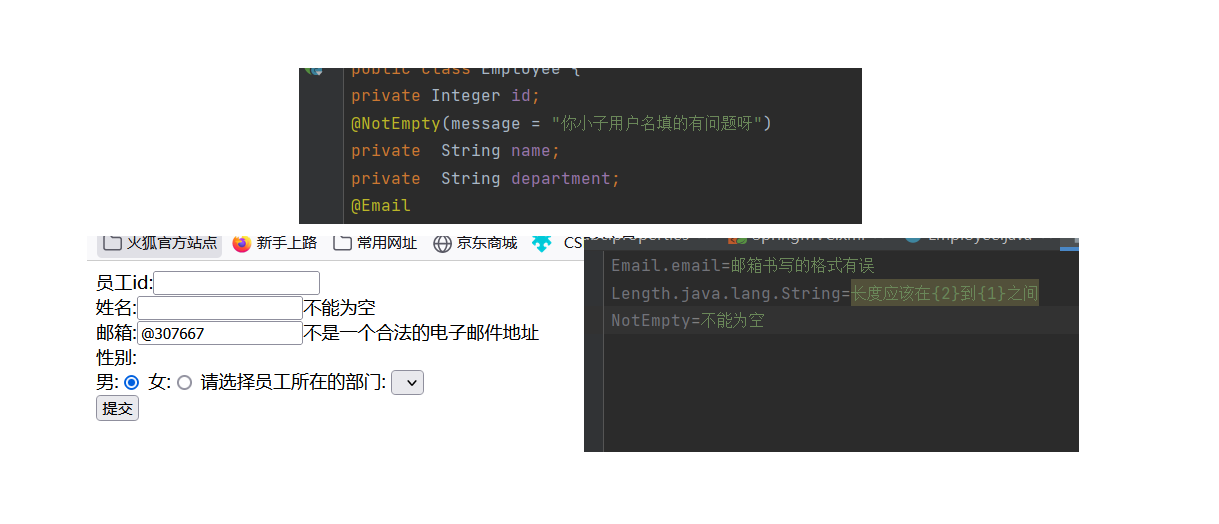
自定义国际化错误消息的显示,Hibernate Validator已经实现了默认的国际化错误消息显示格式
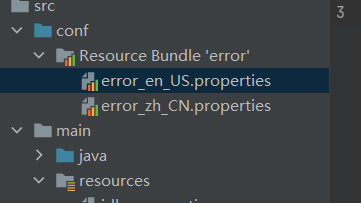
步骤1:编写国际化文件,起名要规范,放在conf资源文件夹下面
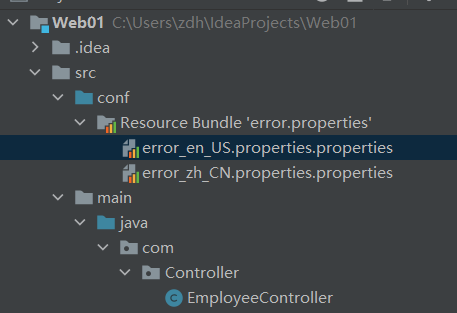
注意:国际化文件里面写的key有规定,每一个字段发生错误以后,都会有一个自己的错误代码,国际化资源文件中的错误消息的key必须对应一个错误代码
什么是错误代码:
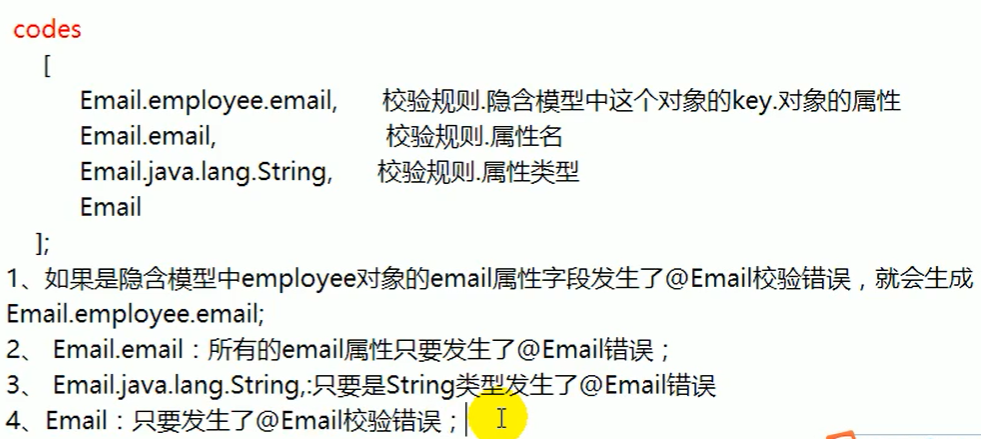
步骤2:编写国际化配置资源文件
error_en_US.properties.properties:
Email.email=email error--->
NotEmpty=not empty--->
Length.java.lang.String=type is not I want--->
error_zh_CN.properties.properties:
Email.email=邮箱书写的格式有误
NotEmpty=不能为空哦
Length.java.lang.String=长度不合法哦
步骤3:让SpringMVC管理国际化资源文件
    <!--让SpringMVC管理国际化资源文件-->
    <bean id="messageSource"  class="org.springframework.context.support.ResourceBundleMessageSource">
    <!--basename:指定国际化资源文件的基础名-->
    <property name="basename" value="error"></property>
    <!-- 支持UTF-8的中文 -->
    <property name="defaultEncoding" value="UTF-8"/>
    </bean>
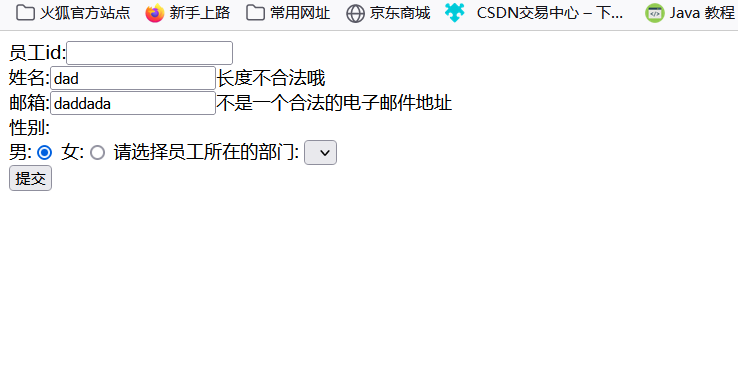
精确优先:同时写了Eamil.eamil和Eamil的错误显示信息,那么先走前者,因为前者更加精确
国际化资源文件支持从JSR-303注解中获取属性的参数值的,例如从@Length注解中,获取min和max属性的值
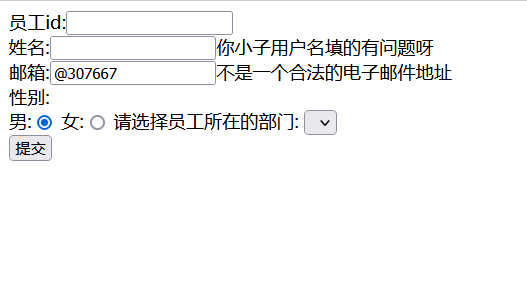
可以通过注解上的message属性来指定错误消息,如果配置了国际化,先走国际化中配置的
@NotEmpty(message = "你小子用户名填的有问题呀")
private  String name;
SpringMVC支持ajax
导入jquery的依赖
    <!--引入jquery的依赖-->
    <dependency>
      <groupId>org.webjars</groupId>
      <artifactId>jquery</artifactId>
      <version>3.3.1-2</version>
    </dependency>
  </dependencies>
导入JackSon的依赖
    <!--jackSon的依赖-->
    <dependency>
      <groupId>com.fasterxml.jackson.core</groupId>
      <artifactId>jackson-databind</artifactId>
      <version>2.10.0</version>
    </dependency>

    <dependency>
      <groupId>com.fasterxml.jackson.core</groupId>
      <artifactId>jackson-core</artifactId>
      <version>2.10.0</version>
    </dependency>


    <dependency>
      <groupId>com.fasterxml.jackson.core</groupId>
      <artifactId>jackson-databind</artifactId>
      <version>2.10.0</version>
    </dependency>
@JsonIgnore 输出数据的时候,不将当前数据发送给前端
    @JsonIgnore//输出数据的时候,忽略id字段
private Integer id;
@JsonFormat与@DateTimeFormat注解的配合使用
@JsonFormat与@DateTimeFormat注解的使用
jQuery的each()函数补充知识点
@ResponseBody注解将服务器端将对象以json对象形式返回,前端收到数据,显示在页面上
ajaxController:
@Controller
public class ajaxController {

    @Autowired
    EmployeeDao employeeDao;

    @ResponseBody//将返回的数据放在响应体中,如果返回的是对象,jackson自动将对象转换为json格式
    @RequestMapping("/getAllAjax")
    public  List<Employee> getAjaxAll()
    {
        List<Employee> allEmployees = employeeDao.getAllEmployees();
        return allEmployees;
    }
}
index.jsp:
<%@ page contentType="text/html;charset=UTF-8" language="java" %>
<% pageContext.setAttribute("ctx",request.getContextPath());%>
<html>
<head>
    <title>JQuery显示页面</title>
</head>
<body>
<script type="text/javascript" src="${ctx}/webjars/jquery/3.3.1-2/jquery.min.js"></script>
<script type="text/javascript">
$("#b1").click(function (){
    //1.发送ajax请求,获取所有员工
    $.ajax(
        {
            url:"${ctx}/getAllAjax",
            type:"get",
            success:function (data)
            {
                $.each(data,function (){
                     var empInfo=data.name+" "+data.department;
                       $("div").append(empInfo);
                })
            }
        }
    )
})
</script>
<button id="b1">ajax请求发送</button>
<div>大忽悠</div>
</body>
</html>
@ReuqestBody获取请求体----只有Post请求才有请求体
ajaxController:
@Controller
public class ajaxController {

    @Autowired
    EmployeeDao employeeDao;

    //放在视图解析器进行拼串
    @ResponseBody//将返回的数据放在响应体中,如果返回的是对象,jackson自动将对象转换为json格式
    @RequestMapping("/getAllAjax")
    public  List<Employee> getAjaxAll()
    {
        System.out.println("ajax方法调用");
        List<Employee> allEmployees = employeeDao.getAllEmployees();
        return allEmployees;
    }

    //获取一个请求的请求体
    @RequestMapping("/Body")
    public String testRequestBody(@RequestBody String Body)
    {
        System.out.println("请求体"+Body);
        return "success";
    }
}
index.jsp:
<%@ page contentType="text/html;charset=UTF-8" language="java" %>
<% pageContext.setAttribute("ctx",request.getContextPath());%>
<html>
<head>
    <title>无标题</title>
</head>
<body>
 <form action="${ctx}/Body" method="post" enctype="multipart/form-data">
     <input name="username" value="大忽悠"/>
     <input type="file" name="file"><%--文件上传--%>
     <button>提交</button>
 </form>
</body>
</html>

将请求体中的数据直接封装为自定义类型对象—@RequestBody
@RequestBody接收json数据,封装为对象(高级用法)
@ResponseBody把对象转换为json数据,返回给浏览器(高级用法)
@RequestBody可以直接将得到的json字符串直接封装为自定义类型对象,前提是自定义对象的属性名和请求参数名一一对应,并且有get和set方法,还有无参构造器
//获取一个请求的请求体,直接封装为people对象
    @RequestMapping("/peo")
    public String getPeople(@RequestBody people p)
    {
        System.out.println("p的值为:"+p);
        return "success";
    }
index.ja
<%@ page contentType="text/html;charset=UTF-8" language="java" %>
<% pageContext.setAttribute("ctx",request.getContextPath());%>
<head>
    <title>JQuery显示页面</title>
</head>
<body>
<script type="text/javascript" src="${ctx}/webjars/jquery/3.3.1-2/jquery.js"></script>
<script>
    $(function ()
    {
        $("#b1").click(function (){
            console.log("=====");
            var emp={"name":"大忽悠","age":"18"};
            //打印emp的类型----》是一个json对象
            alert(typeof emp);
            //将这个json对象,转换为一个json形式的字符串
            var stringEmp=JSON.stringify(emp);
            //打印stringEmp的类型----->字符串
            alert(typeof  stringEmp);
            //1.发送ajax请求,获取所有员工
            $.ajax(
                {
                    url:"${ctx}/peo",
                    type:"post",
                    data:stringEmp,
                    //指定要提交的数据格式为json----告诉浏览器
                    contentType:"application/json",
                    success:function (data)
                    {
                        alert(data);
                    }
                }
            )
            return false;
        })
    })
</script>
<a id="b1" href="${ctx}/peo">点击,ajax请求发送</a>
</body>
</html>


在参数位置写HttpEntity< String>,比@RequestBody更强,可以拿到请所有请求头和请求体数据
    @RequestMapping("/peo")
    public String getPeople(HttpEntity<String>  ret)
    {
        System.out.println(ret);
        return "success";
    }


@ResponseBody加在方法上—》本质是将返回的数据直接塞在请求体重
    @ResponseBody
    @RequestMapping("/peo")
    public String getPeople(HttpEntity<String>  ret)
    {
        return "<h1>success<h1>";
    }

设置方法返回类型为: ResponseEntity< T >:泛型是响应体数据的类型,可以自定义响应
    @RequestMapping("/peo")
    public ResponseEntity<String> getPeople(HttpEntity<String>  ret)
    {
        //三个参数: 响应体,响应头,状态码
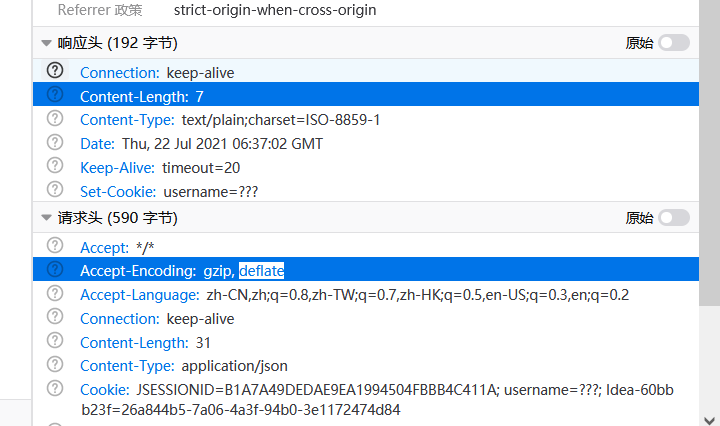
        String body="Success";
        MultiValueMap<String, String> headers=new HttpHeaders();
        //让浏览器保存一个cookie
        headers.add("Set-Cookie","username=大忽悠");
      return   new ResponseEntity<String>(body,headers,HttpStatus.OK);
    }
SpringMVC中提供的文件下载—较为鸡肋—>ResponseEntity方式
 @RequestMapping("/peo")
    public ResponseEntity<Byte[]> download(HttpServletRequest request) throws IOException {
        //1.得到要下载的文件的流
        //找到要下载的文件的真实路径
        ServletContext context=request.getSession().getServletContext();
        String realPath=context.getRealPath("C:\\Users\\zdh\\IdeaProjects\\Web01\\src\\main\\webapp\\index.jsp");
        FileInputStream is=new FileInputStream(realPath);
        byte[] temp=new byte[is.available()];
        is.read(temp);
        is.close();
        //将要下载的文件流返回
        HttpHeaders httpHeaders = new HttpHeaders();
        httpHeaders.set("Content-Disposition","attachment;filename="+"index.jsp");
        return new ResponseEntity<byte[]>(temp,httpHeaders,HttpStatus.OK);
    }
总结: ResponseEntity响应数据的同时,可以自定义响应头 ,HttpEntity< String>获取响应体数据的同时,获取响应头
对于这些怪异的返回值,视图解析器就不会进行拼串了,具体工作机制,看源码
SpringMVC的文件上传
导入依赖
    <!--文件上传的依赖-->
    <dependency>
      <groupId>commons-fileupload</groupId>
      <artifactId>commons-fileupload</artifactId>
      <version>1.3.1</version>
    </dependency>
    <dependency>
    <groupId>commons-io</groupId>
    <artifactId>commons-io</artifactId>
    <version>2.5</version>
    </dependency>
文件上传表单准备
<%@ page contentType="text/html;charset=UTF-8" language="java" %>
<% pageContext.setAttribute("ctx",request.getContextPath());%>
<head>
    <title>JQuery显示页面</title>
</head>
<body>
<script type="text/javascript" src="${ctx}/webjars/jquery/3.3.1-2/jquery.js"></script>
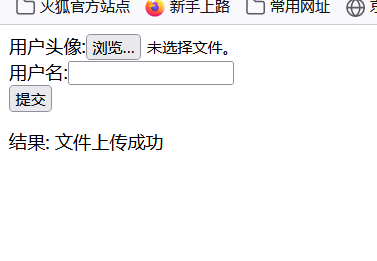
<form action="${ctx}/upload" method="post" enctype="multipart/form-data">
    用户头像:<input type="file" name="head"/><br/>
    用户名:<input type="text" name="username"/><br/>
    <input type="submit"/>
</form>
结果: ${msg}
</body>
</html>
SpringMVC中配置文件上传解析器

    <!--文件上传解析器: id必须是multipartFile-->
    <bean  id="multipartResolver" class="org.springframework.web.multipart.commons.CommonsMultipartResolver">
        <!--设置文件上传最大量为5m-->
        <property name="maxUploadSize" value="5242880"></property><!--spel运算符,计算最大可上传文件体积-->
        <!--设置默认的编码-->
        <property name="defaultEncoding" value="utf-8"></property>
    </bean>
文件上传请求处理
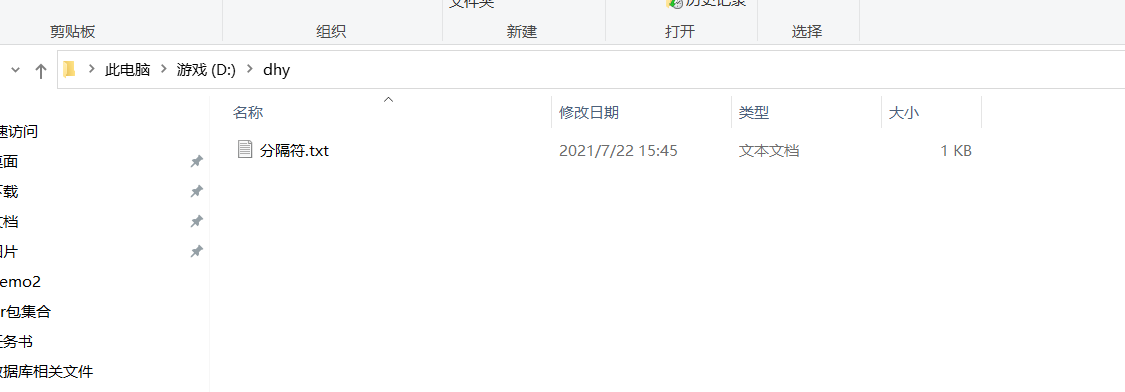
在处理器方法上写一个 @RequestParam(“head”) MultipartFile file,封装当前文件信息,可以直接保存
@Controller
public class uploadController {
         @RequestMapping("/upload")
    public String upload(
                 @RequestParam(value = "username",required = false) String username,
                 @RequestParam("head") MultipartFile file
                 ,Model model)
         {
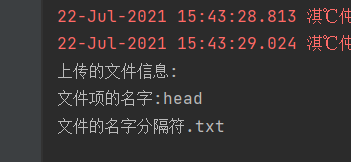
             System.out.println("上传的文件信息:");
             System.out.println("文件项的name:"+file.getName());
             System.out.println("文件的名字"+file.getOriginalFilename());
           //文件保存
             try {
                 file.transferTo(new File("D:\\dhy\\"+file.getOriginalFilename()));
                 model.addAttribute("msg","文件上传成功");
             } catch (IOException e) {
                 e.printStackTrace();
                 model.addAttribute("msg","文件上传失败");
             }

return "forward:/index.jsp";
         }
}
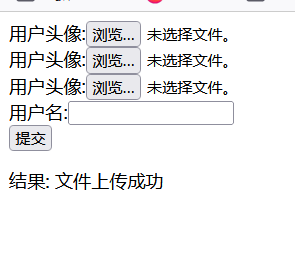
多文件上传
@Controller
public class uploadController {
         @RequestMapping("/upload")
    public String upload(
                 @RequestParam(value = "username",required = false) String username,
                 @RequestParam(value = "head") MultipartFile[] file1
                 ,Model model)
         {
             System.out.println("上传的文件信息:");
             for(MultipartFile file:file1)
             {
                 if(!file.isEmpty())
                 {
                     try {
                         file.transferTo(new File("D:\\dhy\\"+file.getOriginalFilename()));
                         model.addAttribute("msg","文件上传成功");
                     } catch (IOException e) {
                         e.printStackTrace();
                         model.addAttribute("msg","文件上传失败");
                     }
                 }
             }
return "forward:/index.jsp";
         }
index.jsp
<%@ page contentType="text/html;charset=UTF-8" language="java" %>
<% pageContext.setAttribute("ctx",request.getContextPath());%>
<head>
    <title>JQuery显示页面</title>
</head>
<body>
<form action="${ctx}/upload" method="post" enctype="multipart/form-data">
    用户头像:<input type="file" name="head"/><br/>
    用户头像:<input type="file" name="head"/><br/>
    用户头像:<input type="file" name="head"/><br/>
    用户名:<input type="text" name="username"/><br/>
    <input type="submit" value="提交"/>
</form>
结果: ${msg}
</body>
</html>

拦截器
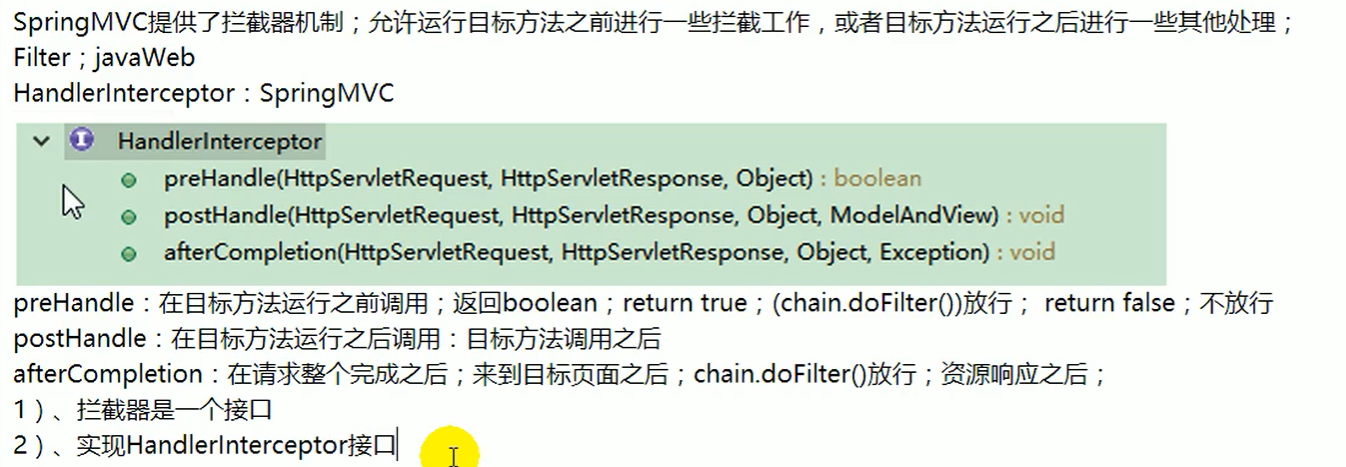
单拦截器运行流程
1.创建拦截器类
public class MyInterceptor implements HandlerInterceptor {

    /**
     * 该方法在目标方法之前被调用.
     * 若返回值为 true, 则继续调用后续的拦截器和目标方法.
     * 若返回值为 false, 则不会再调用后续的拦截器和目标方法.
     *
     * 可以考虑做权限. 日志, 事务等.
     */
    public boolean preHandle(HttpServletRequest request, HttpServletResponse response, Object handler)
            throws Exception {
        System.out.println("[MyInterceptor] preHandle");
        return true;
    }

    /**
     * 调用目标方法之后, 但渲染视图之前.
     * 可以对请求域中的属性或视图做出修改.
     */
    public void postHandle(HttpServletRequest request, HttpServletResponse response, Object handler,
                           ModelAndView modelAndView) throws Exception {
        System.out.println("[MyInterceptor] postHandle");
    }

    /**
     * 渲染视图之后被调用. 释放资源
     */
    public void afterCompletion(HttpServletRequest request, HttpServletResponse response, Object handler, Exception ex)
            throws Exception {
        System.out.println("[MyInterceptor] afterCompletion");
    }
}
2.在spingMVC的配置文件中注册这个拦截器的工作,配置这个拦截器来拦截哪些请求的方法
<!--测试拦截器-->
<mvc:interceptors>
<!--配置某个拦截器,默认是拦截所有请求-->
<bean class="com.Controller.MyInterceptor"/>
<!--具体配置某个拦截器-->
<!-- <mvc:interceptor>
<!–只拦截test01请求–>
<mvc:mapping path="/test01"/>
<bean class="com.Controller.MyInterceptor"/>
</mvc:interceptor>-->
</mvc:interceptors>
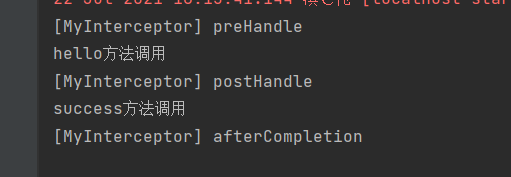
拦截器正常运行流程和其他流程


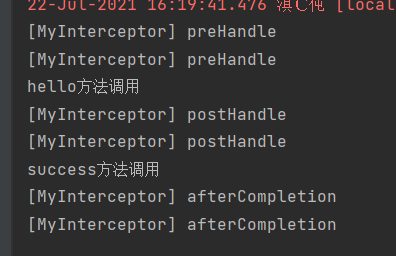
多个拦截器运行流程
    <!--测试拦截器-->
    <mvc:interceptors>
        <!--配置某个拦截器,默认是拦截所有请求-->
    <bean class="com.Controller.MyInterceptor"/>
        <!--具体配置某个拦截器-->
        <mvc:interceptor>
            <!--只拦截hello请求-->
            <mvc:mapping path="/hello"/>
            <bean class="com.Controller.MyInterceptor"/>
        </mvc:interceptor>
    </mvc:interceptors>
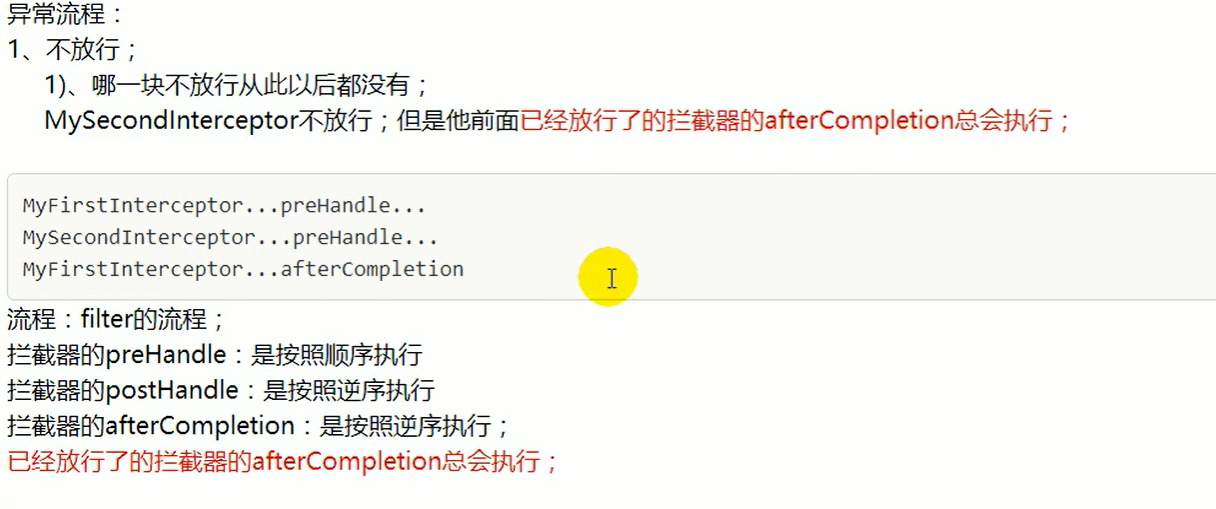
多拦截器异常运行流程
已经放行了的拦截器的afterCompletion总会执行
目标方法出现异常,postHandle不会执行
国际化
1.创建国际化资源文件夹
error_en_US.properties:
welcome=welocme page
username=username
password=password
error_zh_CN.properties:
welcome=登录界面
username=用户名
password=密码
2.配置
    <!--让SpringMVC管理国际化资源文件,id不能改-->
    <bean id="messageSource"  class="org.springframework.context.support.ResourceBundleMessageSource">
    <!--basename:指定国际化资源文件的基础名-->
    <property name="basename" value="error"></property>
    <!-- 支持UTF-8的中文 -->
    <property name="defaultEncoding" value="UTF-8"/>
    </bean>
3.在页面进行内容替换
<%@ page contentType="text/html;charset=UTF-8" language="java" %>
<% pageContext.setAttribute("ctx",request.getContextPath());%>
<%@taglib prefix="c" uri="http://java.sun.com/jsp/jstl/core" %>
<%@ taglib prefix="fmt" uri="http://java.sun.com/jsp/jstl/fmt" %>
<head>
   <h1>
       <fmt:message key="welcome"/>
   </h1>
</head>
<body>
    <form action="">
        <fmt:message key="username"/>:<input/><br/>
        <fmt:message key="password"/>:<input/><br/>
        <input type="submit" value="提交"/>
    </form>
</body>
</html>
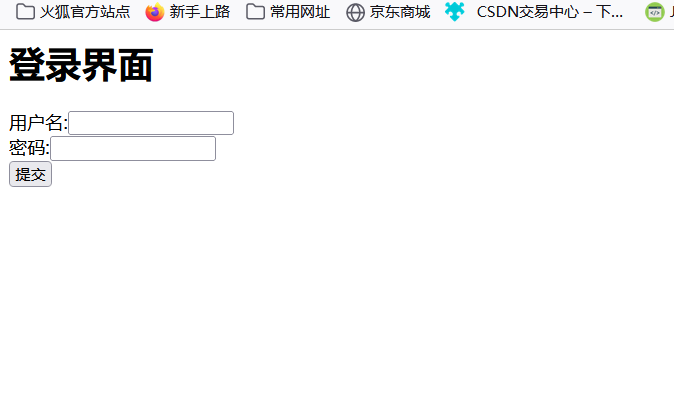
国际化必看注意事项

注意不能直接进入国际化的页面中,因为直接进入某个jsp页面的时候,就相当直接向Tomcat请求页面,没有经过Spring,然而Spring管理的国际化也就不会生效
SpringMVC国际化实现完整流程,详细介绍
springmvc区域信息是由区域信息解析器得到的

通过MessageSource对象,来获取国际化资源文件中对应key对应的值,也可以获取国际化资源文件中的错误信息
@Controller
public class hello {
    @Autowired
    private MessageSource messageSource;
    @RequestMapping("/hello")
public String hai(Locale locale)
{
    System.out.println(locale);//打印当前区域信息
    String username = messageSource.getMessage("username", null, locale);//第二个参数是占位符数组
    System.out.println("用户名:"+username);
    return "guojihua";
}
}
打印结果为:
zh_CN
用户名: 用户名
自定义区域信息解析器----实现点击不同超链接,切换当前页面的语言
MyLocalResolve:
/*自定义区域解析器*/
public class MyLocalResolve implements LocaleResolver {
    //解析返回locale
    public Locale resolveLocale(HttpServletRequest request)
    {
        String localeStr=request.getParameter("locale");
        Locale l=null;
        //如果带了locale参数就用参数指定的区域信息,否则就用请求头的
        if(localeStr!=null&&!"".equals(localeStr))
        {
            l=new Locale(localeStr.split("_")[0],localeStr.split("_")[1]);
        }
        else{
            l=request.getLocale();
        }
        return l;
    }
     //修改locale
    public void setLocale(HttpServletRequest request, HttpServletResponse response, Locale locale)
    {

    }
}
国际化展示页面:
<%@ page contentType="text/html;charset=UTF-8" language="java" %>
<% pageContext.setAttribute("ctx",request.getContextPath());%>
<%@taglib prefix="c" uri="http://java.sun.com/jsp/jstl/core" %>
<%@ taglib prefix="fmt" uri="http://java.sun.com/jsp/jstl/fmt" %>
<head>
    <h1>
        <fmt:message key="welcome"/>
    </h1>
</head>
<body>
<form action="">
    <fmt:message key="username"/>:<input/><br/>
    <fmt:message key="password"/>:<input/><br/>
    <input type="submit" value="提交"/>
</form>
<a href="hello?locale=zh_CN">中文</a><br/>
    <a href="hello?locale=en_US">英文</a><br/>
</body>
</html>
hello页面跳转类:
@Controller
public class hello {
    @Autowired
    private MessageSource messageSource;
    @RequestMapping("/hello")
public String hai(Locale locale)
{
    System.out.println(locale);//打印当前区域信息
    String username = messageSource.getMessage("username", null, locale);//第二个参数是占位符数组
    System.out.println("用户名:"+username);
    return "guojihua";
}
}
将自定义区域解析器放到容器中,让springMVC使用
    <!--配置自定义区域信息解析器 id固定-->
    <bean id="localeResolver" class="com.Controller.MyLocalResolve"></bean>
演示效果
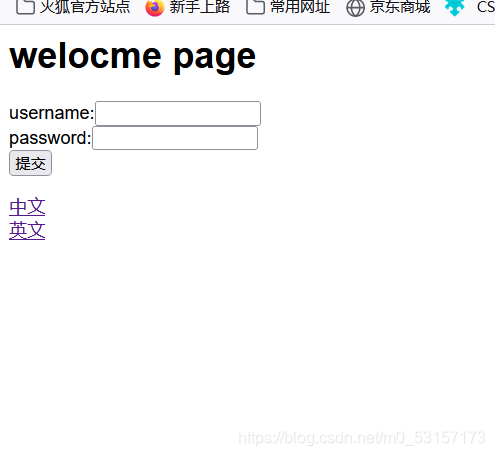

完整流程看下面这篇文章
SessionLocaleResolver实现点击链接切换国际化----信息从session中获取
SessionLocaleResolver保存客户的Locale到HttpSession对象中,并且支持获取和修改
1.在配置文件中配置使用SessionLocaleResolver
<!--区域信息从session中获取-->
    <bean id="localeResolver" class="org.springframework.web.servlet.i18n.SessionLocaleResolver"/>
2.在跳转资源hello中获取区域信息,并防止再session域中,让SessionLocaleResolver进行国际化操作实现
@Controller
public class hello {
    @Autowired
    private MessageSource messageSource;
    @RequestMapping("/hello")         //如果有请求参数locale,那么就使用,否则默认为中文
public String hai(@RequestParam(value = "locale",defaultValue = "zh_CN") String localeStr,
                  Locale locale,//这里locale是获取当前请求头里面的区域信息
                  HttpSession httpSession)
{
    Locale l=null;
    //如果带了locale参数就用参数指定的区域信息,否则就用请求头的
    if(localeStr!=null&&!"".equals(localeStr))
    {
        l=new Locale(localeStr.split("_")[0],localeStr.split("_")[1]);
    }
    else{
        l=locale;
    }
     httpSession.setAttribute(SessionLocaleResolver.class.getName()+".LOCALE",l);
    return "guojihua";
}
}
guojihua.jsp
<%@ page contentType="text/html;charset=UTF-8" language="java" %>
<% pageContext.setAttribute("ctx",request.getContextPath());%>
<%@taglib prefix="c" uri="http://java.sun.com/jsp/jstl/core" %>
<%@ taglib prefix="fmt" uri="http://java.sun.com/jsp/jstl/fmt" %>
<head>
    <h1>
        <fmt:message key="welcome"/>
    </h1>
</head>
<body>
<form action="">
    <fmt:message key="username"/>:<input/><br/>
    <fmt:message key="password"/>:<input/><br/>
    <input type="submit" value="提交"/>
</form>
<a href="hello?locale=zh_CN">中文</a><br/>
    <a href="hello?locale=en_US">英文</a><br/>
</body>
</html>


Session的区域信息解析器SessionLocaleResolver配合LocaleChangeInterceptor拦截器使用
1.配置文件中配置解析器和拦截器
    <!--区域信息从session中获取-->
    <bean id="localeResolver" class="org.springframework.web.servlet.i18n.SessionLocaleResolver"/>
    <mvc:interceptors>
        <!--配置拦截器-->
        <bean id="localeChangeInterceptor" class="org.springframework.web.servlet.i18n.LocaleChangeInterceptor"/>
    </mvc:interceptors>
配置了解析器和拦截器后,其他操作都可以省略
跳转类:
@Controller
public class hello {
    @RequestMapping("/hello")
public String hai()
{
    return "guojihua";
}
}
guojihua.jsp:
<%@ page contentType="text/html;charset=UTF-8" language="java" %>
<% pageContext.setAttribute("ctx",request.getContextPath());%>
<%@taglib prefix="c" uri="http://java.sun.com/jsp/jstl/core" %>
<%@ taglib prefix="fmt" uri="http://java.sun.com/jsp/jstl/fmt" %>
<head>
    <h1>
        <fmt:message key="welcome"/>
    </h1>
</head>
<body>
<form action="">
    <fmt:message key="username"/>:<input/><br/>
    <fmt:message key="password"/>:<input/><br/>
    <input type="submit" value="提交"/>
</form>
<a href="hello?locale=zh_CN">中文</a><br/>
    <a href="hello?locale=en_US">英文</a><br/>
</body>
</html>


工作原理

异常处理
@ExceptionHandler()注解使用演示
里面参数可以填数组,每一个参数代表当前处理异常的方法能够处理的异常类型,返回值可以跳转到定制的错误页面
@Controller
public class exception
{
   @RequestMapping("/dhy")
     public String handle01(Integer i)
     {
         System.out.println(10/i);
        return "success";
     }
     //里面参数可以填数组
     //每一个参数代表当前处理异常的方法能够处理的异常类型,返回值可以跳转到定制的错误页面
     @ExceptionHandler({ArithmeticException.class,NullPointerException.class})
     public  String exceptionHandle()
     {
         System.out.println("发生错误");
         //视图解析器拼串
         return "error";
     }
}
index.jsp
<%@ page contentType="text/html;charset=UTF-8" language="java" %>

<a href="dhy?i=0">点我</a>
error.jsp
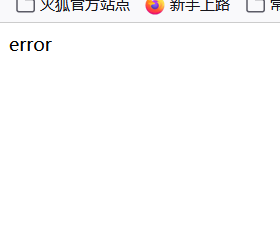
<%@ page contentType="text/html;charset=UTF-8" language="java" %>
<html>
<head>
    <title>Error</title>
</head>
<body>
error
</body>
</html>
注意事项:

返回ModelAndView,可以将错误信息带给页面
@Controller
public class exception
{
   @RequestMapping("/dhy")
     public String handle01(Integer i)
     {
         System.out.println(10/i);
        return "success";
     }
     //里面参数可以填数组
     //每一个参数代表当前处理异常的方法能够处理的异常类型,返回值可以跳转到定制的错误页面
     @ExceptionHandler({ArithmeticException.class,NullPointerException.class})
     public  ModelAndView exceptionHandle(Exception exception)
     {
        ModelAndView m=new ModelAndView("error");//参数:设置跳转页面
        m.addObject("ex",exception);//将错误信息放到隐含模型中
        return m;
     }
}
error页面:
<%@ page contentType="text/html;charset=UTF-8" language="java" %>
<html>
<head>
    <title>Error</title>
</head>
<body>
<h1>错误信息为: ${ex}</h1>
</body>
</html>

如果有多个@ExceptionHandler都能处理一个异常,那么精确优先
@ControllerAdvice注解----》表明当前类是集中处理异常的类,可以全局处理异常
@ControllerAdvice
public class exception
{
    @ExceptionHandler({ArithmeticException.class,NullPointerException.class})
    public  ModelAndView exceptionHandle(Exception exception)
    {
        ModelAndView m=new ModelAndView("error");//参数:设置跳转页面
        m.addObject("ex",exception);//将错误信息放到隐含模型中
        return m;
    }
}
全局异常处理与本类异常处理同时存在,那么本类异常处理优先,不论精确与否
@ResponseStatus标注在自定义异常上,返回一个服务器错误页面,省去做错误页面
ex异常类:
package com.Exception;

import org.springframework.http.HttpStatus;
import org.springframework.web.bind.annotation.ResponseStatus;

//第一个参数自定义的错误信息,第二个参数是错误显示的状态码
@ResponseStatus(reason = "用户登录异常",value = HttpStatus.NOT_FOUND)
public class ex extends RuntimeException{
private  static  final  long serialVersionUID=1l;
}
hello类:
@Controller
public class hello
{
    @RequestMapping("/dhy")
  public String show(String name)
  {
      System.out.println(name);
      if(!name.equals("大忽悠"))
      {
throw new ex();
      }
      return "success";
  }
}
登录页面:
<form action="dhy">
    用户名:<input type="text" name="name"><br/>
    <input type="submit" value="登录"/>
</form>


@ResponseStatus注解工作的前提是,上面没有@ExceptionHandler标注的异常处理方法能处理该异常,否则走@ExceptionHandler标注的异常处理方法
Spring默认的异常如果没人处理,就使用默认的处理方法来进行处理---->DefaultHandlerExceptionResolver

基于SpringMVC.xml配置的异常处理方式-----在处理异常的顺序上,优先级最低

xml配置
    <bean class="org.springframework.web.servlet.handler.SimpleMappingExceptionResolver">
        <!--exceptionMappings配置哪些异常区哪些页面-->
        <property name="exceptionMappings">
            <props>
                <!--key: 异常全类名 value:要去的页面视图名-->
                <prop key="java.lang.NullPointerException">error</prop>
            </props>
        </property>
        <!--指定错误信息取出时指定的key,默认是exception-->
        <property name="exceptionAttribute" value="ex"></property>
    </bean>
error页面:
<%@ page contentType="text/html;charset=UTF-8" language="java" %>
<html>
<head>
    <title>Error</title>
</head>
<body>
<h1>错误信息为: ${ex}</h1>
</body>
</html>
Hai:
@Controller
public class Hai
{
    @RequestMapping("/dhy")
  public String show(String name)
  {
      String s=null;
      s.length();//引发空指针异常
      return "success";
  }
}

SpringMVC运行流程总结


SpringMVC和Spring整合


如果采用上面的合并配置文件,那么相当于系统一起动只有一个IOC容器,这样一部分报错,整个容器就凉凉
建议SpringMVC和spring分容器操作—》通过区分注解扫描范围来达到效果,各自创建自己的容器,在自己的容器中创建自己扫描到或者配置文件中配置的Bean
需要先禁止掉扫描所有包的默认行为
Spring.xml包扫描配置:
    <context:component-scan base-package="com.service" use-default-filters="false">
        <context:exclude-filter type="annotation" expression="org.springframework.stereotype.Controller"/>
        <context:exclude-filter type="annotation" expression="org.springframework.web.bind.annotation.ControllerAdvice"/>
    </context:component-scan>
SpringMVC包扫描配置:
    <context:component-scan base-package="com.controller" use-default-filters="false">
        <context:include-filter type="annotation" expression="org.springframework.stereotype.Controller"/>
        <!--第二个是SpringMVC错误控制的注解-->
        <context:include-filter type="annotation" expression="org.springframework.web.bind.annotation.ControllerAdvice"/>
    </context:component-scan>
父子容器概念: SpringMVC作为子容器,而Spring作为父容器
