Spring Security OAuth2 JWT SSO 整合项目
前言
本项目为Spring Security OAuth2 JWT SSO整合项目。适合对Spring Security、OAuth2和JWT SSO有一定认识并且想要进行有机整合的各位,项目本着上手最简单,基础功能最完善的原则编写。
基于数据库的认证和鉴权。采用OAuth2认证,根据认证服务器端查询的用户信息,进行认证处理,根据权限在资源服务器进行鉴权。此处采用权限鉴权模式,根据用户的权限,开闸可以访问的资源服务器范围。【另外还有根据角色鉴权,只是换汤不换药】
for (int i = 0; i <= 2; i++) {
System.out.println(“直接下载源码食用更佳!源码在文章最下方给出!”);
}
源码已经进行详细的注解,可以结合文章一起理解。
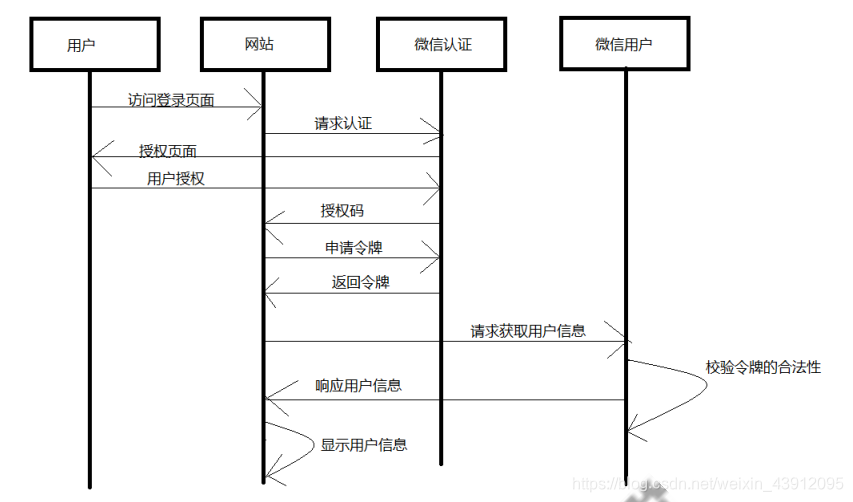
举个栗子稍微理解一下Oauth2认证,网站使用微信认证的过程:(从上到下按按照箭头方向进行)

一、使用步骤
1.工程结构

2.添加依赖
pom.xml
<?xml version="1.0" encoding="UTF-8"?>
<project xmlns="http://maven.apache.org/POM/4.0.0" xmlns:xsi="http://www.w3.org/2001/XMLSchema-instance"
         xsi:schemaLocation="http://maven.apache.org/POM/4.0.0 https://maven.apache.org/xsd/maven-4.0.0.xsd">
    <modelVersion>4.0.0</modelVersion>
    <parent>
        <groupId>org.springframework.boot</groupId>
        <artifactId>spring-boot-starter-parent</artifactId>
        <version>2.2.1.RELEASE</version>
        <relativePath/> <!-- lookup parent from repository -->
    </parent>
    <groupId>com.xxxx</groupId>
    <artifactId>springsecurityoauth2-demo</artifactId>
    <version>0.0.1-SNAPSHOT</version>
    <name>springsecurityoauth2-demo</name>
    <description>Demo project for Spring Boot</description>
    <!--设置spring cloud以及jdk版本变量-->
    <properties>
        <java.version>1.8</java.version>
        <spring-cloud.version>Greenwich.SR2</spring-cloud.version>
    </properties>
    <dependencies>
        <!--oauth2和security使用spring cloud里面的组件-->
        <!--只有引入了spring cloud依赖以及版本后才会生效-->
        <dependency>
            <!--oauth2依赖-->
            <groupId>org.springframework.cloud</groupId>
            <artifactId>spring-cloud-starter-oauth2</artifactId>
        </dependency>
        <dependency>
            <!--security依赖-->
            <groupId>org.springframework.cloud</groupId>
            <artifactId>spring-cloud-starter-security</artifactId>
        </dependency>
        <dependency>
            <!--web依赖-->
            <groupId>org.springframework.boot</groupId>
            <artifactId>spring-boot-starter-web</artifactId>
        </dependency>
        <dependency>
            <!--test依赖-->
            <groupId>org.springframework.boot</groupId>
            <artifactId>spring-boot-starter-test</artifactId>
            <scope>test</scope>
        </dependency>
            <!--jwt 依赖-->
        <dependency>
            <groupId>io.jsonwebtoken</groupId>
            <artifactId>jjwt</artifactId>
            <version>0.9.0</version>
        </dependency>
        <dependency>
            <groupId>org.projectlombok
            </groupId>
            <artifactId>lombok</artifactId>
            <version>1.18.10</version>
        </dependency>
        <!--    MyBatis-Spring-Boot-Starter类似一个中间件,链接Spring Boot和MyBatis,构建基于Spring Boot的MyBatis应用程序-->
        <dependency>
            <groupId>org.mybatis.spring.boot</groupId>
            <artifactId>mybatis-spring-boot-starter</artifactId>
            <version>1.3.2</version>
        </dependency>
        <!--    mysql-connector-java 是MySQL提供的JDBC驱动包,用JDBC连接MySQL数据库时必须使用该jar包-->
        <dependency>
            <groupId>mysql</groupId>
            <artifactId>mysql-connector-java</artifactId>
        </dependency>
        <dependency>
            <groupId>org.projectlombok</groupId>
            <artifactId>lombok</artifactId>
        </dependency>
    </dependencies>
    <!--dependencyManagement利用版本变量引入spring cloud依赖。-->
    <dependencyManagement>
        <dependencies>
            <dependency>
                <groupId>org.springframework.cloud</groupId>
                <artifactId>spring-cloud-dependencies</artifactId>
                <version>${spring-cloud.version}</version>
                <type>pom</type>
                <scope>import</scope>
            </dependency>
        </dependencies>
    </dependencyManagement>
    <build>
        <plugins>
            <plugin>
                <groupId>org.springframework.boot</groupId>
                <artifactId>spring-boot-maven-plugin</artifactId>
            </plugin>
            <!--          mybatis-generator是mybatis自动生成实体代码的插件-->
            <plugin>
                <groupId>org.mybatis.generator</groupId>
                <artifactId>mybatis-generator-maven-plugin</artifactId>
                <version>1.3.7</version>
                <configuration>
                    <verbose>true</verbose>
                    <overwrite>true</overwrite>
                </configuration>
            </plugin>
        </plugins>
    </build>

</project>
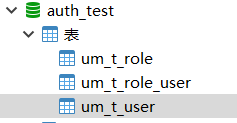
3.数据库建表语句
SET NAMES utf8mb4;
SET FOREIGN_KEY_CHECKS = 0;

-- ----------------------------
-- Table structure for um_t_role
-- ----------------------------
DROP TABLE IF EXISTS `um_t_role`;
CREATE TABLE `um_t_role`  (
  `id` int(0) NOT NULL AUTO_INCREMENT,
  `description` varchar(255) CHARACTER SET utf8 COLLATE utf8_general_ci NULL DEFAULT NULL,
  `created_time` bigint(0) NOT NULL,
  `name` varchar(255) CHARACTER SET utf8 COLLATE utf8_general_ci NOT NULL,
  `role` varchar(255) CHARACTER SET utf8 COLLATE utf8_general_ci NOT NULL,
  PRIMARY KEY (`id`) USING BTREE
) ENGINE = InnoDB AUTO_INCREMENT = 3 CHARACTER SET = utf8mb4 COLLATE = utf8mb4_0900_ai_ci ROW_FORMAT = Dynamic;

-- ----------------------------
-- Records of um_t_role
-- ----------------------------
INSERT INTO `um_t_role` VALUES (1, '管理员拥有所有接口操作权限', 1627199362, '管理员', 'ADMIN');
INSERT INTO `um_t_role` VALUES (2, '普通拥有查看用户列表与修改密码权限,不具备对用户增删改权限', 1627199362, '普通用户', 'USER');

-- ----------------------------
-- Table structure for um_t_role_user
-- ----------------------------
DROP TABLE IF EXISTS `um_t_role_user`;
CREATE TABLE `um_t_role_user`  (
  `role_id` int(0) NULL DEFAULT NULL,
  `user_id` int(0) NULL DEFAULT NULL
) ENGINE = InnoDB CHARACTER SET = utf8mb4 COLLATE = utf8mb4_0900_ai_ci ROW_FORMAT = Dynamic;

-- ----------------------------
-- Records of um_t_role_user
-- ----------------------------
INSERT INTO `um_t_role_user` VALUES (1, 1);

-- ----------------------------
-- Table structure for um_t_user
-- ----------------------------
DROP TABLE IF EXISTS `um_t_user`;
CREATE TABLE `um_t_user`  (
  `id` int(0) NOT NULL AUTO_INCREMENT,
  `account` varchar(255) CHARACTER SET utf8 COLLATE utf8_general_ci NULL DEFAULT NULL,
  `description` varchar(255) CHARACTER SET utf8 COLLATE utf8_general_ci NULL DEFAULT NULL,
  `password` varchar(255) CHARACTER SET utf8 COLLATE utf8_general_ci NULL DEFAULT NULL,
  `name` varchar(255) CHARACTER SET utf8 COLLATE utf8_general_ci NOT NULL,
  PRIMARY KEY (`id`) USING BTREE
) ENGINE = InnoDB AUTO_INCREMENT = 2 CHARACTER SET = utf8mb4 COLLATE = utf8mb4_0900_ai_ci ROW_FORMAT = Dynamic;

-- ----------------------------
-- Records of um_t_user
-- ----------------------------
INSERT INTO `um_t_user` VALUES (1, 'admin', '系统默认管理员', '$2a$10$N97RyMYeQ7aVTxLvdxq5NeBivdbj/u2GQtHERISUt8qhKBfnjSC1q', 'admin');
INSERT INTO `um_t_user` VALUES (2, 'user', '普通用户', '$2a$10$N97RyMYeQ7aVTxLvdxq5NeBivdbj/u2GQtHERISUt8qhKBfnjSC1q', 'user');
INSERT INTO `um_t_user` VALUES (3, 'user', 'test user', '$2a$10$N97RyMYeQ7aVTxLvdxq5NeBivdbj/u2GQtHERISUt8qhKBfnjSC1q', 'Jacks');

SET FOREIGN_KEY_CHECKS = 1;
所有用户密码都是123456


4.编写相关配置文件
(1)generatorConfig.xml 是mybatis-generator的配置文件
<?xml version="1.0" encoding="UTF-8"?>
<!DOCTYPE generatorConfiguration
PUBLIC "-//mybatis.org//DTD MyBatis Generator Configuration 1.0//EN"
"http://mybatis.org/dtd/mybatis-generator-config_1_0.dtd">
<generatorConfiguration>
<!-- generatorConfig.xml配置文件,放在resource目录下即可 -->
<!--数据库驱动个人配置-->
<classPathEntry
location="D:\maven-repo\mysql\mysql-connector-java\8.0.18\mysql-connector-java-8.0.18.jar"/>
<context id="MysqlTables" targetRuntime="MyBatis3">
<property name="autoDelimitKeywords" value="true"/>
<!--可以使用``包括字段名,避免字段名与sql保留字冲突报错-->
<property name="beginningDelimiter" value="`"/>
<property name="endingDelimiter" value="`"/>
<!-- optional,旨在创建class时,对注释进行控制 -->
<commentGenerator>
<property name="suppressDate" value="true"/>
<property name="suppressAllComments" value="true"/>
</commentGenerator>
<!--数据库链接地址账号密码-->
<jdbcConnection driverClass="com.mysql.cj.jdbc.Driver"
connectionURL="jdbc:mysql://127.0.0.1:3306/auth_test?useUnicode=true&characterEncoding=UTF-8&serverTimezone=Asia/Shanghai"
userId="root"
password="123456">
<property name="nullCatalogMeansCurrent" value="true"/>
</jdbcConnection>
<!-- 非必需,类型处理器,在数据库类型和java类型之间的转换控制-->
<javaTypeResolver>
<property name="forceBigDecimals" value="false"/>
</javaTypeResolver>
<!--生成Model类存放位置-->
<javaModelGenerator targetPackage="com.xxxx.springsecurityoauth2demo.model.pojo"
targetProject="src/main/java">
<!-- 是否允许子包,即targetPackage.schemaName.tableName -->
<property name="enableSubPackages" value="true"/>
<!-- 是否对类CHAR类型的列的数据进行trim操作 -->
<property name="trimStrings" value="true"/>
<!-- 建立的Model对象是否 不可改变 即生成的Model对象不会有 setter方法,只有构造方法 -->
<property name="immutable" value="false"/>
</javaModelGenerator>
<!--生成mapper映射文件存放位置-->
<sqlMapGenerator targetPackage="mappers" targetProject="src/main/resources">
<property name="enableSubPackages" value="true"/>
</sqlMapGenerator>
<!--生成Dao类存放位置-->
<javaClientGenerator type="XMLMAPPER" targetPackage="com.xxxx.springsecurityoauth2demo.model.dao"
targetProject="src/main/java">
<property name="enableSubPackages" value="true"/>
</javaClientGenerator>
<!--生成对应表及类名 schema 指数据库的用户名-->
<table schema="root" tableName="um_t_role" domainObjectName="Role"
enableCountByExample="false"
enableUpdateByExample="false" enableDeleteByExample="false" enableSelectByExample="false"
selectByExampleQueryId="false">
</table>
<table schema="root" tableName="um_t_user" domainObjectName="User" enableCountByExample="false"
enableUpdateByExample="false" enableDeleteByExample="false" enableSelectByExample="false"
selectByExampleQueryId="false">
</table>
</context>
</generatorConfiguration>
(2)application.properties
server.port=8080

spring.datasource.url=jdbc:mysql://localhost:3306/auth_test?useUnicode=true&characterEncoding=utf8&autoReconnect=true&useSSL=false&serverTimezone=Asia/Shanghai
spring.datasource.driver-class-name=com.mysql.cj.jdbc.Driver
spring.datasource.username=root
spring.datasource.password=123456

mybatis.mapper-locations=classpath:mappers/*.xml
5.利用mybatis-generator生成实体类、Mapper、XML文档。

6.Security、OAuth2、JWT、SSO配置类
(1)授权服务器
用来进行授权配置。需要继承AuthorizationServerConfigurerAdapter类,重写configure()方法.
AuthorizationServerConfig.java
package com.xxxx.springsecurityoauth2demo.config;

import org.springframework.context.annotation.Configuration;
import org.springframework.security.authentication.AuthenticationManager;
import org.springframework.security.core.userdetails.UserDetailsService;
import org.springframework.security.crypto.password.PasswordEncoder;
import org.springframework.security.oauth2.config.annotation.configurers.ClientDetailsServiceConfigurer;
import org.springframework.security.oauth2.config.annotation.web.configuration.AuthorizationServerConfigurerAdapter;
import org.springframework.security.oauth2.config.annotation.web.configuration.EnableAuthorizationServer;
import org.springframework.security.oauth2.config.annotation.web.configurers.AuthorizationServerEndpointsConfigurer;
import org.springframework.security.oauth2.provider.token.TokenEnhancer;
import org.springframework.security.oauth2.provider.token.TokenEnhancerChain;
import org.springframework.security.oauth2.provider.token.TokenStore;
import org.springframework.security.oauth2.provider.token.store.JwtAccessTokenConverter;

import javax.annotation.Resource;
import java.util.ArrayList;
import java.util.List;

/**
 * 描述:授权服务器 @EnableAuthorizationServer,extends AuthorizationServerConfigurerAdapter
 * 为了模拟,授权服务器和资源服务器放在了一起,正常情况是解耦的。
 */
@Configuration
@EnableAuthorizationServer //开启授权服务器
public class AuthorizationServerConfig extends AuthorizationServerConfigurerAdapter {
    @Resource
    private PasswordEncoder passwordEncoder;
    @Resource
    private AuthenticationManager authenticationManager;
    @Resource
    private UserDetailsService userDetailsService;
    @Resource(name = "jwtTokenStore")
    private TokenStore tokenStore;
    @Resource(name = "jwtAccessTokenConverter")
    private JwtAccessTokenConverter jwtAccessTokenConverter;
    @Resource
    private JwtTokenEnhancer jwtTokenEnhancer;

    /**
     * 密码授权模式的配置
     *
     * @param endpoints
     * @throws Exception
     */
    @Override
    public void configure(AuthorizationServerEndpointsConfigurer endpoints) throws Exception {
        //TokenEnhancerChain是TokenEnhance的一个实现类
        TokenEnhancerChain chain = new TokenEnhancerChain();
        List<TokenEnhancer> delegates = new ArrayList<>();
        delegates.add(jwtTokenEnhancer);
        delegates.add(jwtAccessTokenConverter);//还要把转换器放进去用来实现jwtTokenEnhancer的互相转换
        chain.setTokenEnhancers(delegates);
        endpoints.authenticationManager(authenticationManager)
                .userDetailsService(userDetailsService)
                //可以看到主要是增加了 JwtAccessTokenConverter JWT访问令牌转换器和JwtTokenStore JWT令牌存储组件,
                //通过AuthorizationServerEndpointsConfigurer 授权服务器端点配置加入两个实例
                .tokenStore(tokenStore)
                .accessTokenConverter(jwtAccessTokenConverter)
                .tokenEnhancer(chain); //设置JWT增强内容


    }

    /**
     * 授权配置
     *
     * @param clients
     * @throws Exception
     */
    @Override
    public void configure(ClientDetailsServiceConfigurer clients) throws Exception {
        /*传来的参数clients是我们的应用,要去找授权服务器授权,授权完了之后会给我们授权码,我们
         * (client)拿着授权码再到授权服务器去获取令牌,获取到令牌之后拿着令牌去资源服务器获取资源
         * */

        clients.inMemory() //.inMemory()放入内存。我们为了方便,直接放在内存中生成client,正常情况下是我们主动找授权服务器注册的时候才会有处理。
                .withClient("client") //指定client。参数为唯一client的id
                .secret(passwordEncoder.encode("112233")) //指定密钥
                .redirectUris("http://www.baidu.com") //指定重定向的地址,通过重定向地址拿到授权码。
                //.redirectUris("http://localhost:8081/login") //单点登录到另一服务器
                .accessTokenValiditySeconds(60 * 10) //设置Access Token失效时间
                .refreshTokenValiditySeconds(60 * 60 * 24) //设置refresh token失效时间
                .scopes("all") //指定授权范围
                .autoApprove(true) //自动授权,不需要手动允许了
                /**
                 * 授权类型:
                 * "authorization_code" 授权码模式
                 * "password"密码模式
                 * "refresh_token" 刷新令牌
                 */
                .authorizedGrantTypes("authorization_code", "password", "refresh_token"); //指定授权类型 可以多种授权类型并存。

    }

    /**
     * 单点登录配置
     *
     * @param security
     * @throws Exception
     */
    /*@Override
    public void configure(AuthorizationServerSecurityConfigurer security) throws Exception {
        //必须要身份认证,单点登录必须要配置
        security.tokenKeyAccess("isAuthenticated()");
    } */
}
(2)资源管理器
企业生产环境下授权服务器和资源服务器是两个单独的服务器,我们为了学习,使用了单Model项目,所以放在了一起。
ResourceServerConfig.java
package com.xxxx.springsecurityoauth2demo.config;

import org.springframework.context.annotation.Configuration;
import org.springframework.security.config.annotation.web.builders.HttpSecurity;
import org.springframework.security.oauth2.config.annotation.web.configuration.EnableResourceServer;
import org.springframework.security.oauth2.config.annotation.web.configuration.ResourceServerConfigurerAdapter;

/**
 * 描述:资源管理器 @EnableResourceServer,extends ResourceServerConfigurerAdapter
 * 为了模拟,授权服务器和资源服务器放在了一起,正常情况是解耦的。
 */
@Configuration
@EnableResourceServer //开启资源服务器
public class ResourceServerConfig extends ResourceServerConfigurerAdapter {

    @Override
    public void configure(HttpSecurity http) throws Exception {
         http.requestMatchers().antMatchers("/api/**").and()
                .authorizeRequests()//授权的请求
                //进行接口的鉴权处理
                .antMatchers("/api/user/save").hasAuthority("admin")
                //其余接口不做鉴权,只需要认证即可
                .anyRequest()
                .authenticated();

    }
}
(3)JWT内容增强器
JwtTokenEnhancer.java
package com.xxxx.springsecurityoauth2demo.config;

import org.springframework.security.oauth2.common.DefaultOAuth2AccessToken;
import org.springframework.security.oauth2.common.OAuth2AccessToken;
import org.springframework.security.oauth2.provider.OAuth2Authentication;
import org.springframework.security.oauth2.provider.token.TokenEnhancer;

import java.util.HashMap;
import java.util.Map;

/**
 * 描述:配置JwtTokenEnhancer添加自定义信息 ,继承TokenEnhancer实现一个JWT内容增强器
 */
public class JwtTokenEnhancer implements TokenEnhancer {
    /**
     * JWT内容增强器
     * @param oAuth2AccessToken
     * @param oAuth2Authentication
     * @return
     */
    @Override
    public OAuth2AccessToken enhance(OAuth2AccessToken oAuth2AccessToken, OAuth2Authentication oAuth2Authentication) {
        Map<String, Object> info = new HashMap();
        info.put("enhance", "增强的信息");
        //给的参数是oAuth2的AccessToken,实现类是DefaultOAuth2AccessToken,
        //里面有个setAdditionalInformation方法添加自定义信息(Map类型)
        ((DefaultOAuth2AccessToken) oAuth2AccessToken).setAdditionalInformation(info);
        return oAuth2AccessToken;
    }
}
(4)TokenStore配置类
JwtTokenStoreConfig.java
package com.xxxx.springsecurityoauth2demo.config;

import org.springframework.context.annotation.Bean;
import org.springframework.context.annotation.Configuration;
import org.springframework.security.oauth2.provider.token.TokenStore;
import org.springframework.security.oauth2.provider.token.store.JwtAccessTokenConverter;
import org.springframework.security.oauth2.provider.token.store.JwtTokenStore;

/**
 * 描述:TokenStore配置类。
 * TokenStore的实现类,有InMemoryTokenStore、JdbcTokenStore、JwtTokenStore、RedisTokenStore。
 * JwtAccessTokenConverter JWT访问令牌转换器和 JwtTokenStore JWT令牌存储组件
 */
@Configuration
public class JwtTokenStoreConfig {
    /**
     * 生成TokenStore来保存token  此处为JwtTokenStore实现
     * @return TokenStore
     */
    @Bean
    public TokenStore jwtTokenStore() {
        //需要传入JwtAccessTokenConverter
        return new JwtTokenStore(jwtAccessTokenConverter());
    }
    /**
     *  生成JwtAccessTokenConverter转换器,并设置密钥
     * @return JwtAccessTokenConverter
     */
    @Bean
    public JwtAccessTokenConverter jwtAccessTokenConverter() {
        JwtAccessTokenConverter jwtAccessTokenConverter = new JwtAccessTokenConverter();
        //设置jwt密钥
        jwtAccessTokenConverter.setSigningKey("test_key");
        return jwtAccessTokenConverter;
    }

    /**
     * JwtTokenEnhancer的注入
     * @return
     */
    @Bean
    public JwtTokenEnhancer jwtTokenEnhancer() {
        return new JwtTokenEnhancer();
    }
}
(5)Security核心配置类
SecurityConfig.java
package com.xxxx.springsecurityoauth2demo.config;

import org.springframework.context.annotation.Bean;
import org.springframework.context.annotation.Configuration;
import org.springframework.security.authentication.AuthenticationManager;
import org.springframework.security.config.annotation.web.builders.HttpSecurity;
import org.springframework.security.config.annotation.web.configuration.EnableWebSecurity;
import org.springframework.security.config.annotation.web.configuration.WebSecurityConfigurerAdapter;
import org.springframework.security.crypto.bcrypt.BCryptPasswordEncoder;
import org.springframework.security.crypto.password.PasswordEncoder;

import javax.annotation.Resource;

/**
 * 描述:Security核心配置类
 * 1.重写configure(HttpSecurity http)
 * 2.配置 PasswordEncoder的Ioc注入。
 */
@Configuration
@EnableWebSecurity //开启Web Security
public class SecurityConfig extends WebSecurityConfigurerAdapter {

    @Override
    protected void configure(HttpSecurity http) throws Exception {
        //配置没有权限访问跳转自定义页面
        http.exceptionHandling().accessDeniedPage("/unauth.html");

        http.authorizeRequests()
                //放行授权服务器的几个端点请求、登录请求、登出请求。
                .antMatchers("/oauth/**", "/login/**", "/logout/**")
                .permitAll()
                .anyRequest()
                .authenticated()
                //.and() 就相当于回到 http再继续配置
                .and()
                //放行所有的表单请求
                .formLogin()
                .permitAll()
                .and()
                //关闭csrf
                .csrf().disable();

    }

    /**
     * 密码授权模式用到的AuthenticationManager类
     *
     * @return
     * @throws Exception
     */
    @Override
    @Bean
    protected AuthenticationManager authenticationManager() throws Exception {
        return super.authenticationManager();
    }


    @Bean
    public PasswordEncoder passwordEncoder() {
        return new BCryptPasswordEncoder();
    }
}
7.配置Spring Security的UserDetailService实现从数据库查询信息进行认证
(1)MyUserService接口
package com.xxxx.springsecurityoauth2demo.service;
/**
 * 描述:MyUserService接口
 */
public interface MyUserService{
}
(2)MyUserServiceImpl
package com.xxxx.springsecurityoauth2demo.service.impl;


import com.xxxx.springsecurityoauth2demo.model.pojo.SecurityUser;
import com.xxxx.springsecurityoauth2demo.model.pojo.User;
import com.xxxx.springsecurityoauth2demo.service.MyUserService;
import com.xxxx.springsecurityoauth2demo.service.UserService;
import org.springframework.security.core.authority.AuthorityUtils;
import org.springframework.security.core.userdetails.UserDetails;
import org.springframework.security.core.userdetails.UserDetailsService;
import org.springframework.security.core.userdetails.UsernameNotFoundException;
import org.springframework.security.crypto.password.PasswordEncoder;
import org.springframework.stereotype.Service;

import javax.annotation.Resource;

/**
 * 描述:自定义UserDetailsService实现类
 * 名言:越难找的bug往往是越低级的
 */
@Service  //因为没有加Service注解,所以please login  一直报用户名密码错误!!!
public class MyUserServiceImpl implements UserDetailsService, MyUserService {

    @Resource
    private PasswordEncoder passwordEncoder;
    @Resource
    private UserService userService;

    @Override
    public UserDetails loadUserByUsername(String username) throws UsernameNotFoundException {
        User user = userService.getUserByUserName(username);
        String name = user.getName();
        String password = user.getPassword();
        String authority = user.getAccount();
        return new SecurityUser(name, password, AuthorityUtils.commaSeparatedStringToAuthorityList(authority));
    }
}
(3)自定义Security框架的User实体
SecurityUser.java
package com.xxxx.springsecurityoauth2demo.model.pojo;

import org.springframework.security.core.GrantedAuthority;
import org.springframework.security.core.userdetails.UserDetails;

import java.util.Collection;
import java.util.List;

/**
 * 描述:自定义Security框架的User实体
 */
public class SecurityUser implements UserDetails {

    private String username;
    private String password;
    private List<GrantedAuthority> authorities;

    public SecurityUser(String username, String password, List<GrantedAuthority> authorities) {
        this.username = username;
        this.password = password;
        this.authorities = authorities;
    }

    @Override
    public Collection<? extends GrantedAuthority> getAuthorities() {
        return authorities;
    }

    @Override
    public String getPassword() {
        return password;
    }

    @Override
    public String getUsername() {
        return username;
    }

    @Override
    public boolean isAccountNonExpired() {
        return true;
    }

    @Override
    public boolean isAccountNonLocked() {
        return true;
    }

    @Override
    public boolean isCredentialsNonExpired() {
        return true;
    }

    @Override
    public boolean isEnabled() {
        return true;
    }
}
8.Controller层
(1)针对jwt token测试用的Controller
TestUserController.java
package com.xxxx.springsecurityoauth2demo.controller;


import io.jsonwebtoken.Jwts;
import org.springframework.security.core.Authentication;
import org.springframework.web.bind.annotation.RequestMapping;
import org.springframework.web.bind.annotation.RestController;

import javax.servlet.http.HttpServletRequest;
import java.nio.charset.StandardCharsets;

/**
 * 描述:UserController  模拟资源服务器用的,用来访问资源的。
 */
@RestController
@RequestMapping("/user")
public class TestUserController {

    //测试用的,不与数据库做连接
    @RequestMapping("/getCurrentUser")
    public Object getCurrentUser(Authentication authentication, HttpServletRequest request) {
        //Authorization是在请求头中的属性。
        String header = request.getHeader("Authorization");
        //bearer :jwt token,所以bearer加空格后的第七个才是token。
        String token = header.substring(header.lastIndexOf("bearer") + 7);
        return Jwts.parser()
                .setSigningKey("test_key".getBytes(StandardCharsets.UTF_8))//指定编码格式,要不然token有中文转换异常
                .parseClaimsJws(token)
                .getBody();
    }


}
(2)User资源服务器 UserController
UserService.java
package com.xxxx.springsecurityoauth2demo.controller;

import com.xxxx.springsecurityoauth2demo.model.req.ReqUser;
import com.xxxx.springsecurityoauth2demo.service.UserService;
import org.springframework.web.bind.annotation.*;

import javax.annotation.Resource;

/**
 * 描述:User资源服务器 UserController
 */
@RestController
@RequestMapping("/api/user")
public class UserController {
    @Resource
    private UserService userService;

    /**
     * 得到所有用户列表,所有权限可以访问
     * @return
     */
    @PostMapping("/users")
    public Object getAllUsers() {
        return userService.getAllUsers();
    }

    /**
     * 增加用户,只有权限为admin的用户才可以访问
     */
    @PostMapping("/save")
    public Object save(@RequestBody ReqUser reqUser) {
        return userService.save(reqUser);
    }
}
9.Service层
(1)UserService接口
UserService.java
package com.xxxx.springsecurityoauth2demo.service;

import com.xxxx.springsecurityoauth2demo.model.pojo.User;
import com.xxxx.springsecurityoauth2demo.model.req.ReqUser;

/**
 * 描述:UserService接口
 */
public interface UserService {
    Object getAllUsers();

    User getUserByUserName(String username);

    Object save(ReqUser reqUser);
}
UserServiceImpl.java
package com.xxxx.springsecurityoauth2demo.service.impl;

import com.xxxx.springsecurityoauth2demo.model.dao.UserMapper;
import com.xxxx.springsecurityoauth2demo.model.pojo.User;
import com.xxxx.springsecurityoauth2demo.model.req.ReqUser;
import com.xxxx.springsecurityoauth2demo.service.UserService;
import org.springframework.stereotype.Service;

import javax.annotation.Resource;
import java.util.List;

/**
 * 描述:UserServiceImpl
 */
@Service
public class UserServiceImpl implements UserService {
    @Resource
    private UserMapper userMapper;

    @Override
    public Object getAllUsers() {
        List<User> users = userMapper.selectAllUsers();
        return users;
    }

    @Override
    public User getUserByUserName(String username) {
        return userMapper.selectUserByUsername(username);
    }

    @Override
    public Object save(ReqUser reqUser) {
        int count = userMapper.save(reqUser);
        return count;
    }


}
10.Req对象
User请求参数对象ReqUser
ReqUser.java
package com.xxxx.springsecurityoauth2demo.model.req;

import lombok.AllArgsConstructor;
import lombok.Data;
import lombok.NoArgsConstructor;

/**
 * 描述:User请求参数对象
 */
@Data
@AllArgsConstructor
@NoArgsConstructor
public class ReqUser {
    private String account;

    private String description;

    private String password;

    private String name;
}
二、postman测试
(1)密码模式

用户直接输入密码,Client会拿用户名密码直接访问第三方,第三方认证后回执Access Token。多用于同一项目不同端口,比如维新运动需要微信认证,大家都是同一个项目,知道了密码也没什么关系。
需要访问固定接口/oauth/token 输入固定参数


拿到token后,凭token可以访问到资源服务器的内容
(1)先访问TestController里的getCurrentUser来解析一下token。(也可以去JWT官网或其他网站进行解析,这里我是自己直接编写了代码解析)

如果token不正确,则认证失败,禁止访问

如果token过期,禁止访问

访问UserController.java接口与数据库进行交互
先访问一个只要认证通过就可以访问的不需要鉴权的接口

再访问一个只允许admin权限访问的接口
成功添加用户。

换成权限为user的用户访问此接口,则经过鉴权之后拒绝授权访问。


(2)授权码模式
需要访问指定地址先获取授权码,再根据授权码获取token

User-Agent相当于你用第三方登录弹出的登录网页)会带上 客户凭证(client Credentials)和重定向的uri去到要认证服务器里面去,认证服务器会让Resource Owner也就是用户去认证,用户同意了,会返回一个授权码给User-Agent再给Client。客户端Client拿到授权码之后会跟去我们重定向的URI和授权码再次去找到授权服务器,此时认证服务器会根据授权码返回一个Access Token(可以也返回Refresh Toke)。Access Token是必须要有的,Refresh Token是选择性的。
这里用普通权限user去访问需要admin权限的api/save接口
首先获取授权码,访问固定的url获取授权码
访问此链接:
http://localhost:8080/oauth/authorize?response_type=code&client_id=client&redirect_uri=http://www.baidu.com&scope=all
这个链接的含义http://localhost:8080的 /oauth/authorize 【固定接口地址】到我们的授权服务器请求,response_type=code去获取授权码 &client_id=client指定client的id 【自己定义的client的id】&redirect_uri【自己要重定向的】重定向地址 &scope=all就是全部范围。
输入上面的url会自动跳转登录页面,道理很简单,授权码模式不会携带用户名和密码,所以需要你登录,这也是授权码模式和密码模式的区别之一了。

code=授权码


接下来我们可有凭借token去访问资源了
(3)refresh_token模式
因为JWT Token是无状态的,不会在服务器端存储,所以我们需要设定Access Token的有效时间,而且时间不能太长,否则安全性会差。(如果你不设置Access Token的有效时间那么毫无安全性可言了)但是Access Token过期太快还要用户重新获取授权码,也就是重新输入用户名密码登录吗?那这样用户体验度也太差了吧?于是就有了refresh_token,当Access_Token过期时,只需要再检验refresh_token便可以重新获得Access_Token。所以一般而言,Access_Token的有效期会很短,而refresh_token的有效期会比较长。
先正常获取

假设Access_token已经过期了,我们只需要凭借refresh_token便可以拿到新的Access_Token,不需要输入用户名密码等参数了。

三、整合SSO
1.什么是SSO(Single Sign On)
单点登录全称Single Sign On (以下简称SSO),是指在多系统应用群中登录一个系统,便可在其他所有系统中得到授权而无需再次登录,包括单点登录与单点注销两部分

说人话就是当你在登录百度首页之后,左边红色框内的百度系统旗下加粗样式站点都不需要登录了,实现了一次性鉴别,全网站登录,对用户而言极为友好。

相比于单系统登录, sso需要 个独立的认证中心,只有认证中心能接受用户的用户名密码等安全信息, 其他系统不提供登录入口,只接受认证中心的间接授权。间接授权通过令牌实现,sso认证中心验证用户的用户名密码没问题,创建授权令牌,在接下来的跳转过程中,授权令牌作为参数发送给各个子系统,子系统拿到令牌,即得到了授权,可以借此创建局部会话,局部会话登录方式与单系统的登录方式相同。
2.项目整合实现SSO
(1)客户端工程结构

application.properties
server.port=8081
#多客户端不配置Cookie的话会导致cookie的name相同,会出现Cookie冲突,冲突会导致登录验证不通过
server.servlet.session.cookie.name=OAUTH2-CLIENT-SESSIONID01
#授权服务器地址
oauth2-server-url:http://localhost:8080
#与授权服务器对应的配置
security.oauth2.client.client-id=client
security.oauth2.client.client-secret=112233
#获取授权码的地址配置
security.oauth2.client.user-authorization-uri=${oauth2-server-url}/oauth/authorize
#获取Access Token的地址配置
security.oauth2.client.access-token-uri=${oauth2-server-url}/oauth/token
#获取Jwt Token (授权服务器基于Spring Cloud Oauth2创建后,配置TokenStore为JwtTokenStore,访问/oauth/token_key接口获取公钥)
security.oauth2.resource.jwt.key-uri=${oauth2-server-url}/oauth/token_key
Controller
Controller.java (简单实现,测试用)
package com.xxxx.oauth2client01demo.controller;

import org.springframework.security.core.Authentication;
import org.springframework.web.bind.annotation.RequestMapping;
import org.springframework.web.bind.annotation.RestController;

/**
 * 描述:Controller
 */
@RestController
@RequestMapping("/user")
public class Controller {

    @RequestMapping("/getCurrentUser")
    public Object getCurrentUser(Authentication authentication) {
        return authentication;
    }
}
项目入口开启SSO注解

(2)认证服务器端工程结构
我们为了学习和测试,沿用本项目的认证服务器,不再单独创建认证服务器。
指定重定向地址

单点登录配置

3.SSO测试

跳转到认证服务器完成认证之后,自动跳回要访问的接口地址,此时可以访问客户端的资源。

四、 项目源码
项目源码地址
GitHub: https://github.com/pleineluna/luna
Gitee:https://gitee.com/tsukuyo98/luna
SSO客户端源码地址:
GitHub: https://github.com/pleineluna/oauth2-client01
Gitee:https://gitee.com/tsukuyo98/oauth2-client01
(顺便求各位点个Star?吧)
参考资料:
https://www.cnblogs.com/xiaofengxzzf/p/10733955.html
https://www.bilibili.com/video/BV1Cz4y1k7rd
?