先说感受:如果你认真学完了spring,这个不算难,只需要按部就班的跟着学就行了。不过仍然要重点记忆几个点,比如@ModelAttribute注解的意义以及使用,国际化文件,拦截器等等知识点需要记住。
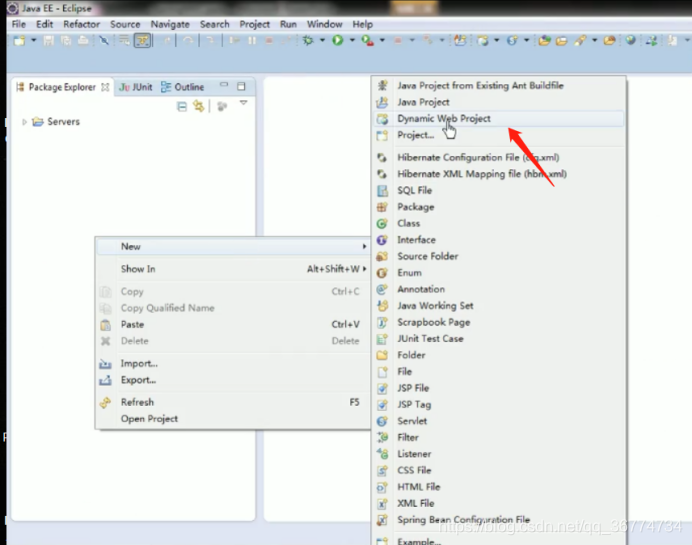
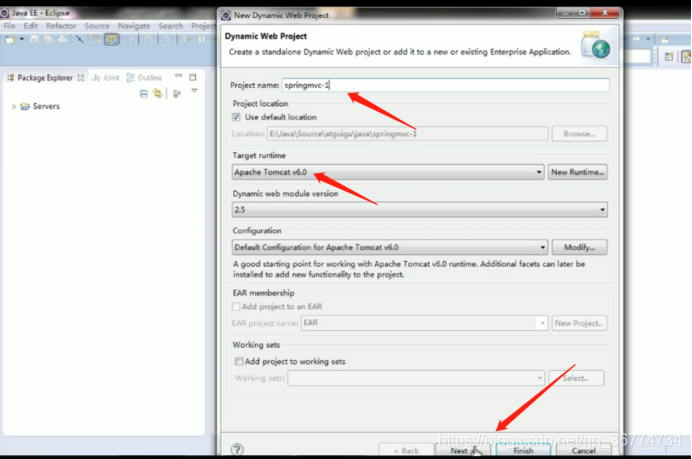
创建mvc项目
?
?
加入springmvc-jar包
以helloworld开始
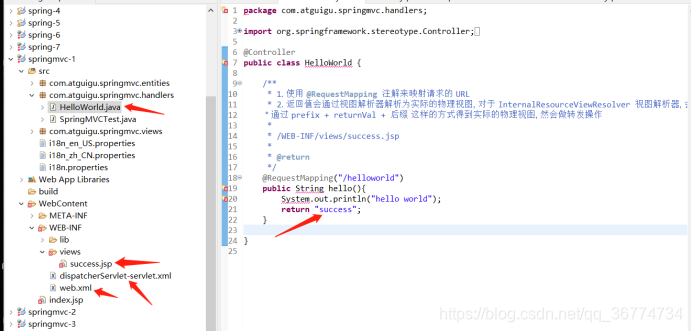
目录
?web.xml
<?xml version="1.0" encoding="UTF-8"?>
<web-app xmlns:xsi="http://www.w3.org/2001/XMLSchema-instance"
	xmlns="http://java.sun.com/xml/ns/javaee"
	xsi:schemaLocation="http://java.sun.com/xml/ns/javaee http://java.sun.com/xml/ns/javaee/web-app_2_5.xsd"
	id="WebApp_ID" version="2.5">
	<!-- 配置 DispatcherServlet -->
	<servlet>
		<servlet-name>dispatcherServlet</servlet-name>
		<servlet-class>org.springframework.web.servlet.DispatcherServlet</servlet-class>
		<!-- 配置 DispatcherServlet 的一个初始化参数: 配置 SpringMVC 配置文件的位置和名称 -->
		<!--
			实际上也可以不通过 contextConfigLocation 来配置 SpringMVC 的配置文件, 而使用默认的.
			默认的配置文件为: /WEB-INF/<servlet-name>-servlet.xml
		-->
		<!--
		<init-param>
			<param-name>contextConfigLocation</param-name>
			<param-value>classpath:springmvc.xml</param-value>
		</init-param>
		-->
		<load-on-startup>1</load-on-startup>
	</servlet>
	<!-- 应答所有请求 -->
	<servlet-mapping>
		<servlet-name>dispatcherServlet</servlet-name>
		<url-pattern>/</url-pattern>
	</servlet-mapping>

</web-app>
dispatcherServlet-servlet.xml
<?xml version="1.0" encoding="UTF-8"?>
<beans xmlns="http://www.springframework.org/schema/beans"
	xmlns:xsi="http://www.w3.org/2001/XMLSchema-instance"
	xmlns:context="http://www.springframework.org/schema/context"
	xmlns:mvc="http://www.springframework.org/schema/mvc"
	xsi:schemaLocation="http://www.springframework.org/schema/beans http://www.springframework.org/schema/beans/spring-beans.xsd
		http://www.springframework.org/schema/context http://www.springframework.org/schema/context/spring-context-4.0.xsd
		http://www.springframework.org/schema/mvc http://www.springframework.org/schema/mvc/spring-mvc-4.0.xsd">

	<!-- 配置自定扫描的包 -->
	<context:component-scan base-package="com.atguigu.springmvc"></context:component-scan>

	<!-- 配置视图解析器: 如何把 handler 方法返回值解析为实际的物理视图 -->
	<bean class="org.springframework.web.servlet.view.InternalResourceViewResolver">
		<property name="prefix" value="/WEB-INF/views/"></property>
		<property name="suffix" value=".jsp"></property>
	</bean>
	</beans>
HelloWorld.java
package com.atguigu.springmvc.handlers;

import org.springframework.stereotype.Controller;
import org.springframework.web.bind.annotation.RequestMapping;

@Controller
public class HelloWorld {

	/**
	 * 1. 使用 @RequestMapping 注解来映射请求的 URL
	 * 2. 返回值会通过视图解析器解析为实际的物理视图, 对于 InternalResourceViewResolver 视图解析器, 会做如下的解析:
	 * 通过 prefix + returnVal + 后缀 这样的方式得到实际的物理视图, 然会做转发操作
	 *
	 * /WEB-INF/views/success.jsp
	 *
	 * @return
	 */
	@RequestMapping("/helloworld")
	public String hello(){
		System.out.println("hello world");
		return "success";
	}

}
success.jsp
<h4>Sucess Page</h4>请求方式
页面:
<form action="springmvc/testMethod" method="POST">
		<input type="submit" value="submit"/>
	</form>
控制器:
/**
* 常用: 使用 method 属性来指定请求方式
*/
@RequestMapping(value = "/testMethod", method = RequestMethod.POST)
public String testMethod() {
System.out.println("testMethod");
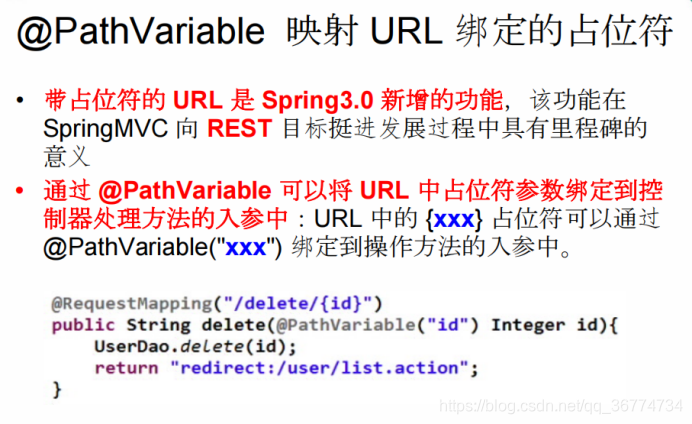
return SUCCESS;@PathVariable用法
/**
* @PathVariable 可以来映射 URL 中的占位符到目标方法的参数中.
* @param id
* @return
*/
@RequestMapping("/testPathVariable/{id}")
public String testPathVariable(@PathVariable("id") Integer id) {
System.out.println("testPathVariable: " + id);
return SUCCESS;
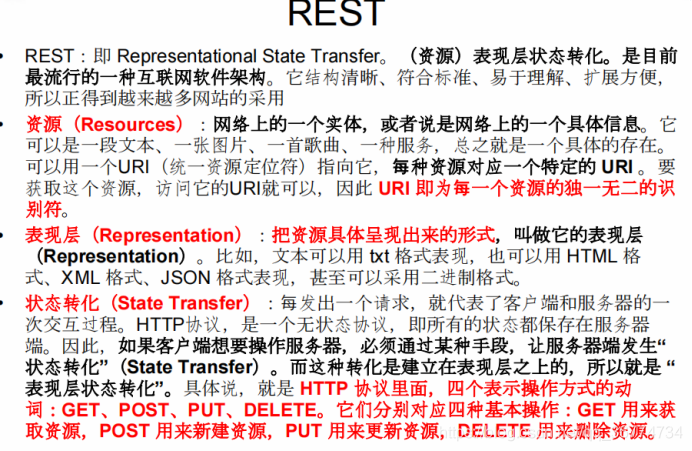
}Rest方式
web.xml添加
	<!--
	配置 org.springframework.web.filter.HiddenHttpMethodFilter: 可以把 POST 请求转为 DELETE 或 POST 请求
	-->
	<filter>
		<filter-name>HiddenHttpMethodFilter</filter-name>
		<filter-class>org.springframework.web.filter.HiddenHttpMethodFilter</filter-class>
	</filter>
	<!-- 过滤所有请求 -->
	<filter-mapping>
		<filter-name>HiddenHttpMethodFilter</filter-name>
		<url-pattern>/*</url-pattern>
	</filter-mapping>
控制器
* 修改: /order/1 PUT update?id=1
	 * 获取:/order/1 GET get?id=1
	 * 删除: /order/1 DELETE delete?id=1
	 *
	 * 如何发送 PUT 请求和 DELETE 请求呢 ?
	 *  1. 需要配置 HiddenHttpMethodFilter
	 *   2. 需要发送 POST 请求
	 * 3. 需要在发送 POST 请求时携带一个 name="_method" 的隐藏域, 值为 DELETE 或 PUT
	 *
	 * 在 SpringMVC 的目标方法中如何得到 id 呢?
	 * 使用 @PathVariable 注解
	 *
	 */
	@RequestMapping(value = "/testRest/{id}", method = RequestMethod.PUT)
	public String testRestPut(@PathVariable Integer id) {
		System.out.println("testRest Put: " + id);
		return SUCCESS;
	}

	@RequestMapping(value = "/testRest/{id}", method = RequestMethod.DELETE)
	public String testRestDelete(@PathVariable Integer id) {
		System.out.println("testRest Delete: " + id);
		return SUCCESS;
	}

	@RequestMapping(value = "/testRest", method = RequestMethod.POST)
	public String testRest() {
		System.out.println("testRest POST");
		return SUCCESS;
	}

	@RequestMapping(value = "/testRest/{id}", method = RequestMethod.GET)
	public String testRest(@PathVariable Integer id) {
		System.out.println("testRest GET: " + id);
		return SUCCESS;
	}
Index.jsp
	<form action="springmvc/testRest/1" method="post">
		<input type="hidden" name="_method" value="PUT"/>
		<input type="submit" value="TestRest PUT"/>
	</form>
	<br><br>

	<form action="springmvc/testRest/1" method="post">
		<input type="hidden" name="_method" value="DELETE"/>
		<input type="submit" value="TestRest DELETE"/>
	</form>
	<br><br>

	<form action="springmvc/testRest" method="post">
		<input type="submit" value="TestRest POST"/>
	</form>
	<br><br>

	<a href="springmvc/testRest/1">Test Rest Get</a>
	<br><br>
@RequestParam用法
//http://localhost:8080/springmvc/testRequestParam?username=atguigu&age=12
	/**
	 * @RequestParam 来映射请求参数. value 值即请求参数的参数名 required 该参数是否必须. 默认为 true
	 *               defaultValue 请求参数的默认值
	 */
	@RequestMapping(value = "/testRequestParam")
	public String testRequestParam(
			@RequestParam(value = "username") String un,
			@RequestParam(value = "age", required = false, defaultValue = "0") int age) {
		System.out.println("testRequestParam, username: " + un + ", age: "
				+ age);
		return SUCCESS;
	}
?@CookieValue用法
控制器
	/**
	 * 了解:
	 *
	 * @CookieValue: 映射一个 Cookie 值. 属性同 @RequestParam
	 */
	@RequestMapping("/testCookieValue")
	public String testCookieValue(@CookieValue("JSESSIONID") String sessionId) {
		System.out.println("testCookieValue: sessionId: " + sessionId);
		return SUCCESS;
	}
实体类映射接参
Index.jsp
<form action="springmvc/testPojo" method="post">
		username: <input type="text" name="username"/>
		<br>
		password: <input type="password" name="password"/>
		<br>
		email: <input type="text" name="email"/>
		<br>
		age: <input type="text" name="age"/>
		<br>
		city: <input type="text" name="address.city"/>
		<br>
		province: <input type="text" name="address.province"/>
		<br>
		<input type="submit" value="Submit"/>
	</form>
SpringMVCTest.java
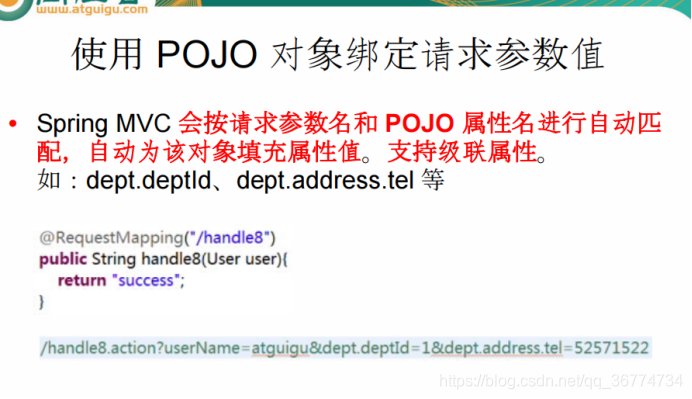
	/**接参时若用@PathVariable需要一个一个的映射,太麻烦了
	 * Spring MVC 会按请求参数名和 POJO 属性名进行自动匹配, 自动为该对象填充属性值。支持级联属性。
	 * 如:dept.deptId、dept.address.tel 等
	 */
	@RequestMapping("/testPojo")
	public String testPojo(User user) {
		System.out.println("testPojo: " + user);
		return SUCCESS;
	}
使用 Serlvet 原生的 API 作为目标方法的参数
/**
	 * 可以使用 Serlvet 原生的 API 作为目标方法的参数 具体支持以下类型
	 *
	 * HttpServletRequest
	 * HttpServletResponse
	 * HttpSession
	 * java.security.Principal
	 * Locale InputStream
	 * OutputStream
	 * Reader
	 * Writer
	 * @throws IOException
	 */
	@RequestMapping("/testServletAPI")
	public void testServletAPI(HttpServletRequest request,
			HttpServletResponse response, Writer out) throws IOException {
		System.out.println("testServletAPI, " + request + ", " + response);
		out.write("hello springmvc");
//		return SUCCESS;
	}
?ModelAndView用法
控制器
/**
	 * 目标方法的返回值可以是 ModelAndView 类型。
	 * 其中可以包含视图和模型信息
	 * SpringMVC 会把 ModelAndView 的 model 中数据放入到 request 域对象中.
	 * @return
	 */
	@RequestMapping("/testModelAndView")
	public ModelAndView testModelAndView(){
		String viewName = SUCCESS;
		ModelAndView modelAndView = new ModelAndView(viewName);

		//添加模型数据到 ModelAndView 中.
		modelAndView.addObject("time", new Date());

		return modelAndView;
	}
Success.jsp
time: ${requestScope.time }
	<br><br>
处理模型数据
控制器
/**
	 * 目标方法可以添加 Map 类型(实际上也可以是 Model 类型或 ModelMap 类型)的参数.
	 * @param map
	 * @return
	 */
	@RequestMapping("/testMap")
	public String testMap(Map<String, Object> map){
		System.out.println(map.getClass().getName());
		map.put("names", Arrays.asList("Tom", "Jerry", "Mike"));
		return SUCCESS;
	}
Success.jsp
names: ${requestScope.names }
@SessionAttributes用法
控制器
/**@SessionAttributes(value={"user"}, types={String.class})作用会让user既放在请求域也会存入session里面
	 * @SessionAttributes可以通过属性名指定也可以通过类型指定
	 *
	 * @SessionAttributes 除了可以通过属性名指定需要放到会话中的属性外(实际上使用的是 value 属性值),
	 * 还可以通过模型属性的对象类型指定哪些模型属性需要放到会话中(实际上使用的是 types 属性值)
	 *
	 * 注意: 该注解只能放在类的上面. 而不能修饰放方法.
	 */
	@RequestMapping("/testSessionAttributes")
	public String testSessionAttributes(Map<String, Object> map){
		User user = new User("Tom", "123456", "tom@atguigu.com", 15);
		map.put("user", user);
		map.put("school", "atguigu");
		return SUCCESS;
	}
Success.jsp
仅仅请求域request user: ${requestScope.user }
<br><br>
session user: ${sessionScope.user }
<br><br>
request school: ${requestScope.school }
<br><br>
session school: ${sessionScope.school }
<br><br>
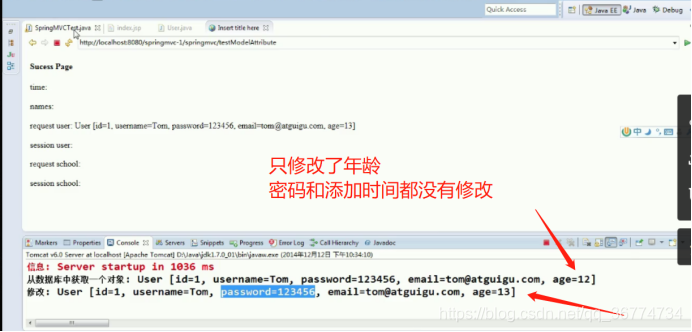
修改操作遇到的问题@ModelAttribute()控制器
		/**
	 * 1. 有 @ModelAttribute 标记的方法, 会在每个目标方法执行之前被 SpringMVC 调用!
	 * 2. @ModelAttribute 注解也可以来修饰目标方法 POJO 类型的入参, 其 value 属性值有如下的作用:
	 * 1). SpringMVC 会使用 value 属性值在 implicitModel 中查找对应的对象, 若存在则会直接传入到目标方法的入参中.
	 * 2). SpringMVC 会一 value 为 key, POJO 类型的对象为 value, 存入到 request 中.
	 */
	@ModelAttribute
	public void getUser(@RequestParam(value="id",required=false) Integer id,
			Map<String, Object> map){
		System.out.println("modelAttribute method");
		if(id != null){
			//模拟从数据库中获取对象
			User user = new User(1, "Tom", "123456", "tom@atguigu.com", 12);
			System.out.println("从数据库中获取一个对象: " + user);

			map.put("user", user);
		}
	}
	/**
	 *    模拟修改操作
		1. 原始数据为: 1, Tom, 123456,tom@atguigu.com,12
		2. 密码,录入时间不能被修改.但是编辑操作会置空这些不传的字段
		3. 表单回显, 模拟操作直接在表单填写对应的属性值
		解决方法:编辑操作之前先查库。因为这样的话,User 里面的参数来自前台传的和从库查的,而那些前台没有传的就是取的数据库的值
	 */

	@RequestMapping("/testModelAttribute")
	public String testModelAttribute(User user){
		System.out.println("修改: " + user);
		return SUCCESS;
	}
?原理
/**
	 * 运行流程:
	 * 1. 执行 @ModelAttribute 注解修饰的方法: 从数据库中取出对象, 把对象放入到了 Map 中. 键为: user
	 * 2. SpringMVC 从 Map 中取出 User 对象, 并把表单的请求参数赋给该 User 对象的对应属性.
	 * 3. SpringMVC 把上述对象传入目标方法的参数.
	 *
	 * 注意: 在 @ModelAttribute 修饰的方法中, 放入到 Map 时的键需要和目标方法入参类型的第一个字母小写的字符串一致!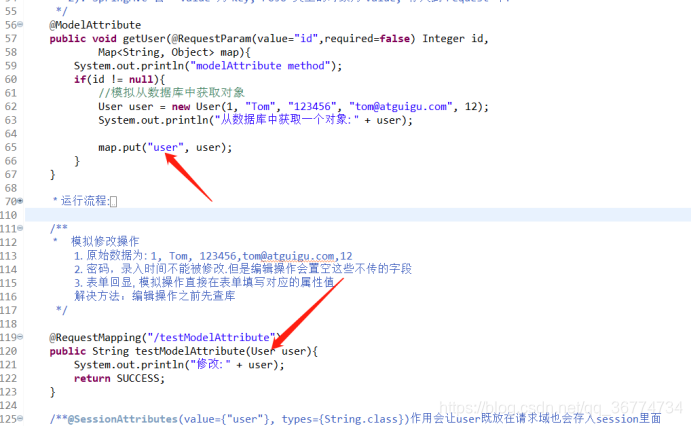
?
	 *
	 * SpringMVC 确定目标方法 POJO 类型入参的过程
	 * 1. 确定一个 key:
	 * 1). 若目标方法的 POJO 类型的参数木有使用 @ModelAttribute 作为修饰, 则 key 为 POJO 类名第一个字母的小写
	 * 2). 若使用了  @ModelAttribute 来修饰, 则 key 为 @ModelAttribute 注解的 value 属性值.
	 * 2. 在 implicitModel 中查找 key 对应的对象, 若存在, 则作为入参传入
	 * 1). 若在 @ModelAttribute 标记的方法中在 Map 中保存过, 且 key 和 1 确定的 key 一致, 则会获取到.
	 * 3. 若 implicitModel 中不存在 key 对应的对象, 则检查当前的 Handler 是否使用 @SessionAttributes 注解修饰,
	 * 若使用了该注解, 且 @SessionAttributes 注解的 value 属性值中包含了 key, 则会从 HttpSession 中来获取 key 所
	 * 对应的 value 值, 若存在则直接传入到目标方法的入参中. 若不存在则将抛出异常.
	 * 4. 若 Handler 没有标识 @SessionAttributes 注解或 @SessionAttributes 注解的 value 值中不包含 key, 则
	 * 会通过反射来创建 POJO 类型的参数, 传入为目标方法的参数
	 * 5. SpringMVC 会把 key 和 POJO 类型的对象保存到 implicitModel 中, 进而会保存到 request 中.
	 *
	 * 源代码分析的流程
	 * 1. 调用 @ModelAttribute 注解修饰的方法. 实际上把 @ModelAttribute 方法中 Map 中的数据放在了 implicitModel 中.
	 * 2. 解析请求处理器的目标参数, 实际上该目标参数来自于 WebDataBinder 对象的 target 属性
	 * 1). 创建 WebDataBinder 对象:
	 * ①. 确定 objectName 属性: 若传入的 attrName 属性值为 "", 则 objectName 为类名第一个字母小写.
	 * *注意: attrName. 若目标方法的 POJO 属性使用了 @ModelAttribute 来修饰, 则 attrName 值即为 @ModelAttribute
	 * 的 value 属性值
	 *
	 * ②. 确定 target 属性:
	 * 	> 在 implicitModel 中查找 attrName 对应的属性值. 若存在, ok
	 * 	> *若不存在: 则验证当前 Handler 是否使用了 @SessionAttributes 进行修饰, 若使用了, 则尝试从 Session 中
	 * 获取 attrName 所对应的属性值. 若 session 中没有对应的属性值, 则抛出了异常.
	 * 	> 若 Handler 没有使用 @SessionAttributes 进行修饰, 或 @SessionAttributes 中没有使用 value 值指定的 key
	 * 和 attrName 相匹配, 则通过反射创建了 POJO 对象
	 *
	 * 2). SpringMVC 把表单的请求参数赋给了 WebDataBinder 的 target 对应的属性.
	 * 3). *SpringMVC 会把 WebDataBinder 的 attrName 和 target 给到 implicitModel.
	 * 近而传到 request 域对象中.
	 * 4). 把 WebDataBinder 的 target 作为参数传递给目标方法的入参.
	 */
配置国际化资源文件
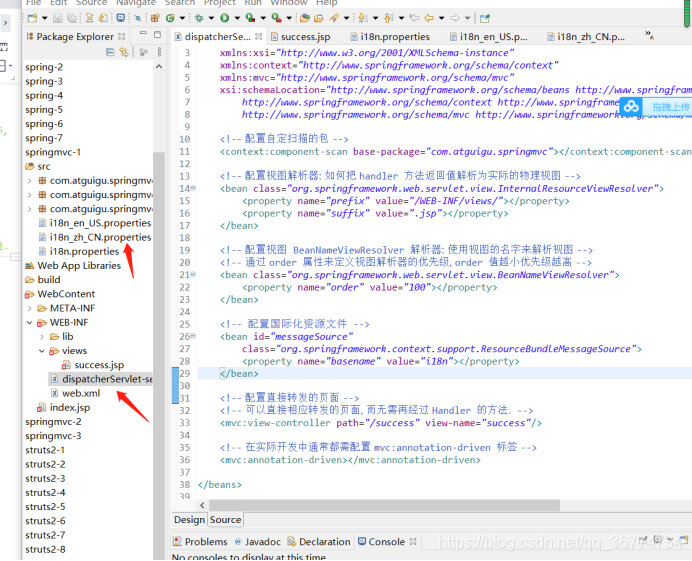
?dispatcherServlet-servlet.xml
	<!-- 配置国际化资源文件 -->
	<bean id="messageSource"
		class="org.springframework.context.support.ResourceBundleMessageSource">
		<property name="basename" value="i18n"></property>
	</bean>
i18n.properties
i18n.username=Username
i18n.password=Password
i18n_en_US.properties
i18n.username=Username
i18n.password=Password
i18n_zh_CN.properties
i18n.username=\u7528\u6237\u540D
i18n.password=\u5BC6\u7801
IE测试即可
dispatcherServlet-servlet.xml
	<!-- 配置视图  BeanNameViewResolver 解析器: 使用视图的名字来解析视图 -->
	<!-- 通过 order 属性来定义视图解析器的优先级, order 值越小优先级越高 -->
	<bean class="org.springframework.web.servlet.view.BeanNameViewResolver">
		<property name="order" value="100"></property>
	</bean>

	<!-- 配置直接转发的页面 -->
	<!-- 可以直接相应转发的页面, 而无需再经过 Handler 的方法.  -->
	<mvc:view-controller path="/success" view-name="success"/>

	<!-- 在实际开发中通常都需配置 mvc:annotation-driven 标签
	要是配置了mvc:view-controller还希望原来rsquestmapping起作用,那就配置这句
	 -->
	<mvc:annotation-driven></mvc:annotation-driven>
重定向
页面
	<a href="springmvc/testRedirect">Test Redirect</a>
	<br><br>
控制器
@RequestMapping("/testRedirect")
public String testRedirect(){
System.out.println("testRedirect");
return "redirect:/index.jsp";
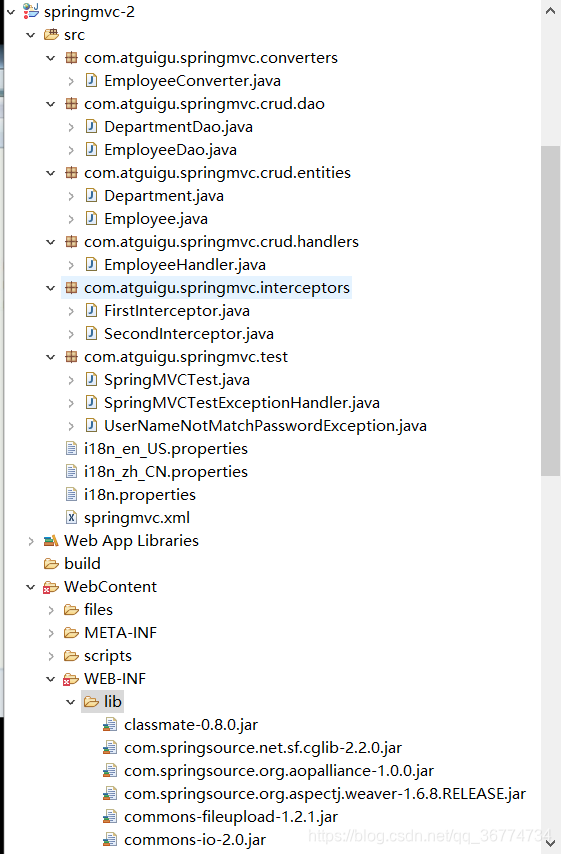
}Rest ?crud
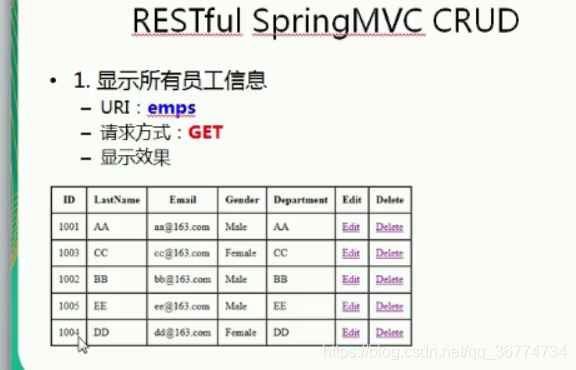
?目录结构
?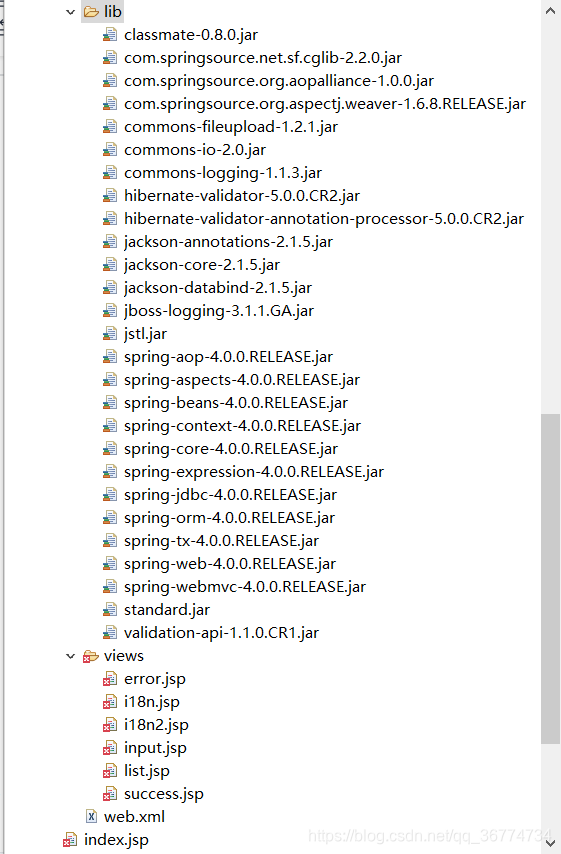
?
加入jar包
web.xml
<?xml version="1.0" encoding="UTF-8"?>
<web-app xmlns:xsi="http://www.w3.org/2001/XMLSchema-instance"
	xmlns="http://java.sun.com/xml/ns/javaee"
	xsi:schemaLocation="http://java.sun.com/xml/ns/javaee http://java.sun.com/xml/ns/javaee/web-app_2_5.xsd"
	id="WebApp_ID" version="2.5">

	<!-- 配置 SpringMVC 的 DispatcherServlet -->
	<!-- The front controller of this Spring Web application, responsible for handling all application requests -->
	<servlet>
		<servlet-name>springDispatcherServlet</servlet-name>
		<servlet-class>org.springframework.web.servlet.DispatcherServlet</servlet-class>
		<init-param>
			<param-name>contextConfigLocation</param-name>
			<param-value>classpath:springmvc.xml</param-value>
		</init-param>
		<load-on-startup>1</load-on-startup>
	</servlet>

	<!-- Map all requests to the DispatcherServlet for handling -->
	<servlet-mapping>
		<servlet-name>springDispatcherServlet</servlet-name>
		<url-pattern>/</url-pattern>
	</servlet-mapping>

	<!-- 配置 HiddenHttpMethodFilter: 把 POST 请求转为 DELETE、PUT 请求 -->
	<filter>
		<filter-name>HiddenHttpMethodFilter</filter-name>
		<filter-class>org.springframework.web.filter.HiddenHttpMethodFilter</filter-class>
	</filter>

	<filter-mapping>
		<filter-name>HiddenHttpMethodFilter</filter-name>
		<url-pattern>/*</url-pattern>
	</filter-mapping>

</web-app>
配置springmvc.xml文件
<?xml version="1.0" encoding="UTF-8"?>
<beans xmlns="http://www.springframework.org/schema/beans"
	xmlns:xsi="http://www.w3.org/2001/XMLSchema-instance"
	xmlns:context="http://www.springframework.org/schema/context"
	xmlns:mvc="http://www.springframework.org/schema/mvc"
	xsi:schemaLocation="http://www.springframework.org/schema/beans http://www.springframework.org/schema/beans/spring-beans.xsd
		http://www.springframework.org/schema/context http://www.springframework.org/schema/context/spring-context-4.0.xsd
		http://www.springframework.org/schema/mvc http://www.springframework.org/schema/mvc/spring-mvc-4.0.xsd">

	<!-- 配置自动扫描的包 -->
	<context:component-scan base-package="com.atguigu.springmvc"></context:component-scan>

	<!-- 配置视图解析器 -->
	<bean class="org.springframework.web.servlet.view.InternalResourceViewResolver">
		<property name="prefix" value="/WEB-INF/views/"></property>
		<property name="suffix" value=".jsp"></property>
	</bean>

	<!--
		default-servlet-handler 将在 SpringMVC 上下文中定义一个 DefaultServletHttpRequestHandler,
		它会对进入 DispatcherServlet 的请求进行筛查, 如果发现是没有经过映射的请求, 就将该请求交由 WEB 应用服务器默认的
		Servlet 处理. 如果不是静态资源的请求,才由 DispatcherServlet 继续处理

		一般 WEB 应用服务器默认的 Servlet 的名称都是 default.
		若所使用的 WEB 服务器的默认 Servlet 名称不是 default,则需要通过 default-servlet-name 属性显式指定

	-->
	<!-- 解决静态资源不需要经过hander的问题 -->
	<mvc:default-servlet-handler/>

	<mvc:annotation-driven conversion-service="conversionService"></mvc:annotation-driven>

</beans>
DepartmentDao.java
package com.atguigu.springmvc.crud.dao;

import java.util.Collection;
import java.util.HashMap;
import java.util.Map;

import org.springframework.stereotype.Repository;

import com.atguigu.springmvc.crud.entities.Department;

@Repository
public class DepartmentDao {

	private static Map<Integer, Department> departments = null;

	static{
		departments = new HashMap<Integer, Department>();

		departments.put(101, new Department(101, "D-AA"));
		departments.put(102, new Department(102, "D-BB"));
		departments.put(103, new Department(103, "D-CC"));
		departments.put(104, new Department(104, "D-DD"));
		departments.put(105, new Department(105, "D-EE"));
	}

	public Collection<Department> getDepartments(){
		return departments.values();
	}

	public Department getDepartment(Integer id){
		return departments.get(id);
	}

}
EmployeeDao.java
package com.atguigu.springmvc.crud.dao;

import java.util.Collection;
import java.util.HashMap;
import java.util.Map;

import org.springframework.beans.factory.annotation.Autowired;
import org.springframework.stereotype.Repository;

import com.atguigu.springmvc.crud.entities.Department;
import com.atguigu.springmvc.crud.entities.Employee;

@Repository
public class EmployeeDao {

	private static Map<Integer, Employee> employees = null;

	@Autowired
	private DepartmentDao departmentDao;

	static{
		employees = new HashMap<Integer, Employee>();

		employees.put(1001, new Employee(1001, "E-AA", "aa@163.com", 1, new Department(101, "D-AA")));
		employees.put(1002, new Employee(1002, "E-BB", "bb@163.com", 1, new Department(102, "D-BB")));
		employees.put(1003, new Employee(1003, "E-CC", "cc@163.com", 0, new Department(103, "D-CC")));
		employees.put(1004, new Employee(1004, "E-DD", "dd@163.com", 0, new Department(104, "D-DD")));
		employees.put(1005, new Employee(1005, "E-EE", "ee@163.com", 1, new Department(105, "D-EE")));
	}

	private static Integer initId = 1006;

	public void save(Employee employee){
		if(employee.getId() == null){
			employee.setId(initId++);
		}

		employee.setDepartment(departmentDao.getDepartment(employee.getDepartment().getId()));
		employees.put(employee.getId(), employee);
	}

	public Collection<Employee> getAll(){
		return employees.values();
	}

	public Employee get(Integer id){
		return employees.get(id);
	}

	public void delete(Integer id){
		employees.remove(id);
	}
}
Department.java
package com.atguigu.springmvc.crud.entities;

public class Department {

	private Integer id;
	private String departmentName;

	public Department() {
		// TODO Auto-generated constructor stub
	}

	public Department(int i, String string) {
		this.id = i;
		this.departmentName = string;
	}

	public Integer getId() {
		return id;
	}

	public void setId(Integer id) {
		this.id = id;
	}

	public String getDepartmentName() {
		return departmentName;
	}

	public void setDepartmentName(String departmentName) {
		this.departmentName = departmentName;
	}

	@Override
	public String toString() {
		return "Department [id=" + id + ", departmentName=" + departmentName
				+ "]";
	}

}
Employee.java
package com.atguigu.springmvc.crud.entities;

import java.util.Date;

import javax.validation.constraints.Past;

import org.hibernate.validator.constraints.Email;
import org.hibernate.validator.constraints.NotEmpty;
import org.springframework.format.annotation.DateTimeFormat;
import org.springframework.format.annotation.NumberFormat;

public class Employee {

	private Integer id;
	@NotEmpty
	private String lastName;

	@Email
	private String email;
	//1 male, 0 female
	private Integer gender;

	private Department department;

	@Past
	@DateTimeFormat(pattern="yyyy-MM-dd")
	private Date birth;

	@NumberFormat(pattern="#,###,###.#")
	private Float salary;

	public Integer getId() {
		return id;
	}

	public void setId(Integer id) {
		this.id = id;
	}

	public String getLastName() {
		return lastName;
	}

	public void setLastName(String lastName) {
		this.lastName = lastName;
	}

	public String getEmail() {
		return email;
	}

	public void setEmail(String email) {
		this.email = email;
	}

	public Integer getGender() {
		return gender;
	}

	public void setGender(Integer gender) {
		this.gender = gender;
	}

	public Department getDepartment() {
		return department;
	}

	public void setDepartment(Department department) {
		this.department = department;
	}

	public Date getBirth() {
		return birth;
	}

	public void setBirth(Date birth) {
		this.birth = birth;
	}

	public Float getSalary() {
		return salary;
	}

	public void setSalary(Float salary) {
		this.salary = salary;
	}

	@Override
	public String toString() {
		return "Employee [id=" + id + ", lastName=" + lastName + ", email="
				+ email + ", gender=" + gender + ", department=" + department
				+ ", birth=" + birth + ", salary=" + salary + "]";
	}

	public Employee(Integer id, String lastName, String email, Integer gender,
			Department department) {
		super();
		this.id = id;
		this.lastName = lastName;
		this.email = email;
		this.gender = gender;
		this.department = department;
	}

	public Employee() {
		// TODO Auto-generated constructor stub
	}
}
EmployeeHandler.java
package com.atguigu.springmvc.crud.handlers;
import java.util.Map;
import javax.validation.Valid;
import org.springframework.beans.factory.annotation.Autowired;
import org.springframework.stereotype.Controller;
import org.springframework.validation.Errors;
import org.springframework.validation.FieldError;
import org.springframework.web.bind.annotation.ModelAttribute;
import org.springframework.web.bind.annotation.PathVariable;
import org.springframework.web.bind.annotation.RequestMapping;
import org.springframework.web.bind.annotation.RequestMethod;
import org.springframework.web.bind.annotation.RequestParam;
import com.atguigu.springmvc.crud.dao.DepartmentDao;
import com.atguigu.springmvc.crud.dao.EmployeeDao;
import com.atguigu.springmvc.crud.entities.Employee;
@Controller
public class EmployeeHandler {
@Autowired
private EmployeeDao employeeDao;
@Autowired
private DepartmentDao departmentDao;
//编辑-post(不要这个的话,编辑之后会置空其他字段)
@ModelAttribute
public void getEmployee(@RequestParam(value="id",required=false) Integer id,
Map<String, Object> map){
if(id != null){
map.put("employee", employeeDao.get(id));
}
}
//编辑-post
@RequestMapping(value="/emp", method=RequestMethod.PUT)
public String update(Employee employee){
employeeDao.save(employee);
return "redirect:/emps";
}
//编辑
@RequestMapping(value="/emp/{id}", method=RequestMethod.GET)
public String input(@PathVariable("id") Integer id, Map<String, Object> map){
//employee必须和表单modelAttribute的值一样
map.put("employee", employeeDao.get(id));
map.put("departments", departmentDao.getDepartments());
return "input";
}
//删除
@RequestMapping(value="/emp/{id}", method=RequestMethod.DELETE)
public String delete(@PathVariable("id") Integer id){
employeeDao.delete(id);
return "redirect:/emps";//重定向
}
//添加 - post
//Errors错误提示
@RequestMapping(value="/emp", method=RequestMethod.POST)
public String save(@Valid Employee employee, Errors result,
Map<String, Object> map){
System.out.println("save: " + employee);
if(result.getErrorCount() > 0){
System.out.println("出错了!");
for(FieldError error:result.getFieldErrors()){
System.out.println(error.getField() + ":" + error.getDefaultMessage());
}
//若验证出错, 则转向定制的页面
map.put("departments", departmentDao.getDepartments());
return "input";
}
employeeDao.save(employee);
return "redirect:/emps";
}
//添加
@RequestMapping(value="/emp", method=RequestMethod.GET)
public String input(Map<String, Object> map){
map.put("departments", departmentDao.getDepartments());
map.put("employee", new Employee());
return "input";
}
//列表
@RequestMapping("/emps")
public String list(Map<String, Object> map){
map.put("employees", employeeDao.getAll());
return "list";
}
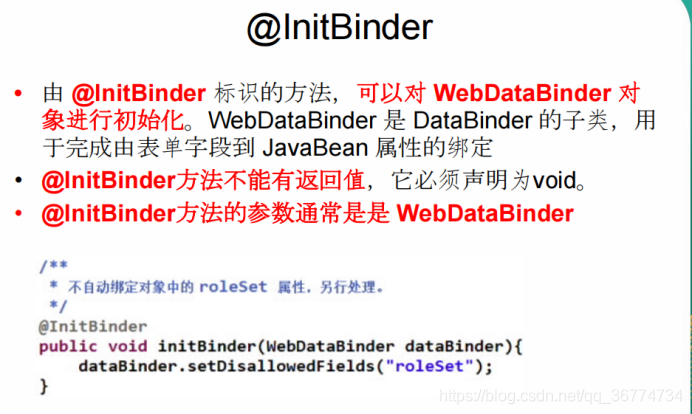
// @InitBinder
// public void initBinder(WebDataBinder binder){
// binder.setDisallowedFields("lastName");
// }
}input.jsp
<%@page import="java.util.HashMap"%>
<%@page import="java.util.Map"%>
<%@ page language="java" contentType="text/html; charset=UTF-8"
    pageEncoding="UTF-8"%>
<%@ taglib prefix="form" uri="http://www.springframework.org/tags/form" %>
<%@ taglib prefix="c" uri="http://java.sun.com/jsp/jstl/core" %>

<!DOCTYPE html PUBLIC "-//W3C//DTD HTML 4.01 Transitional//EN" "http://www.w3.org/TR/html4/loose.dtd">
<html>
<head>
<meta http-equiv="Content-Type" content="text/html; charset=UTF-8">
<title>Insert title here</title>
</head>
<body>
	<br><br>

	<!--
		1. WHY 使用 form 标签呢 ?
		可以更快速的开发出表单页面, 而且可以更方便的进行表单值的回显
		在form里面加上这个modelAttribute="employee"和控制器的map里面的key一致
		2. 注意:
		springmvc 默认回显,请求域对象里面必须与一个和表单name一致的bean,
		和bean的属性一一对应
		找对应的bean和表单一致的属性,若找不到会报错
		解决办法 声明一个空的对象即可
		可以通过 modelAttribute 属性指定绑定的模型属性,
		若没有指定该属性,则默认从 request 域对象中读取 command 的表单 bean
		如果该属性值也不存在,则会发生错误。
	-->
	<br><br>
	<form:form action="${pageContext.request.contextPath }/emp" method="POST"
		modelAttribute="employee">

		<form:errors path="*"></form:errors>
		<br>

		<c:if test="${employee.id == null }">
			<!-- path 属性对应 html 表单标签的 name 属性值 -->
			LastName: <form:input path="lastName"/>
			<form:errors path="lastName"></form:errors>
		</c:if>
		<c:if test="${employee.id != null }">
			<form:hidden path="id"/>
			<input type="hidden" name="_method" value="PUT"/>
			<%-- 对于 _method 不能使用 form:hidden 标签, 因为 modelAttribute 对应的 bean 中没有 _method 这个属性 --%>
			<%--
			<form:hidden path="_method" value="PUT"/>
			--%>
		</c:if>

		<br>
		Email: <form:input path="email"/>
		<form:errors path="email"></form:errors>
		<br>
		<%
			Map<String, String> genders = new HashMap();
			genders.put("1", "Male");
			genders.put("0", "Female");

			request.setAttribute("genders", genders);
		%>
		Gender:
		<br>
		<form:radiobuttons path="gender" items="${genders }" delimiter="<br>"/>
		<br>
		Department: <form:select path="department.id"
			items="${departments }" itemLabel="departmentName" itemValue="id"></form:select>
		<br>
		<!--
			1. 数据类型转换
			2. 数据类型格式化
			3. 数据校验.
			1). 如何校验 ? 注解 ?
			①. 使用 JSR 303 验证标准
			②. 加入 hibernate validator 验证框架的 jar 包
			③. 在 SpringMVC 配置文件中添加 <mvc:annotation-driven />
			④. 需要在 bean 的属性上添加对应的注解
			⑤. 在目标方法 bean 类型的前面添加 @Valid 注解
			2). 验证出错转向到哪一个页面 ?
			注意: 需校验的 Bean 对象和其绑定结果对象或错误对象时成对出现的,它们之间不允许声明其他的入参
			3). 错误消息 ? 如何显示, 如何把错误消息进行国际化
		-->
		Birth: <form:input path="birth"/>
		<form:errors path="birth"></form:errors>
		<br>
		Salary: <form:input path="salary"/>
		<br>
		<input type="submit" value="Submit"/>
	</form:form>

</body>
</html>
list.jsp
<%@ page language="java" contentType="text/html; charset=UTF-8"
    pageEncoding="UTF-8"%>
<%@ taglib prefix="c" uri="http://java.sun.com/jsp/jstl/core" %>

<!DOCTYPE html PUBLIC "-//W3C//DTD HTML 4.01 Transitional//EN" "http://www.w3.org/TR/html4/loose.dtd">
<html>
<head>
<meta http-equiv="Content-Type" content="text/html; charset=UTF-8">
<title>Insert title here</title>
<!--
	SpringMVC 处理静态资源:
	1. 为什么会有这样的问题:
	优雅的 REST 风格的资源URL 不希望带 .html 或 .do 等后缀
	若将 DispatcherServlet 请求映射配置为 /,
	则 Spring MVC 将捕获 WEB 容器的所有请求, 包括静态资源的请求, SpringMVC 会将他们当成一个普通请求处理,
	因找不到对应处理器将导致错误。
	2. 解决: 在 SpringMVC 的配置文件中配置 <mvc:default-servlet-handler/>
-->
<script type="text/javascript" src="scripts/jquery-1.9.1.min.js"></script>
<script type="text/javascript">
	$(function(){
		$(".delete").click(function(){
			var href = $(this).attr("href");
			$("form").attr("action", href).submit();
			return false;
		});
	})
</script>
</head>
<body>

	<form action="" method="POST">
		<input type="hidden" name="_method" value="DELETE"/>
	</form>

	<c:if test="${empty requestScope.employees }">
		没有任何员工信息.
	</c:if>
	<c:if test="${!empty requestScope.employees }">
		<table border="1" cellpadding="10" cellspacing="0">
			<tr>
				<th>ID</th>
				<th>LastName</th>
				<th>Email</th>
				<th>Gender</th>
				<th>Department</th>
				<th>Edit</th>
				<th>Delete</th>
			</tr>

			<c:forEach items="${requestScope.employees }" var="emp">
				<tr>
					<td>${emp.id }</td>
					<td>${emp.lastName }</td>
					<td>${emp.email }</td>
					<td>${emp.gender == 0 ? 'Female' : 'Male' }</td>
					<td>${emp.department.departmentName }</td>
					<td><a href="emp/${emp.id}">Edit</a></td>
					<td><a class="delete" href="emp/${emp.id}">Delete</a></td>
				</tr>
			</c:forEach>
		</table>
	</c:if>

	<br><br>

	<a href="emp">Add New Employee</a>

</body>
</html>
error.jsp
<%@ page language="java" contentType="text/html; charset=UTF-8"
    pageEncoding="UTF-8"%>
<!DOCTYPE html PUBLIC "-//W3C//DTD HTML 4.01 Transitional//EN" "http://www.w3.org/TR/html4/loose.dtd">
<html>
<head>
<meta http-equiv="Content-Type" content="text/html; charset=UTF-8">
<title>Insert title here</title>
</head>
<body>

	<h4>Error Page</h4>

	${requestScope.exception }

</body>
</html>
国际化文件切换(自定义内容)
springmvc.xml
	<!-- 配置国际化资源文件 -->
	<bean id="messageSource"
		class="org.springframework.context.support.ResourceBundleMessageSource">
		<property name="basename" value="i18n"></property>
	</bean>

	<!-- 配置 SessionLocalResolver -->
	<bean id="localeResolver"
		class="org.springframework.web.servlet.i18n.SessionLocaleResolver"></bean>
		<mvc:interceptors>

		<!-- 配置 LocaleChanceInterceptor -->
		<bean class="org.springframework.web.servlet.i18n.LocaleChangeInterceptor"></bean>
	</mvc:interceptors>

	<!--
	<mvc:view-controller path="/i18n" view-name="i18n"/>
	-->
	<mvc:view-controller path="/i18n2" view-name="i18n2"/>
i18n.properties
NotEmpty.employee.lastName=^^LastName\u4E0D\u80FD\u4E3A\u7A7A.
Email.employee.email=Email\u5730\u5740\u4E0D\u5408\u6CD5
Past.employee.birth=Birth\u4E0D\u80FD\u662F\u4E00\u4E2A\u5C06\u6765\u7684\u65F6\u95F4.

typeMismatch.employee.birth=Birth\u4E0D\u662F\u4E00\u4E2A\u65E5\u671F.

i18n.user=User
i18n.password=Password
i18n_en_US.properties
NotEmpty.employee.lastName=^^LastName\u4E0D\u80FD\u4E3A\u7A7A.
Email.employee.email=Email\u5730\u5740\u4E0D\u5408\u6CD5
Past.employee.birth=Birth\u4E0D\u80FD\u662F\u4E00\u4E2A\u5C06\u6765\u7684\u65F6\u95F4.

typeMismatch.employee.birth=Birth\u4E0D\u662F\u4E00\u4E2A\u65E5\u671F.

i18n.user=User
i18n.password=Password
i18n_zh_CN.properties
NotEmpty.employee.lastName=^^LastName\u4E0D\u80FD\u4E3A\u7A7A.
Email.employee.email=Email\u5730\u5740\u4E0D\u5408\u6CD5
Past.employee.birth=Birth\u4E0D\u80FD\u662F\u4E00\u4E2A\u5C06\u6765\u7684\u65F6\u95F4.

typeMismatch.employee.birth=Birth\u4E0D\u662F\u4E00\u4E2A\u65E5\u671F.

i18n.user=\u7528\u6237\u540D
i18n.password=\u5BC6\u7801
Index.jsp
	<!--
		关于国际化:
		1. 在页面上能够根据浏览器语言设置的情况对文本(不是内容), 时间, 数值进行本地化处理
		2. 可以在 bean 中获取国际化资源文件 Locale 对应的消息
		3. 可以通过超链接切换 Locale, 而不再依赖于浏览器的语言设置情况

		解决:
		1. 使用 JSTL 的 fmt 标签
		2. 在 bean 中注入 ResourceBundleMessageSource 的示例, 使用其对应的 getMessage 方法即可
		3. 配置 LocalResolver 和 LocaleChangeInterceptor
	-->
	<br><br>
	<a href="i18n">I18N PAGE</a>
i18n.jsp
<%@ page language="java" contentType="text/html; charset=UTF-8"
    pageEncoding="UTF-8"%>
<%@ taglib prefix="fmt" uri="http://java.sun.com/jsp/jstl/fmt" %>

<!DOCTYPE html PUBLIC "-//W3C//DTD HTML 4.01 Transitional//EN" "http://www.w3.org/TR/html4/loose.dtd">
<html>
<head>
<meta http-equiv="Content-Type" content="text/html; charset=UTF-8">
<title>Insert title here</title>
</head>
<body>

	<fmt:message key="i18n.user"></fmt:message>

	<br><br>
	<a href="i18n2">I18N2 PAGE</a>

	<br><br>
	<a href="i18n?locale=zh_CH">中文</a>

	<br><br>
	<a href="i18n?locale=en_US">英文</a>

</body>
</html>
i18n2.jsp
<%@ page language="java" contentType="text/html; charset=UTF-8"
    pageEncoding="UTF-8"%>
<%@ taglib prefix="fmt" uri="http://java.sun.com/jsp/jstl/fmt" %>

<!DOCTYPE html PUBLIC "-//W3C//DTD HTML 4.01 Transitional//EN" "http://www.w3.org/TR/html4/loose.dtd">
<html>
<head>
<meta http-equiv="Content-Type" content="text/html; charset=UTF-8">
<title>Insert title here</title>
</head>
<body>

	<fmt:message key="i18n.password"></fmt:message>

	<br><br>
	<a href="i18n">I18N PAGE</a>

</body>
</html>
文件上传
springmvc.xml
	<!-- 配置 MultipartResolver -->
	<bean id="multipartResolver"
		class="org.springframework.web.multipart.commons.CommonsMultipartResolver">
		<property name="defaultEncoding" value="UTF-8"></property>
		<property name="maxUploadSize" value="1024000"></property>
	</bean>
Index.jsp
	<form action="testFileUpload" method="POST" enctype="multipart/form-data">
		File: <input type="file" name="file"/>
		Desc: <input type="text" name="desc"/>
		<input type="submit" value="Submit"/>
	</form>
控制器
	@RequestMapping("/testFileUpload")
	public String testFileUpload(@RequestParam("desc") String desc,
			@RequestParam("file") MultipartFile file) throws IOException{
		System.out.println("desc: " + desc);
		System.out.println("OriginalFilename: " + file.getOriginalFilename());
		System.out.println("InputStream: " + file.getInputStream());
		return "success";
	}
拦截器
springmvc.xml
	<mvc:interceptors>
		<!-- 配置自定义的拦截器 -->
		<bean class="com.atguigu.springmvc.interceptors.FirstInterceptor"></bean>

		<!-- 配置拦截器(不)作用的路径 -->
		<mvc:interceptor>
			<mvc:mapping path="/emps"/>
			<bean class="com.atguigu.springmvc.interceptors.SecondInterceptor"></bean>
		</mvc:interceptor>

	</mvc:interceptors>
FirstInterceptor.java
package com.atguigu.springmvc.interceptors;

import javax.servlet.http.HttpServletRequest;
import javax.servlet.http.HttpServletResponse;

import org.springframework.web.servlet.HandlerInterceptor;
import org.springframework.web.servlet.ModelAndView;

public class FirstInterceptor implements HandlerInterceptor{

	/**
	 * 该方法在目标方法之前被调用.
	 * 若返回值为 true, 则继续调用后续的拦截器和目标方法.
	 * 若返回值为 false, 则不会再调用后续的拦截器和目标方法.
	 *
	 * 可以考虑做权限. 日志, 事务等.
	 */
	@Override
	public boolean preHandle(HttpServletRequest request,
			HttpServletResponse response, Object handler) throws Exception {
		System.out.println("[FirstInterceptor] preHandle");
		return true;
	}

	/**
	 * 调用目标方法之后, 但渲染视图之前.
	 * 可以对请求域中的属性或视图做出修改.
	 */
	@Override
	public void postHandle(HttpServletRequest request,
			HttpServletResponse response, Object handler,
			ModelAndView modelAndView) throws Exception {
		System.out.println("[FirstInterceptor] postHandle");
	}

	/**
	 * 渲染视图之后被调用. 释放资源
	 */
	@Override
	public void afterCompletion(HttpServletRequest request,
			HttpServletResponse response, Object handler, Exception ex)
			throws Exception {
		System.out.println("[FirstInterceptor] afterCompletion");
	}

}
SecondInterceptor.java
package com.atguigu.springmvc.interceptors;

import javax.servlet.http.HttpServletRequest;
import javax.servlet.http.HttpServletResponse;

import org.springframework.web.servlet.HandlerInterceptor;
import org.springframework.web.servlet.ModelAndView;

public class SecondInterceptor implements HandlerInterceptor{

	/**
	 * 该方法在目标方法之前被调用.
	 * 若返回值为 true, 则继续调用后续的拦截器和目标方法.
	 * 若返回值为 false, 则不会再调用后续的拦截器和目标方法.
	 *
	 * 可以考虑做权限. 日志, 事务等.
	 */
	@Override
	public boolean preHandle(HttpServletRequest request,
			HttpServletResponse response, Object handler) throws Exception {
		System.out.println("[SecondInterceptor] preHandle");
		return false;
	}

	/**
	 * 调用目标方法之后, 但渲染视图之前.
	 * 可以对请求域中的属性或视图做出修改.
	 */
	@Override
	public void postHandle(HttpServletRequest request,
			HttpServletResponse response, Object handler,
			ModelAndView modelAndView) throws Exception {
		System.out.println("[SecondInterceptor] postHandle");
	}

	/**
	 * 渲染视图之后被调用. 释放资源
	 */
	@Override
	public void afterCompletion(HttpServletRequest request,
			HttpServletResponse response, Object handler, Exception ex)
			throws Exception {
		System.out.println("[SecondInterceptor] afterCompletion");
	}

}
下面是一些老师讲的ppt关键的部分截图
?
?
?
?
?