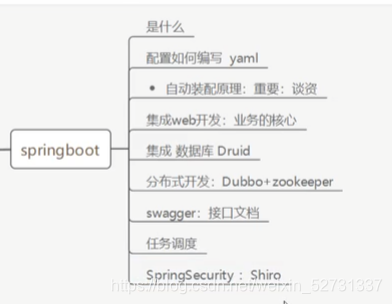
微服务阶段


springboot:构建一切
springcloud:协调一切
spring cloud data flow:连接一切 进行流式数据计算、批处理

1.第一个SpringBoot程序
JDK 1.8
MAVEN 3.6.1
Spring官方提供了非常方便的工具让我们快速构建应用
Spring Initializr:https://start.spring.io/
2.原理初探
2.1.pom.xml
- spring-boot-dependencies:核心在父工程中
- 我们在写或者引入springboot依赖的时候,不需要指定版本,就是因为有这些版本仓库
2.2.启动器
	 	<dependency>
            <groupId>org.springframework.boot</groupId>
            <artifactId>spring-boot-starter</artifactId>
        </dependency>
- 启动器:说白了就是springboot的启动场景
- 比如:spring-boot-starter-web 他就会自动导入web环境所有的依赖
- springboot会将所有的功能场景,都变成一个个的启动器,如果我们要使用什么功能,就只需要找到对应的启动器就可以了 starter
2.3.主程序
//程序的主入口
//@SpringBootApplication 标注这个类是springboot的应用  启动类下的所有资源被导入
@SpringBootApplication
public class SpringbootHelloApplication {

    public static void main(String[] args) {
        //将springboot应用启动
        SpringApplication.run(SpringbootHelloApplication.class, args);
    }
}
-
注解:👇@SpringBootApplication
-
👇1. @SpringBootConfiguration:springboot的配置
- 1.1 @Configuration:spring的配置类
- 1.1.1 @Component:说明这也是spring组件
- 1.1 @Configuration:spring的配置类
-
👇2.@EnableAutoConfiguration:自动导入配置
- 2.1 @AutoConfigurationPackage:自动配置包
- 2.2 @Import(AutoConfigurationPackages.Registrar.class) :自动配置 “ 注册包 ”
- 2.2 @Import(AutoConfigurationImportSelector.class):自动配置导入选择器
- 2.1 @AutoConfigurationPackage:自动配置包
获取所有的配置
在AutoConfigurationImportSelector这个类里面
//获取所有的配置
List<String> configurations = getCandidateConfigurations(annotationMetadata, attributes);
获取候选的配置
//获取候选的配置
	protected List<String> getCandidateConfigurations(AnnotationMetadata metadata, AnnotationAttributes attributes) {
		List<String> configurations = SpringFactoriesLoader.loadFactoryNames(getSpringFactoriesLoaderFactoryClass(),
				getBeanClassLoader());
		//Assert  断言
		Assert.notEmpty(configurations, "No auto configuration classes found in META-INF/spring.factories. If you "
				+ "are using a custom packaging, make sure that file is correct.");
		return configurations;
	}

-
兜兜转转只为了做一件事:导入启动类下的所有资源
-
META-INF/spring.factories 这是一个自动配置的核心文件
-

Properties properties = PropertiesLoaderUtils.loadProperties(resource);
所有的资源加载到配置类中
public static final String FACTORIES_RESOURCE_LOCATION = “META-INF/spring.factories”;
通过这个FACTORIES_RESOURCE_LOCATION 把"META-INF/spring.factories"加载进来在spring.factories的webmvc配置中有注解 @ConditionalOnMissingBean(WebMvcConfigurationSupport.class) 它可以通过一些条件判断是否自动注入
结论:springboot所有的自动配置都是在启动的时候扫描并加载:spring.factories 所有的自动配置类都在这里面,但不一定生效,要判断条件是否成立,只要配置了对应的starter,自动装配就会生效
1.springboot在启动的时候,扫描并加载了META-INF/spring.factories 获取指定的properties
2.将这些自动配置的类导入容器,自动配置就会生效
3.以前我们需要自动配置的东西,现在springboot帮我们做了
4.整合javaEE,解决方案和自动配置的东西都在 spring-boot-autoconfigure-2.5.3.jar 这个包下
5.它会把所有需要导入的组件,以类名的方式返回,这些组件就会被添加到容器

6.它会给容器中导入非常多的自动配置类 (xxxAutoConfiguration), 就是给容器中导入这个场景需要的所有组件 , 并配置好这些组件 ;
7.有了自动配置类 , 免去了我们手动编写配置注入功能组件等的工作;
谈谈你对springboot的理解
- 1.自动装配
- 2.run
- 2.1 判断是是普通项目还是web项目
- this.webApplicationType = WebApplicationType.deduceFromClasspath();
- 2.2 推断出并设置main方法的定义类,找到运行的主类
- 2.3 方法内设置了一些全局监听器,主要是获取上下文,并处理bean容器
- setListeners((Collection) getSpringFactoriesInstances(ApplicationListener.class));
- 2.4 查找并加载所有的可用初始化器,设置到setInitializers
- setInitializers((Collection) getSpringFactoriesInstances(ApplicationContextInitializer.class));
3.yaml配置注入
3.1.yaml可以直接给实体类赋值

解决办法:
        <dependency>
            <groupId>org.springframework.boot</groupId>
            <artifactId>spring-boot-configuration-processor</artifactId>
            <optional>true</optional>
        </dependency>
在application.yaml配置属性
person:
  name: hardy
  age: 12
  happy: true
  birth: 2019/11/02
  maps: {k1: v1,k2: v2}
  lists:
    - code
    - music
    - girl
  dog:
    name: 旺财
    age: 3
通过注解绑定yaml中的person对象
@Component
@Data
@AllArgsConstructor
@NoArgsConstructor
@ConfigurationProperties(prefix = "person")
public class Person {
    private String name;
    private Integer age;
    private Boolean happy;
    private Date birth;
    private Map<String,Object> maps;
    private List<Object> lists;
    private Dog dog;
}
测试:
@SpringBootTest
class Springboot02ConfigApplicationTests {

    @Autowired
    private Dog dog;
    @Autowired
    private Person person;

    @Test
    void contextLoads() {
        System.out.println(dog);
        System.out.println(person);
    }

}
总结:
@ConfigurationProperties的作用:
将配置文件中配置的每一个属性的值,映射到这个组件中;
告诉springboot将本类中的所有属性和配置文件中相关的配置进行绑定
参数 prefix = "person" : 将配置文件中的person下面的所有属性一一对应

只有当前组件存在于容器中,才能使用容器提供的@ConfigurationProperties功能
注意:
这里设置不配套可能会导致yaml读取乱码

- 补充:
- 1.它还可以实现松散绑定:LastName last-name可以绑定成功
- 2.可以完成数据校验:JSR303:数据校验 需要使用注解
@Validated :意思为确认
3.2.通过指定配置文件----赋值(不推荐)
hardy.properties
name=狂神
指定配置文件
@Component
@Data
@AllArgsConstructor
@NoArgsConstructor
//@ConfigurationProperties(prefix = "person")
//加载指定配置文件
@PropertySource(value = "classpath:hardy.properties")
public class Person {
    //spel spring的EL表达式  来取值
    @Value("${name}")
    private String name;
    private Integer age;
    private Boolean happy;
    private Date birth;
    private Map<String,Object> maps;
    private List<Object> lists;
    private Dog dog;
}
4.JSR303数据校验及多环境切换
导入数据校验的依赖
        <dependency>
            <groupId>org.springframework.boot</groupId>
            <artifactId>spring-boot-starter-validation</artifactId>
        </dependency>
@Validated//数据校验
public class Person {

    @Email()  //判断name是不是eamil格式
    private String name;
使用数据校验,可以保证数据的正确性;
常见参数
@NotNull(message="名字不能为空")
private String userName;
@Max(value=120,message="年龄最大不能查过120")
private int age;
@Email(message="邮箱格式错误")//括号里设置出错后的提示信息
private String email;

空检查
@Null       验证对象是否为null
@NotNull    验证对象是否不为null, 无法查检长度为0的字符串
@NotBlank   检查约束字符串是不是Null还有被Trim的长度是否大于0,只对字符串,且会去掉前后空格.
@NotEmpty   检查约束元素是否为NULL或者是EMPTY.

Booelan检查
@AssertTrue     验证 Boolean 对象是否为 true
@AssertFalse    验证 Boolean 对象是否为 false

长度检查
@Size(min=, max=) 验证对象(Array,Collection,Map,String)长度是否在给定的范围之内
@Length(min=, max=) string is between min and max included.

日期检查
@Past       验证 Date 和 Calendar 对象是否在当前时间之前
@Future     验证 Date 和 Calendar 对象是否在当前时间之后
@Pattern    验证 String 对象是否符合正则表达式的规则

.......等等
除此以外,我们还可以自定义一些数据校验规则

4.2 配置文件的加载顺序

4.3 yaml的多文档模块
server:
  port: 8081
spring:
  profiles:
    active: dev  //切换到dev模块
--- //分割模块
server:
  port: 8082
spring:
  profiles: dev

---
server:
  port: 8083
spring:
  profiles: test
5.自动装配原理再理解
我们以**HttpEncodingAutoConfiguration(Http编码自动配置)**为例解释自动配置原理;
//表示这是一个配置类,和以前编写的配置文件一样,也可以给容器中添加组件;
@Configuration

//启动指定类的ConfigurationProperties功能;
  //进入这个HttpProperties查看,将配置文件中对应的值和HttpProperties绑定起来;
  //并把HttpProperties加入到ioc容器中
@EnableConfigurationProperties({HttpProperties.class})

//Spring底层@Conditional注解
  //根据不同的条件判断,如果满足指定的条件,整个配置类里面的配置就会生效;
  //这里的意思就是判断当前应用是否是web应用,如果是,当前配置类生效
@ConditionalOnWebApplication(
    type = Type.SERVLET
)

//判断当前项目有没有这个类CharacterEncodingFilter;SpringMVC中进行乱码解决的过滤器;
@ConditionalOnClass({CharacterEncodingFilter.class})

//判断配置文件中是否存在某个配置:spring.http.encoding.enabled;
  //如果不存在,判断也是成立的
  //即使我们配置文件中不配置pring.http.encoding.enabled=true,也是默认生效的;
@ConditionalOnProperty(
    prefix = "spring.http.encoding",
    value = {"enabled"},
    matchIfMissing = true
)

public class HttpEncodingAutoConfiguration {
    //他已经和SpringBoot的配置文件映射了
    private final Encoding properties;
    //只有一个有参构造器的情况下,参数的值就会从容器中拿
    public HttpEncodingAutoConfiguration(HttpProperties properties) {
        this.properties = properties.getEncoding();
    }

    //给容器中添加一个组件,这个组件的某些值需要从properties中获取
    @Bean
    @ConditionalOnMissingBean //判断容器没有这个组件?
    public CharacterEncodingFilter characterEncodingFilter() {
        CharacterEncodingFilter filter = new OrderedCharacterEncodingFilter();
        filter.setEncoding(this.properties.getCharset().name());
        filter.setForceRequestEncoding(this.properties.shouldForce(org.springframework.boot.autoconfigure.http.HttpProperties.Encoding.Type.REQUEST));
        filter.setForceResponseEncoding(this.properties.shouldForce(org.springframework.boot.autoconfigure.http.HttpProperties.Encoding.Type.RESPONSE));
        return filter;
    }
    //。。。。。。。
}
-
一句话总结 :根据当前不同的条件判断,决定这个配置类是否生效!
-
一但这个配置类生效;这个配置类就会给容器中添加各种组件;
-
这些组件的属性是从对应的properties类中获取的,这些类里面的每一个属性又是和配置文件绑定的;
-
所有在配置文件中能配置的属性都是在xxxxProperties类中封装着;
-
配置文件能配置什么就可以参照某个功能对应的这个属性类
-
//从配置文件中获取指定的值和bean的属性进行绑定
@ConfigurationProperties(prefix = "spring.http")
public class HttpProperties {
    // .....
}
我们去配置文件里面试试前缀,看提示!

这就是自动装配的原理!
5.1 精髓总结
- 1、SpringBoot启动会加载大量的自动配置类
- 2、我们看我们需要的功能有没有在SpringBoot默认写好的自动配置类当中;
- 3、我们再来看这个自动配置类中到底配置了哪些组件;(只要我们要用的组件存在在其中,我们就不需要再手动配置了)
- 4、给容器中自动配置类添加组件的时候,会从properties类中获取某些属性。我们只需要在配置文件中指定这些属性的值即可;
-
xxxAutoConfiguration:自动装配,且有很多默认值,到xxxProperties中去取默认值 -
所以只要配置文件与xxxProperties 里面的属性一一对应,就可以修改默认值 -
xxxxAutoConfigurartion:自动配置类;给容器中添加组件
-
xxxxProperties:封装配置文件中相关属性;
-
了解:@Conditional --> 条件
了解完自动装配的原理后,我们来关注一个细节问题,自动配置类必须在一定的条件下才能生效;
-
@Conditional派生注解(Spring注解版原生的@Conditional作用)
-
作用:必须是@Conditional指定的条件成立,才给容器中添加组件,配置配里面的所有内容才生效;

-
那么多的自动配置类,必须在一定的条件下才能生效;也就是说,我们加载了这么多的配置类,但不是所有的都生效了。
-
我们怎么知道哪些自动配置类生效?
-
我们可以通过启用 debug=true属性;来让控制台打印自动配置报告,这样我们就可以很方便的知道哪些自动配置类生效;
#通过debug=true可以查看哪些自动配置类生效了,哪些没有生效
debug=true
-
Positive matches:(自动配置类启用的:正匹配)
-
Negative matches:(没有启动,没有匹配成功的自动配置类:负匹配)
-
Unconditional classes: (没有条件的类)
-
为什么自动配置有的生效有的不生效?因为在xxxxAutoConfigurartion中,@ConditionalXXX的条件不满足

5.springboot Web开发
最大特点:自动装配
要思考的问题:springboot到底帮我们配置了什么?我们能不能进行修改?能修改哪些东西?能不能扩展?
- 通过xxxxAutoConfiguraion…向容器中自动配置组件
- 通过xxxxProperties:自动配置类,装配配置文件中自定义的一些内容
要解决的问题:
- 导入静态资源
- 首页问题
- jsp,模板引擎 Thymeleaf
- 装配扩展SpringMVC
- 增删改查
- 拦截器
- 国际化!
5.1.静态资源
都在这个类中 WebMvcAutoConfiguration
		@Override
		public void addResourceHandlers(ResourceHandlerRegistry registry) {
			//如果有自定义配置,这个类就失效
			if (!this.resourceProperties.isAddMappings()) {
				logger.debug("Default resource handling disabled");
				return;
			}
			addResourceHandler(registry, "/webjars/**", "classpath:/META-INF/resources/webjars/");
			//private String staticPathPattern = "/**";
			addResourceHandler(registry, this.mvcProperties.getStaticPathPattern(), (registration) -> {
				registration.addResourceLocations(this.resourceProperties.getStaticLocations());
				//getStaticLocations(): CLASSPATH_RESOURCE_LOCATIONS = { "classpath:/META-INF/resources/",
				//"classpath:/resources/", "classpath:/static/", "classpath:/public/" };
				if (this.servletContext != null) {
					ServletContextResource resource = new ServletContextResource(this.servletContext, SERVLET_LOCATION);
					registration.addResourceLocations(resource);
				}
			});
		}
5.1.1方式一:
- 什么是webjars
以导入jquery为例

http://localhost:8080/webjars/jquery/3.4.1/jquery.js
5.1.2方式二:

- 优先级:resources > static > public
public :存放公共的资源
static【默认】 : 存放静态资源,比如图片
resources : upload上传的文件 - 如果自己配置了静态资源路径,默认的就失效了
- spring.mvc.static-path-pattern=/hardy/**
5.1.3总结:
1.在springboot中,我们可以使用以下方法处理静态资源
			webjars									---->  localhost:8080/webjars
			public , static , /** , resources    ---->  localhost:8080/
5.2.首页如何定制
html页面 放在static文件夹
5.3.模板引擎 thymeleaf
templates:只有通过controller才能访问这个文件夹
导入依赖:
        <dependency>
            <groupId>org.thymeleaf</groupId>
            <artifactId>thymeleaf-spring5</artifactId>
        </dependency>
        <dependency>
            <groupId>org.thymeleaf.extras</groupId>
            <artifactId>thymeleaf-extras-java8time</artifactId>
        </dependency>
引用和用法
<html lang="en" xmlns:th="http://www.thymeleaf.org">
<!--所有的html元素,都可以被thymeleaf接管  th:元素名-->
<div th:text="${msg}"></div>
5.3.1基本语法

测试:
@Controller
public class IndexController {

    @RequestMapping("/test")
    public String index(Model model){
        /**model相当于一个容器
        在处理开发结果的时候 process dispatcher result
         在所有结果处理完成之后
         会加上一个将model或者map数据放在请求域中的操作
        */
        model.addAttribute("msg","<h1>hello-spring<h1>");
        return "test";
    }
}

不同数据类型的取法:
${…}:普通EL表达式
*{…}:可变表达式
#{…}:国际化消息
@{…}:URL
~{…}:片段表达式
三元运算符:
(if)?(then)
(if)?(then):(else)
(value)?:(defaultvalue)
5.4.装配扩展SpringMVC
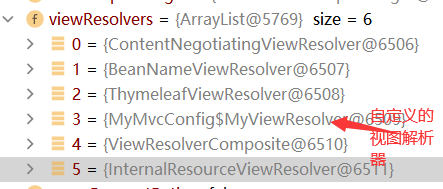
//如果你想diy一些定制化的功能,只要写这个组件,
//然后将它交给springboot,springboot就会帮我们自动装配
//自定义视图解析器
//加载过程中,通过dispatchServlet,会获取所有候选视图并在其中选出最好的

//扩展 springmvc
@Configuration
public class MyMvcConfig implements WebMvcConfigurer {

    @Bean
    public ViewResolver myViewResolver(){
        return new MyViewResolver();
    }

    //自定义视图解析器
    //加载过程中,通过dispatchServlet,会获取所有候选视图并在其中选出最好的
    public static class MyViewResolver implements ViewResolver{

        @Override
        public View resolveViewName(String viewName, Locale locale) throws Exception {
            return null;
        }
    }
}
在springboot中有非常多的xxxx Configuration 会帮助我们扩展配置,只要看见了这个东西,我们就要注意了。
5.5.员工管理系统
表单:
					<form th:action="@{/emp}" method="post">
						<div class="from-group">
							<label>LastName</label>
							<input type="text" name="lastName" class="form-control" placeholder="hardy">
						</div>
						<div class="from-group">
							<label>Email</label>
							<input type="email" name="email" class="form-control" placeholder="1782738@qq.com">
						</div>
						<div class="from-group">
							<label>Gender</label>
							<div class="form-check form-check-inline">
								<input class="form-check-input" type="radio" name="gender" value="1">
								<label class="form-check-label">男</label>
							</div>
							<div class="form-check form-check-inline">
								<input class="form-check-input" type="radio" name="gender" value="0">
								<label class="form-check-label">女</label>
							</div>
						</div>
						<div class="form-group">
							<label>department</label>
							<!--因为数据传输的是ID  所以这里的name也应该对应是id  而不是一个对象
							前端无法提交对象  所以提交ID														?-->
							<select class="form-control" name="department.id">
								<!--th:text  表示下拉框显示的内容		th:value 表示数据传输的值						-->
								<option th:each="dept:${departments}" th:text="${dept.getDepartmentName()}" th:value="${dept.getId()}"></option>

							</select>
						</div>
						<div class="form-group">
							<label>Birth</label>
							<input type="text" name="brith" class="form-control" placeholder="嘤嘤嘤">
						</div>
						<button type="submit" class="btn btn-primary">添加</button>

					</form>
# 1.配置首页  :
 1.1  注意点,所有页面的静态资源都需要使用thymeleaf接管;
 1.2  @{}

# 2.页面的国际化
#确保在setting中  fileEncoding 都是utf-8
注意点: 2.1 我们需要配置I8n文件
    2.2 我们如果需要在项目中进行按钮自动切换,就需要自定义一个组件
MyLocaleResolver
    2.3 记得将自己写的组件配置到spring容器中  @bean
    2.4 #{}

# 3.登录+拦截器

# 4.CRUD 员工列表展示

	4.1.提取公共页面  th:fragment  或者  th:replace
		4.1.1  th:fragment="sidebar"
		4.1.2  <div th:replace="~{common/commons::topbar}"></div>
	  	4.1.3  如果要使用参数,可以使用()传参

4.2 列表循环展示  list页面中

# 5.添加员工
	1.按钮提交
	2.跳转到添加页面
	3.添加员工成功
	4.返回首页

日期:默认`dd/MM/yyyy`. 修改  spring.mvc.date-format=

# 6.CRUD搞定

# 7. 404
6. 整合JDBC
整合Druid
druid依赖
        <dependency>
            <groupId>com.alibaba</groupId>
            <artifactId>druid</artifactId>
            <version>1.2.6</version>
        </dependency>
        <dependency>
            <groupId>log4j</groupId>
            <artifactId>log4j</artifactId>
            <version>1.2.12</version>
        </dependency>

        <!-- alibaba的druid数据库连接池 -->
        <dependency>
            <groupId>com.alibaba</groupId>
            <artifactId>druid-spring-boot-starter</artifactId>
            <version>1.1.0</version>
        </dependency>
application.yaml
spring:
  datasource:
    username: root
    password: root
    #?serverTimezone=UTC解决时区的报错
    url: jdbc:mysql://localhost:3306/springboot?serverTimezone=UTC&useUnicode=true&characterEncoding=utf-8
    driver-class-name: com.mysql.cj.jdbc.Driver
    type: com.alibaba.druid.pool.DruidDataSource

    #Spring Boot 默认是不注入这些属性值的,需要自己绑定
    #druid 数据源专有配置
    initialSize: 5
    minIdle: 5
    maxActive: 20
    maxWait: 60000
    timeBetweenEvictionRunsMillis: 60000
    minEvictableIdleTimeMillis: 300000
    validationQuery: SELECT 1 FROM DUAL
    testWhileIdle: true
    testOnBorrow: false
    testOnReturn: false
    poolPreparedStatements: true

    #配置监控统计拦截的filters,stat:监控统计、log4j:日志记录、wall:防御sql注入
    #如果允许时报错  java.lang.ClassNotFoundException: org.apache.log4j.Priority
    #则导入 log4j 依赖即可,Maven 地址:https://mvnrepository.com/artifact/log4j/log4j
    filters: stat,wall,log4j
    maxPoolPreparedStatementPerConnectionSize: 20
    useGlobalDataSourceStat: true
    connectionProperties: druid.stat.mergeSql=true;druid.stat.slowSqlMillis=500
7.整合mybatis
https://mp.weixin.qq.com/s?__biz=Mzg2NTAzMTExNg%3D%3D&chksm=ce61072ff9168e39c812662a910b8b1f5dc700bfa587724b7790b6eeda4a46fdb763e129b554&idx=1&mid=2247483788&scene=21&sn=aabf8cf31d7d45be184cc59cdb75258c#wechat_redirect
8.SpringSecurity
集成SpringSecurity 狂神笔记
在web开发中,安全第一位! 普通的 过滤器,拦截器
安全是非功能性需求,设计之初就应该考虑
常见安全框架:shiro,SpringSecurity 很像,除了类不一样,名字不一样
主要做:认证,授权(vip1,vip2…)
8.1 认识Spring Security
Spring Security 是针对Spring项目的安全框架,也是Spring Boot底层安全模块默认的技术选型,他可以实现强大的Web安全控制,对于安全控制,我们仅需要引入 spring-boot-starter-security 模块,进行少量的配置,即可实现强大的安全管理!
记住几个类:
-
WebSecurityConfigurerAdapter:自定义Security策略 适配器模式
-
AuthenticationManagerBuilder:自定义认证策略 建造者模式
-
@EnableWebSecurity:开启WebSecurity模式
Spring Security的两个主要目标是 “认证” 和 “授权”(访问控制)。
环境搭建
“认证”(Authentication)
身份验证是关于验证您的凭据,如用户名/用户ID和密码,以验证您的身份。
身份验证通常通过用户名和密码完成,有时与身份验证因素结合使用。
“授权” (Authorization)
授权发生在系统成功验证您的身份后,最终会授予您访问资源(如信息,文件,数据库,资金,位置,几乎任何内容)的完全权限。
这个概念是通用的,而不是只在Spring Security 中存在。
9 shiro
搬运的shiro笔记
依赖 新建web项目,导入以依赖
        <dependency>
            <groupId>org.thymeleaf</groupId>
            <artifactId>thymeleaf-spring5</artifactId>
        </dependency>
        <dependency>
            <groupId>org.thymeleaf.extras</groupId>
            <artifactId>thymeleaf-extras-java8time</artifactId>
        </dependency>

        <dependency>
            <groupId>org.apache.shiro</groupId>
            <artifactId>shiro-core</artifactId>
            <version>1.4.1</version>
        </dependency>

        <!-- configure logging -->
        <dependency>
            <groupId>org.slf4j</groupId>
            <artifactId>jcl-over-slf4j</artifactId>
            <version>1.7.29</version>
        </dependency>
        <dependency>
            <groupId>org.slf4j</groupId>
            <artifactId>slf4j-log4j12</artifactId>
            <version>1.7.29</version>
        </dependency>
        <dependency>
            <groupId>log4j</groupId>
            <artifactId>log4j</artifactId>
            <version>1.2.17</version>
        </dependency>

        <dependency>
            <groupId>org.apache.shiro</groupId>
            <artifactId>shiro-spring-boot-web-starter</artifactId>
            <version>1.6.0</version>
        </dependency>
整合mybatis
mysql依赖 druid数据源
		<dependency>
            <groupId>org.mybatis.spring.boot</groupId>
            <artifactId>mybatis-spring-boot-starter</artifactId>
            <version>2.1.1</version>
        </dependency>
        <dependency>
            <groupId>mysql</groupId>
            <artifactId>mysql-connector-java</artifactId>
        </dependency>
        <dependency>
            <groupId>log4j</groupId>
            <artifactId>log4j</artifactId>
            <version>1.2.17</version>
        </dependency>
        <dependency>
            <groupId>com.alibaba</groupId>
            <artifactId>druid</artifactId>
            <version>1.1.12</version>
        </dependency>
log4j.properties
log4j.rootLogger=INFO, stdout

log4j.appender.stdout=org.apache.log4j.ConsoleAppender
log4j.appender.stdout.layout=org.apache.log4j.PatternLayout
log4j.appender.stdout.layout.ConversionPattern=%d %p [%c] - %m %n

# General Apache libraries
log4j.logger.org.apache=WARN

# Spring
log4j.logger.org.springframework=WARN

# Default Shiro logging
log4j.logger.org.apache.shiro=INFO

# Disable verbose logging
log4j.logger.org.apache.shiro.util.ThreadContext=WARN
log4j.logger.org.apache.shiro.cache.ehcache.EhCache=WARN
shrio.ini
[users]
root = secret, admin
guest = guest, guest
presidentskroob = 12345, president
darkhelmet = ludicrousspeed, darklord, schwartz
lonestarr = vespa, goodguy, schwartz
[roles]
admin = *
schwartz = lightsaber:*
goodguy = winnebago:drive:eagle5
druid : application.yaml
spring:
  datasource:
    username: root
    password: root
    #serverTimezone=UTC
    url: jdbc:mysql://localhost:3306/mybatis?useUnicode=true&characterEncoding=utf-8
    driver-class-name: com.mysql.cj.jdbc.Driver
    type: com.alibaba.druid.pool.DruidDataSource


    #Spring Boot 默认是不注入这些属性值的,需要自己绑定
    #druid 数据源专有配置
    initialSize: 5
    minIdle: 5
    maxActive: 20
    maxWait: 60000
    timeBetweenEvictionRunsMillis: 60000
    minEvictableIdleTimeMillis: 300000
    validationQuery: SELECT 1 FROM DUAL
    testWhileIdle: true
    testOnBorrow: false
    testOnReturn: false
    poolPreparedStatements: true

    #配置监控统计拦截的filters,stat:监控统计、log4j:日志记录、wall:防御sql注入
    #如果允许时报错  java.lang.ClassNotFoundException: org.apache.log4j.Priority
    #则导入 log4j 依赖即可,Maven 地址:https://mvnrepository.com/artifact/log4j/log4j
    filters: stat,wall,log4j
    maxPoolPreparedStatementPerConnectionSize: 20
    useGlobalDataSourceStat: true
    connectionProperties: druid.stat.mergeSql=true;druid.stat.slowSqlMillis=500
application.properties 配置mybatis
mybatis.type-aliass-package=com.hardy.pojo
mybatis.mapper-locations=classpath:mapper/*.xml
10 集成Swagger
11 异步、定时和邮件任务
定时:
- 两个接口
- TaskExecutor接口 Executor:执行 task:工作
- TaskScheduler接口 Scheduler: 安排。。。的时间
- 两个注解:
- @EnableScheduling 开启定时功能注解
- @Scheduled
corn表达式
邮件:
自定义邮件发送工具类
    public void sendMail(Boolean html,String subject,String text) throws MessagingException {

        //邮件设置2:一个复杂的邮件
        MimeMessage mimeMessage = mailSender.createMimeMessage();
        MimeMessageHelper helper = new MimeMessageHelper(mimeMessage, html);

        //正文
        helper.setSubject(subject);
        helper.setText(text,true);

        //发送附件
        helper.addAttachment("1.jpg",new File(""));
        helper.addAttachment("2.jpg",new File(""));

        helper.setTo("24736743@qq.com");
        helper.setFrom("24736743@qq.com");

        mailSender.send(mimeMessage);
    }
12 dubbo、zookeeper
参考笔记
【重要】dubbo原理

**服务提供者(Provider):**暴露服务的服务提供方,服务提供者在启动时,向注册中心注册自己提供的服务。
**服务消费者(Consumer):**调用远程服务的服务消费方,服务消费者在启动时,向注册中心订阅自己所需的服务,服务消费者,从提供者地址列表中,基于软负载均衡算法,选一台提供者进行调用,如果调用失败,再选另一台调用。
**注册中心(Registry):**注册中心返回服务提供者地址列表给消费者,如果有变更,注册中心将基于长连接推送变更数据给消费者
**监控中心(Monitor):**服务消费者和提供者,在内存中累计调用次数和调用时间,定时每分钟发送一次统计数据到监控中心
【调用关系说明】
-
服务容器负责启动,加载,运行服务提供者。
-
服务提供者在启动时,向注册中心注册自己提供的服务。
-
服务消费者在启动时,向注册中心订阅自己所需的服务。
-
注册中心返回服务提供者地址列表给消费者,如果有变更,注册中心将基于长连接推送变更数据给消费者。
-
服务消费者,从提供者地址列表中,基于软负载均衡算法,选一台提供者进行调用,如果调用失败,再选另一台调用。
-
服务消费者和提供者,在内存中累计调用次数和调用时间,定时每分钟发送一次统计数据到监控中心。
12.1zookeeper 安装
在bin目录下zkServer.cmd 打开出现闪退 pause 可以不退出
