前言
之前做了一个简单的springboot项目,在实现基本增删改查的基础上,进行了一些改进优化。
项目基本信息:
- 架构:前后端半分离,即前后端代码放在一个项目
- 后端:Springboot 2.5.3+Mybatis 3.4.6
- 数据库:Mysql 5.7
- 前端:Layui 2.5.7+Jquery 3.5.1
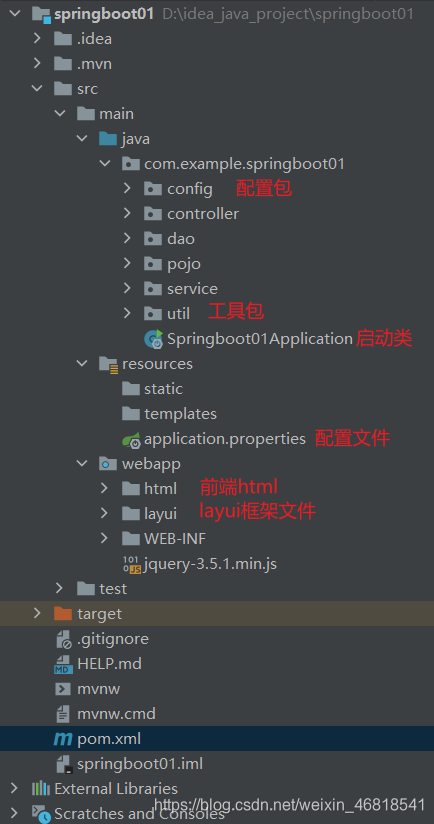
项目结构:

一 Lombok简化代码
参考https://gitee.com/SnailClimb/springboot-guide/blob/master/docs/basis/sringboot-restful-web-service.md
问题:pojo包中每个实体类需要写很多构造方法、getter、setter、toString,实体类属性太多导致代码篇幅很长
解决:使用Lombok插件
- 下载 IDEA 中支持 lombok 的插件
- pom.xml加入依赖
- 在实体类前面加入@Data注解
<dependency>
	<groupId>org.projectlombok</groupId>
	<artifactId>lombok</artifactId>
	<version>1.18.10</version>
</dependency>
package com.example.springboot01.pojo;

import lombok.Data;

/*
客户
 */
@Data
public class Customer {
    //客户id
    private int id;
    //客户名称
    private String name;
    //客户纳税人识别号
    private String taxpayerNumber;
    //客户地址电话
    private String addressAndPhone;
    //客户银行账号
    private String bankAccount;
    //客户邮箱
    private String email;
}
二 读取配置文件数据
参考https://gitee.com/SnailClimb/springboot-guide/blob/master/docs/basis/read-config-properties.md以及https://blog.csdn.net/lizz861109/article/details/110877155?ops_request_misc=%257B%2522request%255Fid%2522%253A%2522162864756216780264095987%2522%252C%2522scm%2522%253A%252220140713.130102334…%2522%257D&request_id=162864756216780264095987&biz_id=0&utm_medium=distribute.pc_search_result.none-task-blog-2allsobaiduend~default-1-110877155.pc_search_download_positive&utm_term=springboot+configuration+annotation+processor&spm=1018.2226.3001.4187
- pom.xml加入spring-boot-configuration-processor依赖
- 新建配置文件类,封装service层需要用的数据,通过@ConfigurationProperties读取相关数据,并注册bean
- 在service层用@Autowired注入配置文件类对象,通过getxxx方法即可使用数据
<dependency>
	<groupId>org.springframework.boot</groupId>
    <artifactId>spring-boot-configuration-processor</artifactId>
    <optional>true</optional>
</dependency>
package com.example.springboot01.util;

import lombok.Getter;
import lombok.Setter;
import lombok.ToString;
import org.springframework.boot.context.properties.ConfigurationProperties;
import org.springframework.stereotype.Component;

/*
配置文件类,用于读取配置信息
 */
@Component
@ConfigurationProperties(prefix = "my")//配置文件中相应数据的前缀
//使用@ConfigurationProperties需要配置springboot的自动配置注解处理器
@Setter
@Getter
@ToString
public class MyConfigProperties {
    private String appKey;
    private String appSecret;
    private String spjqbm;
    private String fjh;
    private int interval;
}
三 controller方法进行参数校验
参考https://gitee.com/SnailClimb/springboot-guide/blob/master/docs/spring-bean-validation.md
问题:为了保证安全,一般需要对controller方法的参数进行一系列校验,校验没问题才允许处理业务逻辑,但是我们要写一大堆if-else来校验吗?
解决:使用spring-boot-starter-validation校验
- pom.xml加入spring-boot-starter-validation依赖
- 在controller前面加入@Validated,告诉 Spring 去校验方法参数
- 在controller方法需要校验的参数前面加入需要的注解,比如@NotBlank就是字符串非null、非空
<dependency>
	<groupId>org.springframework.boot</groupId>
    <artifactId>spring-boot-starter-validation</artifactId>
</dependency>
package com.example.springboot01.controller;

import com.example.springboot01.pojo.Customer;
import com.example.springboot01.service.CustomerService;
import com.example.springboot01.util.JsonUtil;
import io.swagger.annotations.Api;
import io.swagger.annotations.ApiOperation;
import org.springframework.beans.factory.annotation.Autowired;
import org.springframework.http.HttpStatus;
import org.springframework.http.ResponseEntity;
import org.springframework.validation.annotation.Validated;
import org.springframework.web.bind.annotation.PostMapping;
import org.springframework.web.bind.annotation.RequestMapping;
import org.springframework.web.bind.annotation.RestController;

import javax.validation.constraints.Email;
import javax.validation.constraints.Min;
import javax.validation.constraints.NotBlank;
import java.util.List;

@RestController
@RequestMapping("/customer")
@Api(tags = "客户控制器")
//告诉 Spring 去校验方法参数
@Validated
public class CustomerController {
    @Autowired
    private CustomerService customerService;

    @Autowired
    private JsonUtil jsonUtil;

    @PostMapping("/add")
    @ApiOperation(value = "添加客户",httpMethod = "POST")
    public ResponseEntity<String> addCustomer(@NotBlank(message = "客户名称不能为空") String name, @NotBlank(message = "客户纳税人识别号不能为空") String taxpayerNumber,
                                              String addressAndPhone, String bankAccount, @Email(message = "邮箱格式非法") String email) {
        int res = customerService.addCustomer(name, taxpayerNumber, addressAndPhone, bankAccount, email);
        if (res == 1) {
            return ResponseEntity.status(HttpStatus.OK).body(jsonUtil.getResult(0, "success"));
        }
        return ResponseEntity.status(HttpStatus.INTERNAL_SERVER_ERROR).body(jsonUtil.getResult(1, "fail"));
    }
}
当参数校验有问题,抛出异常之后异常在哪里处理呢?
新建一个全局异常处理类
package com.example.springboot01.util;

import com.example.springboot01.controller.BillController;
import com.example.springboot01.controller.CustomerController;
import com.example.springboot01.controller.GoodsController;
import com.example.springboot01.controller.InvoiceController;
import org.springframework.beans.factory.annotation.Autowired;
import org.springframework.http.HttpStatus;
import org.springframework.http.ResponseEntity;
import org.springframework.web.bind.annotation.ControllerAdvice;
import org.springframework.web.bind.annotation.ExceptionHandler;
import org.springframework.web.bind.annotation.ResponseBody;

import javax.validation.ConstraintViolationException;
/*
全局异常处理类
 */
//assignableTypes 指定特定的类,让异常处理类只处理特定类抛出的异常
@ControllerAdvice(assignableTypes = {BillController.class, CustomerController.class, GoodsController.class, InvoiceController.class})
@ResponseBody
public class GlobalExceptionHandler {
    @Autowired
    private JsonUtil jsonUtil;

    /*
    处理controller方法的参数异常
     */
    @ExceptionHandler(ConstraintViolationException.class)
    public ResponseEntity<String> handleConstraintViolationException(ConstraintViolationException e) {
        System.out.println("mes="+e.getMessage());
        return ResponseEntity.status(HttpStatus.BAD_REQUEST).body(jsonUtil.getResult(2,e.getMessage()));
    }
}
四 配置Rest API 文档
参考https://gitee.com/SnailClimb/springboot-guide/blob/master/docs/basis/swagger.md以及https://blog.csdn.net/weixin_43740223/article/details/108491386?ops_request_misc=%257B%2522request%255Fid%2522%253A%2522162873567416780262513569%2522%252C%2522scm%2522%253A%252220140713.130102334…%2522%257D&request_id=162873567416780262513569&biz_id=0&utm_medium=distribute.pc_search_result.none-task-blog-2allsobaiduend~default-1-108491386.pc_search_similar&utm_term=springboot+swagger3&spm=1018.2226.3001.4187
问题:假设后端开发了,需要与前端对接接口名、参数、返回值,怎么高效对接?写一份word文档然后发微信、邮箱?
解决:Swagger 3.0,顺便说说可以通过它的UI 界面直接对相应的 API 进行调试,不过个人感觉还是Postman好用
- pom.xml加入springfox-boot-starter依赖
- 在启动类前面加入@EnableOpenApi,让springboot集成swagger 3.0
- 访问:http://ip:端口/项目名/swagger-ui/index.html,注意这里有项目名是因为在application.properties配置了访问根路径server.servlet.context-path
- 可选,自定义首页属性 Docket配置
- 可选,在controller前面加入@Api,在controller方法前面加入@ApiOperation等等,主要用于解释接口含义、方法作用、参数含义
<dependency>
	<groupId>io.springfox</groupId>
    <artifactId>springfox-boot-starter</artifactId>
    <version>3.0.0</version>
</dependency>
package com.example.springboot01;

import org.springframework.boot.SpringApplication;
import org.springframework.boot.autoconfigure.SpringBootApplication;
import springfox.documentation.oas.annotations.EnableOpenApi;

@SpringBootApplication
@EnableOpenApi
//springboot集成swagger3配置
public class Springboot01Application {

    public static void main(String[] args) {
        SpringApplication.run(Springboot01Application.class, args);
    }

}
package com.example.springboot01.config;

import org.springframework.context.annotation.Bean;
import org.springframework.context.annotation.Configuration;
import springfox.documentation.builders.ApiInfoBuilder;
import springfox.documentation.service.Contact;
import springfox.documentation.spi.DocumentationType;
import springfox.documentation.spring.web.plugins.Docket;

@Configuration
public class SwaggerConfig {
    @Bean
    public Docket docket() {
        return new Docket(DocumentationType.OAS_30).apiInfo(
                new ApiInfoBuilder()
                        .title("xxx系统接口文档")
                        .version("1.0")
                        .contact(new Contact("hhf", "", "hhf@xxx.com"))
                        .build()
        );
    }
}