nexus私服搭建
1、下载nexus
下载链接https://sonatype-download.global.ssl.fastly.net/repository/repositoryManager/3/nexus-3.18.1-01-unix.tar.gz 但是特别慢,原因相信都知道的。
2、配置环境
我采用的nexus-3.18.0-01版本,其他3.x版本也差不多的。上传linux目录(例如:/opt/maven),解压,配置环境变量。
#进入目录
$ cd /opt/maven
#解压
$ tar -zxvf nexus-3.13.0-01-unix.tar.gz
#解压后会生成两个文件目录:nexus-3.13.0-01 和 sonatype-work
#进入bin目录
$ cd nexus-3.13.0-01/bin
#如果需要配置启动参数可以修改nexus.vmoptions文件内容,里面包含启动内存参数、日志等的配置
-Xms512M
-Xmx1024M
-XX:MaxDirectMemorySize=2G
-XX:+UnlockDiagnosticVMOptions
-XX:+UnsyncloadClass
-XX:+LogVMOutput
-XX:LogFile=../sonatype-work/nexus3/log/jvm.log
-XX:-OmitStackTraceInFastThrow
-Djava.net.preferIPv4Stack=true
-Dkaraf.home=.
-Dkaraf.base=.
-Dkaraf.etc=etc/karaf
-Djava.util.logging.config.file=etc/karaf/java.util.logging.properties
-Dkaraf.data=../sonatype-work/nexus3
-Djava.io.tmpdir=../sonatype-work/nexus3/tmp
-Dkaraf.startLocalConsole=false
#根据自己需要修改,一般默认就可以。
3、开放阿里云安全组和服务器防火墙端口
$ firewall-cmd --zone=public --add-port=8081/tcp --permanent
#重新加载
$ firewall-cmd --reload
4、启动
在bin目录下有nexus启动脚本,直接启动就可以。
$ ./nexus start
#或者
$ ./nexus run &
使用 nexus run 也会启动 nexus,区别在于:start以守护线程方式启动,run以非守护线程方式启动, & 代表是以后台进程运行。所以在这里 start=run+& 。
启动时可能比较慢,需要多等一会,如果想看启动日志情况可以进入sonatype-work目录
#进入sonatype-work目录的nexus3日志目录
$ cd sonatype-work/nexus3/log
#查看实时日志
$ tail -f nexus.log
5、管理后台
在浏览器中输入:
http://ip:8081
ip为你的linux服务器ip,8081为nexus的默认端口,这里需要注意:在nexus2的版本访问地址是http://ip:8081/nexus,在nexus3版本直接ip+端口就可以访问了。
① 、登录
初始密码是存储在admin.password 具体路径是:&{home}/sonatype-work/nexus3/admin.password 。使用vim查看
vim &{home}/sonatype-work/nexus3/admin.password
登录成功后,系统提示马上设置新的密码,admin.password文件就会失效了。
默认账户为admin
②、配置阿里云的代理仓库

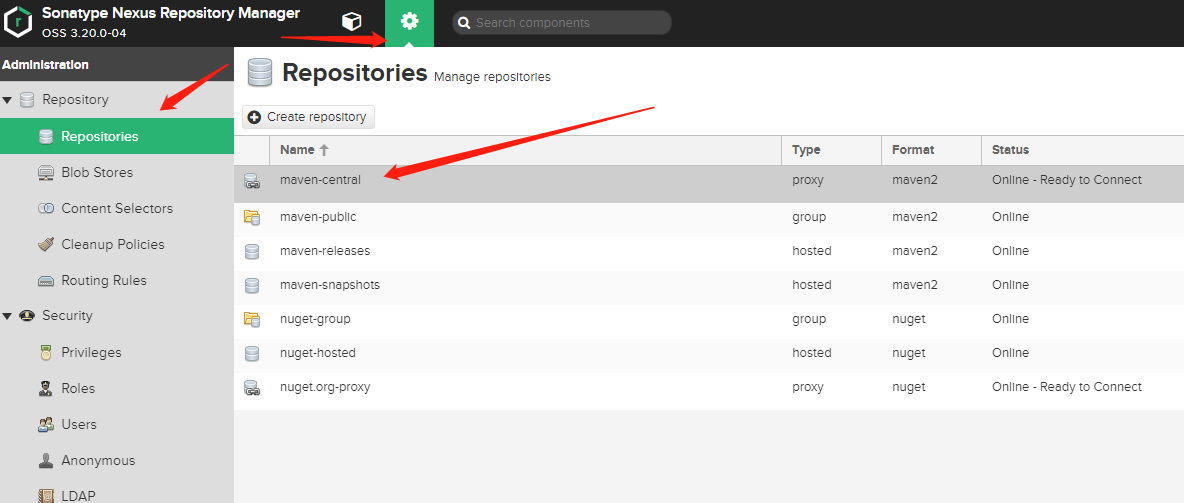
1、点击配置按钮
2、点击Repositories
3、选择 maven-central 中央仓库,这里配置远程代理仓库地址。

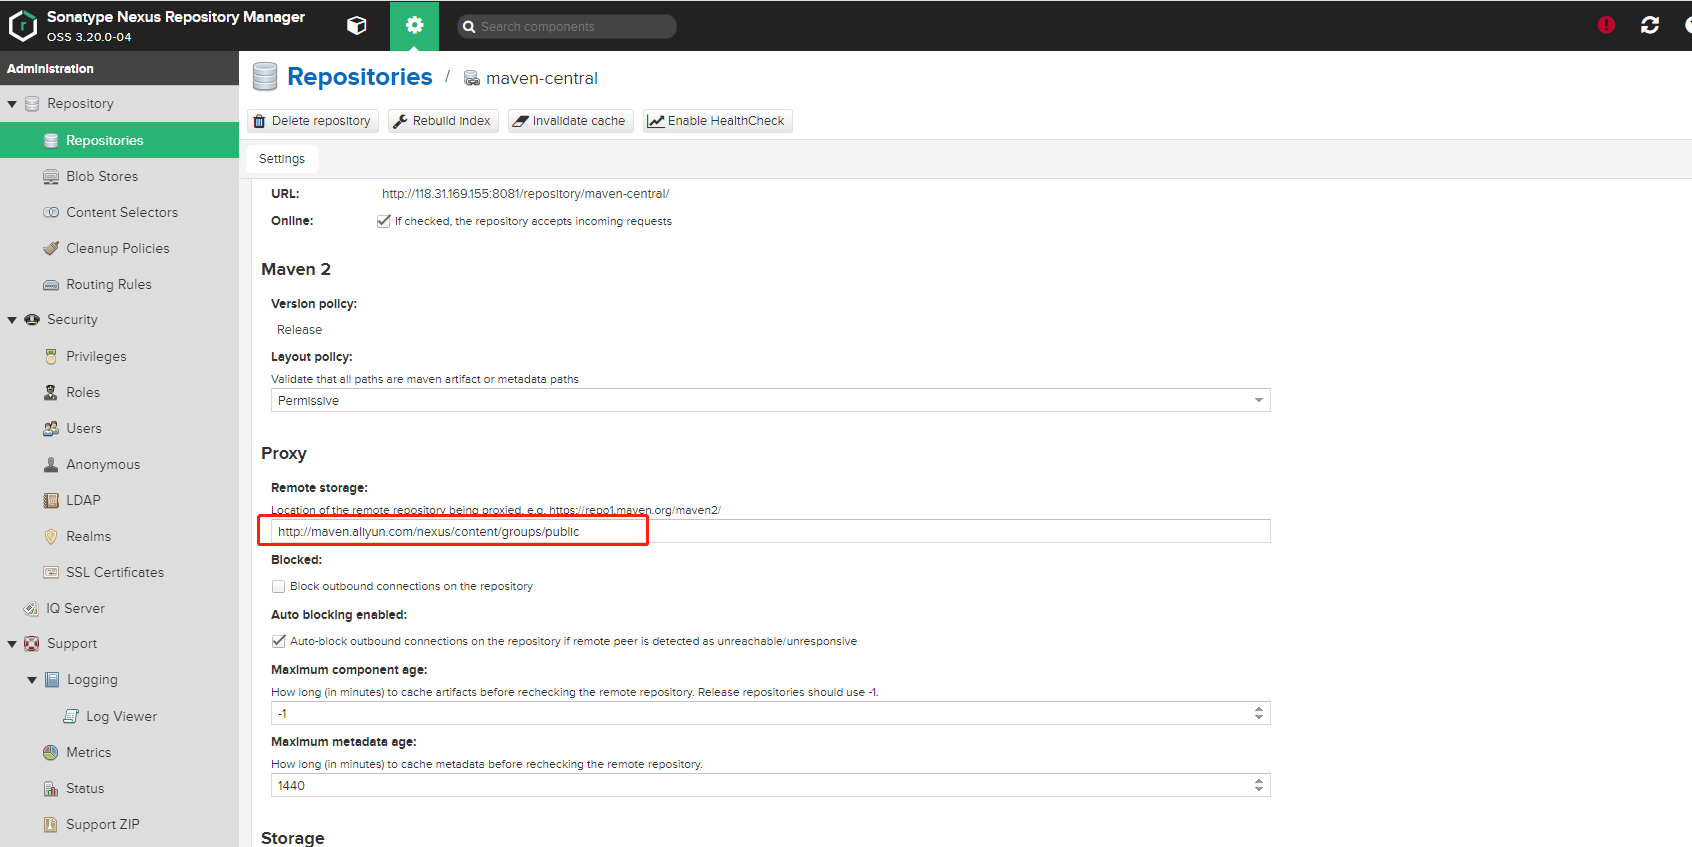
进入maven-central后,往下滑,当划到proxy部分后,停下,在 Remote storage 中输入阿里云的代理仓库地址:
http://maven.aliyun.com/nexus/content/groups/public
④、查看私服地址


复制下这个地址,然后添加maven的配置中,在setting.xml的标签内添加下方内容
 <!-- maven私服-->
    <mirror>
      <id>nexus</id>
      <mirrorOf>*</mirrorOf>
      <name>nexus maven</name>
      <url>http://IP:8081/repository/maven-central/</url>
    </mirror>