怕什么真理无穷
进一步有近一步的欢喜

说明
本文是Spring Boot核心编程思想记录的笔记,书籍地址:Spring Boot编程思想(核心篇):
这篇文档会记录这本我的一些读书的思考,内容可能比较多,我也会根据理解去扩展一些自己的东西,加强自己对技术理解以及应用。
在开头在叨叨一下,技术书籍的评论或评分有时候也就是简单参考下,因为不同的人对书籍内容的理解是不同的。莎士比亚也说过:"一千个观众眼中有一千个哈姆雷特"。我是觉得一本书如果你能从中有些许的收获和思考,那都是有价值的,有时候可以忽略网上的评论或者评价。
PS:本文有大部分内容摘抄自书籍内容,如果内容前后不是很通顺,请阅读书籍原文,谢谢。
第一部分读书笔记:Spring Boot 核心编程思想-第一部分-读书笔记
二、走向自动装配
Spring Boot的自动装配,很大程度上是基于Spring Framework 的努力,Spring Framework的注解驱动开发使得Spring Boot 能够兼容并包,继往开来。
第7 章 走向注解驱动编程(Annotation-Driver)
技术发展是不断演进的,什么都不是一蹴而就的。所以回顾技术的发展路线和轨迹也是和有必要的。就如 :以史为镜,可以知兴替。
Spring的两个核心特性:IOC ?DI。看技术大神对Spring IOC是怎么理解的
推崇:应用不应该以Java代码的方式直接控制依赖关系,而是通过容器去管理。(容器的原理就是Map,依赖关系在配置文件,如xml中管理),早期Spring 因为Java5没发布,不支持Annotation,Bean之间的依赖关系还是通过XML管理。
随着技术的不段发展,xml方式显得繁琐和笨重,则慢慢发展为注解驱动的方式。
注解驱动的发展历史和注解的使用场景
主要的发展轨迹:
SF:Spring Framework
SF1.x ?: 启蒙 时期,随着Java5的发布,支持Annotation特性,Spring也不甘落后,框架层面支持了一些注解:如@Transaction 等
SF2.x :过渡阶段,出现了相对较多的注解,依赖注入(@AutoWired),依赖查询(@Qualifer)、组件申明(@Component),Spring MVC 的注解@Controller等;在此之还支持了可拓展的xml编写(Dubbo xml配置);支持了JSR-250(@Resource 、@PostConstruct、@PerDestroy)
此时注解的激活和扫描还是需要使用xml配置
SF3.x :黄金时代,出现 @Configuration 对应 @Bean 相关注解 @ComponentScan ,这些基本上以及可以取代xml配置 了,也引入了 AnnotationConfigApplicationContext(**@since **3.0),以及 @Import ?@ImportResource。还有其他的如:抽象全新属性API Environment 、 PropertySource ;缓存 @Cache ?;异步 @Ansys 等
SF4.x :完善阶段,如@Conditional ,@EventListener ,@ RestController 等
SF5.x :当下阶段, @Indexed,提升加载速度,也有需要的注意点,可以看:SpringFramework5.0 @Indexed注解 简单解析
核心注解的使用场景:
Spring 模式注解:

装配注解:

依赖注入:

Bean定义注解:


属性配置注解:

生命周期回调:
PostConstruct
PreDestroy
注解属性的注解:

注解编程模式和原理分析
元注解:注解注解的注解。也就是指一个能声明在其他注解上的注解。
组合注解:多个注解 注解的注解。也就是一个注解上声明了一个或者多个注解。
Spring 模式注解 :说白了就是 @Component “派生性”注解。
@Component “派生性”:被@Component注解后,能够被Spring 加入到容器中。
主要注意的是不同版本的层次性:
Spring2.x :单层次
Spring3.x :两层次
Spring4.x :多层次
@Component “派生性" 原理
1、 @Component 需要通过扫描的方式将其加入Spring容器。Spring的方式,xml的时候配置;注解使用 @ComponentScan 。
2、那么 xml方式或者注解的方式,Component-Scan 是如何被Spring处理的呢?
在Spring 中有两个类:分别是 用来处理 xml 和注解。

以xml方式进行分析(注解同理)。
ComponentScanBeanDefinitionParser 的分析过程
(1)、首先是通过ContextNamespaceHandler ?注册。
@Override
public?void?init()?{
????//?...
????registerBeanDefinitionParser("component-scan",?new?ComponentScanBeanDefinitionParser());
????//?...
}
(2)、ComponentScanBeanDefinitionParser implements BeanDefinitionParser ,则在运行的时候会执行 org.springframework.beans.factory.xml.BeanDefinitionParser#parse ?接口方法
(3)、通过源码可以看到 ComponentScanBeanDefinitionParser ?中定义了属性常量。如
private?static?final?String?BASE_PACKAGE_ATTRIBUTE?=?"base-package";
我们 核心还是看 ?parse_(Element element, ParserContext parserContext) ?方法。_
@Override
@Nullable
public?BeanDefinition?parse(Element?element,?ParserContext?parserContext)?{
????//?获取?base-package?的值
????String?basePackage?=?element.getAttribute(BASE_PACKAGE_ATTRIBUTE);
????//?解决占位符的问题
????basePackage?=?parserContext.getReaderContext().getEnvironment().resolvePlaceholders(basePackage);
????String[]?basePackages?=?StringUtils.tokenizeToStringArray(basePackage,
??????????????????????????????????????????????????????????????ConfigurableApplicationContext.CONFIG_LOCATION_DELIMITERS);

????//?Actually?scan?for?bean?definitions?and?register?them.
????//?这里开始才真正的扫描?Bean?,首先创建扫描器,然后执行扫描
????ClassPathBeanDefinitionScanner?scanner?=?configureScanner(parserContext,?element);
????Set<BeanDefinitionHolder>?beanDefinitions?=?scanner.doScan(basePackages);
????//?注册组件
????registerComponents(parserContext.getReaderContext(),?beanDefinitions,?element);

????return?null;
}
(4)在看 scanner.doScan(basePackages) 执行扫描,核心是 findCandidateComponents ,查找候选组件。
protected?Set<BeanDefinitionHolder>?doScan(String...?basePackages)?{
????????Assert.notEmpty(basePackages,?"At?least?one?base?package?must?be?specified");
????????Set<BeanDefinitionHolder>?beanDefinitions?=?new?LinkedHashSet<>();
????????for?(String?basePackage?:?basePackages)?{
????????????Set<BeanDefinition>?candidates?=?findCandidateComponents(basePackage);
????????????//?....
????????}
????????return?beanDefinitions;
????}
5、、org.springframework.context.annotation.ClassPathScanningCandidateComponentProvider#scanCandidateComponents 方法
String?packageSearchPath?=?ResourcePatternResolver.CLASSPATH_ALL_URL_PREFIX?+
????????????????????resolveBasePackage(basePackage)?+?'/'?+?this.resourcePattern;
????????????Resource[]?resources?=?getResourcePatternResolver().getResources(packageSearchPath);
将 backagePage 转换为 ClassLoader 类资源 搜索路径。得到类的资源集合。
MetadataReader?metadataReader?=?getMetadataReaderFactory().getMetadataReader(resource);
获取该资源的 MetadataReader对象(包含了类和注解的元信息)
**
?*?Simple?facade?for?accessing?class?metadata,
?*?as?read?by?an?ASM?{@link?org.springframework.asm.ClassReader}.
?*
?*?@author?Juergen?Hoeller
?*?@since?2.5
?*/
public?interface?MetadataReader?{

????/**
?????*?Return?the?resource?reference?for?the?class?file.
?????????org.springframework.core.io.Resource
?????*/
????Resource?getResource();

????/**
?????*?Read?basic?class?metadata?for?the?underlying?class.
?????*/
????ClassMetadata?getClassMetadata();

????/**
?????*?Read?full?annotation?metadata?for?the?underlying?class,
?????*?including?metadata?for?annotated?methods.
?????*/
????AnnotationMetadata?getAnnotationMetadata();

}
(6)根据 MetadataReader 进行判断 isCandidateComponent_(MetadataReader metadataReader)_
protected?boolean?isCandidateComponent(MetadataReader?metadataReader)?throws?IOException?{
????for?(TypeFilter?tf?:?this.excludeFilters)?{
????????if?(tf.match(metadataReader,?getMetadataReaderFactory()))?{
????????????return?false;
????????}
????}
????for?(TypeFilter?tf?:?this.includeFilters)?{
????????if?(tf.match(metadataReQader,?getMetadataReaderFactory()))?{
????????????return?isConditionMatch(metadataReader);
????????}
????}
????return?false;
}
注:match 是含义
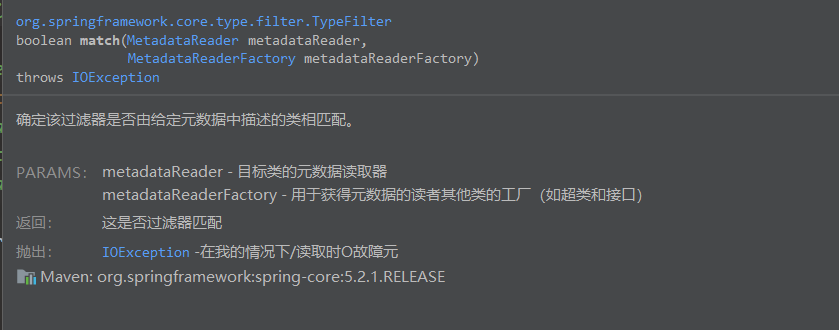
注:includeFilters 在 createScanner创建 ClassPathBeanDefinitionScanner对象的时候,构建函数中有一个 registerDefaultFilters 方法。
//?注册为默认过滤器@Component 。
这将隐式寄存器,有所有注释@Component元注解包括@Repository?,?@Service和@Controller典型化注解。
还支持Java?EE?6的javax.annotation.ManagedBean和JSR-330的javax.inject.Named注释,如果有的话.

protected?void?registerDefaultFilters()?{
????????this.includeFilters.add(new?AnnotationTypeFilter(Component.class));
}
(7)match返回true ,则封装为 ScannedGenericBeanDefinition 对象,并加入到 candidates ?中。
Set<BeanDefinition>?candidates?=?new?LinkedHashSet<>();
tips:??
ClassPathBeanDefinitionScanner 运行自定义类型过滤规则,通过 ?scanner.addIncludeFilter_(typeFilter)_
Spring 5.x 之后,多层次 派生 的原理和 Sping 4.x 实现不同了。
org.springframework.core.type.classreading.AnnotationAttributesReadingVisitor#visitEndorg.springframework.core.type.classreading.SimpleAnnotationMetadataReadingVisitor#visitEnd
总结:通过扫描 @Component 以及其派生注解,然后加入 候选组件集合中,在Sping 启动的时候将后续组件 加入Spring 容器。其中 加入到候选组件集合中的时候,不同的Spring 版本可能存在实现上的差异。
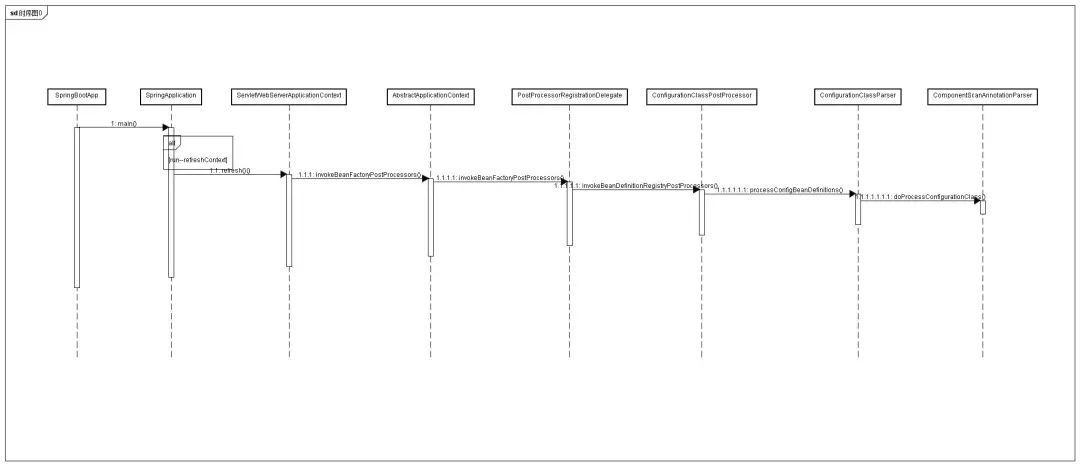
附:org.springframework.context.annotation.ComponentScanAnnotationParser#parse ?Spring Boot启动执行时序图
然后 scanner.doScan扫描,获取候选的注解。
Spring 注解属性覆盖和别名
较低层次注解属性覆盖较高层次。
属性之间相互 @AliasFor ,他们的默认值就必须相等。多层次注解属性之间的 @AliasFor 关系 只能由 较低层次向较高层次建立。
Spring Framework 为Spring 元注解和@AliasFor 提供了属性覆盖和别名的特性,最终 由 AnnotationAttributes 对象来表达语义。
第8章 Spring 注解驱动设计模式
Spring @Enable 模块驱动
@Import ?: 提供的功能和 Spring XML中 标签元素一样。它能允许 引入[ ]() @Configuration classes, [ ]() ImportSelector 和 [ ]() ImportBeanDefinitionRegistrar的 实现类或者普通的 组件类。
@Target(ElementType.TYPE)
@Retention(RetentionPolicy.RUNTIME)
@Documented
public?@interface?Import?{

????/**
?????*?{@link?Configuration?@Configuration},?{@link?ImportSelector},
?????*?{@link?ImportBeanDefinitionRegistrar},?or?regular?component?classes?to?import.
?????*/
????Class<?>[]?value();

}
理解@Enable 模块驱动(SF3.1 发行)
模块:具备相同领域的功能组件集合,形成一个独立的单元。
Enable : 激活、启动
在Spring 中,如 Web MVC 模块、 AspectJ模块、Cachinig模块、Async模块等
使用了@Enablexx ,就能激活xxx领域相应的组件。
@Enable 在 SF 、 SB 、SC 中 一以贯之,命令模块化 的注解 均以 @Enable 作为前缀。

优点: 简化装配步骤,实现“ 按需装配”,屏蔽组件集合装配的细节。
缺点:该模块必须手动触发,即需要标注在某个配置Bean中;实现该模块成本相对较高,尤其是 理解其中的原理和加载机制及单元测试方面。
自定义@Enable模块驱动(三种方式)
自定义分为(本质)两种:
注解驱动 :使用@Import 导入 @Configuration 标注的 类(直接导入配置类)
接口编程 :使用@Import 导入 ImportSelector(依据条件选择配置类) 或 [ ]() ImportBeanDefinitionRegistrar(动态注册Bean) 实现类
两种方式的演练代码:
注解驱动 :
1、写配置类
@Configuration
public?class?HelloWorldConfiguration?{

????@Bean
????public?List?helloWorld(){
????????return?new?LinkedList();
????}
}
2、Enable的注解, 使用 @Import(HelloWorldConfiguration.class)
@Documented
@Retention(value?=?RetentionPolicy.RUNTIME)
@Import(HelloWorldConfiguration.class)
public?@interface?EnableHelloWorld?{

????String?value()?default?"";
}
3、在组件bean上使用 @ EnableHelloWorld 注解
@Configuration
@EnableHelloWorld
public?class?EnableXxxBootStrap?{

????public?static?void?main(String[]?args)?{

????????AnnotationConfigApplicationContext?applicationContext?=
????????????????new?AnnotationConfigApplicationContext(EnableXxxBootStrap.class);

????????String[]?beanDefinitionNames?=?applicationContext.getBeanDefinitionNames();

????????Arrays.stream(beanDefinitionNames).forEach(System.out::println);
????}

}
//?打印的?beab?中有?helloWorld?
接口编程:实现接口,具体就不演示了。如果不会写,看一下 Spring框架 内部实现的类,可参考。
@Enable模块驱动原理
核心还是理解 @Import 注解,因为不管是Spring内建的Enable还是 自定义的Enable,均使用@Import实现。
@Import 的职责 在于装载导入类 ,将其定义为 Spring Bean。
这里肯定还是需要理解 Spring中的 BeanPostProcesser
@Import 注解是如何解析的,这个解析就包括了相关的原理。
第一步:注册 ConfigurationClassPostProcessor
三种情况注册
_
--> _org.springframework.context.annotation.AnnotationConfigBeanDefinitionParser
@Override
????@Nullable
????public?BeanDefinition?parse(Element?element,?ParserContext?parserContext)?{
????????Object?source?=?parserContext.extractSource(element);

????????//?Obtain?bean?definitions?for?all?relevant?BeanPostProcessors.
????????Set<BeanDefinitionHolder>?processorDefinitions?=
????????????????AnnotationConfigUtils.registerAnnotationConfigProcessors(parserContext.getRegistry(),?source);

????????//?....
????????return?null;
????}
_
--> _org.springframework.context.annotation.ComponentScanBeanDefinitionParser#registerComponents
protected?void?registerComponents(
????????????XmlReaderContext?readerContext,?Set<BeanDefinitionHolder>?beanDefinitions,?Element?element)?{

????????//?....
????????//?Register?annotation?config?processors,?if?necessary.
????????boolean?annotationConfig?=?true;
????????if?(element.hasAttribute(ANNOTATION_CONFIG_ATTRIBUTE))?{
????????????annotationConfig?=?Boolean.parseBoolean(element.getAttribute(ANNOTATION_CONFIG_ATTRIBUTE));
????????}
????????if?(annotationConfig)?{
????????????Set<BeanDefinitionHolder>?processorDefinitions?=
????????????????????AnnotationConfigUtils.registerAnnotationConfigProcessors(readerContext.getRegistry(),?source);
????????????for?(BeanDefinitionHolder?processorDefinition?:?processorDefinitions)?{
????????????????compositeDef.addNestedComponent(new?BeanComponentDefinition(processorDefinition));
????????????}
????????}

????????readerContext.fireComponentRegistered(compositeDef);
????}
org.springframework.context.annotation.AnnotationConfigUtils#registerAnnotationConfigProcessors(org.springframework.beans.factory.support.BeanDefinitionRegistry)
这个方法 找到ClassPathBeanDefinitionScanner相关的调用 :

AnnotatedBeanDefinitionReader ? 注册方法,在构建 AnnotationConfigApplicationContext 的时候。
so , ComponentScanAnnotationParser 解析 ComponentScan 这个就不需要在执行的时候在注册一次了
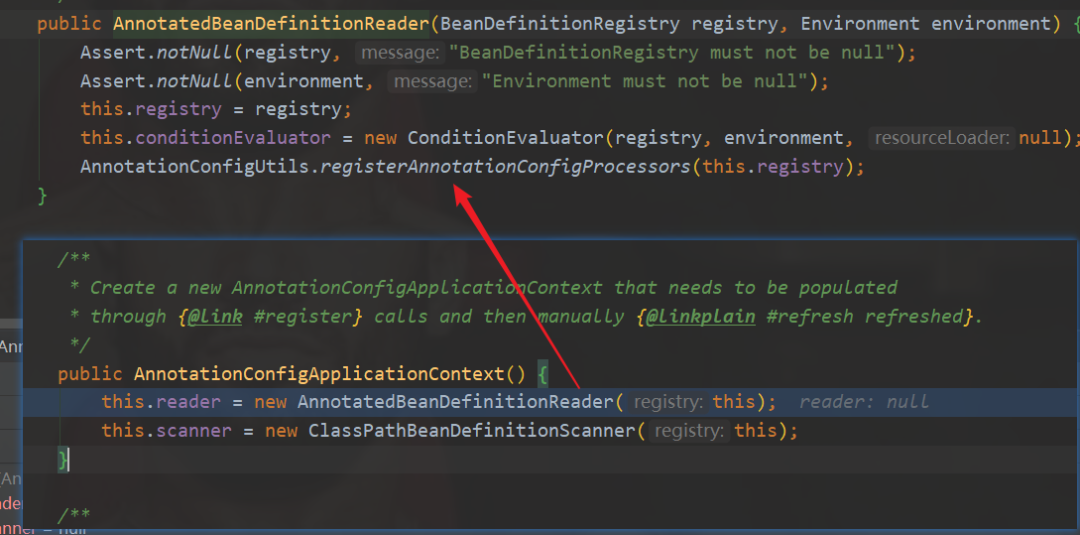
org.springframework.context.annotation.AnnotationConfigUtils#registerAnnotationConfigProcessor
public?static?Set<BeanDefinitionHolder>?registerAnnotationConfigProcessors(
????????????BeanDefinitionRegistry?registry,?@Nullable?Object?source)?{

????????DefaultListableBeanFactory?beanFactory?=?unwrapDefaultListableBeanFactory(registry);
????????//?省略?....
????????Set<BeanDefinitionHolder>?beanDefs?=?new?LinkedHashSet<>(8);

????????if?(!registry.containsBeanDefinition(CONFIGURATION_ANNOTATION_PROCESSOR_BEAN_NAME))?{
????????????RootBeanDefinition?def?=?new?RootBeanDefinition(ConfigurationClassPostProcessor.class);
????????????def.setSource(source);
????????????//?CONFIGURATION_ANNOTATION_PROCESSOR_BEAN_NAME?=?org.springframework.context.annotation.internalConfigurationAnnotationProcessor
????????????beanDefs.add(registerPostProcessor(registry,?def,?CONFIGURATION_ANNOTATION_PROCESSOR_BEAN_NAME));
????????}
????????//?省略?....??
????????return?beanDefs;
????}
在 beanFactory 注册一个 名称为 org.springframework.context.annotation.internalConfigurationAnnotationProcessor 的 ConfigurationClassPostProcessor,并且 这个Processor 在第一位,因为使用的是 LinkedHashSet 有序的(底层实现是LinkHashMap)。
总结:千方百计 要先将 ? ConfigurationClassPostProcessor ?进行注册。
第二步:回调 BeanPostProcessor#postProcessBeanFactory 方法
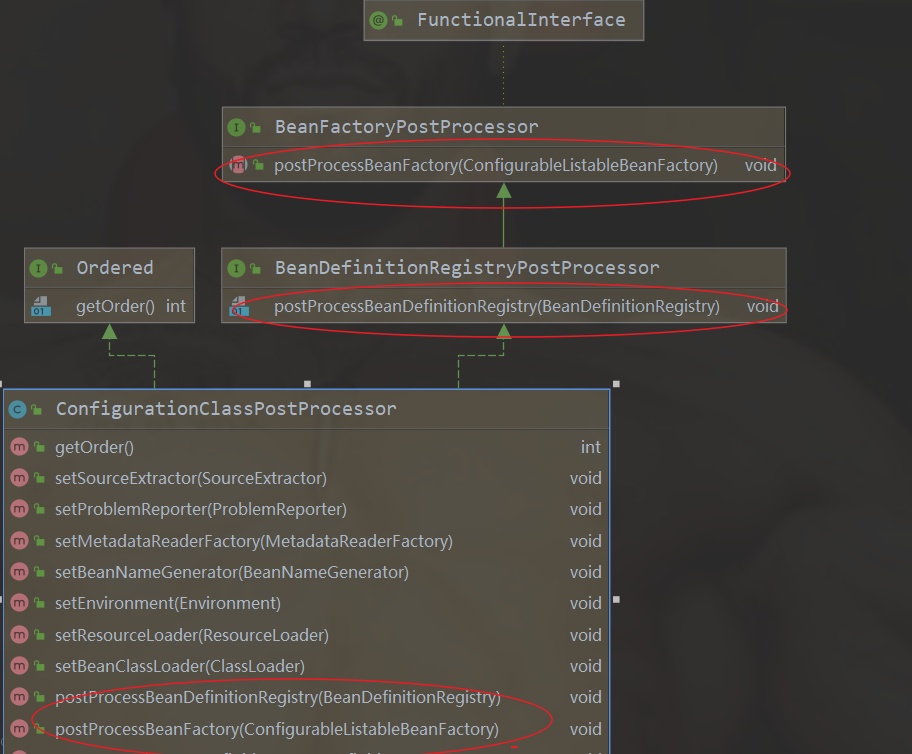
ConfigurationClassPostProcessor 的优先级是最低的 。
_
执行回调顺序分析调用链路,执行main方法后:
//?1.0
org.springframework.boot.SpringApplication#run(java.lang.String...)
????org.springframework.boot.SpringApplication#refreshContext
????org.springframework.boot.SpringApplication#refresh
????org.springframework.context.support.AbstractApplicationContext#refresh
????org.springframework.context.support.AbstractApplicationContext#invokeBeanFactoryPostProcessors?
???????org.springframework.context.support.PostProcessorRegistrationDelegate#invokeBeanDefinitionRegistryPostProcessors
????????private?static?void?invokeBeanDefinitionRegistryPostProcessors(
????????????????Collection<??extends?BeanDefinitionRegistryPostProcessor>?postProcessors,?BeanDefinitionRegistry?registry)?{

????????????for?(BeanDefinitionRegistryPostProcessor?postProcessor?:?postProcessors)?{
????????????????postProcessor.postProcessBeanDefinitionRegistry(registry);
????????????}
????????}
?????????//?1.1???先执行?postProcessBeanDefinitionRegistry?
????????org.springframework.context.annotation.ConfigurationClassPostProcessor#postProcessBeanDefinitionRegistry

????org.springframework.context.support.PostProcessorRegistrationDelegate#invokeBeanFactoryPostProcessors
????????private?static?void?invokeBeanFactoryPostProcessors(
????????????Collection<??extends?BeanFactoryPostProcessor>?postProcessors,?ConfigurableListableBeanFactory?beanFactory)?{

????????????for?(BeanFactoryPostProcessor?postProcessor?:?postProcessors)?{
????????????????postProcessor.postProcessBeanFactory(beanFactory);
????????????}
????????}
????????//?1.2??然后执行?
????????org.springframework.context.annotation.ConfigurationClassPostProcessor#postProcessBeanFactory
第三步:处理 processConfigBeanDefinitions
Spring 之前的版本处理的处理是在 ?postProcessBeanFactory 方法中(具体哪个版本后进行修改了,没有去追踪)。在本次分析的5.2.1 版本中,首先执行 ?postProcessBeanDefinitionRegistry --> postProcessBeanFactory
方法。
在 postProcessBeanDefinitionRegistry ?中会先处理 进行 processConfigBeanDefinitions_(registry) 的处理。_
_并且保存一个注册的处理ID。在执行 _postProcessBeanFactory ?进行判断,已处理则不在处理。
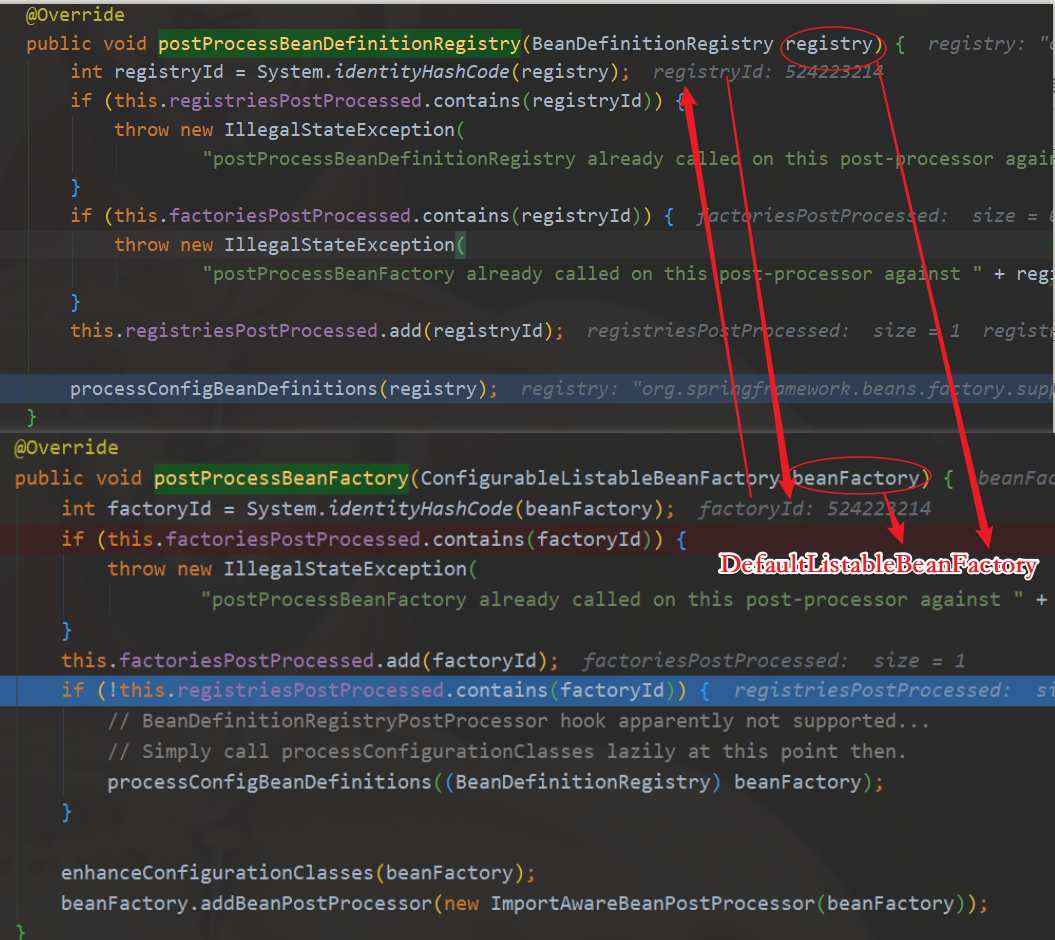
入参都是 DefaultListableBeanFactory ?对象,则获取 hashcode 值是一样的。即 registryId == factoryId 。
/**
?????*?Build?and?validate?a?configuration?model?based?on?the?registry?of
?????*?{@link?Configuration}?classes.
?????*/
????public?void?processConfigBeanDefinitions(BeanDefinitionRegistry?registry)?{
????????List<BeanDefinitionHolder>?configCandidates?=?new?ArrayList<>();
????????//?从?DefaultListableBeanFactory?中获取?所有?BeanDefinitionName
????????String[]?candidateNames?=?registry.getBeanDefinitionNames();
????????//?循环?
????????for?(String?beanName?:?candidateNames)?{
????????????//?通过Bean的名字获取?BeanDefinition
????????????BeanDefinition?beanDef?=?registry.getBeanDefinition(beanName);
????????????//?判断beanDef是否有被处理过,处理过则不进行?BeanDefinitionHolder?封装
????????????if?(beanDef.getAttribute(ConfigurationClassUtils.CONFIGURATION_CLASS_ATTRIBUTE)?!=?null)?{
????????????????if?(logger.isDebugEnabled())?{
????????????????????logger.debug("Bean?definition?has?already?been?processed?as?a?configuration?class:?"?+?beanDef);
????????????????}
????????????}
????????????//?checkConfigurationClassCandidate?检查和筛选
????????????//(检查给定bean定义是否为配置类的候选(或配置/部件类中声明的一个嵌套组件类,以自动注册为好),并相应地标记它)
????????????else?if?(ConfigurationClassUtils.checkConfigurationClassCandidate(beanDef,?this.metadataReaderFactory))?{
????????????????configCandidates.add(new?BeanDefinitionHolder(beanDef,?beanName));
????????????}
????????}

????????//?Return?immediately?if?no?@Configuration?classes?were?found
????????if?(configCandidates.isEmpty())?{
????????????return;
????????}

????????//?Sort?by?previously?determined?@Order?value,?if?applicable
????????//?根据order?对候选的Config类进行排序
????????configCandidates.sort((bd1,?bd2)?->?{
????????????int?i1?=?ConfigurationClassUtils.getOrder(bd1.getBeanDefinition());
????????????int?i2?=?ConfigurationClassUtils.getOrder(bd2.getBeanDefinition());
????????????return?Integer.compare(i1,?i2);
????????});

????????//?Detect?any?custom?bean?name?generation?strategy?supplied?through?the?enclosing?application?context
????????SingletonBeanRegistry?sbr?=?null;
????????if?(registry?instanceof?SingletonBeanRegistry)?{
????????????sbr?=?(SingletonBeanRegistry)?registry;
????????????if?(!this.localBeanNameGeneratorSet)?{
????????????????BeanNameGenerator?generator?=?(BeanNameGenerator)?sbr.getSingleton(
????????????????????????AnnotationConfigUtils.CONFIGURATION_BEAN_NAME_GENERATOR);
????????????????if?(generator?!=?null)?{
????????????????????this.componentScanBeanNameGenerator?=?generator;
????????????????????this.importBeanNameGenerator?=?generator;
????????????????}
????????????}
????????}

????????if?(this.environment?==?null)?{
????????????this.environment?=?new?StandardEnvironment();
????????}

????????//?Parse?each?@Configuration?class
????????//?解析?Configuration?类
????????ConfigurationClassParser?parser?=?new?ConfigurationClassParser(
????????????????this.metadataReaderFactory,?this.problemReporter,?this.environment,
????????????????this.resourceLoader,?this.componentScanBeanNameGenerator,?registry);

????????Set<BeanDefinitionHolder>?candidates?=?new?LinkedHashSet<>(configCandidates);
????????Set<ConfigurationClass>?alreadyParsed?=?new?HashSet<>(configCandidates.size());
????????do?{
????????????//??解析?candidates?
????????????parser.parse(candidates);
????????????parser.validate();
????????????//?解析?后?通过?getConfigurationClasses?获取?ConfigurationClass?集合
????????????Set<ConfigurationClass>?configClasses?=?new?LinkedHashSet<>(parser.getConfigurationClasses());
????????????configClasses.removeAll(alreadyParsed);

????????????//?Read?the?model?and?create?bean?definitions?based?on?its?content
????????????if?(this.reader?==?null)?{
????????????????this.reader?=?new?ConfigurationClassBeanDefinitionReader(
????????????????????????registry,?this.sourceExtractor,?this.resourceLoader,?this.environment,
????????????????????????this.importBeanNameGenerator,?parser.getImportRegistry());
????????????}
????????????this.reader.loadBeanDefinitions(configClasses);
????????????alreadyParsed.addAll(configClasses);

????????????candidates.clear();
????????????if?(registry.getBeanDefinitionCount()?>?candidateNames.length)?{
????????????????String[]?newCandidateNames?=?registry.getBeanDefinitionNames();
????????????????Set<String>?oldCandidateNames?=?new?HashSet<>(Arrays.asList(candidateNames));
????????????????Set<String>?alreadyParsedClasses?=?new?HashSet<>();
????????????????for?(ConfigurationClass?configurationClass?:?alreadyParsed)?{
????????????????????alreadyParsedClasses.add(configurationClass.getMetadata().getClassName());
????????????????}
????????????????for?(String?candidateName?:?newCandidateNames)?{
????????????????????if?(!oldCandidateNames.contains(candidateName))?{
????????????????????????BeanDefinition?bd?=?registry.getBeanDefinition(candidateName);
????????????????????????if?(ConfigurationClassUtils.checkConfigurationClassCandidate(bd,?this.metadataReaderFactory)?&&
????????????????????????????????!alreadyParsedClasses.contains(bd.getBeanClassName()))?{
????????????????????????????candidates.add(new?BeanDefinitionHolder(bd,?candidateName));
????????????????????????}
????????????????????}
????????????????}
????????????????candidateNames?=?newCandidateNames;
????????????}
????????}
????????while?(!candidates.isEmpty());

????????//?Register?the?ImportRegistry?as?a?bean?in?order?to?support?ImportAware?@Configuration?classes
????????if?(sbr?!=?null?&&?!sbr.containsSingleton(IMPORT_REGISTRY_BEAN_NAME))?{
????????????sbr.registerSingleton(IMPORT_REGISTRY_BEAN_NAME,?parser.getImportRegistry());
????????}

????????if?(this.metadataReaderFactory?instanceof?CachingMetadataReaderFactory)?{
????????????//?Clear?cache?in?externally?provided?MetadataReaderFactory;?this?is?a?no-op
????????????//?for?a?shared?cache?since?it'll?be?cleared?by?the?ApplicationContext.
????????????((CachingMetadataReaderFactory)?this.metadataReaderFactory).clearCache();
????????}
????}
重点看下 parser.parse_(candidates)_; -> processConfigurationClass ->doProcessConfigurationClass
protected?final?SourceClass?doProcessConfigurationClass(ConfigurationClass?configClass,?SourceClass?sourceClass)
????????????throws?IOException?{

????????if?(configClass.getMetadata().isAnnotated(Component.class.getName()))?{
????????????//?Recursively?process?any?member?(nested)?classes?first
????????????processMemberClasses(configClass,?sourceClass);
????????}

????????//?Process?any?@PropertySource?annotations
????????for?(AnnotationAttributes?propertySource?:?AnnotationConfigUtils.attributesForRepeatable(
????????????????sourceClass.getMetadata(),?PropertySources.class,
????????????????org.springframework.context.annotation.PropertySource.class))?{
????????????if?(this.environment?instanceof?ConfigurableEnvironment)?{
????????????????processPropertySource(propertySource);
????????????}
????????????else?{
????????????????logger.info("Ignoring?@PropertySource?annotation?on?["?+?sourceClass.getMetadata().getClassName()?+
????????????????????????"].?Reason:?Environment?must?implement?ConfigurableEnvironment");
????????????}
????????}

????????//?Process?any?@ComponentScan?annotations
????????Set<AnnotationAttributes>?componentScans?=?AnnotationConfigUtils.attributesForRepeatable(
????????????????sourceClass.getMetadata(),?ComponentScans.class,?ComponentScan.class);
????????if?(!componentScans.isEmpty()?&&
????????????????!this.conditionEvaluator.shouldSkip(sourceClass.getMetadata(),?ConfigurationPhase.REGISTER_BEAN))?{
????????????for?(AnnotationAttributes?componentScan?:?componentScans)?{
????????????????//?The?config?class?is?annotated?with?@ComponentScan?->?perform?the?scan?immediately
????????????????Set<BeanDefinitionHolder>?scannedBeanDefinitions?=
????????????????????????this.componentScanParser.parse(componentScan,?sourceClass.getMetadata().getClassName());
????????????????//?Check?the?set?of?scanned?definitions?for?any?further?config?classes?and?parse?recursively?if?needed
????????????????for?(BeanDefinitionHolder?holder?:?scannedBeanDefinitions)?{
????????????????????BeanDefinition?bdCand?=?holder.getBeanDefinition().getOriginatingBeanDefinition();
????????????????????if?(bdCand?==?null)?{
????????????????????????bdCand?=?holder.getBeanDefinition();
????????????????????}
????????????????????if?(ConfigurationClassUtils.checkConfigurationClassCandidate(bdCand,?this.metadataReaderFactory))?{
????????????????????????parse(bdCand.getBeanClassName(),?holder.getBeanName());
????????????????????}
????????????????}
????????????}
????????}

????????//?Process?any?@Import?annotations
????????processImports(configClass,?sourceClass,?getImports(sourceClass),?true);

????????//?Process?any?@ImportResource?annotations
????????AnnotationAttributes?importResource?=
????????????????AnnotationConfigUtils.attributesFor(sourceClass.getMetadata(),?ImportResource.class);
????????if?(importResource?!=?null)?{
????????????String[]?resources?=?importResource.getStringArray("locations");
????????????Class<??extends?BeanDefinitionReader>?readerClass?=?importResource.getClass("reader");
????????????for?(String?resource?:?resources)?{
????????????????String?resolvedResource?=?this.environment.resolveRequiredPlaceholders(resource);
????????????????configClass.addImportedResource(resolvedResource,?readerClass);
????????????}
????????}

????????//?Process?individual?@Bean?methods
????????Set<MethodMetadata>?beanMethods?=?retrieveBeanMethodMetadata(sourceClass);
????????for?(MethodMetadata?methodMetadata?:?beanMethods)?{
????????????configClass.addBeanMethod(new?BeanMethod(methodMetadata,?configClass));
????????}

????????//?Process?default?methods?on?interfaces
????????processInterfaces(configClass,?sourceClass);

????????//?Process?superclass,?if?any
????????if?(sourceClass.getMetadata().hasSuperClass())?{
????????????String?superclass?=?sourceClass.getMetadata().getSuperClassName();
????????????if?(superclass?!=?null?&&?!superclass.startsWith("java")?&&
????????????????????!this.knownSuperclasses.containsKey(superclass))?{
????????????????this.knownSuperclasses.put(superclass,?configClass);
????????????????//?Superclass?found,?return?its?annotation?metadata?and?recurse
????????????????return?sourceClass.getSuperClass();
????????????}
????????}

????????//?No?superclass?->?processing?is?complete
????????return?null;
????}
终于找打了Import ?处理
//?Process?any?@Import?annotations
processImports(configClass,?sourceClass,?getImports(sourceClass),?true);

//?getImports(sourceClass)?递归获取??imports
private?Set<SourceClass>?getImports(SourceClass?sourceClass)?throws?IOException?{
????Set<SourceClass>?imports?=?new?LinkedHashSet<>();
????Set<SourceClass>?visited?=?new?LinkedHashSet<>();
????collectImports(sourceClass,?imports,?visited);
????return?imports;
}
private?void?collectImports(SourceClass?sourceClass,?Set<SourceClass>?imports,?Set<SourceClass>?visited)
????throws?IOException?{

????if?(visited.add(sourceClass))?{
????????for?(SourceClass?annotation?:?sourceClass.getAnnotations())?{
????????????String?annName?=?annotation.getMetadata().getClassName();
????????????if?(!annName.equals(Import.class.getName()))?{
????????????????collectImports(annotation,?imports,?visited);
????????????}
????????}
????????imports.addAll(sourceClass.getAnnotationAttributes(Import.class.getName(),?"value"));
????}
}

//?然后是处理 processImports,递归调用,实现多层次的@Import 元标注ConfigurationClass 的解析。
//?ImportSelector.class?和?ImportBeanDefinitionRegistrar.class?处理也在此逻辑中
很多细节没有去写。可以看源码的时候,通过debug 方式 跟踪。解析最后,注册成 BeanDefiniton。
第四步:增强 enhanceConfigurationClasses
先判断是ConfigurationClassPostProcessor.getName + "configurationClass"
Object configClassAttr = beanDef.getAttribute_(ConfigurationClassUtils._CONFIGURATION_CLASS_ATTRIBUTE);
然后判断是 ConfigurationClassUtils.CONFIGURATION_CLASS_FULL ?完全模式。可进行增强、
_
org.springframework.context.annotation.ConfigurationClassUtils#checkConfigurationClassCandidate
Map<String,?Object>?config?=?metadata.getAnnotationAttributes(Configuration.class.getName());
// Configuration proxyBeanMethods 默认是 true,默认就是完全模式。
if?(config?!=?null?&&?!Boolean.FALSE.equals(config.get("proxyBeanMethods")))?{
????beanDef.setAttribute(CONFIGURATION_CLASS_ATTRIBUTE,?CONFIGURATION_CLASS_FULL);
}
else?if?(config?!=?null?||?isConfigurationCandidate(metadata))?{
????//?轻量模式,
????beanDef.setAttribute(CONFIGURATION_CLASS_ATTRIBUTE,?CONFIGURATION_CLASS_LITE);
}
else?{
????return?false;
}
Spring web 自动装配
前面 掌握了 @Enable 模块驱动, 这种方式 是需要手动触发的, Spring Boot 提供的是自动 装配的能力, 首先看一下 Spring web的自动装配,对后续SB的自动装配会更得心应手。
SB自动装配:
Web应用
非Web应用
Spring Framework 3.1+ 自动装配:
仅支持 web应用,并且依赖的容器 必须是Servlet 3.0 +
理解 WebApplicationInitializer
Spring web自动装配依托于 Servlet3.0+ ,Spring自己也做了一些工作来适应Servlet3.0+的改变。在SpringFramework 3.1.0中 新增了一个类:WebApplicationInitializer ?。构建在Servlet3.0 的 ServletContainerIniitializer 之上,WebApplicationInitializer ? ? 的自定义实现,能够被任何Servlet3.0容器侦测并自动初始化。初始化调用的是 onStartup 方法。
public?interface?WebApplicationInitializer?{

????/**
?????*?Configure?the?given?{@link?ServletContext}?with?any?servlets,?filters,?listeners
?????*?context-params?and?attributes?necessary?for?initializing?this?web?application.?See
?????*?examples?{@linkplain?WebApplicationInitializer?above}.
?????*?@param?servletContext?the?{@code?ServletContext}?to?initialize
?????*?@throws?ServletException?if?any?call?against?the?given?{@code?ServletContext}
?????*?throws?a?{@code?ServletException}
?????*/
????void?onStartup(ServletContext?servletContext)?throws?ServletException;

}
用编程的方式支持替换传统的 web.xml
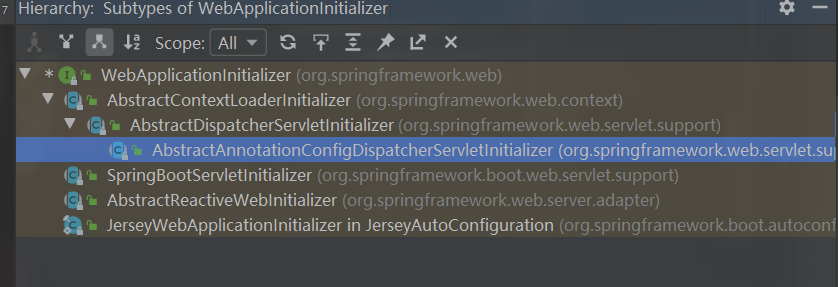

相关代码可 Spring WebMVC 官网介绍:https://docs.spring.io/spring/docs/current/spring-framework-reference/web.html#spring-web

AbstractAnnotationConfigDispatcherServletInitializer :SpringJava代码配置驱动
public?class?MyWebAppInitializer?extends?AbstractAnnotationConfigDispatcherServletInitializer?{

????@Override
????protected?Class<?>[]?getRootConfigClasses()?{
????????return?new?Class<?>[]?{?RootConfig.class?};
????}

????@Override
????protected?Class<?>[]?getServletConfigClasses()?{
????????return?new?Class<?>[]?{?App1Config.class?};
????}

????@Override
????protected?String[]?getServletMappings()?{
????????return?new?String[]?{?"/app1/*"?};
????}
}
上面的代码等同于下面的xml配置。
<web-app>

????<listener>
????????<listener-class>org.springframework.web.context.ContextLoaderListener</listener-class>
????</listener>

????<context-param>
????????<param-name>contextConfigLocation</param-name>
????????<param-value>/WEB-INF/root-context.xml</param-value>
????</context-param>

????<servlet>
????????<servlet-name>app1</servlet-name>
????????<servlet-class>org.springframework.web.servlet.DispatcherServlet</servlet-class>
????????<init-param>
????????????<param-name>contextConfigLocation</param-name>
????????????<param-value>/WEB-INF/app1-context.xml</param-value>
????????</init-param>
????????<load-on-startup>1</load-on-startup>
????</servlet>

????<servlet-mapping>
????????<servlet-name>app1</servlet-name>
????????<url-pattern>/app1/*</url-pattern>
????</servlet-mapping>

</web-app>
AbstractDispatcherServletInitializer :Spring XML配置驱动
public?class?MyWebAppInitializer?extends?AbstractDispatcherServletInitializer?{

????@Override
????protected?WebApplicationContext?createRootApplicationContext()?{
????????return?null;
????}

????@Override
????protected?WebApplicationContext?createServletApplicationContext()?{
????????XmlWebApplicationContext?cxt?=?new?XmlWebApplicationContext();
????????cxt.setConfigLocation("/WEB-INF/spring/dispatcher-config.xml");
????????return?cxt;
????}

????@Override
????protected?String[]?getServletMappings()?{
????????return?new?String[]?{?"/"?};
????}
}
自定义Web自动装配
1、 实现 AbstractAnnotationConfigDispatcherServletInitializer?
2、写配置 类- ConfigClasses
3、将配置类加入 getServletConfigClasses
?@Override
????protected?Class<?>[]?getServletConfigClasses()?{
????????return?new?Class<?>[]?{?App1Config.class?};
????}
4、打包,启动
5、测试
具体示例可自行实现下。
理解 Servlet 3.0 ?- ServletContainerInitializer
1、首先 Servlet3.0开始提供 ServletContext 可以 通过编程的方式动态的装配Servlet、Filter和各种Listener 。(SpringBoot中使用较多)
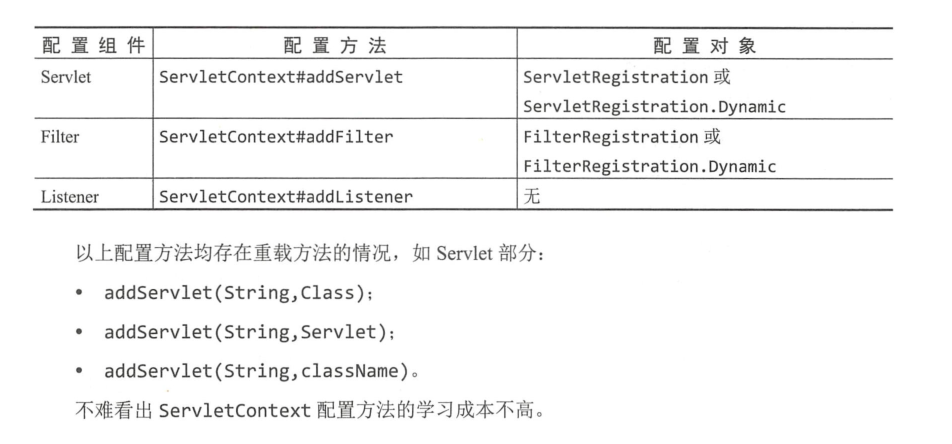
2、ServletContext ?仅能在 如下两个方法被调用。
javax.servlet.ServletContainerInitializer#onStartup:当容器启动的时候,onStartup 方法执行,ServletContext当作参数传入
javax.servlet.ServletContextListener#contextInitialized (监听 ServletContext 的生命周期事件- 初始化 - 销毁)
关于ServletContainerInitializer 可以参考 Servlet 3.0规范。需要关注的两个点:
第一:当容器或应用启动的时候,onStartup 方法回调,onStartup 有两个参数
Set
<class@HandlersTypes 来进行过滤。(Spring web mvc 自动装配就是利用了这一特性。)</class
ServletContext ctx:
/**
?????*?应用启动的时候,会运行onStartup方法;
?????*?
?????* Set<Class<?>> arg0:感兴趣的类型的所有子类型;
?????* ServletContext arg1:代表当前Web应用的ServletContext;一个Web应用一个ServletContext;
?????*?
?????*?1)、使用ServletContext注册Web组件(Servlet、Filter、Listener)
?????* 2)、使用编码的方式,在项目启动的时候给ServletContext里面添加组件;
?????*??????必须在项目启动的时候来添加;
?????*????? 1)、ServletContainerInitializer得到的ServletContext;
?????*????? 2)、ServletContextListener得到的ServletContext;
?????*/
public?void?onStartup(Set<Class<?>>?c,?ServletContext?ctx)
????????throws?ServletException;?
第二:ServletContainerInitializer 的实现类必须放到 ?javax.servlet.ServletContainerInitializer 文本文件中,该文件存在在独立JAR包中的 METE-INF/services 目录。
META-INF/services
Spring web自动装配原理-SpringServletContainerInitializer
@HandlesTypes(WebApplicationInitializer.class)
public?class?SpringServletContainerInitializer?implements?ServletContainerInitializer?{


}
侦测 WebApplicationInitializer 以及其所有的子类,调用 onStartup ,它的子类在上文已经贴出。具体源码实现可以参考SpringFramework 框架实现。
总结:

推荐阅读:
Java SPI (Service Provider Interface) and ServiceLoader:
https://www.journaldev.com/31602/java-spi-service-provider-interface-and-serviceloader
可以看看,讲解的比较清晰,还有对应的示例。
Spring 条件装配
条件装配 @Profile ?和 @Conditional ?
Profile:侧面,通过某个角度去观察。Maven 中类似语义。静态激活和配置,Spring中存在两种类型:Active 、 Default,当 Active 不存在,采用默认 Profile。

在Spring中的原理: 解析@Profile 注解,然后根据当前的环境配置 进行验证是否匹配。
@Conditional :相较于 @Profile 更关注 运行时 动态选择。Spring Boot中内建了不少条件注解:
ConditionalOnClass
ConditionalOnBean
ConditionalOnProperty
….
自定义@Conditional 条件装配
1、写一个类实现 Condition 接口,实现 ?matches 方法
public?class?SystemCondition?implements?Condition?{
????@Override
????public?boolean?matches(ConditionContext?context,?AnnotatedTypeMetadata?metadata)?{
????????Map<String,?Object>?annotationAttributes?=?metadata.getAnnotationAttributes(SystemOnCondition.class.getName());
????????String?name?=?(String)annotationAttributes.get("name");
????????if("aflyun".equals(name)){
????????????return?true;
????????}
????????return?false;
????}
}
2、写一个条件注解,使用 @Conditional 注解,@Conditional 的 value 加入自定义的实现
@Target({ElementType.TYPE,?ElementType.METHOD})
@Retention(RetentionPolicy.RUNTIME)
@Documented
@Conditional(SystemCondition.class)
public?@interface?SystemOnCondition?{
????String?name()?default?"";
}
3、在需要进行条件判断的地方使用此注解
???@Bean
????@SystemOnCondition(name?=?"aflyun")
????public?String?dufy(){
????????return?"hello?Java编程技术乐园";
????}

第9 章 ?Spring Boot 自动装配
掌握@SpringBootApplication#@EnableAutoConfiguration
@EnableAutoConfiguration ?适合用 Import导入 Selector。
@Import_(AutoConfigurationImportSelector.class)_
_
protected?AutoConfigurationEntry?getAutoConfigurationEntry(AutoConfigurationMetadata?autoConfigurationMetadata,
???????????????????????????????????????????????????????????AnnotationMetadata?annotationMetadata)?{
????if?(!isEnabled(annotationMetadata))?{
????????return?EMPTY_ENTRY;
????}
????AnnotationAttributes?attributes?=?getAttributes(annotationMetadata);
????List<String>?configurations?=?getCandidateConfigurations(annotationMetadata,?attributes);
????configurations?=?removeDuplicates(configurations);
????Set<String>?exclusions?=?getExclusions(annotationMetadata,?attributes);
????checkExcludedClasses(configurations,?exclusions);
????configurations.removeAll(exclusions);
????configurations?=?filter(configurations,?autoConfigurationMetadata);
????fireAutoConfigurationImportEvents(configurations,?exclusions);
????return?new?AutoConfigurationEntry(configurations,?exclusions);
}
_
调用流程简单分析:
org.springframework.context.annotation.ConfigurationClassParser#processImports
????-->org.springframework.context.annotation.ConfigurationClassParser.DeferredImportSelectorHandler#handle
????????-->?org.springframework.context.annotation.ConfigurationClassParser.DeferredImportSelectorGroupingHandler#processGroupImports
????????????-->org.springframework.context.annotation.ConfigurationClassParser.DeferredImportSelectorGrouping#getImports
????????????????-->org.springframework.context.annotation.DeferredImportSelector.Group#process
????????????????-->org.springframework.boot.autoconfigure.AutoConfigurationImportSelector.AutoConfigurationGroup#process
????????????????????-->org.springframework.boot.autoconfigure.AutoConfigurationImportSelector#getAutoConfigurationEntry
记录Spring Boot启动SPI 加载机制
1、如果是内嵌的tomcat容器,则 不走 SPI机制(注:SPI机制可以往上翻看推荐阅读。),直接 EnableAutoXX 进行配置。如DispatcherServlet bean 配置。
2、如果使用外部Tomcat 启动的时候,则 需要 配置 SpringBootServletInitializer 。如下:
1.必须创建war项目,需要创建好web项目的目录。
2.嵌入式Tomcat依赖scope指定provided。
3.编写SpringBootServletInitializer类子类,并重写configure方法。
public?class?MySpringBootServletInitializer?extends?SpringBootServletInitializer?{

????private?static?Logger?logger?=?LoggerFactory.getLogger(MySpringBootServletInitializer.class);
????@Override
????protected?SpringApplicationBuilder?configure(SpringApplicationBuilder?builder)?{
????????logger.info("MySpringBootServletInitializer--->Springboot2CoreCh02Application引导");
????????return?createSpringApplicationBuilder().sources(Springboot2CoreCh02Application.class);
????}
}
这的一套流程,原理是Spring Framework web的自动装配的原理。使用了Servlet3.0+ ,具体可以看上面 :Spring web 自动装配
Tomcat 加载 ServletContainerInitializer 文件。
import?java.util.Set;

import?javax.servlet.ServletContainerInitializer;


//?**************?ServletContainerInitializer接口?的使用?**************?
//?1、在jar包中创建META-INF/services/javax.servlet.ServletContainerInitializer文件
// 2、在文件中写入实现的类路径,如:org.apache.jasper.servlet.JasperInitializer

//?**************?Tomcat中对ServletContainerInitializer接口的实现类的检测和自动调用?**************
//?检测实现ServletContainerInitializer接口的类---------------------------1
class?org.apache.catalina.core.StandardContext{
????protected?synchronized?void?startInternal()?throws?LifecycleException?{
????????//?读取并解析“d:/a/c/d/tomcat/conf/web.xml”,读取并解析"d:/a/b/tomcat/conf/Catalina/localhost/web.xml.default"
????????//?取得输入流?"d:/a/b/c/tomcat/webapps/dir1/WEB-INF/web.xml"
????????//?合并配置文件内容
????????//?合并全局配置
????????//?使用?org.apache.jasper.servlet.JspServlet?包装??<jsp-file>/a/b/c/file.jsp</jsp-file>的文件
????????//?把解析处理的内容设置到 context 中?,如:context.addFilterMap(filterMap);

????????//?在org.apache.catalina.core.NamingContextListener事件处理器中,内部调用了createNamingContext()创建?envCtx
????????//?Notify?our?interested?LifecycleListeners??触发事件监听器??org.apache.catalina.startup.ContextConfig
????????fireLifecycleEvent(Lifecycle.CONFIGURE_START_EVENT,?null);?//?配置启动事件?"configure_start"----------------------
????}

????//?添加初始化器
????public?void?addServletContainerInitializer(
????????ServletContainerInitializer?sci,?Set<Class<?>>?classes)?{
????????initializers.put(sci,?classes);
????}
}

class?org.apache.catalina.startup.ContextConfig{
????public?void?lifecycleEvent(LifecycleEvent?event)?{
????????context?=?(Context)?event.getLifecycle();?//?取得触发者?org.apache.catalina.core.StandardContext
????????configureStart();
????}

????protected?synchronized?void?configureStart()?{
????????//?读取并解析“d:/a/c/d/tomcat/conf/web.xml”,读取并解析"d:/a/b/tomcat/conf/Catalina/localhost/web.xml.default"
????????//?取得输入流?"d:/a/b/c/tomcat/webapps/dir1/WEB-INF/web.xml"
????????//?合并配置文件内容
????????//?合并全局配置
????????//?使用?org.apache.jasper.servlet.JspServlet?包装??<jsp-file>/a/b/c/file.jsp</jsp-file>的文件
????????//?把解析处理的内容设置到 context 中?,如:context.addFilterMap(filterMap);
????????webConfig();//!!!!??核心
????}

????protected?void?webConfig()?{
????????//?org.apache.jasper.servlet.JasperInitializer??jasper.jar
????????//?org.apache.tomcat.websocket.server.WsSci????tomcat-websocket.jar

????????//?解析类路径中"META-INF/services/javax.servlet.ServletContainerInitializer"文件内容
????????//?创建文件中声明的类型对象,并把创建对象转成ServletContainerInitializer类型的引用
????????//????????????????????initializerClassMap{
????????//????????????????????????'MyServletContainerInitializer1_Obj'=>[],
????????//????????????????????????'MyServletContainerInitializer2_Obj'=>[],
????????//????????????????????}
????????//????????????????????typeInitializerMap{
????????//????????????????????????'MyAnnotation1.class'=>[MyServletContainerInitializer1_Obj?],
????????//????????????????????????'MyAnnotation2.class'=>[MyServletContainerInitializer2_Obj?]
????????//????????????????????}

????????processServletContainerInitializers();?//?查看实现ServletContainerInitializer的初始化器


????????if?(ok)?{
????????????//?org.apache.jasper.servlet.JasperInitializer??jasper.jar
????????????//?org.apache.tomcat.websocket.server.WsSci????tomcat-websocket.jar

????????????//?解析类路径中"META-INF/services/javax.servlet.ServletContainerInitializer"文件内容
????????????//?创建文件中声明的类型对象,并把创建对象转成ServletContainerInitializer类型的引用
????????????//????????????????????????initializerClassMap{
????????????//????????????????????????????'MyServletContainerInitializer1_Obj'=>[],
????????????//????????????????????????????'MyServletContainerInitializer2_Obj'=>[],
????????????//????????????????????????}
????????????//????????????????????????typeInitializerMap{
????????????//????????????????????????????'MyAnnotation1.class'=>[MyServletContainerInitializer1_Obj?],
????????????//????????????????????????????'MyAnnotation2.class'=>[MyServletContainerInitializer2_Obj?]
????????????//????????????????????????}
????????????for?(Map.Entry<ServletContainerInitializer,Set<Class<?>>>?entry?:?initializerClassMap.entrySet())?{
????????????????if?(entry.getValue().isEmpty())?{?//?添加Servlet容器初始化器到StandardContext
????????????????????//?添加初始化器
????????????????????//?context?===?org.apache.catalina.core.StandardContext
????????????????????//?StandardContext.initializers.put(entry.getKey(),?null);
????????????????????context.addServletContainerInitializer(
????????????????????????entry.getKey(),?null);?
????????????????}?else?{
????????????????????context.addServletContainerInitializer(
????????????????????????entry.getKey(),?entry.getValue());
????????????????}
????????????}
????????}

????????protected?void?processServletContainerInitializers()?{
????????????//?容器初始化器
????????????WebappServiceLoader<ServletContainerInitializer>?loader?=?new?WebappServiceLoader<>(context);
????????????//?org.apache.jasper.servlet.JasperInitializer??jasper.jar
????????????//?org.apache.tomcat.websocket.server.WsSci????tomcat-websocket.jar
????????????//?解析类路径中"META-INF/services/javax.servlet.ServletContainerInitializer"文件内容
????????????//?创建文件中声明的类型对象,并把创建对象转成ServletContainerInitializer类型的引用
????????????detectedScis?=?loader.load(ServletContainerInitializer.class);?//?检测到的?ServletContainerInitializer
????????????for?(ServletContainerInitializer?sci?:?detectedScis)?{
????????????????initializerClassMap.put(sci,?new?HashSet<Class<?>>());?//?要调用的初始化器
????????????}
????????}
????}
????public?List<T>?load(Class<T>?serviceType)?throws?IOException?{
????????String?configFile?=?"META-INF/services/"?+?serviceType.getName();
????????LinkedHashSet<String>?applicationServicesFound?=?new?LinkedHashSet();
????????LinkedHashSet<String>?containerServicesFound?=?new?LinkedHashSet();
????????ClassLoader?loader?=?this.servletContext.getClassLoader();
????????List<String>?orderedLibs?=?(List)this.servletContext.getAttribute("javax.servlet.context.orderedLibs");

????????return?containerServicesFound.isEmpty()???Collections.emptyList()?:?this.loadServices(serviceType,?containerServicesFound);
????}

????//?调用实现ServletContainerInitializer接口的类的方法,进行初始化---------------------------2
????class?org.apache.catalina.core.StandardContext{
????????protected?synchronized?void?startInternal()?throws?LifecycleException?{
????????????//?fireLifecycleEvent(Lifecycle.CONFIGURE_START_EVENT,?null);
????????????//?....

????????????//?org.apache.jasper.servlet.JasperInitializer??jasper.jar
????????????//?org.apache.tomcat.websocket.server.WsSci????tomcat-websocket.jar

????????????//?Call?ServletContainerInitializers
????????????for?(Map.Entry<ServletContainerInitializer,?Set<Class<?>>>?entry?:
?????????????????initializers.entrySet())?{?//?调用容器初始化器?,
????????????????//?如:org.apache.jasper.servlet.JasperInitializer.onStartup();?
????????????????try?{
????????????????????//?执行初始化器
????????????????????entry.getKey().onStartup(entry.getValue(),getServletContext());
????????????????}?catch?(ServletException?e)?{
????????????????????log.error(sm.getString("standardContext.sciFail"),?e);
????????????????????ok?=?false;
????????????????????break;
????????????????}
????????????}
????????}
????}

}
@EnableAutoConfiguration扫描BasePackage
本质是理解:@AutoConfigurationPackage 注解。
/**
?*?Indicates?that?the?package?containing?the?annotated?class?should?be?registered?with
?*?{@link?AutoConfigurationPackages}.
?*
?*?@author?Phillip?Webb
?*?@since?1.3.0
?*?@see?AutoConfigurationPackages
?*/
@Target(ElementType.TYPE)
@Retention(RetentionPolicy.RUNTIME)
@Documented
@Inherited
@Import(AutoConfigurationPackages.Registrar.class)
public?@interface?AutoConfigurationPackage?{

}
static?class?Registrar?implements?ImportBeanDefinitionRegistrar,?DeterminableImports?{

???????//?new?PackageImport(metadata).getPackageName()?获取?当前?metadata?对应的包名????
????????@Override
????????public?void?registerBeanDefinitions(AnnotationMetadata?metadata,?BeanDefinitionRegistry?registry)?{
????????????register(registry,?new?PackageImport(metadata).getPackageName());
????????}

????????@Override
????????public?Set<Object>?determineImports(AnnotationMetadata?metadata)?{
????????????return?Collections.singleton(new?PackageImport(metadata));
????????}

????}
ConstructorArgumentValues 应该如何理解?
第9 章 ?Spring Boot 自动装配
9.3 自定义 Spring Boot 自动装配
1、如何命名自动装配Class和package
官网并没有给出命名规则。
从官方目前实现的源码中窥探一二。
Class 命名:xxxAutoConfiguration
package命名:
{module-package}
|- AutoConfiguration ?
|- ${sub-module-package}
|- …
例子 :org.springframework.boot.autoconfigure.web.servlet.WebMvcAutoConfiguration
2、如何命名自动装配 Starter
Spring boot starter 包含的组件
autofigure 模块
starter 模块
官方建议 :将自动装配的代码存放在 autoconfigure 模块, starter模块依赖该模块。
上述建议并非强制,也可以将两个模块合在一起,当Starter部署结构确定后,取一个佳名即可。
Spring boot starter 命名规则
官方推荐 ${module-name}-spring-boot-starter .
Spring 官方 Starter 通常命名为 spring-boot-starter-{module-name}如:spring-boot-starter-web,
比如:spring-cloud-starter-openfeign
Spring 官方建议非官方的 Starter 命名应遵守 {module-name}-spring-boot-starter 的格式。
比如:mybatis-spring-boot-starte
注意:starter 的配置文件 命名空间不要 使用 server 、management、Spring 等作为配置key 命名空间。
3、实现一个 Spring boot ?starter
①:新建Maven工程,在pom中添加依赖配置
<!--?添加?Spring?boot?starter?基础依赖?-->
<dependency>
??<groupId>org.springframework.boot</groupId>
??<artifactId>spring-boot-starter</artifactId>
??<!--?注意:设置为true ,不传递这个依赖-->
??<optional>true</optional>
</dependency>
②:写功能代码
③:自动装配类 xxxAutoConfiguration
④:在 META-INF/spring.factories 资源申明 xxxAutoConfiguration
org.springframework.boot.autoconfigure.EnableAutoConfiguration=
com.test.configure.xxxAutoConfiguration
⑤:在其他的工程中依赖 此 Starter
实现的套路比较简单,真正要思考的是实际场景下如何更好的使用。
9.4 ?Spring Boot 条件化自动装配-@Conditional
所有 Spring 条件注解 @Conditional 均采用 元标注 @Conditional(OnClassCondition.class) 的方式实现。
Spring boot 条件注解学习成本不高,但是合理的运用需要较高的专业化程度。
1、Class 条件注解
2、Bean 条件注解
3、Property 条件注解
4、Resource 条件注解
5、Web Application 条件注解
6、SpEL 表达式 ?条件注解
总结
Spring boot 自动装配 所依赖的
注解驱动
@Enable模块驱动
条件装配
Spring 工厂加载机制等(从spring.factories中加载)
这些特性 均来自 Spring Framework。
Sprng Framework 时代,Spring应用上下文通常 由容器启动,如 ContextLoaderListener 或 WebApplicationInitializer 的实现类由Servlet 容器装载并驱动。
Spring boot 时代,只用一个SpringApplication#run 结合 @SpringBootApplication 或 @EnableAutoConfiguration注解方式完成,启动方式发生了逆转?(和之前WAR启动对比,不需要发布到容器就能启动)
需知后续,请看下回分解,或者你自己直接去看书吧。
tips:最近很多伙伴后台留言说准备换新地方体验【拧螺丝】的工作了,
但是没有好的【造火箭】的资料,这不,特意整理了一份,内容非常丰富,包括大厂Java面试资料和经验总结!
See you next good day~


 ?
?
