Spring_cloud-Eureka
一. 注册中心概述
本文仅供单个模块代码的提示,如想知整套demo,请留言!
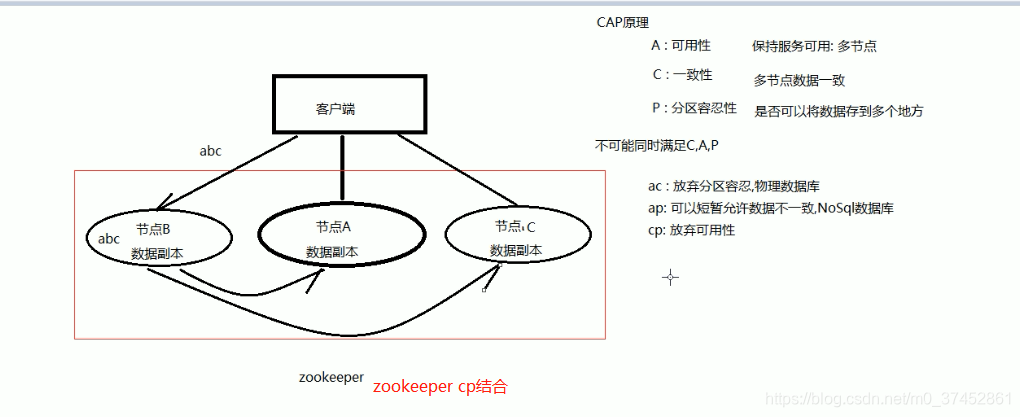
cap原理图解:

Eureka注册中心的客户端消费者会缓存地址信息到本地,这就造成了信息不一致,也就是cap原理的ap;

二.使用Eureka的步骤
Eureka是服务注册中心,只做服务注册;自身并不提供服务也不消费服务。可以搭建web工程使用Eureka,可以使用Spring Boot方式搭建。
1.搭建Eureka
步骤:
-
创建一个maven工程;
-
导入坐标
    <dependencies>
        <dependency>
            <groupId>org.springframework.cloud</groupId>
            <artifactId>spring-cloud-starter-netflix-eureka-server</artifactId>
        </dependency>
    </dependencies>
- 配置application.yml文件
spring:
  application:
    name: eureka-server
server:
  port: 9000 #端口
#配置eureka server
eureka:
    instance:
      hostname: localhost #主机地址名称
    client:
      register-with-eureka: false  # 是否将自己注册到注册中心
      fetch-registry: false   # 是否从eureka中获取注册信息
      service-url: #配置暴露给Eureka Client(客户端)的请求地址
        defaultZone: http://127.0.0.1:9000/eureka/  # eureka 服务地址,如果是集群的话;需要指定其它集群eureka地址,使用逗号隔开
      #或者 http://${eureka.client.instance.hostname}:${server.port}/eureka/
- 配置启动类:一个注解@EnableEurekaServer
package cn.itcast.eureka;

import org.springframework.boot.SpringApplication;
import org.springframework.boot.autoconfigure.SpringBootApplication;
import org.springframework.boot.autoconfigure.domain.EntityScan;
import org.springframework.cloud.netflix.eureka.server.EnableEurekaServer;
import org.springframework.context.annotation.Bean;
import org.springframework.web.client.RestTemplate;

@SpringBootApplication
@EnableEurekaServer //激活EurekaServer
class EurekaServerApplication {
    public static void main(String[] args) {

        SpringApplication.run(EurekaServerApplication.class,args);
    }
}
2.将服务提供者注册到EurekaServer上
1. 引入EurekaClient的坐标
  <!--引入eureka-client-->
        <dependency>
            <groupId>org.springframework.cloud</groupId>
            <artifactId>spring-cloud-starter-netflix-eureka-client</artifactId>
        </dependency>
2. 修改application.yml 添加EurekaServer的相关信息
server:
  port: 9001 #端口
spring:
  application:
    name: service-product #服务名称
  datasource:
    driver-class-name: com.mysql.jdbc.Driver
    url: jdbc:mysql://localhost:3306/shop?useUnicode=true&characterEncoding=utf8
    username: root
    password: root
  jpa:
    database: MySQL
    show-sql: true
    open-in-view: true
#配置Eureka
eureka:
    client:
      service-url:
        defaultZone: http://127.0.0.1:9000/eureka/ #EurekaService的路径
    instance:
     prefer-ip-address: true #使用ip地址注册
3.修改启动类,添加服务发现的支持(可选)
//激活Eureka(两个注解都可以),新版本可以不写
@EnableEurekaClient
@EnableDiscoveryClient
3.服务消费者通过注册中心获取服务列表,并调用
1.引入坐标
        <!--引入eureka-client-->
        <dependency>
            <groupId>org.springframework.cloud</groupId>
            <artifactId>spring-cloud-starter-netflix-eureka-client</artifactId>
        </dependency>
2. 修改application.yml 添加EurekaServer的相关信息
server:
  port: 9002 #端口
spring:
  application:
    name: service-order #服务名称
  datasource:
    driver-class-name: com.mysql.jdbc.Driver
    url: jdbc:mysql://localhost:3306/shop?useUnicode=true&characterEncoding=utf8
    username: root
    password: root
  jpa:
    database: MySQL
    show-sql: true
    open-in-view: true
#配置Eureka
eureka:
  client:
    service-url:
      defaultZone: http://127.0.0.1:9000/eureka/ #EurekaService的路径
  instance:
    prefer-ip-address: true #使用ip地址注册
3.	更改controller类,其中的RestTemplate是在启动类中添加了一个如下的方法:
3.1启动类如下
package cn.itcast.order;

import org.springframework.boot.SpringApplication;
import org.springframework.boot.autoconfigure.SpringBootApplication;
import org.springframework.boot.autoconfigure.domain.EntityScan;
import org.springframework.context.annotation.Bean;
import org.springframework.web.client.RestTemplate;

@SpringBootApplication
@EntityScan("cn.itcast.order.entity")
public class OrderApplication {
    public static void main(String[] args) {
        SpringApplication.run(OrderApplication.class,args);
    }


    /**
     * 使用spring提供的RestTemplate发送http请求到商品服务 创建远程调用对象的bean
     */
    @Bean
    public RestTemplate restTemplate(){
        return new RestTemplate();
    }
}
3.2 Controller类如下:
package cn.itcast.order.controller;

import cn.itcast.order.entity.Product;
import org.springframework.beans.factory.annotation.Autowired;
import org.springframework.cloud.client.ServiceInstance;
import org.springframework.cloud.client.discovery.DiscoveryClient;
import org.springframework.web.bind.annotation.PathVariable;
import org.springframework.web.bind.annotation.RequestMapping;
import org.springframework.web.bind.annotation.RequestMethod;
import org.springframework.web.bind.annotation.RestController;
import org.springframework.web.client.RestTemplate;

import java.util.List;

@RestController
@RequestMapping("/order")
public class OrderController {

    @Autowired
    private  RestTemplate restTemplate;

    /**
     * 注入DiscoveryClient
     * springcloud提供的获取元数据的工具类
     *      调用方法获取原服务的元数据信息
     */
    @Autowired
    private DiscoveryClient discoveryClient;


    /**
     * 使用注册中心调用远程服务根据id查询商品信息
     * @param id
     * @return
     */
    @RequestMapping(value = "/buyEureka/{id}",method = RequestMethod.GET)
    public Product findByIdEureka(@PathVariable Long id){
        //调用discoveryClient方法
        //根据服务名称获取到所有的元数据
        List<ServiceInstance> instances = discoveryClient.getInstances("SERVICE-PRODUCT");
        for (ServiceInstance instance : instances) {
            System.out.println(instance);
        }

        //获取唯一的一个元数据
        ServiceInstance serviceInstance = instances.get(0);
        //根据元数据中的主机地址和端口号拼接请求微服务的URL
        Product product = restTemplate.getForObject("http://"+serviceInstance.getHost()+":"+serviceInstance.getPort()+"/product/1",Product.class);
        return product;
    }

    /**
     * 调用远程服务根据id查询商品信息
     * @param id
     * @return
     */
    @RequestMapping(value = "/buy/{id}",method = RequestMethod.GET)
    public Product findById(@PathVariable Long id){
        Product product = restTemplate.getForObject("http://127.0.0.1:9001/product/1",Product.class);
        return product;
    }


}
4.父工程的pom文件
<?xml version="1.0" encoding="UTF-8"?>
<project xmlns="http://maven.apache.org/POM/4.0.0"
         xmlns:xsi="http://www.w3.org/2001/XMLSchema-instance"
         xsi:schemaLocation="http://maven.apache.org/POM/4.0.0 http://maven.apache.org/xsd/maven-4.0.0.xsd">
    <modelVersion>4.0.0</modelVersion>

    <groupId>cn.itcast</groupId>
    <artifactId>spring_cloud_demo</artifactId>
    <packaging>pom</packaging>
    <version>1.0-SNAPSHOT</version>
    <modules>
        <module>product_service</module>
        <module>order_service</module>
        <module>eureka_server</module>
    </modules>

    <parent>
        <groupId>org.springframework.boot</groupId>
        <artifactId>spring-boot-starter-parent</artifactId>
        <version>2.1.6.RELEASE</version>
    </parent>

    <properties>
        <project.build.sourceEncoding>UTF-8</project.build.sourceEncoding>
        <project.reporting.outputEncoding>UTF-8</project.reporting.outputEncoding>
        <java.version>1.8</java.version>
    </properties>


    <dependencies>
        <dependency>
            <groupId>org.springframework.boot</groupId>
            <artifactId>spring-boot-starter-web</artifactId>
        </dependency>
        <dependency>
            <groupId>org.springframework.boot</groupId>
            <artifactId>spring-boot-starter-logging</artifactId>
        </dependency>
        <dependency>
            <groupId>org.springframework.boot</groupId>
            <artifactId>spring-boot-starter-test</artifactId>
            <scope>test</scope>
        </dependency>
        <dependency>
            <groupId>org.projectlombok</groupId>
            <artifactId>lombok</artifactId>
            <version>1.18.4</version>
            <scope>provided</scope>
        </dependency>
    </dependencies>

    <dependencyManagement>
        <dependencies>
            <dependency>
                <groupId>org.springframework.cloud</groupId>
                <artifactId>spring-cloud-dependencies</artifactId>
                <version>Greenwich.RELEASE</version>
                <type>pom</type>
                <scope>import</scope>
            </dependency>
        </dependencies>
    </dependencyManagement>

    <repositories>
        <repository>
            <id>spring-snapshots</id>
            <name>Spring Snapshots</name>
            <url>http://repo.spring.io/libs-snapshot-local</url>
            <snapshots>
                <enabled>true</enabled>
            </snapshots>
        </repository>
        <repository>
            <id>spring-milestones</id>
            <name>Spring Milestones</name>
            <url>http://repo.spring.io/libs-milestone-local</url>
            <snapshots>
                <enabled>false</enabled>
            </snapshots>
        </repository>
        <repository>
            <id>spring-releases</id>
            <name>Spring Releases</name>
            <url>http://repo.spring.io/libs-release-local</url>
            <snapshots>
                <enabled>false</enabled>
            </snapshots>
        </repository>
    </repositories>
    <pluginRepositories>
        <pluginRepository>
            <id>spring-snapshots</id>
            <name>Spring Snapshots</name>
            <url>http://repo.spring.io/libs-snapshot-local</url>
            <snapshots>
                <enabled>true</enabled>
            </snapshots>
        </pluginRepository>
        <pluginRepository>
            <id>spring-milestones</id>
            <name>Spring Milestones</name>
            <url>http://repo.spring.io/libs-milestone-local</url>
            <snapshots>
                <enabled>false</enabled>
            </snapshots>
        </pluginRepository>
    </pluginRepositories>

    <build>
        <plugins>
            <plugin>
                <groupId>org.springframework.boot</groupId>
                <artifactId>spring-boot-maven-plugin</artifactId>
                <version>2.1.6.RELEASE</version>
            </plugin>
        </plugins>
    </build>
</project>
三.eureka的高可用
1.准备两个以上eurekaServer,需要互相注册
本文搭建的是三个,修改eurekaServer的application.yml文件,内容如下:
1.1 注意这两个属性被注释掉了,	register-with-eureka和 fetch-registry
1.2 defaultZone 需要填写其他EurekaServer的地址,使用逗号隔开
spring:
  application:
    name: eureka-server
server:
  port: 8001 #端口
#配置eureka server
eureka:
    instance:
      hostname: localhost #主机地址名称
    client:
      #register-with-eureka: false  # 是否将自己注册到注册中心
      #fetch-registry: false   # 是否从eureka中获取注册信息
      service-url: #配置暴露给Eureka Client(客户端)的请求地址
        defaultZone: http://127.0.0.1:9000/eureka/,http://127.0.0.1:8000/eureka/  # eureka 服务地址,如果是集群的话;需要指定其它集群eureka地址,使用逗号隔开
      #或者 http://${eureka.client.instance.hostname}:${server.port}/eureka/
2.需要将所有的服务注册到多个eurekaServer上
server:
  port: 9002 #端口
spring:
  application:
    name: service-order #服务名称
  datasource:
    driver-class-name: com.mysql.jdbc.Driver
    url: jdbc:mysql://localhost:3306/shop?useUnicode=true&characterEncoding=utf8
    username: root
    password: root
  jpa:
    database: MySQL
    show-sql: true
    open-in-view: true
#配置Eureka
eureka:
  client:
    service-url:
      defaultZone: http://127.0.0.1:9000/eureka/,http://127.0.0.1:8000/eureka/,http://127.0.0.1:8001/eureka/ #EurekaService的路径
  instance:
    prefer-ip-address: true #使用ip地址注册
四.高可用产生的细节问题解决
1.eureka服务控制台显示ip的问题
如图所示未显示ip


在服务提供者,通过eureka.instance.instance-id配置控制台显示服务器ip
instance-id: ${spring.cloud.client.ip-address}:${server.port} #向注册中心中注册服务id
2.Eureka的服务剔除问题
提供服务者每隔30秒发送一次心跳,如果90s没有发送心跳,表示宕机,想缩短时间可以通过:
在服务提供者,设置心跳间隔,设置续约到期时间

lease-renewal-interval-in-seconds: 5 #发送心跳的间隔
lease-expiration-duration-in-seconds: 4000 #续约到期的时间
3.自我保护机制
自我保护机制一旦开启将不再剔服务(在测试阶段可以关闭),正式上线尽量不修改,因为eureka会有好多的算法。

关闭配置如下:
eureka中配置关闭自我保护和剔除服务间隔

  server:
        enable-self-preservation: false  #关闭自我保护
        eviction-interval-timer-in-ms: 4000 #单位毫秒,剔除服务的间隔时间