setting.xml 是全局级别的配置文件,主要用于配置 maven 的运行环境等一系列通用的属性。
pom.xml 是项目级别的配置文件 。 pom 作为项目对象模型。通过 xml 表示 maven 项目,使用 pom.xml 来实现。主要描述了:项目的 maven 坐标、依赖关系、开发者需要遵循的规则、缺陷管理系统、组织和 licenses、项目的 url、项目的依赖性,以及其他所有的项目相关因素。
一、基础配置
<project xmlns="http://maven.apache.org/POM/4.0.0" xmlns:xsi="http://www.w3.org/2001/XMLSchema-instance"
    xsi:schemaLocation="http://maven.apache.org/POM/4.0.0http://maven.apache.org/xsd/maven-4.0.0.xsd">

    <!-- 模型版本。maven2.0必须是这样写,现在是maven2唯一支持的版本 -->
    <modelVersion>4.0.0</modelVersion>

    <!-- 公司或者组织的唯一标志,并且配置时生成的路径也是由此生成, 如 cn.edu.ouc,maven 会将该项目打成的 jar 包放本地路径:/cn/edu/ouc -->
    <groupId>cn.edu.ouc</groupId>
    <!-- 本项目的唯一ID,一个groupId下面可能多个项目,就是靠artifactId来区分的 -->
    <artifactId>pom-learning</artifactId>
    <!-- 本项目目前所处的版本号 -->
    <version>1.0.0-SNAPSHOT</version>
    <!-- 打包的机制,如 pom、jar、maven-plugin、ejb、war、ear、rar和par,默认为jar -->
    <packaging>jar</packaging>

  	<parent>
        <groupId>org.springframework.boot</groupId>
        <artifactId>spring-boot-starter-parent</artifactId>
        <version>2.4.3</version>
    </parent>

    <!-- 帮助定义构件输出的一些附属构件,附属构件与主构件对应,有时候需要加上classifier才能唯一的确定该构件 不能直接定义项目的classifer,因为附属构件不是项目直接默认生成的,而是由附加的插件帮助生成的 -->
    <classifier>...</classifier>

    <!-- 为 pom 定义一些常量,在 pom 中的其它地方可以直接引用这些变量。使用方式如下:${file.encoding} -->
    <properties>
        <file.encoding>UTF-8</file.encoding>
        <java.source.version>1.5</java.source.version>
        <java.target.version>1.5</java.target.version>
    </properties>

    <!-- 定义本项目的依赖关系 -->
    <dependencies>
        <!-- 每个dependency都对应这一个jar包 -->
        <dependency>
            <!--一般情况下,maven是通过groupId、artifactId、version这三个元素值(俗称坐标)来检索该构件, 然后引入你的工程。如果别人想引用你现在开发的这个项目(前提是已开发完毕并发布到了远程仓库),-->
            <!--就需要在他的pom文件中新建一个dependency节点,将本项目的groupId、artifactId、version写入, maven就会把你上传的jar包下载到他的本地 -->
            <groupId>org.springframework</groupId>
      		<artifactId>spring-webmvc</artifactId>
      		<version>5.1.5.RELEASE</version>
            <!-- maven认为,程序对外部的依赖会随着程序的所处阶段和应用场景而变化,所以maven中的依赖关系有作用域(scope)的限制。 -->
            <!--scope包含如下的取值:compile(编译范围)、provided(已提供范围)、runtime(运行时范围)、test(测试范围)、system(系统范围) -->
            <scope>test</scope>
            <!-- 设置子项目是否默认继承该依赖:默认为 false,即子项目默认都继承,子项目不需要显示的引入;若为 true 则子项目必需显示的引入,与dependencyManagement里定义的依赖类似  -->
            <optional>false</optional>
            <!-- 屏蔽依赖关系,使其不起作用。比如项目中使用的libA依赖某个库的1.0版,libB依赖某个库的2.0版,现在想统一使用2.0版,就应该屏蔽掉对1.0版的依赖 -->
            <exclusions>
                <exclusion>
                    <groupId>org.slf4j</groupId>
                    <artifactId>slf4j-api</artifactId>
                </exclusion>
            </exclusions>
        </dependency>
    </dependencies>
    ...
</project>
一般来说,上面的几个配置项对任何项目都是必不可少的,定义了项目的基本属性。
1、<parent> 标签< parent> 用于引用父工程,统一管理默认配置以及 jar 包的版本,其依赖需要在子工程中定义才有效。
1)使用 spring-boot-starter-parentspring-boot-starter-parent 是一个特殊的 starter,它用来提供相关的 Maven 默认依赖:定义
Java 编译版本为 1.8 ;项目使用 UTF-8 编码;继承自 spring-boot-dependencies,这个里边定义了依赖的版本,也正是因为继承了这个依赖,所以我们在写依赖时才不需要写版本号;执行打包操作的配置;自动化的资源过滤;自动化的插件配置;针对 application.properties 和 application.yml 的资源过滤,包括通过 profile 定义的不同环境的配置文件。2)使用自定义 parent
但是并非所有的公司都需要这个 parent,有的时候,公司会自定义 parent,我们的 SpringBoot 项目只能继承一个 parent,继承了公司内部的 parent 就不能再继承这个了,这个时候怎么办呢?
● 对于依赖版本,我们可以定义 <dependencyManagement> 节点,然后在里面定义好版本号,接下来引用依赖时也就不用写版本号了,像下面这样:<dependencyManagement> <dependencies> <dependency> <groupId>org.springframework.boot</groupId> <artifactId>spring-boot-starter-parent</artifactId> <version>2.3.1.RELEASE</version> <type>pom</type> <scope>import</scope> </dependency> </dependencies> </dependencyManagement>这样写之后,就可以不用继承spring-boot-starter-parent了,但依赖的版本号问题虽然解决了,但是关于打包的插件、编译的JDK版本、文件的编码格式等等这些配置,在没有parent的时候,这些统统要自己去配置。
● Java版本的配置很简单,添加一个plugin即可:<plugin> <groupId>org.apache.maven.plugins</groupId> <artifactId>maven-compiler-plugin</artifactId> <version>3.8.1</version> <configuration> <source>1.8</source> <target>1.8</target> </configuration> </plugin>● 编码格式,在pom.xml中加入如下配置:
<properties>
	<project.build.sourceEncoding>UTF-8</project.build.sourceEncoding>
	<project.reporting.outputEncoding>UTF-8</project.reporting.outputEncoding>
</properties>
2、classifier 元素
这里有必要对一个不太常用的属性 classifier 做一下解释,因为有时候引用某个 jar 包,classifier 不写的话会报错。
classifier 元素用来帮助定义构件输出的一些附属构件。附属构件与主构件对应,比如主构件是 kimi-app-2.0.0.jar,该项目可能还会通过使用一些插件生成,如 kimi-app-2.0.0-javadoc.jar (Java文档)、kimi-app-2.0.0-sources.jar(Java源代码)这样两个附属构件。这时候javadoc、sources 就是这两个附属构件的 classifier,这样附属构件也就拥有了自己唯一的坐标。
3、classifier 的用途:
1)maven download javadoc / sources jar 包的时候,需要借助 classifier 指明要下载那个附属构件
2)引入依赖的时候,有时候仅凭 groupId、artifactId、version 无法唯一的确定某个构件,需要借助 classifier 来进一步明确目标。比如 JSON-lib,有时候会同一个版本会提供多个jar包,在 JDK1.5 环境下是一套,在 JDK1.3 环境下是一套:
引用它的时候就要注明 JDK 版本,否则 maven 不知道你到底需要哪一套jar包:<dependency> <groupId>net.sf.json-lib</groupId> <artifactId>json-lib</artifactId> <version>2.4</version> <classifier>jdk15</classifier> </dependency>
二、构建配置
<build>

    <!-- 产生的构建的文件名,默认值是 ${artifactId}-${version} -->
    <finalName>myPorjectName</finalName>

    <!-- 构建产生的所有文件存放的目录,默认为 ${basedir}/target,即项目根目录下的 target -->
    <directory>${basedir}/target</directory>

    <!--当项目没有规定目标(Maven2叫做阶段(phase))时的默认值 -->
    <!--必须跟命令行上的参数相同例如jar:jar,或者与某个阶段(phase)相同例如install、compile等 -->
    <defaultGoal>install</defaultGoal>

    <!--当 filtering 开关打开时,使用到的过滤器属性文件列表。 -->
    <!--项目配置信息中诸如 ${spring.version} 之类的占位符会被属性文件中的实际值替换掉 -->
    <filters>
        <filter>../filter.properties</filter>
    </filters>

    <!--项目相关的所有资源路径列表,例如和项目相关的配置文件、属性文件,这些资源被包含在最终的打包文件里。 -->
    <resources>

        <resource>
            <!--描述了资源的目标路径。该路径相对target/classes目录(例如${project.build.outputDirectory})。 -->
            <!--举个例子,如果你想资源在特定的包里(org.apache.maven.messages),你就必须该元素设置为org/apache/maven/messages。 -->
            <!--然而,如果你只是想把资源放到源码目录结构里,就不需要该配置。 -->
            <targetPath>resources</targetPath>
            <!--是否使用参数值代替参数名。参数值取自properties元素或者文件里配置的属性,文件在filters元素里列出。 -->
            <filtering>true</filtering>
            <!--描述存放资源的目录,该路径相对POM路径 -->
            <directory>src/main/resources</directory>

            <!--要被打包的资源列表 -->
            <includes>
                <include>**/*.properties</include>
                <include>**/*.xml</include>
            </includes>

            <!--排除的资源列表,这些资源不会被打包。如果<include>与<exclude>划定的范围存在冲突,以<exclude>为准 -->
            <excludes>
                <exclude>jdbc.properties</exclude>
            </excludes>

        </resource>
    </resources>

    <!--单元测试需要用到的的所有资源路径,配置方法与resources类似 -->
    <testResources>
        <testResource>
            <targetPath />
            <filtering />
            <directory />
            <includes />
            <excludes />
        </testResource>
    </testResources>

    <!--项目源码目录,当构建项目的时候,构建系统会编译目录里的源码。该路径是相对于pom.xml的相对路径。 -->
    <sourceDirectory>${basedir}\src\main\java</sourceDirectory>

    <!--项目脚本源码目录,该目录和源码目录不同,绝大多数情况下,该目录下的内容会被拷贝到输出目录(因为脚本是被解释的,而不是被编译的)。 -->
    <scriptSourceDirectory>${basedir}\src\main\scripts
    </scriptSourceDirectory>

    <!--项目单元测试使用的源码目录,当测试项目的时候,构建系统会编译目录里的源码。该路径是相对于pom.xml的相对路径。 -->
    <testSourceDirectory>${basedir}\src\test\java</testSourceDirectory>

    <!--被编译过的应用程序class文件存放的目录。 -->
    <outputDirectory>${basedir}\target\classes</outputDirectory>

    <!--被编译过的测试class文件存放的目录。 -->
    <testOutputDirectory>${basedir}\target\test-classes</testOutputDirectory>

    <!--项目的一系列构建扩展,它们是一系列build过程中要使用的产品,会包含在running bulid's classpath里面。 -->
    <!--他们可以开启extensions,也可以通过提供条件来激活plugins。 -->
    <!--简单来讲,extensions是在build过程被激活的产品 -->
    <extensions>

        <!--例如,通常情况下,程序开发完成后部署到线上Linux服务器,可能需要经历打包、将包文件传到服务器、SSH连上服务器、敲命令启动程序等一系列繁琐的步骤。 -->
        <!--实际上这些步骤都可以通过Maven的一个插件 wagon-maven-plugin 来自动完成 -->
        <!--下面的扩展插件wagon-ssh用于通过SSH的方式连接远程服务器, -->
        <!--类似的还有支持ftp方式的wagon-ftp插件 -->
        <extension>
            <groupId>org.apache.maven.wagon</groupId>
            <artifactId>wagon-ssh</artifactId>
            <version>2.8</version>
        </extension>

    </extensions>

    <!--使用的插件列表 。 -->
    <plugins>
        <plugin>
            <groupId></groupId>
            <artifactId>maven-assembly-plugin</artifactId>
            <version>2.5.5</version>

            <!--在构建生命周期中执行一组目标的配置。每个目标可能有不同的配置。 -->
            <executions>
                <execution>

                    <!--执行目标的标识符,用于标识构建过程中的目标,或者匹配继承过程中需要合并的执行目标 -->
                    <id>assembly</id>

                    <!--绑定了目标的构建生命周期阶段,如果省略,目标会被绑定到源数据里配置的默认阶段 -->
                    <phase>package</phase>

                    <!--配置的执行目标 -->
                    <goals>
                        <goal>single</goal>
                    </goals>

                    <!--配置是否被传播到子POM -->
                    <inherited>false</inherited>

                </execution>
            </executions>

            <!--作为DOM对象的配置,配置项因插件而异 -->
            <configuration>
                <finalName>${finalName}</finalName>
                <appendAssemblyId>false</appendAssemblyId>
                <descriptor>assembly.xml</descriptor>
            </configuration>

            <!--是否从该插件下载Maven扩展(例如打包和类型处理器), -->
            <!--由于性能原因,只有在真需要下载时,该元素才被设置成true。 -->
            <extensions>false</extensions>

            <!--项目引入插件所需要的额外依赖 -->
            <dependencies>
                <dependency>...</dependency>
            </dependencies>

            <!--任何配置是否被传播到子项目 -->
            <inherited>true</inherited>

        </plugin>
    </plugins>

    <!--主要定义插件的共同元素、扩展元素集合,类似于dependencyManagement, -->
    <!--所有继承于此项目的子项目都能使用。该插件配置项直到被引用时才会被解析或绑定到生命周期。 -->
    <!--给定插件的任何本地配置都会覆盖这里的配置 -->
    <pluginManagement>
        <plugins>...</plugins>
    </pluginManagement>

</build>
Maven 是通过 pom.xml 来执行任务的,其中的 <build> 标签描述了如何来编译及打包项目,而具体的编译和打包工作是通过 build 中配置的 plugin 来完成。当然plugin配置不是必须的,默认情况下,Maven 会绑定以下几个插件来完成基本操作。

在 Maven的pom.xml 文件中,存在如下两种 <build>:
全局配置(project build):是<project>的直接子元素,针对整个项目的所有情况都有效;
局部配置(profile build):是<profile>的直接子元素,针对不同的profile配置。
字段说明
1、finalName:build目标文件的名称,默认情况为 ${artifactId}-${version}。
2、defaultGoal:执行 build 任务时,如果没有指定目标,将使用的默认值。如上配置,在命令行中执行 mvn,则相当于执行 mvn install。
3、directory:build 结果文件的存放目录,默认在 ${basedir}/target 目录。
4、filter:定义 *.properties 文件,包含一个 properties 列表,该列表会应用到支持 filter 的 resources 中。也就是说,定义在 filter 的文件中的 name=value 键值对,会在 build 时代替 ${name}
值应用到 resources 中。maven 的默认 filter 文件夹为 ${basedir}/src/main/filters。
5、resources: 一个 resource 元素的列表。每一个都描述与项目关联的文件是什么和在哪里。
6、testResources: 定义和resource类似,只不过在test时使用。
7、Project Build 特有的 <…Directory>:往往配置在父项目中,供所有父子项目使用。
8、Project Build 特有的 <extensions>:<extensions> 是
执行构建过程中可能用到的其他工具,在执行构建的过程中被加入到 classpath 中。也可以通过 <extensions>**构建插件,从而改变构建的过程。通常,通过 <extensions> 给出通用插件的一个具体实现,用于构建过程。
9、plugins:<plugins> 给出构建过程中所用到的插件。
● groupId
● artifactId
● version
● extensions:是否加载该插件的扩展,默认false;
● inherited:该插件的 configuration 中的配置是否可以被(继承该POM的其他Maven项目)继承,默认true;
● configuration:该插件所需要的特殊配置,在父子项目之间可以覆盖或合并;
● dependencies:该插件所特有的依赖类库;
● executions:该插件的某个goal(一个插件中可能包含多个goal)的执行方式。一个execution有如下设置:id:唯一标识;
goals:要执行的插件的goal(可以有多个),如<goal>run</goal>;
phase:插件的goal要嵌入到Maven的phase中执行,如verify;
inherited:该execution是否可被子项目继承;
configuration:该execution的其他配置参数;10、<pluginManagement> :在 <build> 中,<pluginManagement> 与 <plugins> 并列,两者之间的关系类似于 <dependencyManagement> 与 <dependencies> 之间的关系。<pluginManagement> 中也配置 <plugin>,其配置参数与 <plugins> 中的 <plugin>完全一致。
<pluginManagement> 往往出现在父项目中,其中配置的 <plugin>往往通用于子项目。子项目中只要在 <plugins> 中以 <plugin> 声明该插件,该插件的具体配置参数则继承自父项目中 <pluginManagement> 对该插件的配置,从而避免在子项目中进行重复配置。
三、profile 配置
有些时候,一个项目需要适配多种开发环境,如数据库不同(mysql、oracle、db2等)、如开发环境不同(dev、pro、test)等不同的环境需要指定不同的配置。这种情况下,我们就可以采用配置 profiles 来控制。在启动的时候指定不同的配置组合,maven进行build时会自动选择指定配置。
    <!--  定义配置文件  -->
    <profiles>
        <!--  配置文件  id 名字    properties 参数   -->
        <profile>
            <id>dev</id>
            <!--自动触发profile的条件逻辑。Activation是profile的开启钥匙。 -->
            <activation>
            	 <!--profile默认是否激活的标识 -->
                <activeByDefault>true</activeByDefault>
                <!--activation有一个内建的java版本检测,如果检测到jdk版本与期待的一样,profile被激活。 -->
            	<jdk>1.7</jdk>
            	<!--当匹配的操作系统属性被检测到,profile被激活。os元素可以定义一些操作系统相关的属性。 -->
            	<os>
                	<!--激活profile的操作系统的名字 -->
                	<name>Windows XP</name>
                	<!--激活profile的操作系统所属家族(如 'windows') -->
                	<family>Windows</family>
                	<!--激活profile的操作系统体系结构 -->
                	<arch>x86</arch>
                	<!--激活profile的操作系统版本 -->
                	<version>5.1.2600</version>
            	</os>
            	<!--如果Maven检测到某一个属性(其值可以在POM中通过${名称}引用),其拥有对应的名称和值,Profile就会被激活。 -->
            	<!-- 如果值字段是空的,那么存在属性名称字段就会激活profile,否则按区分大小写方式匹配属性值字段 -->
            	<property>
                	<!--激活profile的属性的名称 -->
                	<name>profileProperty</name>
                	<!--激活profile的属性的值 -->
                	<value>dev</value>
            	</property>
            	<!--提供一个文件名,通过检测该文件的存在或不存在来激活profile。missing检查文件是否存在,如果不存在则激活profile。 -->
            	<!--另一方面,exists则会检查文件是否存在,如果存在则激活profile。 -->
            	<file>
                	<!--如果指定的文件存在,则激活profile。 -->
                	<exists>/usr/local/hudson/hudson-home/jobs/maven-guide-zh-to-production/workspace/</exists>
                	<!--如果指定的文件不存在,则激活profile。 -->
                	<missing>/usr/local/hudson/hudson-home/jobs/maven-guide-zh-to-production/workspace/</missing>
            	</file>
            </activation>
            <properties>
            	<!-- 该 profile 的映射路径 -->
                <profiles.active>dev</profiles.active>
                <!--  众多参数配置 -->
                <db.driver>com.mysql.jdbc.Driver</db.driver>
            	<db.url>jdbc:mysql://localhost:3306/test</db.url>
            	<db.username>root</db.username>
            	<db.password>root</db.password>
            </properties>
            <dependencies>
                <dependency>
                    <groupId>org.springframework.boot</groupId>
                    <artifactId>spring-boot-starter-quartz</artifactId>
                </dependency>
                <dependency>
                    <groupId>mysql</groupId>
                    <artifactId>mysql-connector-java</artifactId>
                    <version>5.1.43</version>
                </dependency>
            </dependencies>
            <!-- 打包配置 build -->
            <build>
        		<resources>
            		<!-- 配置一个 resource -->
            		<resource>
            			<!-- 资源文件所在的路径 -->
                		<directory>src/main/resources/</directory>
                		<!-- 打包自动忽略以下资源文件,不会被打包进来 -->
                		<excludes>
                    		<exclude>config/dev/*</exclude>
                    		<exclude>config/pro/*</exclude>
                    		<exclude>config/test/*</exclude>
                		</excludes>
                		<!-- 包含进来,防止打包时忽略掉除环境配置文件以外的对象 -->
                		<includes>
                    		<include>views/*</include>
                		</includes>
            		</resource>
            		<resource>
                		<!--这里是关键! 根据不同的环境,把对应文件夹里的配置文件打包-->
                		<directory>src/main/resources/config/${profiles.active}</directory>
            		</resource>
        		</resources>
    		</build>
        </profile>

        <profile>
            <id>pro</id>
            <properties>
                <profiles.active>pro</profiles.active>
                <!--  众多参数配置 -->
            </properties>
        </profile>

        <profile>
            <id>test</id>
            <properties>
                <profiles.active>test</profiles.active>
                <!--  众多参数配置 -->
            </properties>
        </profile>
    </profiles>

 	 <!-- 全局 build -->
    <build>
        <plugins>
            <plugin>
                <groupId>org.springframework.boot</groupId>
                <artifactId>spring-boot-maven-plugin</artifactId>
            </plugin>
        </plugins>
    </build>
四、springboot 打包配置
SpringBoot 自带Tomcat,所以我们的项目可以单独部署,不需要依赖 Window、Linux 系统中的服务器,所以打包出来的 Jar 包是可以直接运行的。
打包插件
SpringBoot 项目可以通过 maven 的插件进行打包,分为两种情况:
(1)项目以 spring-boot-starter-parent 作为 parent
<plugin>
	<groupId>org.springframework.boot</groupId>
	<artifactId>spring-boot-maven-plugin</artifactId>
</plugin>
(2)项目不以 spring-boot-starter-parent 作为 parent
有时项目的 parent 不是 spring-boot-starter-parent,而是自定义的配置,此时 spring-boot-maven-plugin 插件不能直接使用,需要做一些修改。
<plugin>
      <groupId>org.springframework.boot</groupId>
      <artifactId>spring-boot-maven-plugin</artifactId>
      <version>2.0.4.RELEASE</version>
      <configuration>
     	 <!--  打包出来的jar/war就是可执行的 -->
      	<executable>true</executable>
      </configuration>
      <executions>
        <execution>
          <goals>
            <goal>repackage</goal>
          </goals>
        </execution>
      </executions>
</plugin>
经过这样配置,就可以进行打包了。
1、Maven 项目结构
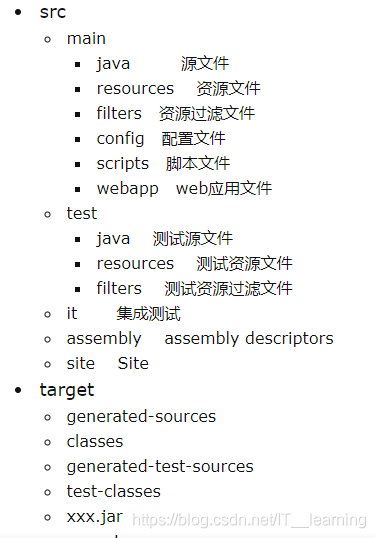
Maven 项目的标准目录结构:

构建 Maven 项目的时候,如果没有进行特殊的配置,Maven 会按照标准的目录结构查找和处理各种类型文件。
(1)
src/main/java 和 src/test/java 这两个目录中的所有 *.java 文件会分别在 compile 和 test-comiple 阶段被编译,编译结果分别放到了 target/classes 和 targe/test-classes 目录中,但是这两个目录中的其他文件都会被忽略掉。
(2)src/main/resouces 和 src/test/resources 这两个目录中的文件也会分别被复制到 target/classes 和target/test-classes 目录中。
在 springboot 项目中,打包插件默认会把这个目录中的所有内容打入到 jar 包或者 war 包中,然后放在 BOOT-INF 目录下。

2、打包时资源文件的配置
(1)打包 src/main/java 目录下的 xml
一般情况下,我们用到的资源文件(各种xml,properites,xsd文件等)都放在src/main/resources下面,利用 maven 打包时,maven 能把这些资源文件打包到相应的 jar 或者 war 里。
有时候,比如 mybatis 的 mapper.xml 文件,我们习惯把它和 Mapper.java 放一起,都在 src/main/java 下面,这样利用 maven 打包时,就需要修改 pom.xml 文件,来把 mapper.xml 文件一起打包进 jar 或者 war 里了,否则,这些文件不会被打包的。(maven认为src/main/java只是java的源代码路径)
例如:
默认情况下,执行 mvn clean package 打包命令后在 target\classes 目录下不会把 UserMapper.xml 打包到下 mapper 目录下。

解决方法有如下几种:
1)配置 POM.XML 的 resource 把 xml 也打包到 mapper 目录下
    <build>
       <!-- 资源目录 -->
        <resources>
            <resource>
                <!-- 设定主资源目录  -->
                <directory>src/main/java</directory>

                <!-- maven default生命周期,process-resources阶段执行maven-resources-plugin插件的resources目标处理主资源目下的资源文件时,只处理如下配置中包含的资源类型
-->
				 <includes>
					  <include>**/*.xml</include>
				 </includes>

                <!-- maven default生命周期,process-resources阶段执行maven-resources-plugin插件的resources目标处理主资源目下的资源文件时,不处理如下配置中包含的资源类型(剔除下如下配置中包含的资源类型)-->
				<excludes>
					<exclude>**/*.yaml</exclude>
				</excludes>

                <!-- maven default生命周期,process-resources阶段执行maven-resources-plugin插件的resources目标处理主资源目下的资源文件时,指定处理后的资源文件输出目录,默认是${build.outputDirectory}指定的目录-->

                <!--<targetPath>${build.outputDirectory}</targetPath> -->

                <!-- maven default生命周期,process-resources阶段执行maven-resources-plugin插件的resources目标处理主资源目下的资源文件时,是否对主资源目录开启资源过滤
-->
                <filtering>true</filtering>
            </resource>
        </resources>
    </build>
2)maven-resources-plugin 插件
为了使项目结构更为清晰,Maven区别对待Java代码文件和资源文件,maven-compiler-plugin用来编译Java代码,maven-resources-plugin则用来处理资源文件。
默认的主资源文件目录是src/main/resources,很多用户会需要添加额外的资源文件目录,这个时候就可以通过配置maven-resources-plugin来实现。<!-- 利用此plugin,把源代码中的xml文件,打包到相应位置,这里主要是为了打包Mybatis的mapper.xml文件--> <plugin> <artifactId>maven-resources-plugin</artifactId> <version>2.5</version> <executions> <execution> <id>copy-xmls</id> <phase>process-sources</phase> <goals> <goal>copy-resources</goal> </goals> <configuration> <outputDirectory>${basedir}/target/classes</outputDirectory> <resources> <resource> <directory>${basedir}/src/main/java</directory> <includes> <include>**/*.xml</include> </includes> </resource> </resources> </configuration> </execution> </executions> </plugin>3)build-helper-maven-plugin 插件
<!-- 利用此plugin,把源代码中的xml文件,打包到相应位置,这里主要是为了打包Mybatis的mapper.xml文件  -->
            <plugin>
                <groupId>org.codehaus.mojo</groupId>
                <artifactId>build-helper-maven-plugin</artifactId>
                <version>1.8</version>
                <executions>
                    <execution>
                        <id>add-resource</id>
                        <phase>generate-resources</phase>
                        <goals>
                            <goal>add-resource</goal>
                        </goals>
                        <configuration>
                            <resources>
                                <resource>
                                    <directory>src/main/java</directory>
                                    <includes>
                                        <include>**/*.xml</include>
                                    </includes>
                                </resource>
                            </resources>
                        </configuration>
                    </execution>
                </executions>
            </plugin>
(2)src/main/resources 目录下的 xml 等资源文件不被打包
默认 resources 目录下的文件都会被打包,如果想 resources 目录下的 xml 文件不被打包,可通过如下配置:
	<!--过滤resource下的文件-->
	<resources>
        <resource>
            <directory>src/main/resources</directory>
            <includes>
                <include>*.properties</include>  <!--打包properties文件-->
            </includes>
            <excludes>
                <exclude>*.xml</exclude>  <!--过滤xml与yaml文件-->
                <exclude>*.yaml</exclude>
            </excludes>
        </resource>
    </resources>
当然也可以通过插件来实现:
    <plugin>
        <artifactId>maven-resources-plugin</artifactId>
        <executions>
            <execution>
                <id>copy-resources</id>
                <phase>validate</phase>
                <goals>
                    <goal>copy-resources</goal>
                </goals>
                <configuration>

					<!-- 并把文件复制到target/conf目录下-->
                    <outputDirectory>${project.build.directory}/conf</outputDirectory>
                    <resources>
                        <resource>
                            <directory>src/main/resources</directory>
							<!-- 指定不需要处理的资源 <excludes> <exclude>WEB-INF/*.*</exclude> </excludes> -->
							<excludes>
								<exclude>**/*.xml</exclude>
							</excludes>
                            <filtering>true</filtering>
                        </resource>
                    </resources>
                </configuration>
            </execution>
        </executions>
    </plugin>
实现的效果如下:

编译好之后,会在target目录下生成 conf 目录并且把 resources 目录下的所有文件都自动拷贝到 target/conf/ 目录下。
四、仓库配置
五、发布配置
六、pom 项目依赖、继承与聚合
1、项目之间的相互依赖
现在有两个项目,HelloWorld1 和 HelloWorld2,如果 HelloWorld1 要引用 HelloWorld2 中的方法,也就是 HelloWorld1 要依赖 HelloWorld2。做法如下:
(1)在 helloworld1 项目之中,执行打包命令将当前项目打包成
可依赖的 jar 包,并放进本地仓库当中;
(2)在helloworld2 项目的 pom.xml 之中,加入 helloworld1 依赖。helloworld 的 jar 包坐标:<dependency> <groupId>cn.edu.ouc</groupId> <artifactId>HelloWorld</artifactId> <version>1.0-SNAPSHOT</version> </dependency>(3)通过 import 导入 jar 包,就成功的引入我们自定义的项目 jar 包。这样就可以使用
helloworld1 项目的所有方法。
如何打包成可依赖的 jar 包
在 SpringBoot 工程中使用 spring-boot-maven-plugin 的默认配置 build,那么所生成的 jar 包虽然是可执行的,但却是不可被依赖的。
通过修改 pom.xml 中 spring-boot-maven-plugin 的配置,可以让所在工程一次打包生成两个 jar 包,其中 XXX.jar 可作为其它工程的依赖,XXX-exec.jar 可被执行。<plugin> <groupId>org.springframework.boot</groupId> <artifactId>spring-boot-maven-plugin</artifactId> <version>2.0.4.RELEASE</version> <executions> <execution> <goals> <!--可以把依赖的包都打包到生成的Jar包中 --> <goal>repackage</goal> </goals> </execution> </executions> <!--生成可执行 Jar 包 --> <configuration> <classifier>exec</classifier> </configuration> </plugin>classifier 指定了可执行 jar 包的名字,默认的 jar 包则作为可被其他程序依赖的 Artifact。配置完成后对项目进行打包,会生成以下两个 jar 包。
SpringbootDemo-1.0-SNAPSHOT.jar 是一个可以被其他项目依赖的 jar,
SpringbootDemo-1.0-SNAPSHOT-exec.jar 是一个可执行的 jar。
对其分别解压,可以看到 class 路径是不同的:
2、maven 父子项目依赖的继承
现在有两个项目 A 和 B,继承就是说 B 项目之中依赖的包 A 项目也可以使用。一般用于统一管理依赖版本号等
具体实现如下:
(1)创建父工程 parent,
打包方式为 pom,并在其中依赖 junit.jar,注意要将依赖写在 <dependencyManagement> 标签之中。Maven 提供了 <dependencyManagement> 元素既能让子模块继承到父模块的依赖配置,又能保证子模块依赖的使用灵活性。
在 <dependencyManagement> 标签下的依赖声明不会将依赖直接引入到父工程和子工程中,不过它能约束 dependencies 下的依赖配置;子模块中只有在<dependenices> 标签中声明的依赖才会被继承并引入到子工程中。如下:
(2)在子工程 Helloworld 的 pom.xml 当中添加父工程标签,这里的
<relativePath> 是父工程的 pom.xml 文件的位置,其他是父工程的 gav。如下:<parent> <groupId>org.apache.maven</groupId> <artifactId>parent</artifactId> <version>1.0-SNAPSHOT</version> <relativePath>../parent/pom.xml</relativePath> </parent>(3)在子工程当中,声明需要使用父类当中的哪些 jar 包,
声明写在 pom.xml 的 <dependenices> 标签之中,子模块不需要配置 jar 包的版本和作用域,只需配置 groupId 和 artifactId。如下:
可以看到有一个向上继承的符号,说明继承已经成功了。更新之后发现 junit 已经导入。
3、多模块项目的聚合
如果一个项目有多个模块,也叫做多重模块,或者合成项目。
如果不用聚合那么每次打包每个模块都要运行,但是用来聚合后,只运行一次就行了。
<project>
  <modelVersion>4.0.0<modelVersion>
  <groupId>cn.edu.ouc<groupId>
  <artifactId>my-parent<artifactId>
  <version>2.0<version>
  <modules>
  	<!-- 模块相对于pom文件的位置-->
    <module>my-project1<module>
    <module>my-project2<module>
  <modules>
<project>
如果多个模块有相同的内容,那么就可以用一个父模块来实现相同的内容,其他模块只要继承父模块就行了。
父模块中把所有 jar 包都引用进来,子模块就不用配置 jar 包的版本和作用域了。(继承)
反应堆:
在一个多模块的 Maven 项目中,反应堆是指所有模块组成的一个构建结构。反应堆包含了各个模块之间的继承与依赖关系,从而能够自动计算出合理的模块构建顺序。
<modules>
	<module>account-email</module>
	<module>account-persist</module>
	<module>account-parent</module>
</modules>
实际的构建顺序为: ~parent, ~email, ~persist。可见构建的顺序并不是声明的顺序。
该例中 account-email 和 account-persist 都依赖于 account-parent,那么 account-parent 就必须在另外两个模块之前构建。
实际的构建顺序是这样的:Maven 按声明顺序读取 POM,如果 POM 没有依赖模块,那么就构建该模块,否则就先构建其依赖的模块;如果依赖的模块还依赖于其他模块,则进一步构建依赖的依赖。模块之间的关系将反应堆构成一个有向非循环图,各个模块是该图的节点,依赖关系构成又向边,这个图
不允许出现循环,因此当出现 A 依赖于 B,B 又依赖于 A 的情况时 Maven 就会报错。
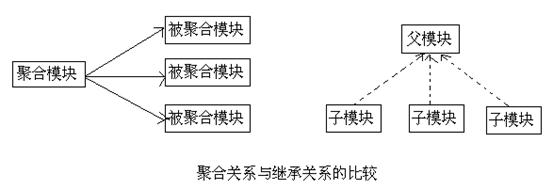
4、聚合与继承的关系

(1)区别 :
1)对于聚合模块来说,它知道有哪些被聚合的模块,但那些被聚合的模块不知道这个聚合模块的存在。
2)对于继承关系的父 POM 来说,它不知道有哪些子模块继承与它,但那些子模块都必须知道自己的父 POM是什么。
(2)共同点 :
1)
聚合 POM 与继承关系中的父 POM 的 packaging 都是 pom;2)
聚合模块与继承关系中的父模块除了 POM 之外都没有实际的内容。
现有的实际项目往往是一个POM既是聚合POM又是父POM,这么做主要是为了方便。


