SpringMVC集成springfox-swagger2
- 依赖管理
在整合之前,需要把所有使用到的依赖包全部引入。网上很多文章只是简单告诉读者引入swagger-springmvc-1.0.2.jar包,但是随后你发现这远远不够,还需要很多包,(这里只记录跟swagger相关的jar包,spring的包这里就不展示了)如下所示:
        <dependency>
            <groupId>io.springfox</groupId>
            <artifactId>springfox-swagger2</artifactId>
            <version>2.9.2</version>
        </dependency>
        <dependency>
            <groupId>io.springfox</groupId>
            <artifactId>springfox-swagger-ui</artifactId>
            <version>2.9.2</version>
        </dependency>
        <dependency>
            <groupId>io.swagger</groupId>
            <artifactId>swagger-annotations</artifactId>
            <version>1.5.20</version>
        </dependency>
        <dependency>
            <groupId>com.fasterxml.jackson.core</groupId>
            <artifactId>jackson-databind</artifactId>
            <version>2.12.1</version>
        </dependency>
这里再强调一下,网上好多文章都说引入前两个包就够了,然而我学习的时候是不行的,会报ClassNotFoundException,必须要手动引入第三个包。
- Swagger配置
Swagger的配置实际上就是自定义一个Config类,通过java编码的方式实现配置。代码如下:
package cn.qxgl.config;

import org.springframework.context.annotation.Bean;
import org.springframework.context.annotation.Configuration;
import org.springframework.web.servlet.config.annotation.EnableWebMvc;
import org.springframework.web.servlet.config.annotation.WebMvcConfigurerAdapter;
import springfox.documentation.builders.ApiInfoBuilder;
import springfox.documentation.builders.RequestHandlerSelectors;
import springfox.documentation.service.ApiInfo;
import springfox.documentation.spi.DocumentationType;
import springfox.documentation.spring.web.plugins.Docket;
import springfox.documentation.swagger2.annotations.EnableSwagger2;

@Configuration
@EnableSwagger2
@EnableWebMvc
public class SwaggerConfig extends WebMvcConfigurerAdapter {
    @Bean
    public Docket api() {
        return new Docket(DocumentationType.SWAGGER_2)
                .select()
//                .apis(RequestHandlerSelectors.any())
                .apis(RequestHandlerSelectors.basePackage("cn.qxgl.ssm.controller"))
                .build()
                .apiInfo(apiInfo());
    }

    private ApiInfo apiInfo() {
        return new ApiInfoBuilder()
                .title("spring-data-jpa-demoAPI 文档")               //大标题 title
                .description("spring-data-jpa-demo对外开放接口")             //小标题
                .version("1.0.0")                           //版本
                .termsOfServiceUrl("http://spring-data-jpa-demo.com")    //终端服务程序
                .license("spring-data-jpa-demo")                         //链接显示文字
                .licenseUrl("http://spring-data-jpa-demo.com")           //网站链接
                .build();
    }

    //已经在spring-mvc.xml中增加配置了
/*    @Override
    public void addResourceHandlers(ResourceHandlerRegistry registry)
    {
        registry.addResourceHandler("swagger-ui.html").addResourceLocations("classpath:/META-INF/resources/");
        registry.addResourceHandler("/webjars/**").addResourceLocations("classpath:/META-INF/resources/webjars/");
    }*/
}
上面这段代码是从网络上找到后根据自己的项目配置修改了的,对吧!但是,修改后会发现一个问题:SwaggerConfig无法注入。这是为什么呢?其实很简单,因为spring容器里没有SwaggerConfig类型的对象。解决办法:在spring-mvc的配置文件中加入以下配置即可。
<!--自动扫描,确保Spring工厂可以管理到这个类-->
    <context:component-scan base-package="cn.qxgl.config"/>
SwaggerConfig中注释掉的代码相当于在spring-mvc中配置了
   <!--Spring的静态资源映射路径-->
    <mvc:resources mapping="swagger-ui.html" location="classpath:/META-INF/resources/"/>
    <mvc:resources mapping="/webjars/**" location="classpath:/META-INF/resources/webjars/"/>
然后同时在spring-mvc中添加映射静态的配置(网上看到的)
<!--添加映射静态的配置 SwaggerConfig-->
    <mvc:default-servlet-handler />
到目前为止,我们已经完成了对所有接口方法的扫描解析功能,那解析得到什么内容呢?这需要我们自定义,自定义操作的对象就是接口方法。先看段代码:
package cn.qxgl.ssm.controller;

import cn.qxgl.ssm.domain.Product;
import cn.qxgl.ssm.service.IProductService;
import io.swagger.annotations.Api;
import io.swagger.annotations.ApiOperation;
import org.springframework.beans.factory.annotation.Autowired;
import org.springframework.stereotype.Controller;
import org.springframework.web.bind.annotation.RequestMapping;
import org.springframework.web.bind.annotation.RequestMethod;
import org.springframework.web.servlet.ModelAndView;

import java.util.List;

@Controller
@RequestMapping("/product")
@Api(tags = "产品管理")
public class ProductController {

    @Autowired
    private IProductService productService;

    //产品添加
    @RequestMapping("/save.do")
    @ApiOperation("产品-产品添加")
    public String save(Product product) throws Exception {
        productService.save(product);
        return "redirect:findAll.do";
    }

    //查询全部产品
    @RequestMapping(value = "/findAll.do",method = RequestMethod.GET)
    @ApiOperation("产品-查询全部产品")
    public ModelAndView findAll() throws Exception {
        ModelAndView mv = new ModelAndView();
        List<Product> ps = productService.findAll();
        mv.addObject("productList", ps);
        mv.setViewName("product-list1");
        return mv;
    }
}
上述代码是Controller中的一个方法,@ApiOperation注解对这个方法进行了说明,@ApiParam注解对方法参数进行了说明。关于这两个注解的使用,可以参看源码。这样子,Swagger就可以扫描接口方法,得到我们自定义的接口说明内容。
 说明:
 其中@ApiOperation和@ApiParam为添加的API相关注解,个参数说明如下:
 @ApiOperation(value = “接口说明”, httpMethod = “接口请求方式”, response = “接口返回参数类型”, notes = “接口发布说明”;其他参数可参考源码;
 @ApiParam(required = “是否必须参数”, name = “参数名称”, value = “参数具体描述”
- Swagger-UI配置
Swagger扫描解析得到的是一个json文档,对于用户不太友好。下面介绍swagger-ui,它能够友好的展示解析得到的接口说明内容。
??因为swagger-ui项目都是静态资源,restful形式的拦截方法会将静态资源进行拦截处理,所以在springmvc配置文件中需要配置对静态文件的处理方式。(即在上面已经有配置过的了)
   <!--Spring的静态资源映射路径-->
    <mvc:resources mapping="swagger-ui.html" location="classpath:/META-INF/resources/"/>
    <mvc:resources mapping="/webjars/**" location="classpath:/META-INF/resources/webjars/"/>
此时已经全部配置完毕!
但我启动的时候遇到了org.springframework.beans.factory.BeanCreationException: Error creating bean xxx的报错问题,后经过很长时间的排查,原因是
web.xml配置文件中url-pattern配置时只写了*.do,找不到相应的映射文件,这样会导致发起请求时,无法获得资源,网上查询时有人说加上
    <url-pattern>/s/*</url-pattern>
    <url-pattern>/api/*</url-pattern>
,我加上后也还是不可,后面直接将url-pattern设置为/就可以正常访问了
    <!-- 前端控制器(加载classpath:springmvc.xml 服务器启动创建servlet) -->
    <servlet>
        <servlet-name>dispatcherServlet</servlet-name>
        <servlet-class>org.springframework.web.servlet.DispatcherServlet</servlet-class>
        <!-- 配置初始化参数,创建完DispatcherServlet对象,加载springmvc.xml配置文件 -->
        <init-param>
            <param-name>contextConfigLocation</param-name>
            <param-value>classpath:spring-mvc.xml</param-value>
        </init-param>
        <!-- 服务器启动的时候,让DispatcherServlet对象创建 -->
        <load-on-startup>1</load-on-startup>
    </servlet>
    <servlet-mapping>
        <servlet-name>dispatcherServlet</servlet-name>
        <url-pattern>/</url-pattern>
        <!--<url-pattern>*.do</url-pattern>-->
        <!--<url-pattern>/s/*</url-pattern>-->
        <!--<url-pattern>/api/*</url-pattern>-->
    </servlet-mapping>
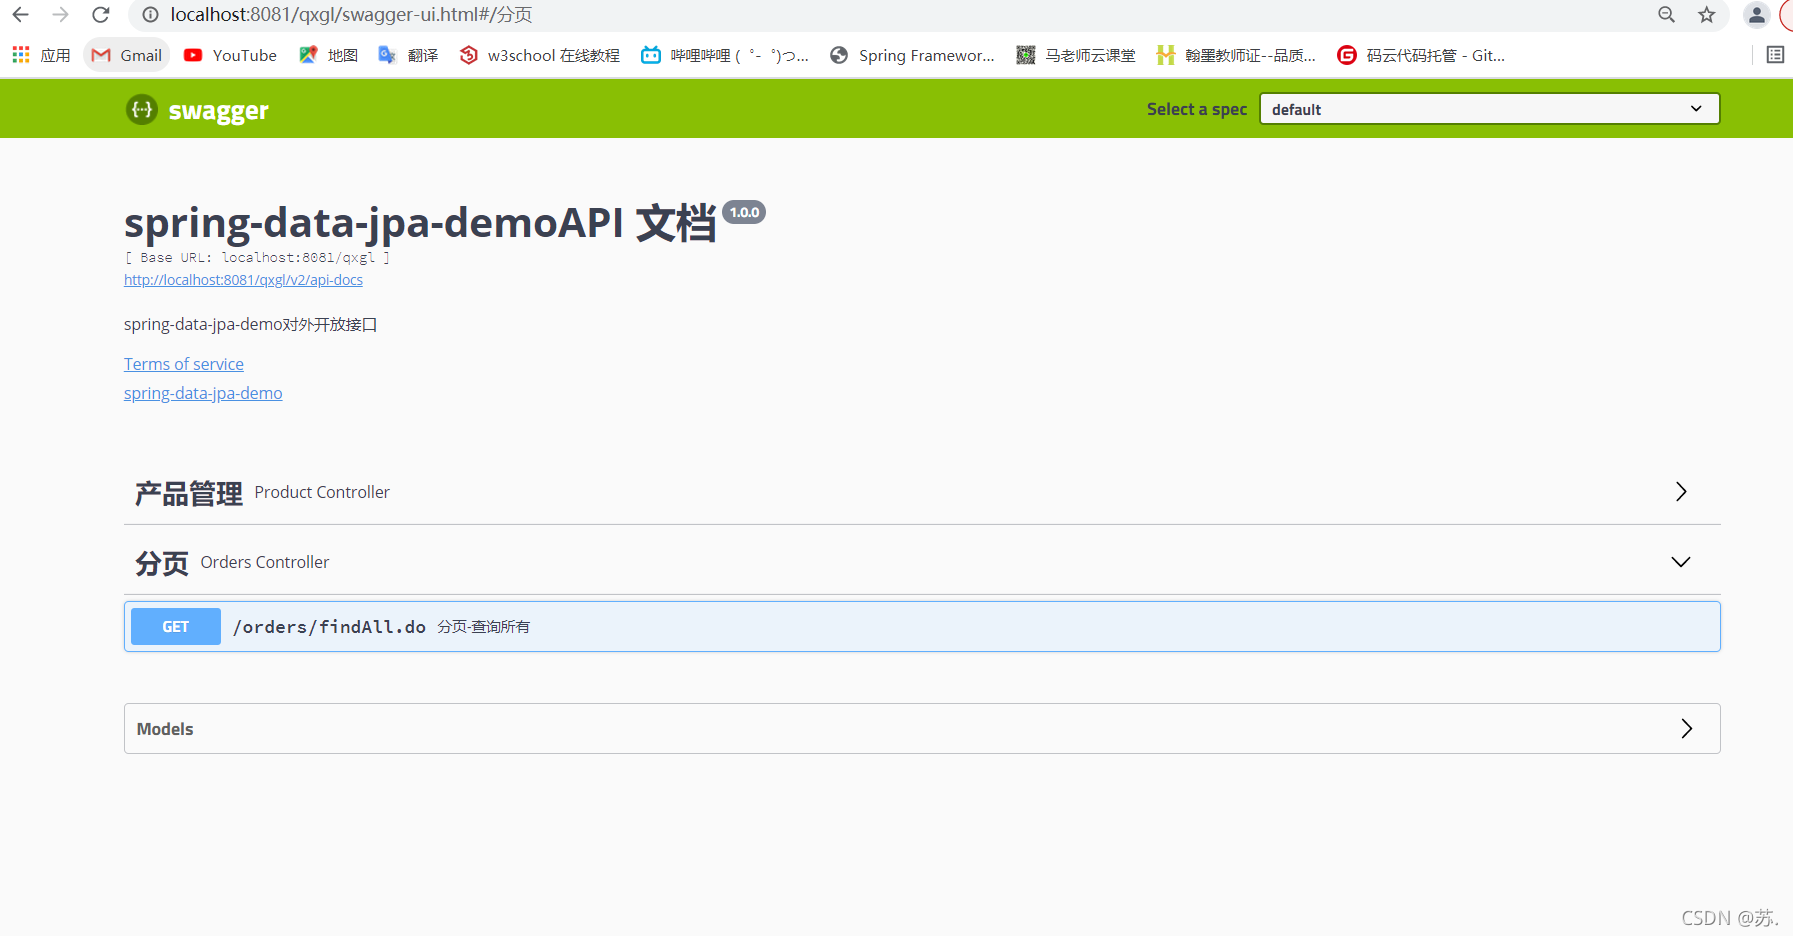
此时运行项目,通过浏览器访问http://localhost:8081/qxgl/swagger-ui.html#/即可看到接口文档说明了。注意访问地址哦!(其中8081是我服务器的地址,qxgl是虚拟目录)看下图:

如果接口中的方法有很多个请求方式,看一下注解@RequestMapping()中是否有设置method属性为具体的请求方式,因为@RequestMapping()可以指定具体的请求方式。
@RequestMapping(value = “/findAll.do”,method = RequestMethod.GET)
等同于
@GetMapping(value="/findAll.do")
其中
@GetMapping(value = “/findAll.do”) 和 @GetMapping(value = “findAll.do”) 的区别
1、带上 “/” 是绝对路径,不带 “/” 是相对路径。
2、这个"/" 其实起到连接作用, 如果只是单纯的一个地址,写不写 “/” 都可以。
如果控制器最外层有一层映射地址,那么方法上面的RequestMapping 的"/" 其实就起到分割作用