Spring securty<六> 认证–手机号+验证码
文章目录
本地项目的基础环境
| 环境 | 版本 |
|---|---|
| jdk | 1.8.0_201 |
| maven | 3.6.0 |
| Spring-boot | 2.3.3.RELEASE |
1、简介
spring security是一个提供身份验证、授权和防止常见攻击的框架,它对命令式和反应式应用程序都有一流的支持,是保护基于Spring的应用程序的事实上的标准。
详细可以参看《spring security官网》
2、认证(登录)
通过之前的两篇文章的介绍,应该也比较清楚了基本的概念了安全框架里的核心的概念了,从这篇开始,主要开始细化讲代码层面上的开发了;在权限框架中,认证这个部分,也算是最难的了,之后的几篇,也是主要讲述认证相关的。
《Spring securty<五> 认证–帐号/邮箱/手机号+密码》
3、认证的流程
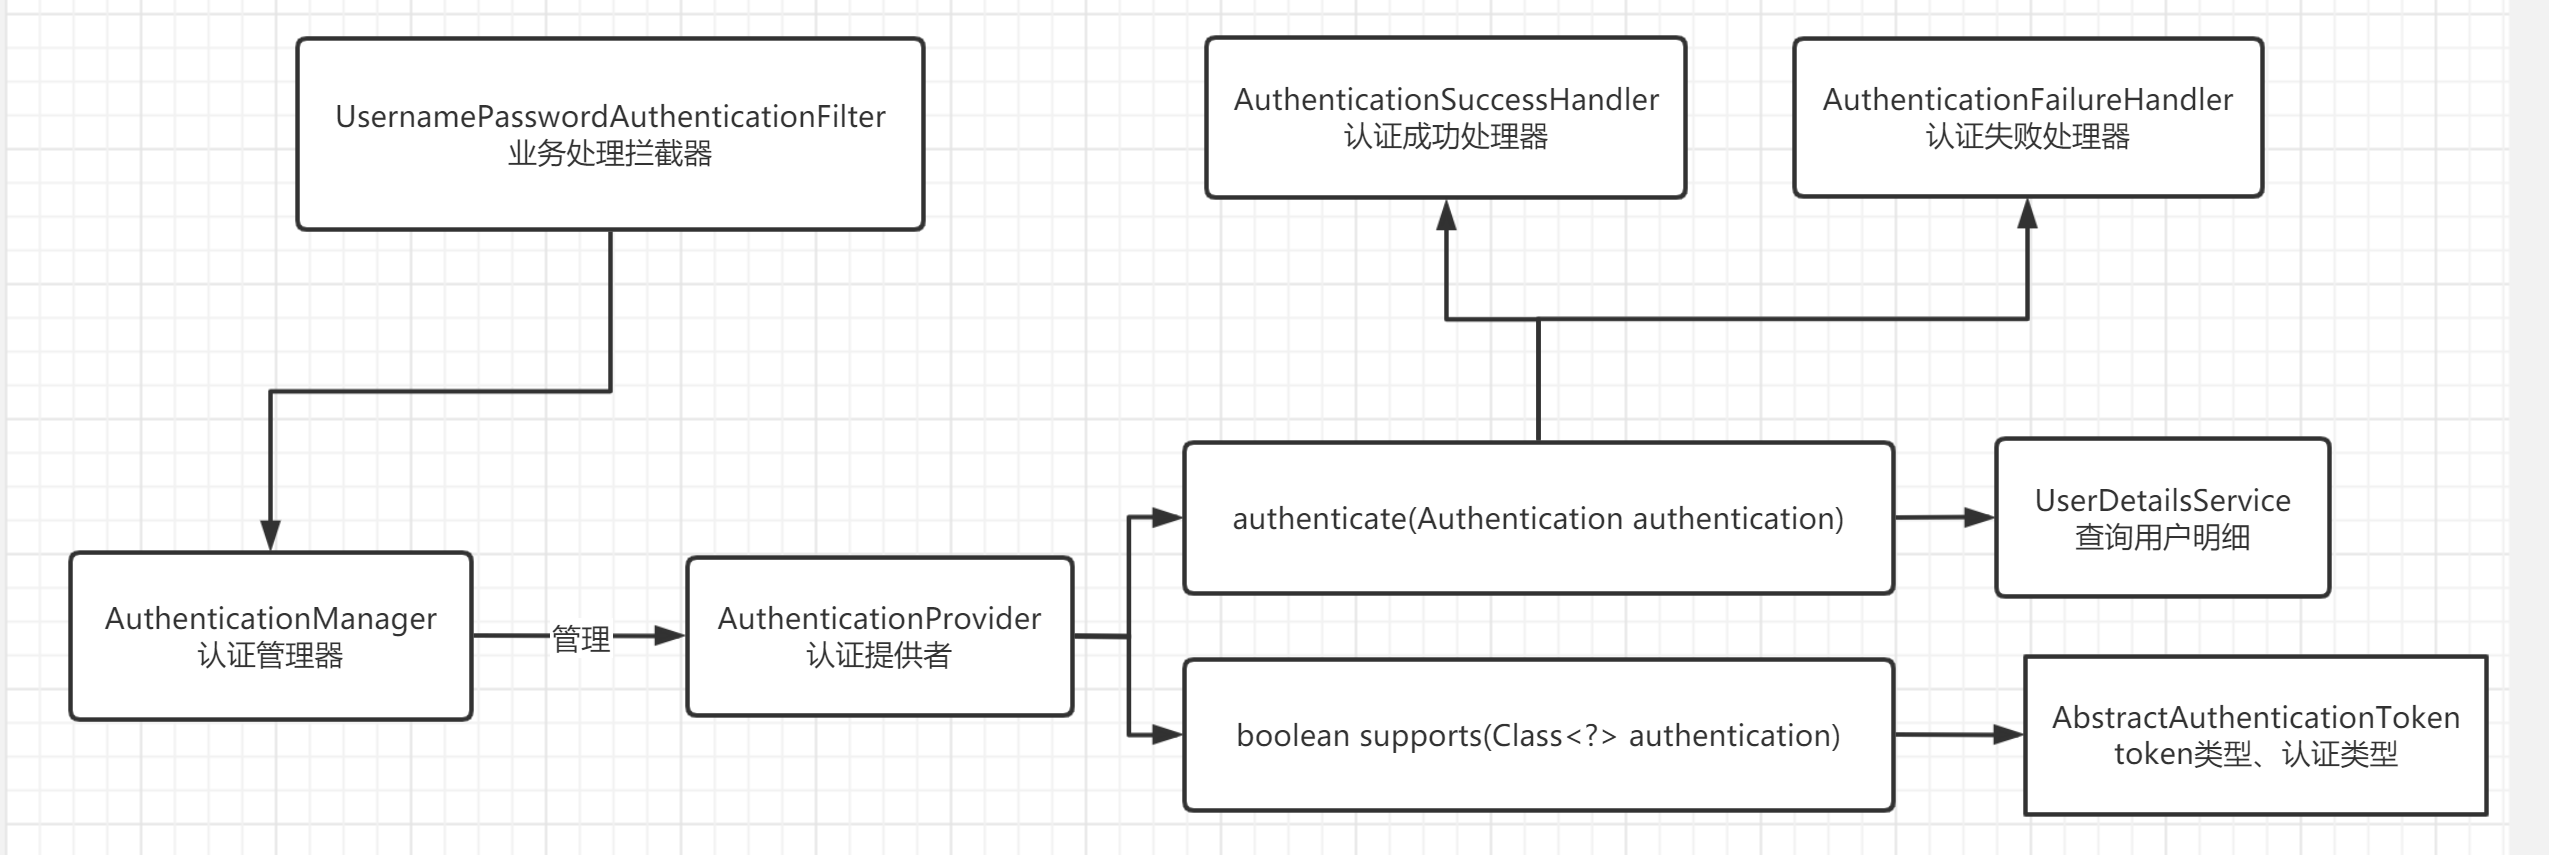
认证的流程中,我们把上一篇《Spring securty<四> 认证的源码解析》的最后一个图拿过来,整个流程也会按照这个方向去写代码;

整个登录的过程中,会通过常用的登录方式,要详细编写实际应用中的代码,代码案例中,为了简便,数据库查询操作,使用模拟操作;
暂时整理的案例中,会通过2篇博文,演示如下两种登录方式:
1、帐号/邮箱/手机号+密码 登录;
2、手机号+短信验证码 登录
当前这篇博文,主要讲述的第二种,手机号+短信验证码 登录
其他形式的登录,例如:QQ登录、微信登录、微博登录……这些都是基于OAuth2协议的,后续有时间了,详细讲解这块协议的时候,在说明;
3、构建基础代码的项目
复制项目《Spring securty<五> 认证–帐号/邮箱/手机号+密码》中的项目,修改名称为badger-spring-security-5;下面的,就是直接代码实现了,具体的分析过程,可以看上一篇的内容。
4、手机号+验证码 代码编写
4.1、请求短信的接口
   @ApiOperation(value = "短信验证码")
    @ApiImplicitParam(name = "phone", value = "手机号", dataType = "String", paramType = "query")
    @GetMapping("/code/sms")
    public Map<String, String> smsCode(@RequestParam(name = "phone", required = true) String phone,
            HttpServletRequest request, HttpServletResponse response) {
        // 生成4位随机数
        StringBuffer code = new StringBuffer();
        Random r = new Random();
        for (int i = 0; i < 4; i++) {
            code.append(r.nextInt(9));
        }
        // TODO 模拟发送短信到手机号
        System.out.println("发送短信到:" + phone + " 验证码:" + code);
        // 生成身份信息
        String identity = UUID.randomUUID().toString().replace("-", "");

        // 写入存储,本地演示,是单机项目,实际存储到三方组件中
        HttpSession session = request.getSession();
        session.setAttribute(identity, code.toString());
        // 信息写入 cookie以及header中
        ResponseCookieBuilder cookieBuild = ResponseCookie.from("identity_sms", identity);
        cookieBuild.path("/");
        cookieBuild.maxAge(60 * 5);
        cookieBuild.sameSite("None");
        response.setHeader(HttpHeaders.SET_COOKIE, cookieBuild.build().toString());// 写入cookie
        response.setHeader("identity_sms", identity);// 写入header
        // 数据通过返回体返回
        Map<String, String> dataMap = new HashMap<>();
        dataMap.put("identity_sms", identity);
        dataMap.put("code", code.toString());
        return dataMap;
    }
代码都是比较简单的业务,发送短信,也就是模拟了一下;
之后的系统,可能是分布式的系统,所以加了身份信息identity_sms,信息内容,分别写到了cookie、header、以及返回体中;
验证的时候,通过header、cookie、或者请求参数拿到身份信息,然后匹配验证码就可以了;
我本地环境使用的案例,就是单机的,演示的时候,存入seesion会话中了,实际项目中,可以存入三方组件中(例如:redis);
4.2、手机号验证码登录的测试接口
    @ApiOperation(value = "手机号+验证码")
    @ApiImplicitParams({ @ApiImplicitParam(name = "phone", value = "手机号", dataType = "String", paramType = "query"),
            @ApiImplicitParam(name = "code", value = "验证码", dataType = "String", paramType = "query"),
            @ApiImplicitParam(name = "identity_sms", value = "身份信息", dataType = "String", paramType = "query") })
    @PostMapping("/auth/login/sms")
    public void phone(@RequestParam(name = "phone", required = true) String phone,
            @RequestParam(name = "code", required = true) String code,
            @RequestParam(name = "identity_sms", required = false) String identity_sms) {
    }
4.3、AbstractAuthenticationToken:认证的类型的实现
package com.badger.spring.boot.security.sms;

import java.util.Collection;

import org.springframework.security.authentication.AbstractAuthenticationToken;
import org.springframework.security.core.GrantedAuthority;
import org.springframework.security.core.SpringSecurityCoreVersion;
import org.springframework.web.context.request.ServletWebRequest;

/**
 * 只验证账号的登录:短信登录等
 * @author liqi
 */
public class SmsAuthenticationToken extends AbstractAuthenticationToken {

    private static final long serialVersionUID = SpringSecurityCoreVersion.SERIAL_VERSION_UID;

    private Object principal;

    public SmsAuthenticationToken(String principal) {
        super(null);
        this.principal = principal;
        setAuthenticated(false);
    }

    public SmsAuthenticationToken(Object principal, Collection<? extends GrantedAuthority> authorities) {
        super(authorities);
        this.principal = principal;
        super.setAuthenticated(true);
    }

    public ServletWebRequest getRequest() {
        return (ServletWebRequest) this.getDetails();
    }

    public void setRequest(ServletWebRequest request) {
        setDetails(request);
    }

    @Override
    public Object getCredentials() {
        return null;
    }

    @Override
    public Object getPrincipal() {
        return this.principal;
    }

    @Override
    public void setAuthenticated(boolean isAuthenticated) throws IllegalArgumentException {
        if (isAuthenticated) {
            throw new IllegalArgumentException(
                    "Cannot set this token to trusted - use constructor which takes a GrantedAuthority list instead");
        }
        super.setAuthenticated(false);
    }

    @Override
    public void eraseCredentials() {
        super.eraseCredentials();
    }
}
手机号+短信登录:短信验证码,一般在拦截器验证了,就不在往后传了;所有验证的对象只有一个手机号了;
4.4、拦截器的编写
package com.badger.spring.boot.security.sms;

import javax.servlet.http.HttpServletRequest;
import javax.servlet.http.HttpServletResponse;

import org.springframework.security.authentication.AuthenticationServiceException;
import org.springframework.security.core.Authentication;
import org.springframework.security.core.AuthenticationException;
import org.springframework.security.web.authentication.AbstractAuthenticationProcessingFilter;
import org.springframework.security.web.util.matcher.AntPathRequestMatcher;
import org.springframework.util.StringUtils;

/**
 * 短信登录过滤器
 * @author liqi
 */
public class SmsAuthenticationFilter extends AbstractAuthenticationProcessingFilter {

    public static final String SMS_MOBILE = "phone";

    public static final String CODE = "code";

    public static final String IDENTITY_SMS = "identity_sms";

    public SmsAuthenticationFilter() {
        super(new AntPathRequestMatcher("/auth/login/sms", "POST"));
    }

    @Override
    public Authentication attemptAuthentication(HttpServletRequest request, HttpServletResponse response)
            throws AuthenticationException {
        String loginName = request.getParameter(SMS_MOBILE);
        if (StringUtils.isEmpty(loginName)) {
            throw new AuthenticationServiceException("手机号不能为空");
        }
        String code = request.getParameter(CODE);
        if (StringUtils.isEmpty(code)) {
            throw new AuthenticationServiceException("手机验证码不能为空");
        }
        String identity_sms = request.getParameter(IDENTITY_SMS);
        if (StringUtils.isEmpty(identity_sms)) {
            throw new AuthenticationServiceException("身份信息不能为空");
        }
        // 验证短信验证码
        Object attribute = request.getSession().getAttribute(identity_sms);
        if (attribute != null && attribute.toString().equals(code)) {
            SmsAuthenticationToken authRequest = new SmsAuthenticationToken(loginName);
            authRequest.setDetails(super.authenticationDetailsSource.buildDetails(request));
            return this.getAuthenticationManager().authenticate(authRequest);
        }
        throw new AuthenticationServiceException("验证码输入不正确");
    }
}
代码比较简单,就不在解释了;需要注意的是,参数记得传准确,上述中的参数为phone、code、identity_sms;
4.5、AuthenticationProvider代码编写
package com.badger.spring.boot.security.sms;

import org.springframework.security.authentication.AuthenticationProvider;
import org.springframework.security.core.Authentication;
import org.springframework.security.core.AuthenticationException;
import org.springframework.security.core.userdetails.UserDetails;
import org.springframework.security.core.userdetails.UserDetailsService;

/**
 * 验证逻辑,只获取登录对象,不做密码校验
 * @author liqi
 */
public class SmsAuthenticationProvider implements AuthenticationProvider {

    private UserDetailsService userDetailsService;

    public SmsAuthenticationProvider(UserDetailsService userDetailsService) {
        super();
        this.userDetailsService = userDetailsService;
    }

    @Override
    public Authentication authenticate(Authentication authentication) throws AuthenticationException {
        String loginName = (String) authentication.getPrincipal();
        // 由于短信验证码的验证在过滤器里已完成;
        UserDetails user = userDetailsService.loadUserByUsername(loginName);
        return new SmsAuthenticationToken(loginName, user.getAuthorities());
    }

    @Override
    public boolean supports(Class<?> authentication) {
        return SmsAuthenticationToken.class.isAssignableFrom(authentication);
    }
}
验证码,在拦截器验证了,这里只是根据手机号,查询用户就可以了~
4.6、代码编写UserDetailsService查询用户明细
上一篇的代码中,有帐号/手机号/邮箱,查询的,就用这个实例吧~
AuthenticationProvider:这个提供者,需要单独创建SmsAuthenticationProvider的实例;
配置类SecurityConfig完整代码:
package com.badger.spring.boot.security.config;

import java.util.ArrayList;
import java.util.List;

import org.springframework.context.annotation.Bean;
import org.springframework.context.annotation.Configuration;
import org.springframework.security.authentication.AuthenticationProvider;
import org.springframework.security.core.userdetails.UserDetails;
import org.springframework.security.core.userdetails.UserDetailsService;
import org.springframework.security.core.userdetails.UsernameNotFoundException;

import com.badger.spring.boot.security.entity.SystemUserDetails;
import com.badger.spring.boot.security.entity.UserEntity;
import com.badger.spring.boot.security.sms.SmsAuthenticationProvider;

@Configuration
public class SecurityConfig {

    static final List<UserEntity> USER_LIST = new ArrayList<>();

    static {
        for (int i = 1; i < 6; i++) {
            UserEntity userEntity = new UserEntity();
            userEntity.setId(i);
            userEntity.setName("测试人员" + i);
            userEntity.setUsername("ceshi_" + i);
            // 密码使用 PasswordEncoder 类对123456 加密之后的结果
            userEntity.setPassword("$2a$10$D1q09WtH./yTfFTh35n0k.o6yZIXwxIW1/ex6/EjYTF7EiNxXyF7m");
            userEntity.setEmail("100" + i + "@qq.com");
            userEntity.setPhone("186xxxx351" + i);
            USER_LIST.add(userEntity);
        }
    }

    /************************帐号密码登录**********************/
    @Bean
    public UserDetailsService usernamePasswordUserDetails() {
        return new UserDetailsService() {
            @Override
            public UserDetails loadUserByUsername(String username) throws UsernameNotFoundException {
                UserEntity user = null;
                for (UserEntity userEntity : USER_LIST) {
                    if (username.equals(userEntity.getUsername()) || username.equals(userEntity.getPhone())
                            || username.equals(userEntity.getEmail())) {
                        user = userEntity;
                    }
                }
                if (user != null) {
                    return new SystemUserDetails(user.getUsername(), user.getPassword(), user, null);
                }
                throw new UsernameNotFoundException("用户未注册,请先注册");
            }
        };
    }

    @Bean
    public AuthenticationProvider usernamePasswordAuthenticationProvider() {
        return new UsernamePasswordAuthenticationProvider(usernamePasswordUserDetails());
    }

    /************************手机+短信登录**********************/
    @Bean
    public AuthenticationProvider phoneSmsAuthenticationProvider() {
        return new SmsAuthenticationProvider(usernamePasswordUserDetails());
    }
}
4.7、认证流程串联代码
之前拦截器是用的,框架默认的;这次是我们自定义了拦截器,那么需要把拦截器加入到拦截器链路之中;WebSecurityConfig完整代码如下:
package com.badger.spring.boot.security.config;

import java.util.List;

import org.springframework.beans.factory.annotation.Autowired;
import org.springframework.context.annotation.Bean;
import org.springframework.security.authentication.AuthenticationManager;
import org.springframework.security.authentication.AuthenticationProvider;
import org.springframework.security.config.annotation.SecurityConfigurerAdapter;
import org.springframework.security.config.annotation.web.builders.HttpSecurity;
import org.springframework.security.config.annotation.web.configuration.EnableWebSecurity;
import org.springframework.security.config.annotation.web.configuration.WebSecurityConfigurerAdapter;
import org.springframework.security.config.annotation.web.configurers.FormLoginConfigurer;
import org.springframework.security.crypto.bcrypt.BCryptPasswordEncoder;
import org.springframework.security.crypto.password.PasswordEncoder;
import org.springframework.security.web.AuthenticationEntryPoint;
import org.springframework.security.web.DefaultSecurityFilterChain;
import org.springframework.security.web.access.AccessDeniedHandler;
import org.springframework.security.web.authentication.AbstractAuthenticationProcessingFilter;
import org.springframework.security.web.authentication.AuthenticationFailureHandler;
import org.springframework.security.web.authentication.AuthenticationSuccessHandler;
import org.springframework.security.web.authentication.UsernamePasswordAuthenticationFilter;

import com.badger.spring.boot.security.sms.SmsAuthenticationFilter;

@EnableWebSecurity
public class WebSecurityConfig extends WebSecurityConfigurerAdapter {

    private static final String[] EXCLUDE_URLS = { "/**/*.js", "/**/*.css", "/**/*.jpg", "/**/*.png", "/**/*.gif",
            "/v2/**", "/errors", "/error", "/favicon.ico", "/swagger-ui.html/**", "/swagger-ui/**", "/webjars/**",
            "/swagger-resources/**", "/auth/login" };
    @Autowired
    private AuthenticationSuccessHandler successHandler;
    @Autowired
    private AuthenticationFailureHandler failureHandler;
    @Autowired
    AccessDeniedHandler deniedHandler;
    @Autowired
    AuthenticationEntryPoint entryPoint;
    @Autowired
    private List<AuthenticationProvider> authenticationProviderList;

    @Bean
    public PasswordEncoder passwordEncoder() {
        return new BCryptPasswordEncoder();
    }

    @Override
    protected AuthenticationManager authenticationManager() throws Exception {
        // TODO Auto-generated method stub
        return super.authenticationManager();
    }

    @Override
    protected void configure(HttpSecurity http) throws Exception {
        // 登录处理器
        for (AuthenticationProvider authenticationProvider : authenticationProviderList) {
            http.authenticationProvider(authenticationProvider);
        }
        // 全局异常配置
        http.exceptionHandling().accessDeniedHandler(deniedHandler).authenticationEntryPoint(entryPoint);
        http.authorizeRequests().antMatchers(EXCLUDE_URLS).permitAll();
        // 表单操作
        FormLoginConfigurer<HttpSecurity> formLogin = http.formLogin();
        // 表单请求成功处理器、失败处理器;与loginPage冲突,配置后,loginPage不生效
        formLogin.successHandler(successHandler).failureHandler(failureHandler);
        // 表单提交的post请求地址,用户参数名称
        formLogin.loginProcessingUrl("/auth/login");
        http.csrf().disable();

        SecurityConfigurerAdapter<DefaultSecurityFilterChain, HttpSecurity> securityConfigurerAdapter = new SecurityConfigurerAdapter<DefaultSecurityFilterChain, HttpSecurity>() {
            @Override
            public void configure(HttpSecurity httpSecurity) throws Exception {
                // 手机号+短信登录
                AuthenticationManager authenticationManager = httpSecurity.getSharedObject(AuthenticationManager.class);
                AbstractAuthenticationProcessingFilter smsFilter = new SmsAuthenticationFilter();
                smsFilter.setAuthenticationManager(authenticationManager);
                smsFilter.setAuthenticationSuccessHandler(successHandler);
                smsFilter.setAuthenticationFailureHandler(failureHandler);
                httpSecurity.addFilterAfter(smsFilter, UsernamePasswordAuthenticationFilter.class);
            }
        };
        http.apply(securityConfigurerAdapter);
    }
}
在UsernamePasswordAuthenticationFilter拦截器之前,加入了一个拦截器;
创建拦截器的时候,需要的对象
1、AuthenticationManager:认证管理器;可以看到外层其实也有个http对象,如果直接拿到外层的对象
AuthenticationManager authenticationManager = http.getSharedObject(AuthenticationManager.class);
会报错,外层的程序还没有执行完,AuthenticationManager对象,还没有创建;
我们这里,就重写了SecurityConfigurerAdapter<DefaultSecurityFilterChain, HttpSecurity>类的public void configure(HttpSecurity httpSecurity)方法,然后在重新构建AuthenticationManager
2、AuthenticationSuccessHandler、AuthenticationFailureHandler成功和失败的处理器,使用容器注入的;
5、测试演示
项目启动后,执行得到结果
5.1、先调用发送短信
curl -X GET "http://localhost:8080/code/sms?phone=186xxxx3511" -H "accept: */*"
{
  "code": "1555",
  "identity_sms": "9595cdf7c34e4e818acf997506fae3a0"
}
5.2、发送手机+短信登录
curl -X POST "http://localhost:8080/auth/login/sms?phone=186xxxx3511&code=1555&identity_sms=9595cdf7c34e4e818acf997506fae3a0" -H "accept: */*"
{
  "code": 200,
  "message": "186xxxx3511"
}
详细的代码,可以查看《码云》