说明:?
(1)本篇博客的主要内容是,【如何搭建SpringMVC的开发环境】,【如何在SpringMVC环境下,开发一个标准的Controller控制器】;
(2)本篇博客的代码延续自【SpringMVC入门与数据绑定2:Spring MVC初体验二:使用IDEA创建【maven + WebApp】项目;】中的first-springmvc项目;
(3)目前只是简单介绍了SpringMVC,本篇博客也仅仅是一个简单案例,走了一遍流程;SpringMVC还有很多内容,需要逐一介绍;
目录
1.在pom.xml中引入【spring-webmvc模块】;
2.在web.xml中配置【SpringMVC】的核心Servlet:DispatcherServlet;(目的是,拦截HTTP请求)
(2)在web.xml中配置DispatcherServlet;(这儿需要创建Spring的核心配置文件:applicationContext.xml)
3.在Spring的配置文件applicationContext.xml中配置mvc这个标记;
4.验证:开发一个Controller,验证上述配置是否正确;
(2)再调整一下Tomcat;设置一下Tomcat部署内容;(这些内容以前遇到过好多次…)
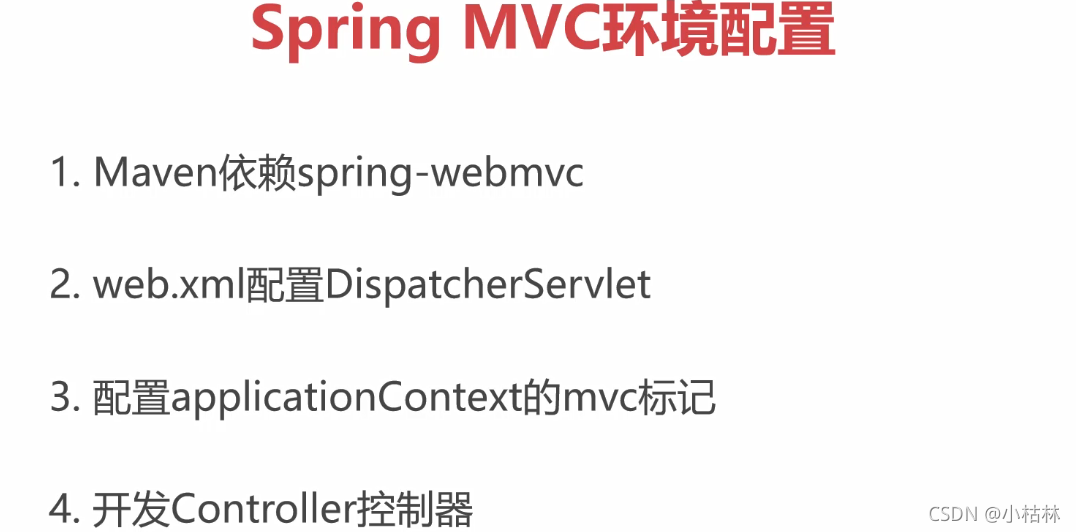
一:Spring?MVC环境配置步骤简述;
说明:
(1)首先,需要引入【spring-webmvc模块】;
(2)在【SpringMVC】中有一个核心的Servlet:DispatcherServlet;我们需要在web.xml中配置这个Servlet;(PS:这种类似的情况,在【FreeMarker七:FreeMarker与Servlet整合;(这篇博客是Freemarker部分的核心重点)】也遇到过;)
(3)在Spring的配置文件applicationContext.xml中配置mvc这个标记;
(4)最后,就可以开发Controller控制器了;
二:Spring?MVC环境配置;
在?【SpringMVC入门与数据绑定2:Spring MVC初体验二:使用IDEA创建【maven + WebApp】项目;】中我们已经创建了【maven+webApp】项目;接下来,就是对其配置【Spring?MVC】;
1.在pom.xml中引入【spring-webmvc模块】;
<?xml version="1.0" encoding="UTF-8"?>
<project xmlns="http://maven.apache.org/POM/4.0.0"
         xmlns:xsi="http://www.w3.org/2001/XMLSchema-instance"
         xsi:schemaLocation="http://maven.apache.org/POM/4.0.0 http://maven.apache.org/xsd/maven-4.0.0.xsd">
    <modelVersion>4.0.0</modelVersion>

    <groupId>com.imooc</groupId>
    <artifactId>first-springmvc</artifactId>
    <version>1.0-SNAPSHOT</version>
    <repositories>
        <repository>
            <id>aliyun</id>
            <name>aliyun</name>
            <url>https://maven.aliyun.com/repository/public</url>
        </repository>
    </repositories>

    <dependencies>
        <dependency>
            <groupId>org.springframework</groupId>
            <artifactId>spring-webmvc</artifactId>
            <version>5.1.9.RELEASE</version>
        </dependency>
    </dependencies>

</project>
说明:
(1)结构说明:
……………………………………………………?
2.在web.xml中配置【SpringMVC】的核心Servlet:DispatcherServlet;(目的是,拦截HTTP请求)
这种类似的情况,在【FreeMarker七:FreeMarker与Servlet整合;(这篇博客是Freemarker部分的核心重点)】也遇到过;虽然与此处不是一个东西,但二者关联一下,似乎可以帮助开阔思路;
(1)DispatcherServlet简介
? ? ? ? ? ● DispatcherServlet是【Spring?MVC】最重要的一个类,其作用是对所有请求进行拦截;
? ? ? ? ? ● DispatcherServlet是整个【Spring?MVC】的程序入口,所有http请求都要被DispatcherServlet拦截;同时,DispatcherServlet会根据不同请求的url地址,调用与之对应的Controller方法,以完成http请求的处理;
? ? ? ? ? ● DispatcherServlet就像一个中转站,负责将我们的请求,根据不同的url,传递给不同的Controller处理;
? ? ? ? ? ● 即,DispatcherServlet的作用就像一个【公司的前台】一样;公司所有的信件、访客,来公司后首先遇到的就是【公司的前台】,【公司的前台】会根据不同的情况,会联系公司内部不同的人来应对处理;
? ? ? ? ? ● 如上案例中,【DispatcherServlet】看成【公司的前台】,那么,【Controller中的某一个具体的处理方法】可以看成是【公司内部不同的人】;
(2)在web.xml中配置DispatcherServlet;(这儿需要创建Spring的核心配置文件:applicationContext.xml)
<?xml version="1.0" encoding="UTF-8"?>
<web-app xmlns="http://xmlns.jcp.org/xml/ns/javaee"
         xmlns:xsi="http://www.w3.org/2001/XMLSchema-instance"
         xsi:schemaLocation="http://xmlns.jcp.org/xml/ns/javaee http://xmlns.jcp.org/xml/ns/javaee/web-app_3_1.xsd"
         version="3.1">
    <servlet>
        <servlet-name>springmvc</servlet-name>
        <servlet-class>org.springframework.web.servlet.DispatcherServlet</servlet-class>
        <init-param>
            <param-name>contextConfigLocation</param-name>
            <param-value>classpath:applicationContext.xml</param-value>
        </init-param>
        <load-on-startup>0</load-on-startup>
    </servlet>
    <servlet-mapping>
        <servlet-name>springmvc</servlet-name>
        <url-pattern>/</url-pattern>
    </servlet-mapping>
</web-app>
说明:
(1)?内容分析
(2)?可参考文章
? ? ? ? ? ● Servlet的配置的最原始内容,如有需要可以参考:【Servlet入门四:Eclipse创建一个javaWeb工程;创建一个标准的Servlet示例】;
? ? ? ? ? ● Servlet启动时加载最初的介绍文章,如有需要可以参考:【Servlet入门十一:启动时加载】;
? ? ? ? ? ● 关于IoC容器的applicationContext.xml配置文件,如有需要可以参考最初介绍的文章:【Spring IoC容器与Bean管理4:使用XML方式实现Spring IoC预一:Spring IoC初体验一:IoC容器完成【对象的实例化】;】;虽然与本篇博客的表现形式不同,但是背后的与原理是基本相同的;
(3)DispatcherServlet的<url-pattern>说明:
关于<url-pattern>的有关内容,可以参考类比:【Servlet与JSP进阶八:web.xml的其他作用:设置默认首页;url通配符*;设置全局变量;404等错误默认页;】?和【过滤器六:url-pattern设置过滤范围】的内容;
(4)applicationContext.xml文件初始内容
<?xml version="1.0" encoding="UTF-8"?>
<beans xmlns="http://www.springframework.org/schema/beans"
       xmlns:mvc="http://www.springframework.org/schema/mvc"
       xmlns:context="http://www.springframework.org/schema/context"
       xmlns:xsi="http://www.w3.org/2001/XMLSchema-instance" xmlns:mv="http://www.springframework.org/schema/mvc"
       xsi:schemaLocation="http://www.springframework.org/schema/beans
            http://www.springframework.org/schema/beans/spring-beans.xsd
            http://www.springframework.org/schema/context
            http://www.springframework.org/schema/context/spring-context.xsd
            http://www.springframework.org/schema/mvc
            http://www.springframework.org/schema/mvc/spring-mvc.xsd">
</beans>
? ? ? ? ? ● 可以看到,其引入了【默认命名空间】,【context命名空间】,以及第一次遇到的【mvc命名空间】;
? ? ? ? ? ●?【mvc】是【Spring?MVC】的核心标签;要想使【Spring?MVC】生效,必须要使用【mvc命名空间】中的标签;
……………………………………………………?
3.在Spring的配置文件applicationContext.xml中配置mvc这个标记;
<?xml version="1.0" encoding="UTF-8"?>
<beans xmlns="http://www.springframework.org/schema/beans"
       xmlns:mvc="http://www.springframework.org/schema/mvc"
       xmlns:context="http://www.springframework.org/schema/context"
       xmlns:xsi="http://www.w3.org/2001/XMLSchema-instance" xmlns:mv="http://www.springframework.org/schema/mvc"
       xsi:schemaLocation="http://www.springframework.org/schema/beans
            http://www.springframework.org/schema/beans/spring-beans.xsd
            http://www.springframework.org/schema/context
            http://www.springframework.org/schema/context/spring-context.xsd
            http://www.springframework.org/schema/mvc
            http://www.springframework.org/schema/mvc/spring-mvc.xsd">
    <!--
    context:component-scan 标签作用
    在Spring IOC初始化过程中,自动创建并管理com.imooc.springmvc及子包中
    拥有以下注解的对象.
    @Repository
    @Service
    @Controller
    @Component
    -->
    <context:component-scan base-package="com.imooc.springmvc"></context:component-scan>

    <mvc:annotation-driven/>
    <mvc:default-servlet-handler/>
</beans>
说明:
(1)<context:component-scan>组件扫描标签;
? ? ? ? ? ● 以前用到过多次,第一次是在【Spring IoC容器与Bean管理21:使用注解方式实现Spring IoC二:组件类型注解(对象实例化);@Repository,@Service,@Controller,@Component;】中遇到的;
? ? ? ? ? ●?配置<context:component-scan>后,就可以使用注解方式来创建Spring的对象了;
(2)<mvc:annotation-driven/>标签;
? ? ? ? ? ●?这个标签的作用是:启用Spring?MVC注解开发模式;通过这个标签,我们就可以在类中书写【Spring?MVC的各种注解】,来简化开发过程;再说,使用注解方式开发,也是在日常开发中主要的开发方式;
(3)<mvc:default-servlet-handler/>标签;
? ? ? ? ? ●?这个标签的作用是:将图片/JS/CSS等静态资源排除在外,这样做可提高Spring?MVC的执行效率;
? ? ? ? ? ●?详细阐述如下:
?这儿依旧设置<mvc:default-servlet-handler/>的目的,可以认为是其再增加了一层保险,双保险~~
? ? ? ? ? ●?设置<mvc:default-servlet-handler/>后:当某一个HTTP请求过来以后,【Spring?MVC】会识别出,这个请求是一个【图片/JS/CSS等静态资源】,那么【Spring?MVC】就不对这个请求进行处理了。所以说,设置<mvc:default-servlet-handler/>的目的是,提高Spring?MVC的执行效率;
……………………………………………………
4.验证:开发一个Controller,验证上述配置是否正确;
(1)编写TestController;?
package com.imooc.springmvc.controller;

import org.springframework.stereotype.Controller;
import org.springframework.web.bind.annotation.GetMapping;
import org.springframework.web.bind.annotation.ResponseBody;

@Controller
public class TestController {

    @GetMapping("/t") //如【localhost/t】这样的url的请求过来时,就会被test()这个方法处理;
    @ResponseBody  //直接向响应输出字符串数据,不跳转页面;即,当test()这个方法执行以后,return “SUCCESS”返回的字符串,
    // 会原封不动的通过响应返回给浏览器,当浏览器看到“SUCCESS”字符串后,就代表TestController中的test()方法执行成功了;
    public String test() {
        return "SUCCESS";
    }
}
说明:
(1)@Controller注解;(以前详细介绍过,这儿再啰嗦一下)
(2)public String test() :Controller控制器处理http请求的方法,其基本结构就是这样的;即【方法是public的】,【返回一个String字符串】,【一个自定义的方法名】;
(3)【@GetMapping("/t")注解 】和【@ResponseBody注解】:public String test()一开始只是一个标准的java方法,如果想让这个方法能够处理http请求,就需要用到【@GetMapping("/t")注解 】和【@ResponseBody注解】了;
(4)这儿只是最简单的一个案例,后续会详细介绍;
(2)再调整一下Tomcat;设置一下Tomcat部署内容;(这些内容以前遇到过好多次…)
*************************************************************************?
? ? ? ? ? ●?具体这儿,可以参考【附加:IDEA的Artifacts;(这篇博客,以后有了更深的理解时,随时补充……)】;
? ? ? ? ? ●?很简单,无论是【程序打成jar包】,【程序打成war包】、【程序部署到Tomcat】,都需要设置【程序中的哪些东西:会打到jar包中,会打到war包中,会部署到Tomcat中】;
*************************************************************************?
?
?
?
(3)启动Tomcat,正式发布;
?
?
三:Summary;
目前可以感觉到:
(0)目前只是简单介绍了SpringMVC,本篇博客也仅仅是一个简单案例,走了一遍流程;SpringMVC还有很多内容,需要逐一介绍;
(1.1)以前我们接触的都是,使用Servlet来处理web请求;但是Servlet不太好用;
(1.2)Spring这个机构提供了【Spring?MVC这个框架】,简化了处理web请求的过程;
(1.3)【通过Spring?MVC来处理请求】比【原先通过Servlet处理请求】,简单多了;
?
(2)Spring?MVC处理示意图;
?


