目录
导论:初识多线程
? 首先,我们来讨论讨论什么叫做多线程。举个简单的例子,比如说造房子这个任务。如果只有一个人的话,他既要搬砖还得拎砂浆、搅拌水泥之类的(其他工种这里就不一一阐述了),哪怕这个工人技术再熟练,精力再旺盛,他同时也只能干一个工种。那么问题来了,该如何提升效率呢?很简单,我们可以请多个工人同时来干活,可以同时干多种也可以干同种活儿,这样效率就高得多。尽管他们各自可干着不同的活儿,但本质都是为了造房子这个任务,这就叫做多进程,即将一个大任务拆分成不同的小任务,分配不同的人来执行,当包工头也就是处理器下达命令时,他们按照指令来工作。
? 每个工种的话,比如搅拌水泥的大工优惠叫来几个小工,都是来干搅拌水泥这个活儿,所以这里叫做多线程。
? 那么,怎么区分多进程和多线程呢?这里简单概括:
一:动手来创建多线程
1.1 创建一个主线程
请看代码:
public class ThreadDemo1 {
    static class MyThread extends Thread {
        @Override
        public void run() {
            System.out.println("hello world, 我是一个线程");
            while (true) {

            }
        }
    }

    public static void main(String[] args) {
        // 创建线程需要使用 Thread 类, 来创建一个 Thread 的实例.
        // 另一方面还需要给这个线程指定, 要执行哪些指令/代码.
        // 指定指令的方式有很多种方式, 此处先用一种简单的, 直接继承 Thread 类,
        // 重写 Thread 类中的 run 方法.

        // [注意!] 当 Thread 对象被创建出来的时候, 内核中并没有随之产生一个线程(PCB).
        Thread t = new MyThread();
        // 执行这个 start 方法, 才是真的创建出了一个线程.
        // 此时内核中才随之出现了一个 PCB, 这个 PCB 就会对应让 CPU 来执行该线程的代码. (上面的 run 方法中的逻辑)
        t.start();

        while (true) {
            // 这里啥都不干
        }
    }
}
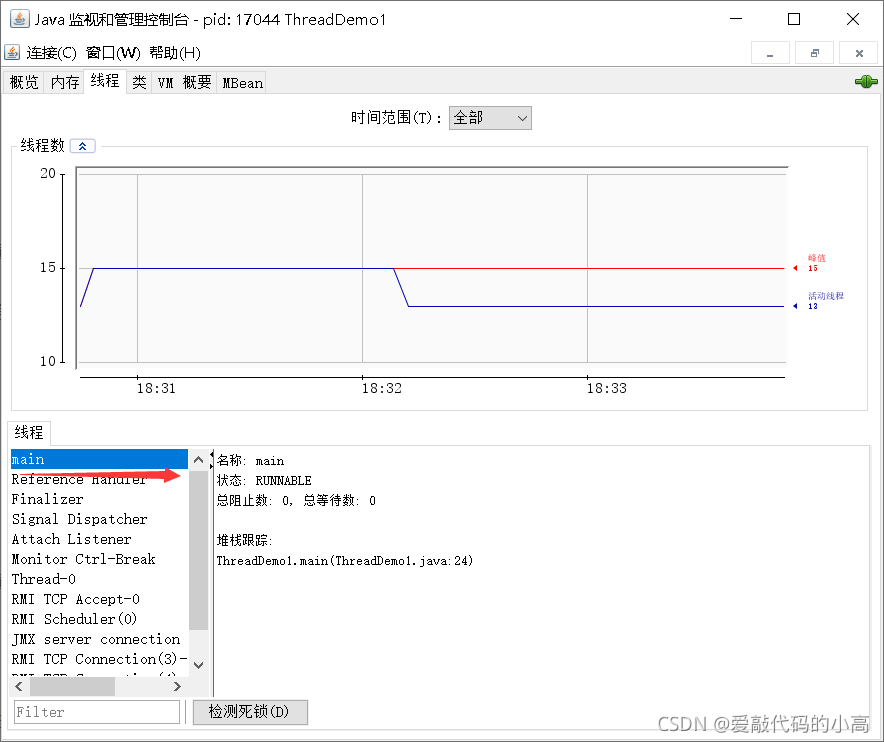
接下里,我们可以通过jdk里面的一个jconsole来查看,我的文件路径是C:\Program Files\Java\jdk1.8.0_192\bin,大家可以对照自己安装的jdk文件位置来寻找。运行程序,打开jconsole可以看下

?这里这个主线程就是我们创建的线程,线程创建成功。
1.2 多线程抢占式执行
创建两个线程,输出线程运行前后时间,多次运行发现运行时间不一,这里就体现了现成的抢占式执行方法,看代码:
public class ThreadDemo2 {
    private static long count = 100_0000_0000L;

    public static void main(String[] args) {
        // serial();
        concurrency();
    }

    private static void serial() {
        long beg = System.currentTimeMillis();

        int a = 0;
        for (long i = 0; i < count; i++) {
            a++;
        }
        int b = 0;
        for (long i = 0; i < count; i++) {
            b++;
        }

        long end = System.currentTimeMillis();
        System.out.println("time: " + (end - beg) + " ms");
    }

    private static void concurrency() {
        long beg = System.currentTimeMillis();

        Thread t1 = new Thread() {
            @Override
            public void run() {
                int a = 0;
                for (long i = 0; i < count; i++) {
                    a++;
                }
            }
        };

        Thread t2 = new Thread() {
            @Override
            public void run() {
                int b = 0;
                for (long i = 0; i < count; i++) {
                    b++;
                }
            }
        };
        t1.start();
        t2.start();

        try {
            // 线程等待. 让主线程等待 t1 和 t2 执行结束, 然后再继续往下执行.
            t1.join();
            t2.join();
        } catch (InterruptedException e) {
            e.printStackTrace();
        }

        // t1 t2 和 main 线程之间都是并发执行的.
        // 调用了 t1.start 和 t2.start 之后, 两个新线程正在紧锣密鼓的进行计算过程中,
        // 此时主线程仍然会继续执行, 下面的 end 就随之被计算了.
        // 正确的做法应该是要保证 t1 和 t2 都计算完毕, 再来计算这个 end 的时间戳.
        long end = System.currentTimeMillis();
        System.out.println("time: " + (end - beg) + " ms");
    }
}
多次运行,会有以下结果:
?
?可以发现线程是抢占式执行。
我们用join关键字,可以规定线程运行先后顺序,比如这里规定t1运行完后t2再运行,代码如下:
public class ThreadDemo2 {
    private static long count = 100_0000_0000L;

    public static void main(String[] args) {
         serial();
        //concurrency();
    }

    private static void serial() {
        long beg = System.currentTimeMillis();

        int a = 0;
        for (long i = 0; i < count; i++) {
            a++;
        }
        int b = 0;
        for (long i = 0; i < count; i++) {
            b++;
        }

        long end = System.currentTimeMillis();
        System.out.println("time: " + (end - beg) + " ms");
    }

    private static void concurrency() {
        long beg = System.currentTimeMillis();

        Thread t1 = new Thread() {
            @Override
            public void run() {
                int a = 0;
                for (long i = 0; i < count; i++) {
                    a++;
                }
            }
        };

        Thread t2 = new Thread() {
            @Override
            public void run() {
                int b = 0;
                for (long i = 0; i < count; i++) {
                    b++;
                }
            }
        };
        t1.start();
        t2.start();

        try {
            // 线程等待. 让主线程等待 t1 和 t2 执行结束, 然后再继续往下执行.
            t1.join();
            t2.join();
        } catch (InterruptedException e) {
            e.printStackTrace();
        }

        // t1 t2 和 main 线程之间都是并发执行的.
        // 调用了 t1.start 和 t2.start 之后, 两个新线程正在紧锣密鼓的进行计算过程中,
        // 此时主线程仍然会继续执行, 下面的 end 就随之被计算了.
        // 正确的做法应该是要保证 t1 和 t2 都计算完毕, 再来计算这个 end 的时间戳.
        long end = System.currentTimeMillis();
        System.out.println("time: " + (end - beg) + " ms");
    }
}
?多次运行,结果如下:

 ?
?
?这里发现,由于规定了线程运行先后时间,导致运行时间大大增长,由此体现了线程并发运行的优势所在。
这里说明一点:由于线程是抢占式执行,所以每次结果都是不一定的,但误差会在一定范围内。
二:创建线程的几个常用方法
2.2??继承 Thread 类
class MyThread extends Thread {@Overridepublic void run () {System . out . println ( " 这里是线程运行的代码 " );}}MyThread t = new MyThread ();t . start (); // 线程开始运行
2.2?实现 Runnable 接口
class MyRunnable implements Runnable {@Overridepublic void run () {System . out . println ( Thread . currentThread (). getName () + " 这里是线程运行的代码 " );}}Thread t = new Thread(new MyRunnable());t.start(); // 线程开始运行
2.3 匿名类创建
// 使用匿名类创建 Thread 子类对象Thread t1 = new Thread() {@Overridepublic void run() {System.out.println(" 使用匿名类创建 Thread 子类对象 ");}};// 使用匿名类创建 Runnable 子类对象Thread t2 = new Thread(new Runnable() {@Overridepublic void run() {System.out.println(" 使用匿名类创建 Runnable 子类对象 ");}});// 使用 lambda 表达式创建 Runnable 子类对象Thread t3 = new Thread(() -> System.out.println(" 使用匿名类创建 Thread 子类对象 "));Thread t4 = new Thread(() -> {System.out.println(" 使用匿名类创建 Thread 子类对象 ");});?
?
?三:Thread的几个常见属性

?代码如下:
public class ThreadDemo {
    public static void main(String[] args) {
        Thread thread = new Thread(() -> {
            for (int i = 0; i < 10; i++) {
                try {
                    System.out.println(Thread.currentThread().getName() + ": 我还活着");
                    Thread.sleep(1 * 1000);
                } catch (InterruptedException e) {
                    e.printStackTrace();
                }
            }
            System.out.println(Thread.currentThread().getName() + ": 我即将死去");
        });
        thread.start();
        System.out.println(Thread.currentThread().getName()
                + ": ID: " + thread.getId());
        System.out.println(Thread.currentThread().getName()
                + ": 名称: " + thread.getName());
        System.out.println(Thread.currentThread().getName()
                + ": 状态: " + thread.getState());
        System.out.println(Thread.currentThread().getName()
                + ": 优先级: " + thread.getPriority());
        System.out.println(Thread.currentThread().getName()
                + ": 后台线程: " + thread.isDaemon());
        System.out.println(Thread.currentThread().getName()
                + ": 活着: " + thread.isAlive());
        System.out.println(Thread.currentThread().getName()
                + ": 被中断: " + thread.isInterrupted());

        while (thread.isAlive()) {}
        System.out.println(Thread.currentThread().getName()
                + ": 状态: " + thread.getState());
    }
}
运行结果:
?由此可见各个关键字的含义,今天的分享就到这里。
记:
最近刚开学,各种事儿,选导师,研一七天都有课,导致时间紧张,希望自己还是可以平衡好学业和代码的关系吧,谢谢大家支持。
整理不易,大家多多支持。