mybatis以及spring的整合
文章目录
mybatis操作步骤
1.读取配置文件(其中全局配置文件mybatis-config.xml负责配置数据库的连接。mapper文件负责sql操作)
2.根据配置文件构建SqlSessionFactory。
3.根据SqlSessionFactory创建SqlSession。
4.使用SqlSession对象操作数据库(增、删、改、查、事务提交、回滚等)。
SqlSession对象
sqlsession对象不能被共享。同时sqlsession实例也是线程不安全的。不能将其放在一个类的静态字段、实例字段或任何类型的管理范围(如servlet的HttpSession)中使用。使用完后,要记得关闭它。
sqlsession包含了很多方法用于对sql语句进行处理
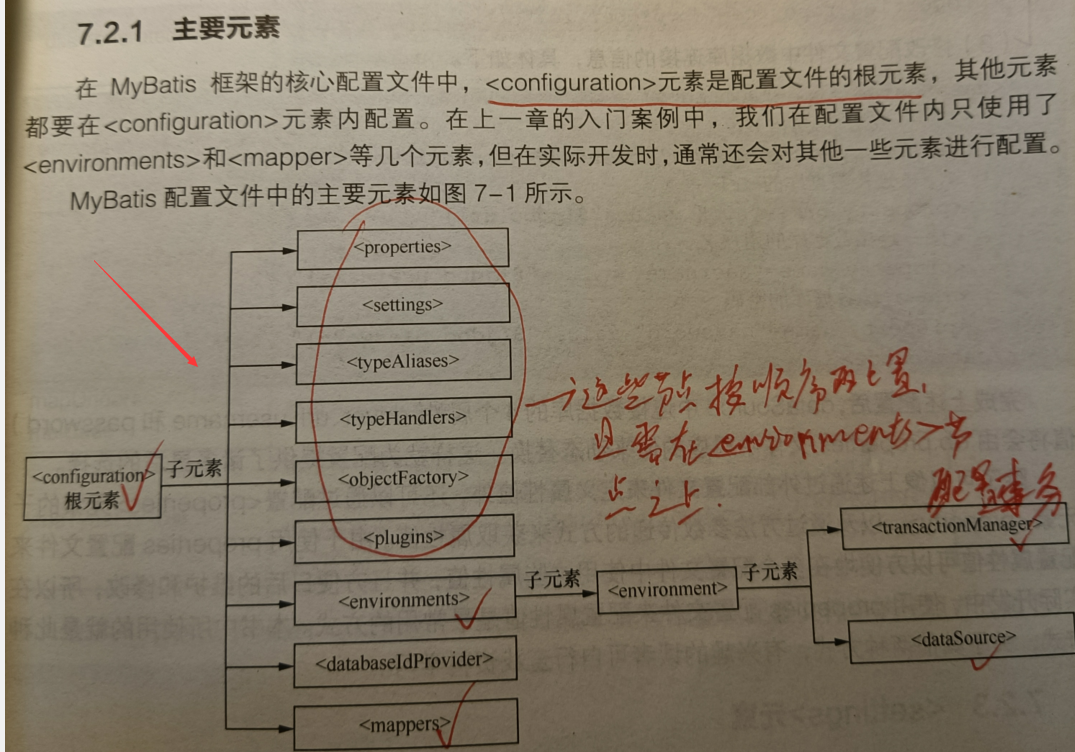
mybatis全局配置文件中的主要元素

注意:
的子元素必须按照上图中的顺序从上到下排列。否则会解析出错。
常用元素刨析
1.properties:
常用于将内部的配置外在化,即通过外不配置动态来改变内部定义的属性。
2.settings元素
一把用于开启缓存、延迟加载
3.typeAliases元素
为java类设置别名,减少全限定类名的冗余。
如果省略alias属性。mybatis默认会将类名首字母小写后的名称当作别名
一键配置:
但pojo类过多时,可以通过包扫描来来定义别名(通过package子元素),这样mybatis会将所有该包下的pojo类的别名设置为以首字母小写的非全限定类名。如com.demo.User的别名为:user.
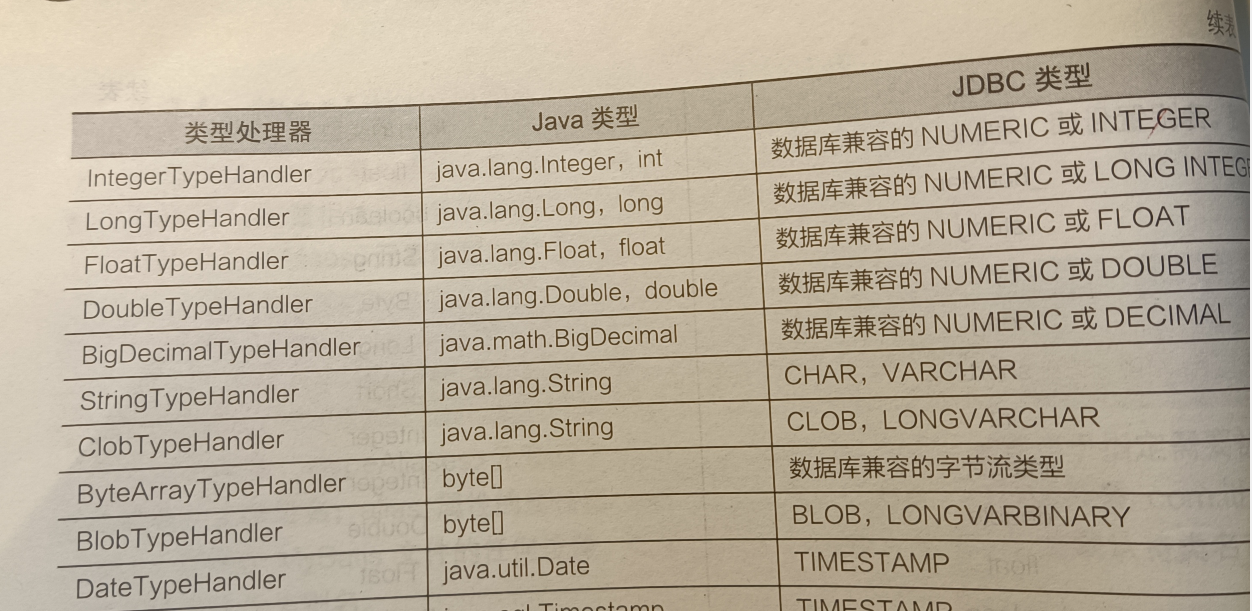
4.typeHandler
将预处理语句中传入的参数从javaType(java类型)转为jdbcType(JDBC类型),或从数据库取出结果将jdbcType转为javaType。如下图:

5.plugins元素
mybatis运行将已映射语句执行过程中的某一点进行拦截调用。这种拦截调用是通过插件来实现的。
6.environments元素
对数据源进行配置(就是配置一些用户名、密码、驱动等)
可配置多种数据源
在mybatis中可以配置两种类型的事务管理器(JDBC和MANAGE)
JDBC:此配置使用了JDBC的提交和回滚设置
MANAGE:让容器来管理整个事务的整个生命周期。
7.mapper元素
指定mybatis映射文件的位置,一般使用以下4种引入方式。
1.类路径 resource属性
2.本地文件 url属性
3.接口类 class属性
4.包名 name属性
mybatis的默认别名
由于别名不区分大小写。所以不建议使用,容易出现重复定义的覆盖问题。
下面(左:别名,右:映射的类型)
_byte byte
_long long
_int int
_double double
数据源类型
1.UNPOOLED
每次请求都会打开和关闭连接。它对没有性能要求的简单应用是一个好的选择。
2.POOLED
此数据源利用“池”的概率将JDBC连接对象组织起来,避免了在创建新的连接实例时所需的初始化和认证时间。可以使得并发web应用可以快速响应请求。是当前流形的处理方式。
3.JNDI
可以在EJB或应用服务器等容器中使用。容器可以集中在外部配置数据源,然后放置一个JNDI上下文引用。
mapper映射文件主要元素

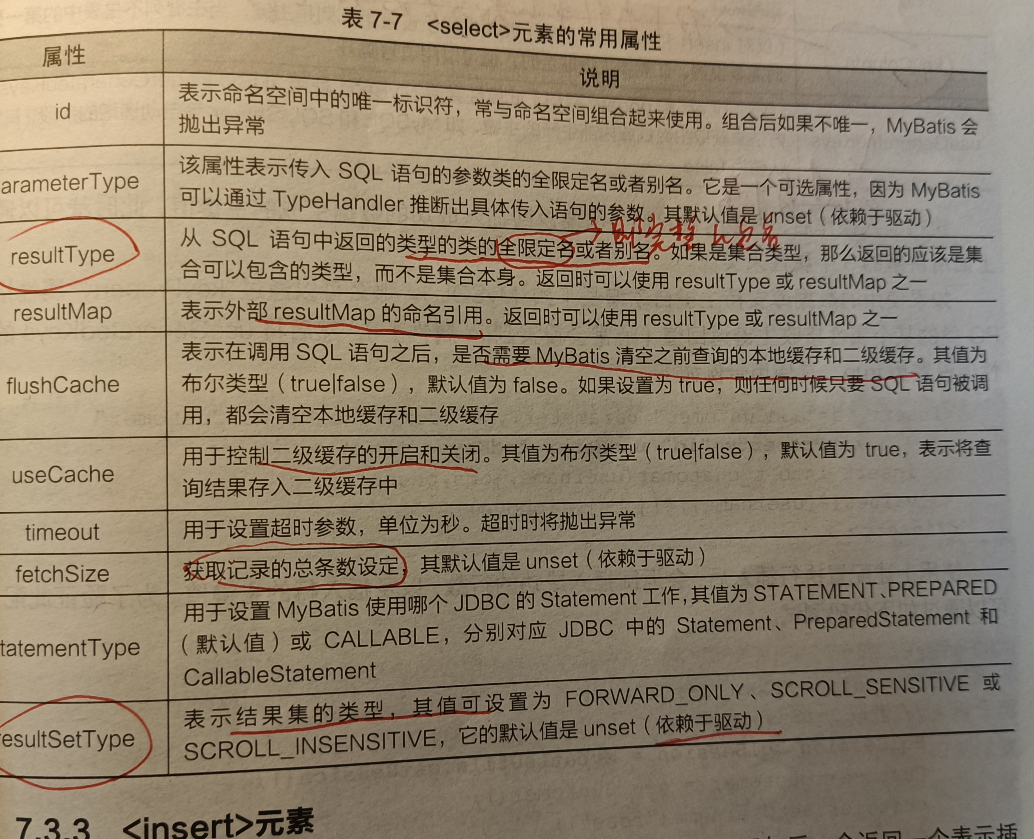
1.select元素

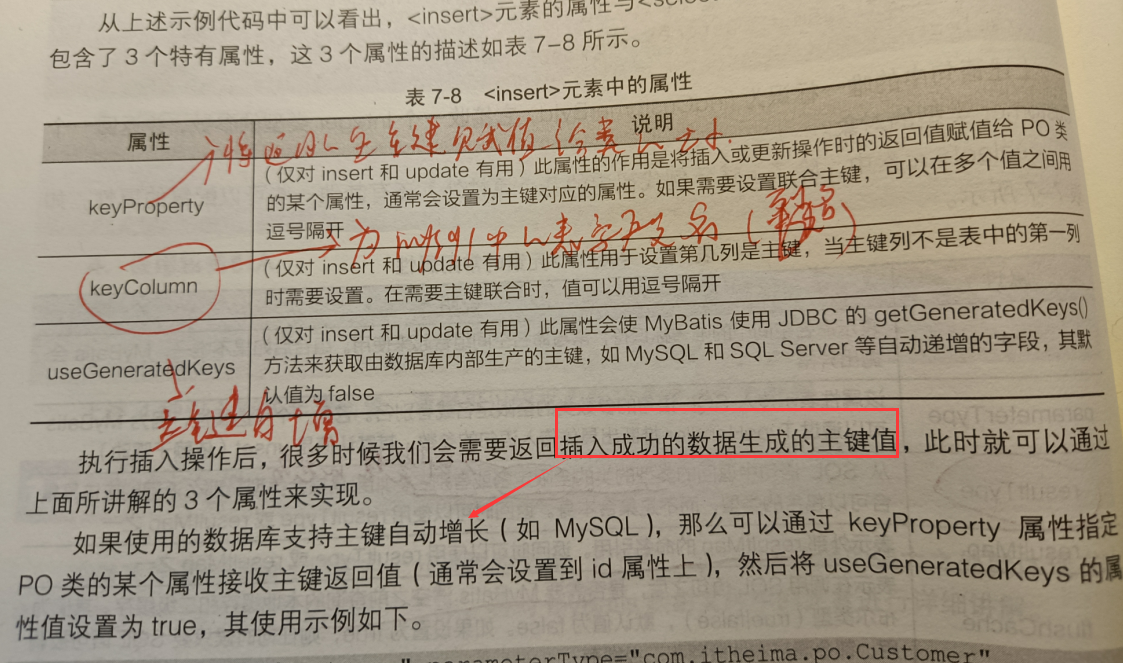
2.insert元素
其他元素和select差不多,多了以下几个元素

3.update元素和delete元素
属性配置和select基本相同。
4.sql元素
适用范围:当一个映射文件中需要定义很多sql语句。这些sql语句有些部分是相同的(比如id、user、job等字段)。可以通过把相同的部分抽离出来,然后在到相应的元素将其引用势必能够减少代码的臃肿。
sql元素里面适用include元素,基本元素(select、insert等)也可以使用include元素。可以通过${prefix}获取property元素中name=prefix的属性值。
如下:
<sql id="cust">id,user</sql>
// 未来简写。就不写一些属性值了
<select>
	select <include refid="cust"></include>
	from customer
	where id=#{id}
</select>

// 其中include元素中的refid属性引用了自定义的代码片段。refid属性值为自定义代码片段的id
5.resultMap元素
resultMap:表示结果映射集。用于定义映射规则、级联更新、类型转换器。
它有以下几个常用的子元素:
1.constructor元素:
用于配置构造方法
2.association元素和collection元素:
用于处理多表时的关联关系。(其中association一般用于处理一对一的关系,而collection用于处理一对多或多对多的关系)
3.discriminator元素:
处理一个单独的数据库查询返回很多不同类型结果集的情况。
4.id元素:标识哪个列是主键
5.result元素:标识java类属性和表字段的映射关系。
resultMap常用的几个属性
1.type:标识要映射的java类
2.id:resultMap元素的唯一标识
association元素
association常用的几个属性:
1.property:实体类对象属性与表字段一 一对应
2.column:指定表中对应的字段
3.javaType:指定映射到实体对象的属性类型
4.select:指定嵌入的子sql语句(用于关联映射中的嵌套查询)
5.fetchType:指定关联时是否启用延迟加载。有2个属性值:lazy(懒加载)、eager,具体解释如下图:

一对一
因为这里是一对一:所以使用association元素就可以了。可以这样理解:
查询出business表后,将business中order的id赋值给下面字段为column的。最后通过下面的select语句映射的sql语句查出对应的order(当然现实生活中一般都是一对多,或多对多)
<!--    一对一-->
    <select id="relation_find_one" parameterType="Integer" resultMap="order_business">
        select* from business
        where id=#{id}
    </select>
<!--    指定要映射的java类-->
    <resultMap id="order_business" type="business">
        <!-- 进行字段的映射-->
        <id property="id" column="id"></id>
        <result property="username" column="username"></result>
        <association property="order" column="order_id" javaType="order" select="com.mybatis.pojo.Order.findByid" />
    </resultMap>
一对多
有2种方式:(推荐使用嵌套结果查询)
1.通过嵌套查询(简单来说,就是将前一个表的查询出来的外键传递给另外一个语句,最后返回查询结果)
2.另外一种是嵌套结果查询
具体如下:
1.嵌套查询
比如1个user有多个order
查询步骤:
查询该对应user(把business当左user就好了)的记录,然后将该user的id赋值给下面的column。然后select关联的sql再从order表中查询出所有user_id=user.id的订单,最后返回数据。注意:接收order表数据的属性是哟个List集合(因为可能有多条数据)
<!--    一对多-->
    <select id="relation_one_many" parameterType="Integer" resultMap="order_business_one_many">
<!--        这里将o.id别名为order_id,已防止下面出现重复的id-->
       <!-- sql语句-->
    </select>
    <resultMap id="order_business_one_many" type="business">
        <id property="id" column="id"></id>
       <result property="username" column="username" />

        <collection property="orderList" ofType="order" select="另外一个mapper" column="用于传递给另外一个表的id字段"></collection>

    </resultMap>
2.嵌套结果查询
注意点:collection中的字段名不能和resultMap中的一样,不然下面查询的结果会出错。
<!--    一对多-->
    <select id="relation_one_many" parameterType="Integer" resultMap="order_business_one_many">
<!--        这里将o.id别名为order_id,已防止下面出现重复的id-->
        select b.*,o.id as order_id,o.number,o.username as order_username,o.order_name
        from business b,`order` o
        where o.user_id=b.id
        and b.id=#{id}
    </select>
    <resultMap id="order_business_one_many" type="business">
        <id property="id" column="id"></id>
       <result property="username" column="username" />

        <collection property="orderList" ofType="order">
          <!--  根据上面的映射结果进行映射 -->
            <id property="id" column="order_id" />
            <result property="number" column="number" />
            <result property="username" column="order_username"/>
            <result property="order_name" column="order_name" />
        </collection>
    </resultMap>
多对多
思想:将多对多的两个表的主键都放到一个中间表中。当要进行多对多查询时,将会利用中间表寻找到对应的id,然后再寻找出另外一个表的id,就可以查出数据了。直接举个例子吧:
现在有3个表:order(订单)、order_user(中间表)、user(表)。我现在需要查询出user表中id=1的用户的订单有多少。
解决方案:
直接上sql语句
select
from order,order_user,user
where
user.id=#{id}   先获取要查询的id值 这里#不是注释!!
order_user.user_id=user.id   #查询中间表中user_id等于user.id的有哪些数据,这时就可以得到order表的id值了
order.id=order_user.order_id  #查询出order表中id等于oder_user中order_id的数据就可以查询关联的所有数据了
可参照如下代码:
注意点:collection中的字段名不能和resultMap中的一样,不然下面查询的结果会出错。
 <!--    多对多-->
    <select id="relation_many_many" parameterType="Integer" resultMap="order_business_many_many">
        select b.* ,o.id as order_id,o.number,o.username oder_username,o.order_name
        from `order` o,business b,t_order_business t
        where b.id=#{id}
        and t.business_id=b.id
        and o.id=t.order_id
    </select>
    <resultMap id="order_business_many_many" type="business">
<!--        这里必须做映射,不然查询出来的与表字段对应的属性值为0或空-->
        <id property="id" column="id"></id>
        <result property="username" column="username" />
<!--        <result property="order_id" column="order_id" />-->

        <collection property="orderList" ofType="order">
            <id property="id" column="order_id" />
            <result property="number" column="number" />
            <result property="username" column="oder_username"/>
            <result property="order_name" column="order_name" />
            <result property="user_id" column="user_id" />
        </collection>
    </resultMap>
spring整合mybatis
!!! 推荐MapperScanerConfigurer整合方式
需要相关的几个包:
.......(还有其他的一些包)
<!--       spring整合mybatis-->
        <!-- https://mvnrepository.com/artifact/org.mybatis/mybatis-spring -->
        <dependency>
            <groupId>org.mybatis</groupId>
            <artifactId>mybatis-spring</artifactId>
            <version>2.0.3</version>
        </dependency>

        <!--        mybatis-->
        <!-- https://mvnrepository.com/artifact/org.mybatis/mybatis -->
        <dependency>
            <groupId>org.mybatis</groupId>
            <artifactId>mybatis</artifactId>
            <version>3.5.6</version>
        </dependency>
spring整合mybatis (标注为sm)与原生的mybatis(m)区别主要在于:
1.sm是以bean的方式来进行整合的(将mybatis的全局配置文件放入其中,总而言之:就是整个都加载到bean这个配置文件中)。而m主要是通过全局配置文件来进行加载的。
2.元素的m需要自己配置数据操作对象SqlSession,而sm相对来说简化了这一步操作。(通过bean,向接口的实现类注入SqlSessionFactory,从而得到SqlSession,进而操作数据库)
spring整合mybatis的几种方式
下面来具体说一下这几种整合的方式
1.传统Dao方式整合
注意点:
1.接口的方法名需要和mapper文件中对于sql语句的id一样。
2.mapper中的namespace空间的值必须为接口的全路径。
3.需要接口和实现类(通过将SqlSession对象注入到接口的实现类中从而获取操作对象)
<?xml version="1.0" encoding="UTF-8"?>
<beans xmlns="http://www.springframework.org/schema/beans"
       xmlns:xsi="http://www.w3.org/2001/XMLSchema-instance"
       xmlns:context="http://www.springframework.org/schema/context"
       xmlns:aop="http://www.springframework.org/schema/aop"
       xmlns:tx="http://www.springframework.org/schema/tx"
       xsi:schemaLocation="http://www.springframework.org/schema/beans
	http://www.springframework.org/schema/beans/spring-beans-4.3.xsd
	http://www.springframework.org/schema/context
	http://www.springframework.org/schema/context/spring-context.xsd
	http://www.springframework.org/schema/aop
	http://www.springframework.org/schema/aop/spring-aop.xsd
	http://www.springframework.org/schema/tx
	http://www.springframework.org/schema/tx/spring-tx.xsd">

    读取外在的数据库连接属性
    <context:property-placeholder location="classpath:db.properties" />
    <!--    配置数据源-->
    <bean id="dataSource" class="org.springframework.jdbc.datasource.DriverManagerDataSource">
         读取外在的数据库连接属性
        <property name="driverClassName" value="${db.driver}" />
        <property name="url" value="${db.url}" />
        <property name="username" value="${db.username}" />
        <property name="password" value="${db.password}" />
    </bean>


    <!--    事务管理器-->
    <!-- 配置事务管理器,事务依赖于数据源所产生的连接对象,只有连接对象创建成功了才能够处理事务 -->
    <bean id="dataSourceTransactionManager" class="org.springframework.jdbc.datasource.DataSourceTransactionManager">
        <property name="dataSource" ref="dataSource"></property>
    </bean>

<!--    开启事务注解支持-->
    <tx:annotation-driven transaction-manager="transactionManager"/>

<!--    配置mybatis工厂   依赖数据源 和 mybatis全局配置文件-->
    <bean id="sqlSessionFactory" class="org.mybatis.spring.SqlSessionFactoryBean">
        <!--    注入数据源-->
        <property name="dataSource" ref="dataSource" />
<!--        指定核心配置文件位置-->
        <property name="configLocation" value="classpath:mybatis-config.xml"/>
    </bean>

<!--    为实例化对象注入SqlSessionFactory对象    基于传统Dao的整合 即含有执行方法的接口,class为其实现类-->
    <bean id="OrderDao" class="com.spring.OrderDaoImpl">
        <property name="SqlSessionFactory" ref="sqlSessionFactory"/>
    </bean>

<!--    基于MapperFactoryBean的整合-->
    <bean id="orderMapper" class="org.mybatis.spring.mapper.MapperFactoryBean">
        <property name="mapperInterface" value="com.spring.MapperFactory.MapperFactory_Order"/>
        <property name="sqlSessionFactory" ref="sqlSessionFactory"/>
    </bean>


</beans>
2.Mapper接口整合
? ----Mapper接口整合 又分为MapperFactoryBean的整合和MapperScanerConfigurer的整合
? 其中MapperScanerConfigurer的整合更加简单。MapperFactoryBean的整合对于严格性比较高(容易出错)
MapperFactoryBean的整合
好处:
1.不需要执行执行文件(mapper)中的id。
2.不需要实现类。只要有个接口就可以了。
3.会自动生成mapper接口的实现类的代理对象,从而简化开发。
需要遵循的规范:
1.mapper接口的名称必须和mapper.xml文件的名称一样。(主要这点容易出错)
2.mapper.xml中的namespace必须与mapper接口中的类路径相同。
3.mapper接口中方法名和mapper.xml中定义的每个执行语句的id相同。
4.mapper.xml中输入参数类型要和输出参数类型要和接口的一样。
<?xml version="1.0" encoding="UTF-8"?>
<beans xmlns="http://www.springframework.org/schema/beans"
       xmlns:xsi="http://www.w3.org/2001/XMLSchema-instance"
       xmlns:context="http://www.springframework.org/schema/context"
       xmlns:aop="http://www.springframework.org/schema/aop"
       xmlns:tx="http://www.springframework.org/schema/tx"
       xsi:schemaLocation="http://www.springframework.org/schema/beans
	http://www.springframework.org/schema/beans/spring-beans-4.3.xsd
	http://www.springframework.org/schema/context
	http://www.springframework.org/schema/context/spring-context.xsd
	http://www.springframework.org/schema/aop
	http://www.springframework.org/schema/aop/spring-aop.xsd
	http://www.springframework.org/schema/tx
	http://www.springframework.org/schema/tx/spring-tx.xsd">

    <context:property-placeholder location="classpath:db.properties" />
    <!--    配置数据源-->
    <bean id="dataSource" class="org.springframework.jdbc.datasource.DriverManagerDataSource">
        <property name="driverClassName" value="${db.driver}" />
        <property name="url" value="${db.url}" />
        <property name="username" value="${db.username}" />
        <property name="password" value="${db.password}" />
    </bean>


    <!--    事务管理器-->
    <!-- 配置事务管理器,事务依赖于数据源所产生的连接对象,只有连接对象创建成功了才能够处理事务 -->
    <bean id="dataSourceTransactionManager" class="org.springframework.jdbc.datasource.DataSourceTransactionManager">
        <property name="dataSource" ref="dataSource"></property>
    </bean>

<!--    开启事务注解支持-->
    <tx:annotation-driven transaction-manager="transactionManager"/>

<!--    配置mybatis工厂   依赖数据源 和 mybatis全局配置文件-->
    <bean id="sqlSessionFactory" class="org.mybatis.spring.SqlSessionFactoryBean">
        <!--    注入数据源-->
        <property name="dataSource" ref="dataSource" />
<!--        指定核心配置文件位置-->
        <property name="configLocation" value="classpath:mybatis-config.xml"/>
    </bean>

<!--    为实例化对象注入SqlSessionFactory对象    基于传统Dao的整合-->
    <bean id="OrderDao" class="com.spring.OrderDaoImpl">
        <property name="SqlSessionFactory" ref="sqlSessionFactory"/>
    </bean>

<!--    基于MapperFactoryBean的整合-->
    <bean id="orderMapper" class="org.mybatis.spring.mapper.MapperFactoryBean">
        <property name="mapperInterface" value="com.spring.MapperFactory.MapperFactory_Order"/>
        <property name="sqlSessionFactory" ref="sqlSessionFactory"/>
    </bean>

</beans>
MapperScanerConfigurer整合(首选,简单易用)
好处:
1.只需要接口,不需要实现类。
2.bean配置文件通过包扫描自动扫描接口
3.不需要再bean配置文件中配置对应接口,只需要通过扫描对于包。就可以自动配置所有接口。简化开发
基本上spring与mybatis整合都需要满足以下者三点
只要满足以下3点就可以了(相对于MapperFactoryBean)
1.mapper.xml中的namespace必须与mapper接口中的类路径相同。
2.mapper接口中方法名和mapper.xml中定义的每个执行语句的id相同。
3.mapper.xml中输入参数类型要和输出参数类型要和接口的一样。
<?xml version="1.0" encoding="UTF-8"?>
<beans xmlns="http://www.springframework.org/schema/beans"
       xmlns:xsi="http://www.w3.org/2001/XMLSchema-instance"
       xmlns:context="http://www.springframework.org/schema/context"
       xmlns:aop="http://www.springframework.org/schema/aop"
       xmlns:tx="http://www.springframework.org/schema/tx"
       xsi:schemaLocation="http://www.springframework.org/schema/beans
	http://www.springframework.org/schema/beans/spring-beans-4.3.xsd
	http://www.springframework.org/schema/context
	http://www.springframework.org/schema/context/spring-context.xsd
	http://www.springframework.org/schema/aop
	http://www.springframework.org/schema/aop/spring-aop.xsd
	http://www.springframework.org/schema/tx
	http://www.springframework.org/schema/tx/spring-tx.xsd">

    <context:property-placeholder location="classpath:db.properties" />
    <!--    配置数据源-->
    <bean id="dataSource" class="org.springframework.jdbc.datasource.DriverManagerDataSource">
        <property name="driverClassName" value="${db.driver}" />
        <property name="url" value="${db.url}" />
        <property name="username" value="${db.username}" />
        <property name="password" value="${db.password}" />
    </bean>


    <!--    事务管理器-->
    <!-- 配置事务管理器,事务依赖于数据源所产生的连接对象,只有连接对象创建成功了才能够处理事务 -->
    <bean id="dataSourceTransactionManager" class="org.springframework.jdbc.datasource.DataSourceTransactionManager">
        <property name="dataSource" ref="dataSource"></property>
    </bean>

<!--    开启事务注解支持-->
    <tx:annotation-driven transaction-manager="transactionManager"/>

<!--    配置mybatis工厂   依赖数据源 和 mybatis全局配置文件-->
    <bean id="sqlSessionFactory" class="org.mybatis.spring.SqlSessionFactoryBean">
        <!--    注入数据源-->
        <property name="dataSource" ref="dataSource" />
<!--        指定核心配置文件位置-->
        <property name="configLocation" value="classpath:mybatis-config.xml"/>
    </bean>

<!--    为实例化对象注入SqlSessionFactory对象    基于传统Dao的整合-->
    <bean id="OrderDao" class="com.spring.OrderDaoImpl">
        <property name="SqlSessionFactory" ref="sqlSessionFactory"/>
    </bean>


<!--
        基于MapperScannerConfigurer整合spring
        优点:
           1.可以减少接口在配置文件中的配置
           2.spring会自动通过包中的接口来生成映射器
 -->
    <bean class="org.mybatis.spring.mapper.MapperScannerConfigurer">
<!--        扫描其中的接口,自动通过包中的接口来生成映射器-->
        <property name="basePackage" value="com.spring.MapperScannerConfigurer"/>
    </bean>


</beans>
综上所述,推荐MapperScanerConfigurer整合方式