- 经过前面几篇文章得分析,可以大致知晓从native层往下是如何进行SM的获取,那么这篇文章将着手从JAVA层开始梳理service服务端如何添加服务到SM中的
addService()整体流程简介
-
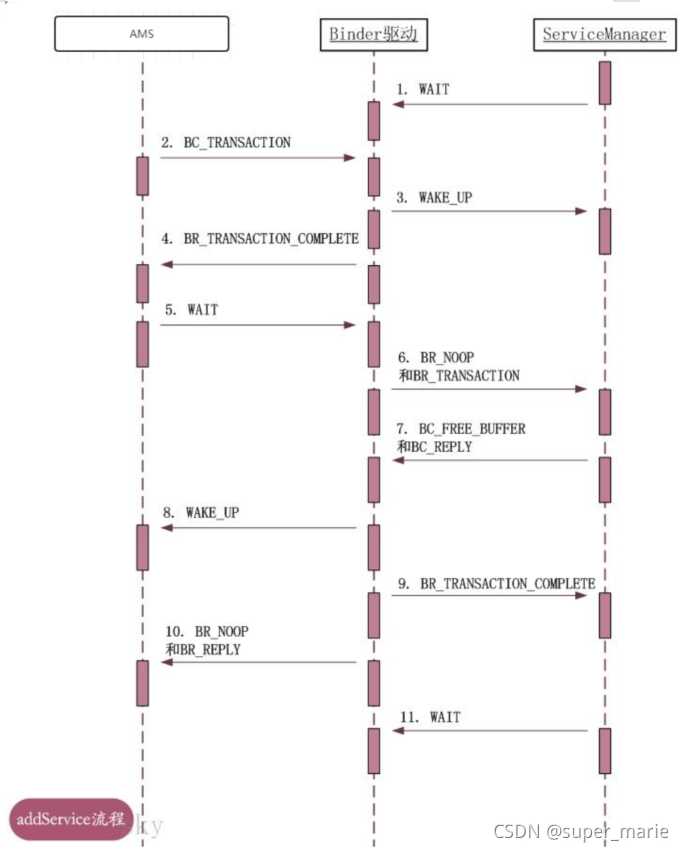
照例先给出整个流程的时序图

-
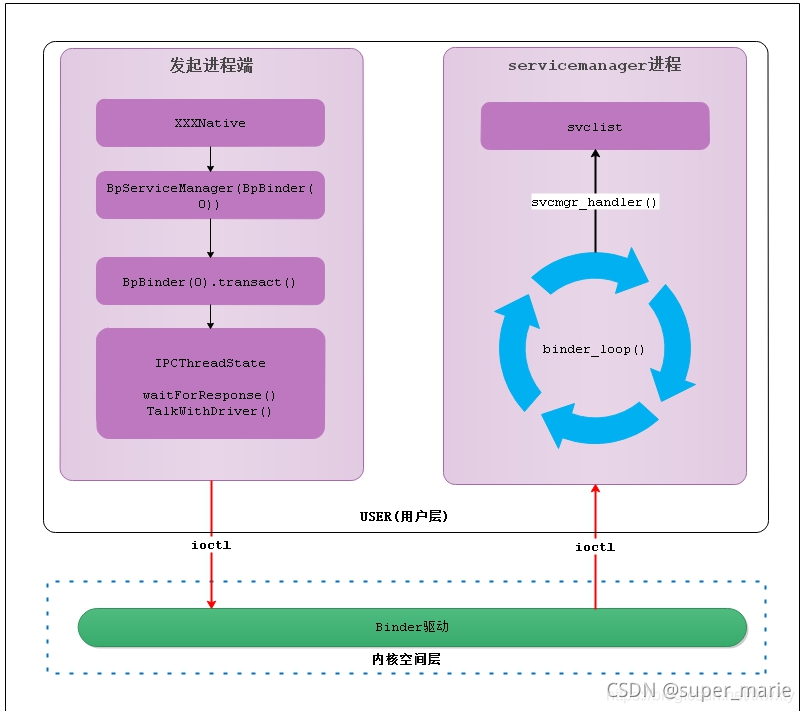
addService整个流程的示意图如下:

AMS启动
-
本篇以AMS的addService为例进行梳理分析,其他的服务也都是大同小异,这里简单说一下AMS服务的启动
-
AMS是由SystemServer进行开启的,我们从AMS开启入手。
代码路径:android/framework/base/services/java/com/android/server/SystemServer.java
public static void main(String[] args) { new SystemServer().run(); } //省略一些无关代码 private void run() { .... // Create the system service manager. //创建SystemServiceManager mSystemServiceManager = new SystemServiceManager(mSystemContext); mSystemServiceManager.setStartInfo(mRuntimeRestart, mRuntimeStartElapsedTime, mRuntimeStartUptime); LocalServices.addService(SystemServiceManager.class, mSystemServiceManager); // Start services. try { t.traceBegin("StartServices"); //启动一些关键服务,AMS服务就是在这个函数中进行启动的 startBootstrapServices(t); startCoreServices(t); startOtherServices(t); } catch (Throwable ex) { Slog.e("System", "******************************************"); Slog.e("System", "************ Failure starting system services", ex); throw ex; } finally { t.traceEnd(); // StartServices } .... } private void startBootstrapServices(@NonNull TimingsTraceAndSlog t) { ... // Activity manager runs the show. t.traceBegin("StartActivityManager"); //启动AMS ActivityTaskManagerService atm = mSystemServiceManager.startService( ActivityTaskManagerService.Lifecycle.class).getService(); mActivityManagerService = ActivityManagerService.Lifecycle.startService( mSystemServiceManager, atm); mActivityManagerService.setSystemServiceManager(mSystemServiceManager); mActivityManagerService.setInstaller(installer); mWindowManagerGlobalLock = atm.getGlobalLock(); t.traceEnd(); ... // Set up the Application instance for the system process and get started. t.traceBegin("SetSystemProcess"); //将AMS注册到SM中 mActivityManagerService.setSystemProcess(); t.traceEnd(); .... }到这里,AMS就已经启动了,接下来就是进行服务的注册了,AMS向SM中注册都是在
setSystemProcess()函数中完成的,接下来进一步进行分析
AMS的注册
1. ActivityManagerService.setSystemProcess()
代码路径: android/framework/base/services/core/java/com/android/server/am/ActivityManagerService.java
public void setSystemProcess() {
    try {
        //开始调用addService()方法进行向ServiceManager中进行注册
        ServiceManager.addService(Context.ACTIVITY_SERVICE, this, /* allowIsolated= */ true,
        		DUMP_FLAG_PRIORITY_CRITICAL | DUMP_FLAG_PRIORITY_NORMAL | DUMP_FLAG_PROTO);
        ServiceManager.addService(ProcessStats.SERVICE_NAME, mProcessStats);
        ServiceManager.addService("meminfo", new MemBinder(this), /* allowIsolated= */ false,
				DUMP_FLAG_PRIORITY_HIGH);
        ServiceManager.addService("gfxinfo", new GraphicsBinder(this));
        ServiceManager.addService("dbinfo", new DbBinder(this));
        if (MONITOR_CPU_USAGE) {
            ServiceManager.addService("cpuinfo", new CpuBinder(this),
					/* allowIsolated= */ false, DUMP_FLAG_PRIORITY_CRITICAL);
        }
        ServiceManager.addService("permission", new PermissionController(this));
        ServiceManager.addService("processinfo", new ProcessInfoService(this));
        ServiceManager.addService("cacheinfo", new CacheBinder(this));

        ...
}
查看setSystemProcess()方法,可以看到通过ServiceManager.addService()方法将AMS相关信息都注册到了SM中,但是这里就有了疑问,SM是在哪里进行获取的呢?带着这个疑问继续分析。
2. ServiceManager.addService()
代码路径:android/framework/base/services/core/java/com/android/os/ServiceManager.java
public static void addService(String name, IBinder service, boolean allowIsolated,
		int dumpPriority) {
    try {
        //这里最终变成:ServiceManagerNative.java$ServiceManagerProxy.addService();
        getIServiceManager().addService(name, service, allowIsolated, dumpPriority);
    } catch (RemoteException e) {
        Log.e(TAG, "error in addService", e);
    }
}
-
看到此处,针对上面的SM是在哪里获取的问题大致有了一个猜测,应该就是通过
getIServiceManager()方法去获取的,那么究竟对不对呢,展开分析一下getIServiceManager()代码路径:android/framework/base/services/core/java/com/android/os/ServiceManager.java
private static IServiceManager getIServiceManager() { //如果sServiceManager已存在,直接返回sServiceManager对象,单例 if (sServiceManager != null) { return sServiceManager; } // Find the service manager //返回一个ServiceManagerNative对象 sServiceManager = ServiceManagerNative. asInterface(Binder.allowBlocking(BinderInternal.getContextObject())); //所以这里也就变成了:sServiceManager = ServiceManagerNative.asInterface(new BinderProxy()); return sServiceManager; } -
确实如上面的猜测,
getIServiceManager()就是返回了一个IServiceManager对象,并且保证了单例,如果已存在IServiceManager对象,那么就直接返回,否则新建后返回,接下来看一下IServiceManager对象是如何新建的,同样将创建的代码进行拆分:-
BinderInternal.getContextObject()代码路径:android/frameworks/base/core/java/com/android/internal/os/BinderInternal.java
//此处最终返回值为BinderProxy对象
public static final native IBinder getContextObject();
发现
getContextObject()是一个native方法,会通过JNI层再往下调用,如何调用到JNI,调用哪个JNI方法,可以看前面的<binder JNI注册>文章,这里不做赘述代码路径:android/frameworks/base/core/jni/android_util_Binder.cpp
static jobject android_os_BinderInternal_getContextObject(JNIEnv* env, jobject clazz) { //此处代码就很熟悉了,和defaultServiceManager()方法里面获取SM的方式是一致的,最终就获取了SM的BpBinder对象 sp<IBinder> b = ProcessState::self()->getContextObject(NULL); return javaObjectForIBinder(env, b); }-
获取BpBinder对象的方法和
defaultServiceManager()方法里获取BpBinder的方式是完全一样的,这里就不展开了,接下来就着重看一下javaObjectForIBinder()方法代码路径:android/frameworks/base/core/jni/android_util_Binder.cpp
// If the argument is a JavaBBinder, return the Java object that was used to create it. // Otherwise return a BinderProxy for the IBinder. If a previous call was passed the // same IBinder, and the original BinderProxy is still alive, return the same BinderProxy. jobject javaObjectForIBinder(JNIEnv* env, const sp<IBinder>& val) { // N.B. This function is called from a @FastNative JNI method, so don't take locks around // calls to Java code or block the calling thread for a long time for any reason. if (val == NULL) return NULL; //这里是在判断传入的Binder对象是BBinder还是BpBinder,即确认当前server是客户端还是服务端,而这里显然是客户端,val是ServiceManager的BpBinder对象 /* //如果是BBinder,那么调用的就是android_util_Binder.cpp$JavaBBinder.checkSubClass() bool checkSubclass(const void* subclassID) const { return subclassID == &gBinderOffsets; } //如果是BpBinder,那么调用的就是Binder.cpp$IBinder.checkSubclass() bool IBinder::checkSubclass(const void* /subclassID/) const { return false; } */ if (val->checkSubclass(&gBinderOffsets)) { // It's a JavaBBinder created by ibinderForJavaObject. Already has Java object. //从通过JavaBBinder的object()方法可以拿到mObject成员,而这个mObject就是android.os.Binder在native层的JNI对象 jobject object = static_cast<JavaBBinder*>(val.get())->object(); LOGDEATH("objectForBinder %p: it's our own %p!\n", val.get(), object); //返回JavaBBinderHolder对象 return object; } BinderProxyNativeData* nativeData = new BinderProxyNativeData(); nativeData->mOrgue = new DeathRecipientList; nativeData->mObject = val; //通过调用BinderProxy的构造函数,创建一个BinderProxy对象 jobject object = env->CallStaticObjectMethod(gBinderProxyOffsets.mClass, gBinderProxyOffsets.mGetInstance, (jlong) nativeData, (jlong) val.get()); if (env->ExceptionCheck()) { // In the exception case, getInstance still took ownership of nativeData. return NULL; } BinderProxyNativeData* actualNativeData = getBPNativeData(env, object); if (actualNativeData == nativeData) { // Created a new Proxy uint32_t numProxies = gNumProxies.fetch_add(1, std::memory_order_relaxed); uint32_t numLastWarned = gProxiesWarned.load(std::memory_order_relaxed); if (numProxies >= numLastWarned + PROXY_WARN_INTERVAL) { // Multiple threads can get here, make sure only one of them gets to // update the warn counter. if (gProxiesWarned.compare_exchange_strong(numLastWarned, numLastWarned + PROXY_WARN_INTERVAL, std::memory_order_relaxed)) { ALOGW("Unexpectedly many live BinderProxies: %d\n", numProxies); } } } else { delete nativeData; } //最后返回BinderProxy对象,即BpBinder return object; } -
有几个点需要再次说明一下
-
gBinderProxyOffsets结构体的初始化,是在
int_register_android_os_BinderProxy()中完成的,在JNI注册的时候就会调用 -
gBinderOffsets结构体的初始化,是在
int_register_android_os_Binder()中完成的,同样是在JNI注册的时候调用的 -
如果
val->checkSubclass(&gBinderOffsets)返回为TRUE,为什么说返回的是BBinder对象?首先,object是通过方法:
static_cast<JavaBBinder*>(val.get())->object()获取的,那么同样拆分后进行分析- 先看
val.get()
代码路径:android/frameworks/base/core/jni/android_util_Binder.cpp
sp<JavaBBinder> get(JNIEnv* env, jobject obj)
{
    AutoMutex _l(mLock);
    //将弱指针升级为强指针,如果是首次进来,会返回NULL
    sp<JavaBBinder> b = mBinder.promote();
    if (b == NULL) {
        //新建一个JavaBBinder,然后返回JavaBBinder对象
        b = new JavaBBinder(env, obj);
        mBinder = b;
        ALOGV("Creating JavaBinder %p (refs %p) for Object %p, weakCount=%" PRId32 "\n",
             b.get(), b->getWeakRefs(), obj, b->getWeakRefs()->getWeakCount());
    }

    return b;
}
发现会在
get()方法中进行新建JavaBBinderJavaBBinder(JNIEnv* env, jobject /* Java Binder */ object) : mVM(jnienv_to_javavm(env)), mObject(env->NewGlobalRef(object)) //mObject就被赋值为object{ ALOGV("Creating JavaBBinder %p\n", this); android_atomic_inc(&gNumLocalRefs); incRefsCreated(env);}- 这里的object是BBinder,也就是android.os.binder在native层的JNI对象
JavaBBinder->object()
jobject object() const{ //返回mObject对象 return mObject;} - 先看
-
最终
BinderInternal.getContextObject()在addService()时返回的是BinderProxy对象,也就是BpBinder -
-
ServiceManagerNative.asInterface(new BinderProxy())代码路径:android/framework/base/core/java/android/os/ServiceManagerNative.java
static public IServiceManager asInterface(IBinder obj){ if (obj == null) { return null; } //最终会新建ServiceManagerProxy对象返回,通过ServiceManagerProxy(new BinderProxy())方法去创建 return new ServiceManagerProxy(obj);}-
如注释,因为obj是BinderProxy对象,所以对应
queryLocalInterface()返回的就是NULL,接下去就会新建ServiceManagerProxy对象public ServiceManagerProxy(IBinder remote) { //这里就是用mRemote保存了BinderProxy对象,所以后面mRemote就是BinderProxy对象 mRemote = remote; //同时会调用IServiceManager.Stub.asInterface创建ServiceManagerProxy对象,用mServiceManager保存了起来 mServiceManager = IServiceManager.Stub.asInterface(remote);}
-
-
JNI和JAVA层各个Binder类的关系图
- 至此Binder的整体解析,包含ServiceManager的整个结构就告一段落了,整一个部分,关于客户端和服务端各个Binder对象的关系再进行梳理一下,如下图所示:

- JavaBBinder继承自本地框架的BBinder,代表binder service服务端实体,而JavaBBinderHolder保存JavaBBinder指针,Java层Binder的mObject保存的是JavaBBinderHolder指针的值(android_os_Binder_init函数的env->SetLongField(obj, gBinderOffsets.mObject, (jlong)jbh);),故这里用聚合关系表示。JavaBBinder中的mObject保存的是android.os.Binder在native层的JNI对象,BinderProxy的mObject保存的是BpBinder对象指针的值,故此这里用聚合关系表示
?