?
?一、Spring框架概述
1.Spring是轻量级的开源的一站式的JavaEE框架?
什么是轻量级?不需要大量的jar包,其组件对环境的依赖程度较小。开源即免费,可白嫖
什么是一站式?就是普通项目一般是采用三层架构来搭建的,像mybatis框架只能用来处理数据访问层(持久化层),而这三层架构都可以使用spring框架进行处理
2.Spring可以用来解决企业应用开发的复杂性
3.Spring有两个核心部分:IOC(Inverse of Control控制反转)和AOP(Aspect Oriented Programming 面向切面编程)
(1)IOC:控制反转,把创建对象的过程交给Spring管理
(2)AOP:面向切面:在不修改源代码的前提下,进行功能的增强
4.Spring特点
(1)方便解耦,简化开发
(2)AOP编程支持
(3)方便程序测试
(4)方便和其他框架整合(比如和mybatis框架进行整合)
(5)方便进行事务的操作
(6)降低Java API的开发难度
①Spring就是一个大工厂,可以将所有对象创建和依赖关系维护,交给Spring管理
②Spring提供面向切面编程,可以方便的实现对程序进行权限拦截、运行监控等功能
③?只需要通过配置就可以完成对事务的管理,而无需手动编程 ?
④可以通过注解方便的测试Spring程序 ?
⑤pring不排斥各种优秀的开源框架,其内部提供了对各种优秀框架(如:Struts、Hibernate、MyBatis、Quartz等)的直接支持 ?
⑥Spring 对JavaEE开发中非常难用的一些API(JDBC、JavaMail、远程调用等),都提供了封装,降低JavaEE API的使用难度
二、Spring框架的访问和下载,和组成
2.1?访问和下载
官方网站:Spring | Home
下载地址:JFrog
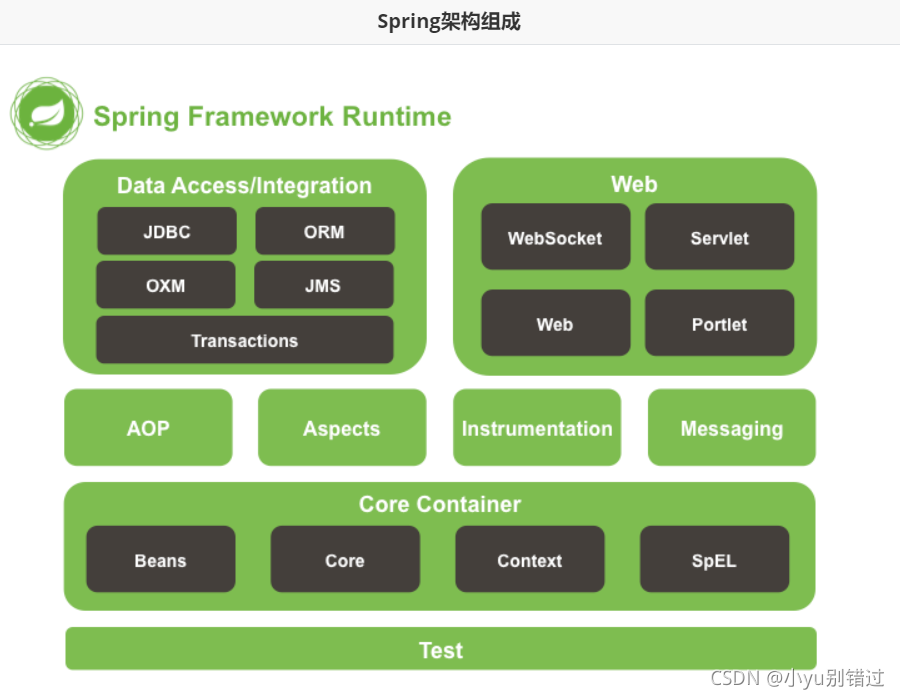
2.2Spring的组成
Spring架构由诸多模块组成,可分类为
-
测试:模拟对象,TestContext框架,Spring MVC测试,WebTestClient。
-
数据访问:事务,DAO支持,JDBC,ORM。
-
Spring MVC和 Spring WebFlux Web框架。
-
集成:远程处理,JMS,JCA,JMX,电子邮件,任务,调度,缓存。
-
语言:Kotlin,Groovy,动态语言。

| GroupId | ArtifactId | 说明 |
|---|---|---|
| org.springframework | spring-beans | Beans 支持,包含 Groovy |
| org.springframework | spring-aop | 基于代理的AOP支持 |
| org.springframework | spring-aspects | 基于AspectJ 的切面 |
| org.springframework | spring-context | 应用上下文运行时,包括调度和远程抽象 |
| org.springframework | spring-context-support | 支持将常见的第三方类库集成到 Spring 应用上下文 |
| org.springframework | spring-core | 其他模块所依赖的核心模块 |
| org.springframework | spring-expression | Spring 表达式语言,SpEL |
| org.springframework | spring-instrument | JVM 引导的仪表(监测器)代理 |
| org.springframework | spring-instrument-tomcat | Tomcat 的仪表(监测器)代理 |
| org.springframework | spring-jdbc | 支持包括数据源设置和 JDBC 访问支持 |
| org.springframework | spring-jms | 支持包括发送/接收JMS消息的助手类 |
| org.springframework | spring-messaging | 对消息架构和协议的支持 |
| org.springframework | spring-orm | 对象/关系映射,包括对 JPA 和 Hibernate 的支持 |
| org.springframework | spring-oxm | 对象/XML 映射(Object/XML Mapping,OXM) |
| org.springframework | spring-test | 单元测试和集成测试支持组件 |
| org.springframework | spring-tx | 事务基础组件,包括对 DAO 的支持及 JCA 的集成 |
| org.springframework | spring-web | web支持包,包括客户端及web远程调用 |
| org.springframework | spring-webmvc | REST web 服务及 web 应用的 MVC 实现 |
| org.springframework | spring-webmvc-portlet | 用于 Portlet 环境的MVC实现 |
| org.springframework | spring-websocket | WebSocket 和 SockJS 实现,包括对 STOMP 的支持 |
| org.springframework | spring-jcl | Jakarta Commons Logging 日志系统 |
?三、Spring的入门案例
1、创建一个maven工程,并在pom.xml文件中导入依赖
<?xml version="1.0" encoding="UTF-8"?>
<project xmlns="http://maven.apache.org/POM/4.0.0"
         xmlns:xsi="http://www.w3.org/2001/XMLSchema-instance"
         xsi:schemaLocation="http://maven.apache.org/POM/4.0.0 http://maven.apache.org/xsd/maven-4.0.0.xsd">
    <modelVersion>4.0.0</modelVersion>

    <groupId>com.qf</groupId>
    <artifactId>spring-05</artifactId>
    <version>1.0-SNAPSHOT</version>

    <dependencies>
        <!--Spring依赖-->
        <dependency>
            <groupId>org.springframework</groupId>
            <artifactId>spring-context</artifactId>
            <version>5.3.1</version>
        </dependency>
        <!--测试依赖-->
        <dependency>
            <groupId>junit</groupId>
            <artifactId>junit</artifactId>
            <version>4.13.2</version>
        </dependency>
    </dependencies>
</project>
2、在src/main/java/com/ayit目录下创建实体类User
package com.ayit;

public class User {

    public User(){
        System.out.println("无参构造方法执行");
    }

    public void addUser(){
        System.out.println("创建用户");
    }
}
3、在src/main/resources目录下创建application.xml文件
<?xml version="1.0" encoding="UTF-8"?>
<beans xmlns="http://www.springframework.org/schema/beans"
       xmlns:xsi="http://www.w3.org/2001/XMLSchema-instance"
       xsi:schemaLocation="
            http://www.springframework.org/schema/beans http://www.springframework.org/schema/beans/spring-beans.xsd">

    <!--id:类名,首字母小写   class:类的全限定名-->
    <bean id="user" class="com.ayit.User"></bean>

</beans>
?4.编写测试类
import com.ayit.User;
import org.junit.Test;
import org.springframework.context.support.ClassPathXmlApplicationContext;

public class SpringTest {
    @Test
    public void test(){
        ClassPathXmlApplicationContext applicationContext =
                new ClassPathXmlApplicationContext("applicationContext.xml");
        User user = (User) applicationContext.getBean("user");
        user.addUser();
    }
}
?5、结果

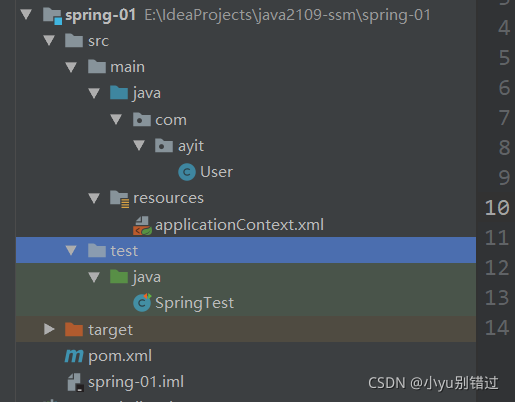
?6.目录结构:

7.BeanFactory和ApplicationContext的区别
ApplicationContext:它在构建核心容器的时候,创建对象采用的策略是立即加载的方式
BeanFactory:它在构建核心容器的时候,创建对象采用的策略是延迟加载
ApplicationContext是BeanFactory的子接口,对BeanFactory提供了以下扩展
(1)国际化处理
(2)事件传递
(3)bean的自动装配
(4)各种不同应用层的Context的实现
早期开发使用的是BeanFactory,现在使用ApplicationContext,在服务器启动的时候,需要把环境准备好,对象创建出来,所以现在采用立即加载的方式,提高用户体验。
四、Spring对bean管理细节
4.1创建bean的三种方式
bean元素:使用该元素描述需要被Spring容器管理的对象
- id属性:给管理的对象起个名字(一般使用类名,且首字母小写),获得对象时使用该名字获得对象
- class属性:被管理的对象的全限定名(类名加包名)
- name属性:给id属性的作用一致(以前用,现在用id)
第一种方式:使用当前类的构造函数(空参和带参)创建:
- 使用当前类的空参构造函数创建:
????????????????在spring的配置文件中使用bean标签,配以id和class属性。
????????<bean id="user" class="com.ayit.pojo.User"></bean>
? ? ?2.使用当前类的带参构造函数创建:
? ? ? ? 如果使用当前类的带参构造函数创建,必须在bean标签的内部,写上constructor-arg子标签,在constructor-arg子标签中配以name和value(或ref)属性,且赋值,带参构造函数中的参数每一个都要对应一个constructor-arg标签
第二种方式:使用普通工厂的实例方法创建对象(使用某个类的方法创建对象,并存入spring容器中)
<bean id="userFactory" class="com.ayit.factory.UserFactory"></bean>
<bean id="user" factory-bean="userFactory" factory-method="getUser"></bean>
第三种方式:使用工厂的静态方法创建对象(使用某个类的静态方法创建对象,并存入spring容器中)
<bean id = "user" class="com.ayit.factory.UserStaticFactory" factory-method = "getUser"></bean>
案例:(这里使用的有空参构造函数创建和第二种及第三种创建对象的方式)
1.导入依赖
<?xml version="1.0" encoding="UTF-8"?>
<project xmlns="http://maven.apache.org/POM/4.0.0"
         xmlns:xsi="http://www.w3.org/2001/XMLSchema-instance"
         xsi:schemaLocation="http://maven.apache.org/POM/4.0.0 http://maven.apache.org/xsd/maven-4.0.0.xsd">
    <modelVersion>4.0.0</modelVersion>

    <groupId>com.ayit</groupId>
    <artifactId>spring-01</artifactId>
    <version>1.0-SNAPSHOT</version>

    <dependencies>
        <dependency>
            <groupId>org.springframework</groupId>
            <artifactId>spring-context</artifactId>
            <version>5.3.1</version>
        </dependency>
        <dependency>
            <groupId>junit</groupId>
            <artifactId>junit</artifactId>
            <version>4.13.2</version>
        </dependency>
        <dependency>
            <groupId>org.projectlombok</groupId>
            <artifactId>lombok</artifactId>
            <version>1.18.20</version>
        </dependency>
    </dependencies>

</project>
2.创建实体类User:
package com.ayit.pojo;

public class User {

    public User(){
        System.out.println("无参构造方法执行");
    }

    public void addUser(){
        System.out.println("创建用户");
    }
}
3.创建UserFactory和UserStaticFactory工厂类
UserFactory工厂类:
package com.ayit.factory;

import com.ayit.pojo.User;

public class UserFactory {

    public User getUser(){
        System.out.println("UserFactory工厂的实例方法创建User对象!");

//        return new User();//直接创建对象,耦合度还是很高
        //使用反射创建对象,降低耦合性
        try {
           return (User) Class.forName("com.ayit.pojo.User").newInstance();
        } catch (Exception e) {
            e.printStackTrace();
        }
        //如果创建对象失败,这里我手动创建一个异常,便于查看看错误信息
        throw new RuntimeException("创键User对象异常!");
    }
}
UserStaticFactory工厂类:
package com.ayit.factory;

import com.ayit.pojo.User;


public class UserStaticFactory {
    public static User getUser(){
        System.out.println("UserStaticFactory工厂的静态方法创建User对象!");
        try {
           return (User) Class.forName("com.ayit.pojo.User").newInstance();
        } catch (Exception e) {
            e.printStackTrace();
        }
        return null;
    }
}
4.创建applicationContext.xml文件
<?xml version="1.0" encoding="UTF-8"?>
<beans xmlns="http://www.springframework.org/schema/beans"
       xmlns:xsi="http://www.w3.org/2001/XMLSchema-instance"
       xsi:schemaLocation="
            http://www.springframework.org/schema/beans http://www.springframework.org/schema/beans/spring-beans.xsd">

    <!--第一种方式:使用无参构造方法创建对象-->
<!--    <bean id="user" class="com.ayit.pojo.User"></bean>-->

    <!--第二种方式:使用工厂的实例方法创建对象(使用某个类的方法创建对象,并存入spring容器中)-->
<!--    <bean id="userFactory" class="com.ayit.factory.UserFactory"></bean>-->
<!--    <bean id="user" factory-bean="userFactory" factory-method="getUser"></bean>-->

    <!--第三种方式:使用工厂的静态方法创建对象(使用某个类的静态方法创建对象,并存入spring容器中)-->
    <bean id="user" class="com.ayit.factory.UserStaticFactory" factory-method="getUser"></bean>


</beans>
?5.创建测试类:
import com.ayit.pojo.User;
import org.junit.Test;
import org.springframework.context.support.ClassPathXmlApplicationContext;

public class SpringTest {

    //无参构造方法创建对象
    @Test
    public void test1(){
        ClassPathXmlApplicationContext applicationContext =
                new ClassPathXmlApplicationContext("applicationContext.xml");
        User user = (User) applicationContext.getBean("user");
        user.addUser();
    }

    //使用对象工厂的实例方法创建对象
    @Test
    public void test2(){
        ClassPathXmlApplicationContext applicationContext =
                new ClassPathXmlApplicationContext("applicationContext.xml");
        User user = (User) applicationContext.getBean("user");
        user.addUser();
    }

    //使用对象工厂的静态方法创建对象
    @Test
    public void test3(){
        ClassPathXmlApplicationContext applicationContext =
                new ClassPathXmlApplicationContext("applicationContext.xml");
        User user = (User) applicationContext.getBean("user");
        user.addUser();
    }

}
6.结果:
?
?
?4.2、Bean对象的作用范围
bean标签的scope属性:
? ? 作用:用于指定bean的作用范围
? ? 取值: 常用的就是单例的和多例的
? ? singleton:单例的(默认值)
? ? prototype:多例的
? ? request:作用于web应用的请求范围
? ? session:作用于web应用的会话范围
? ? global-session:作用于集群环境的会话范围(全局会话范围),当不是集群环境时,它就是session
<bean id="userDao" class="com.qf.dao.impl.UserDaoImpl" scope="prototype"></bean>
例子:
1.导入依赖:和上一个例子的代码一样
2.创建实体类User
package com.qf.pojo;


public class User {

    private Integer id;
    private String name;
    private String password;

    public User() {
        System.out.println("无参构造方法执行!");
    }
}
3.创建applicationContext.xml文件
<?xml version="1.0" encoding="UTF-8"?>
<beans xmlns="http://www.springframework.org/schema/beans"
       xmlns:xsi="http://www.w3.org/2001/XMLSchema-instance"
       xsi:schemaLocation="
        http://www.springframework.org/schema/beans http://www.springframework.org/schema/beans/spring-beans.xsd">

        <!--scope属性:默认为单例singleton,prototype多例-->
<!--        <bean id="user1" class="com.qf.pojo.User" scope="singleton"></bean>-->
        <bean id="user2" class="com.qf.pojo.User" scope="prototype"></bean>

</beans>
4.创建测试类进行测试:
import com.qf.pojo.User;
import org.junit.Test;
import org.springframework.context.support.ClassPathXmlApplicationContext;

public class SpringTest {

    //测试scope属性
    @Test
    public void test(){
        ClassPathXmlApplicationContext applicationContext =
                new ClassPathXmlApplicationContext("applicationContext.xml");

        //当scope属性为:singleton 单例模式只创建一个对象
//        User user1 = (User) applicationContext.getBean("user1");
//        User user2 = (User) applicationContext.getBean("user1");
//        System.out.println(user1 == user2);
        //输出结果为:无参构造方法执行!
        //true

        //当scope属性为:prototype 多例模式创建多个对象
        User user1 = (User) applicationContext.getBean("user2");
        User user2 = (User) applicationContext.getBean("user2");
        System.out.println(user1 == user2);
        //输出结果为:无参构造方法执行!
        //无参构造方法执行!
        //false
    }
}
5.结果为:
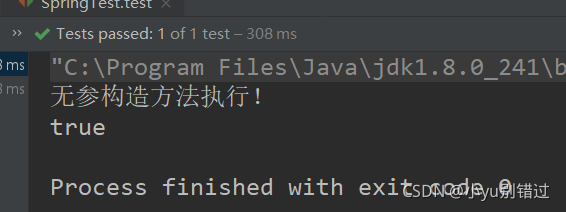
当scope属性为:singleton 单例模式只创建一个对象

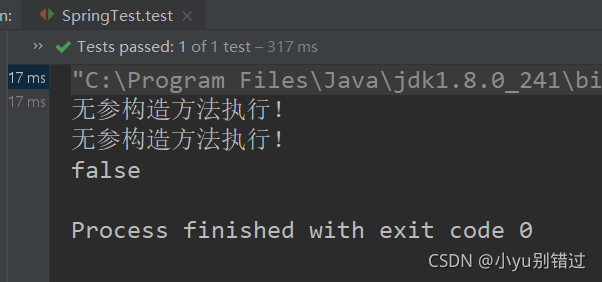
当scope属性为:prototype 多例模式创建多个对象

?总结:第一次的输出结果,两个对象比较得到的结果是true,且打印了一次无参构造方法执行,说明在spring容器中只创建了一个User对象
第二次的输出结果,两个对象比较得到的结果是false,且打印了两次无参构造方法执行,说明在spring容器中创建了两个User对象
五、Spring的依赖注入
5.1Spring中的依赖注入
依赖注入:Dependency Injection(DI)
- IOC:SpringIOC负责创建对象,管理对象(通过依赖注入(DI)),装配对象,配置对象,并管理这些对象的整个生命周期
- 依赖关系的管理:以后都交给Spring管理,在当前类需要用到其它类的对象,由Spring为我们提供,我们只需要在配置文件中说明即可
依赖关系的维护:就称为依赖注入
依赖注入:给类的成员属性进行赋值
- 能注入的数据:
- 基本数据类型和String类型
- 其它bean类型(在配置文件中或者注解配置过的bean)
- 复杂类型/集合类型
- 注入的方式:
- 第一种:使用构造函数提供
- 第二种:使用set方法提供
- 第三种:使用注解提供
5.2 构造函数注入
使用的标签:constructor-arg
? ? ? ? 标签使用的位置:bean标签的内部
? ? ? ? 标签中的属性:
? ? ? ? ? ? ? ? 【重要】name:用于指定给构造函数中指定名称的参数进行赋值
? ? ? ? ? ? ? ? 【重要】value:用于提供基本数据类型和String类型的数据
? ? ? ? ? ? ? ? 【重要】ref:用于指定其它的bean类型的数据。他指的就是在spring的IOC核心容器中出现过的bean对象。
? ? ? ? ? ? ? ? type:用于指定要注入的数据的数据类型,该数据类型也是带参构造函数中某个或某些参数的类型
? ? ? ? ? ? ? ? index:用于指定要注入的数据给构造函数中指定索引位置的参数赋值。索引是从0开始
? ? ? ? ? ? ? ?
优点:在获取bean对象时,注入数据是必须的操作,否则对象无法创建成功
缺点:改变了bean对象的实例化方式,使得我们在创建对象的时候,如果用不到这些数据,也必须提供
案例:
1.导入依赖
我导入了lombok依赖,该依赖需要使用lombok插件(想用的自己百度在idea装lombok插件,非常简单),通过使用该依赖的注解,可以得到当前实体类的所有属性的getter和setter方法,以及toString方法等等,用的非常方便
<?xml version="1.0" encoding="UTF-8"?>
<project xmlns="http://maven.apache.org/POM/4.0.0"
         xmlns:xsi="http://www.w3.org/2001/XMLSchema-instance"
         xsi:schemaLocation="http://maven.apache.org/POM/4.0.0 http://maven.apache.org/xsd/maven-4.0.0.xsd">
    <modelVersion>4.0.0</modelVersion>

    <groupId>com.ayit</groupId>
    <artifactId>spring-03</artifactId>
    <version>1.0-SNAPSHOT</version>

    <dependencies>
        <dependency>
            <groupId>org.springframework</groupId>
            <artifactId>spring-context</artifactId>
            <version>5.3.10</version>
        </dependency>
        <dependency>
            <groupId>junit</groupId>
            <artifactId>junit</artifactId>
            <version>4.13.2</version>
        </dependency>
        <dependency>
            <groupId>org.projectlombok</groupId>
            <artifactId>lombok</artifactId>
            <version>1.18.20</version>
        </dependency>
    </dependencies>


</project>
2.创建实体类
package com.qf.pojo;

import lombok.Data;

//使用lombok插件的注解
@Data
public class User {
    private Integer id;
    private String name;
    private String password;

    private Car car;
}
package com.qf.pojo;

import lombok.Data;

@Data
public class Car {
    private String cname;
    private String color;
    private Double price;


    //带参构造方法1
    public Car(String cname, String color, Double price){
        this.cname=cname;
        this.color =color;
        this.price = price;
    }

    //带参构造方法2
    public Car(Double price,String color,String cname){
        this.price = price;
        this.color =color;
        this.cname = cname;
    }
}
3.创建applicationContext.xml文件
<?xml version="1.0" encoding="UTF-8"?>
<beans xmlns="http://www.springframework.org/schema/beans"
       xmlns:xsi="http://www.w3.org/2001/XMLSchema-instance"
       xsi:schemaLocation="
        http://www.springframework.org/schema/beans http://www.springframework.org/schema/beans/spring-beans.xsd">

    <!--使用Car类的带参构造函数1创建car对象,并存入到spring的IOC容器中-->
    <bean id="car1" class="com.qf.pojo.Car">
        <!--使用构造函数注入属性值,使用标签properties-->
        <constructor-arg name="cname" value="法拉利" type="java.lang.String" index="0"></constructor-arg>
        <constructor-arg name="color" value="红色" type="java.lang.String" index="1"></constructor-arg>
        <constructor-arg name="price" value="520.6" type="java.lang.Double" index="2"></constructor-arg>
    </bean>

    <!--使用Car类的带参构造函数2创建car对象,并存入到spring的IOC容器中-->
    <bean id="car2" class="com.qf.pojo.Car">
        <!--注意每个属性所对应的index的值,和构造函数的参数的位置必须一样-->
        <constructor-arg name="price" value="600.6" index="0"></constructor-arg>
        <constructor-arg name="color" value="黑色" index="1"></constructor-arg>
        <constructor-arg name="cname" value="保时捷" index="2"></constructor-arg>
    </bean>


    <!--使用User类的空参构造函数创建bean对象,并存入到spring的IOC容器中-->
    <bean id="user" class="com.qf.pojo.User">
        <!--使用set方法注入属性值,使用标签properties-->
        <!--对于基本数据类型和String类型的属性赋值,使用value属性-->
        <property name="id" value="1001"></property>
        <property name="name" value="张三"></property>
        <property name="password" value="123456"></property>

        <!--对于其它bean类型的属性,使用ref属性-->
        <!--这里我使用的是带参构造函数1创建的car对象-->
        <property name="car" ref="car1"></property>
    </bean>


</beans>
4.编写测试类
import com.qf.pojo.User;
import org.junit.Test;
import org.springframework.context.support.ClassPathXmlApplicationContext;

public class SpringTest {
    @Test
    public void test(){
        ClassPathXmlApplicationContext applicationContext =
                new ClassPathXmlApplicationContext("applicationContext.xml");
        User user = (User) applicationContext.getBean("user");

        System.out.println(user);
    }
}
5.结果为:

5.3 set方法注入
涉及的标签:property
? ? ? ? 出现的位置:bean标签的内部
? ? ? ? 标签的属性:
? ? ? ? name:用于指定注入时所调用的set方法名称
? ? ? ? value:用于提供基本数据类型和String类型的数据
? ? ? ? ref:用于指定其他的bean类型的数据,它指的就是在spring的IOC容器中出现过的bean对象
优势:创建对象时没有明确的限制,可以直接使用默认的无参构造函数进行创建
弊端:如果有某个成员必须有值,则获取对象是有可能set方法没有执行。
案例:
1.导入依赖,和上一个案例的依赖代码一样
2.创建实体类
package com.qf.pojo;

import lombok.Data;

//使用lombok插件的注解
@Data
public class User {
    private Integer id;
    private String name;
    private String password;

    private Car car;
}
package com.qf.pojo;

import lombok.Data;

@Data
public class Car {
    private String cname;
    private String color;
    private Double price;

}
3.创建application.xml文件
<?xml version="1.0" encoding="UTF-8"?>
<beans xmlns="http://www.springframework.org/schema/beans"
       xmlns:xsi="http://www.w3.org/2001/XMLSchema-instance"
       xsi:schemaLocation="
        http://www.springframework.org/schema/beans http://www.springframework.org/schema/beans/spring-beans.xsd">

     <!--使用空参构造函数创建对象-->
    <bean id="car" class="com.qf.pojo.Car">
        <!--使用set方法注入,在bean标签的内部使用property标签-->
        <!--如果实体类的成员属性的类型是基本数据类型,则使用value-->
        <property name="cname" value="宝马"></property>
        <property name="color" value="蓝色"></property>
        <property name="price" value="123.6"></property>
    </bean>

    <bean id="user" class="com.qf.pojo.User">
        <property name="name" value="李四"></property>
        <property name="id" value="1002"></property>
        <property name="password" value="345678"></property>

        <!--如果实体类的成员属性的类型为bean类型,则使用ref-->
        <property name="car" ref="car"></property>
    </bean>


</beans>
4.编写测试类测试:测试类代码和上一个案例的测试类代码一样
5.结果:

?5.4?复杂类型的注入/集合类型的注入
用于给数组结构注入的标签:array ---> value / ref
用于给collection集合结构注入的标签:list / set ---> value / ref
用于给map集合结构注入的标签:map ---> (key,value) / (key-ref,value-ref)
用于给properties结构注入的标签:props --->prop
案例:
applicationContext.xml文件
<?xml version="1.0" encoding="UTF-8"?>
<beans xmlns="http://www.springframework.org/schema/beans"
       xmlns:xsi="http://www.w3.org/2001/XMLSchema-instance"
       xsi:schemaLocation="
        http://www.springframework.org/schema/beans http://www.springframework.org/schema/beans/spring-beans.xsd">

    <!--方便复杂类型引入测试-->
    <bean id="car" class="com.qf.pojo.Car">
        <property name="cname" value="法拉利"></property>
        <property name="color" value="红色"></property>
        <property name="price" value="500.6"></property>
    </bean>
    <bean id="user" class="com.qf.pojo.User">
        <property name="id" value="1001"></property>
        <property name="name" value="张三"></property>
        <property name="password" value="654321"></property>
        <property name="car" ref="car" ></property>
    </bean>

     <!--复杂类型的注入/集合类型的注入-->
    <bean id="collectionDemo" class="com.qf.pojo.CollectionDemo">
        <property name="arr">
            <array>
                <value>123</value>
                <value>456</value>
            </array>
        </property>
        <property name="list">
            <list>
                <value>李白</value>
                <value>123</value>
                <value>aac</value>
                <!--如果是bean类型,使用ref-->
                <ref bean="user"></ref>
            </list>
        </property>
        <property name="set">
            <set>
                <value>李白</value>
                <value>123</value>
                <value>aac</value>
                <ref bean="user"></ref>
            </set>
        </property>
        <property name="map">
            <map>
                <entry key="username" value="兔兔"></entry>
                <entry key-ref="user" value-ref="user"></entry>
            </map>
        </property>
        <property name="properties">
            <props>
                <prop key="username">root</prop>
                <prop key="password">123456</prop>
                <prop key="driverClassName">com.mysql.cj.jdbc.Driver</prop>
            </props>
        </property>
    </bean>


</beans>
实体类:
package com.qf.pojo;

import lombok.Data;

import java.io.Serializable;
import java.util.List;
import java.util.Map;
import java.util.Properties;
import java.util.Set;

@Data
public class CollectionDemo implements Serializable {
    private Integer[] arr;
    private List list;
    private Set set;
    private Map map;
    private Properties properties;
}
结果:(打印的结果太长,只截取了片段)

?5.5 注解的方法注入(需要在applicationContext.xml文件添加context约束)
用于创建对象的
? ? 他们的作用就和在XML配置文件中编写一个<bean>标签实现的功能是一样的
? ? ? ? Component:用于把当前类对象存入spring容器中
? ? ? ? value属性:用于指定bean的id。当我们不写时,它的默认值是当前类名,且首字母改小写。
? ? ? ??
? ? ? ? Controller:一般用在表现层
? ? ? ? Service:一般用在业务层
? ? ? ? Repository:一般用在持久层
? ? ? ? 以上三个注解的作用和属性与Component相同,是spring框架为我们提供明确的三层使用的注解
? ? ? ?
用于注入数据的
?? ?他们的作用就和在xml配置文件中的bean标签中写一个<property>标签的作用是一样的
? ? Autowired:自动按照类型注入
? ? Qualifier:在按照类中注入的基础之上再按照名称注入,value属性:用于指定注入bean的id
? ? Resource:直接按照bean的id注入。它可以独立使用,name属性:用于指定bean的id
? ??
注意:以上三个注入都只能注入其他bean类型的数据,而基本类型和String类型无法使用上述注解实现,另外,集合类型的注入只能通过XML来实现。因为Resource注解是J2EE的,而不是Spring本身的,所以在使用时需要在pom.xml中导入依赖:
?? ?<dependency>
? ? ? ? ? ? <groupId>javax.annotation</groupId>
? ? ? ? ? ? <artifactId>javax.annotation-api</artifactId>
? ? ? ? ? ? <version>1.3.2</version>
? ? </dependency>
? ? Value:用于注入基本类型和String类型的数据
<br class="Apple-interchange-newline"><div></div>
用于改变作用范围的
????????作用和在bean标签中使用scope属性实现的功能是一样的
????????Scope:用于指定bean的作用范围
????????value:指定范围的取值。常用取值:singleton prototype
和生命周期相关
????????作用和在bean标签中使用init-method和destroy-methode的作用是一样的
????????PreDestroy:用于指定销毁方法
????????PostConstruct:用于指定初始化方法
案例:
1.导入依赖,依赖的pom.xml文件和上面的一样
2.创建实体类
package com.ayit.pojo;

import org.springframework.beans.factory.annotation.Autowired;
import org.springframework.beans.factory.annotation.Qualifier;
import org.springframework.beans.factory.annotation.Value;
import org.springframework.context.annotation.Scope;
import org.springframework.stereotype.Component;
import org.springframework.stereotype.Controller;
import org.springframework.stereotype.Repository;
import org.springframework.stereotype.Service;

import javax.annotation.PostConstruct;
import javax.annotation.PreDestroy;
import javax.annotation.Resource;

//@Component//把当前类对象作为bean对象存入到spring的IOC容器中,相当于application.xml文件中的<bean id="" class=""></bean>
//@Component(value = "user")//value的值是当前类对象的名称,可以根据此名称取值,value可以不写,不写的话,当前类对象的名称默认为类名,且首字母小写
@Component//适用于所有层
//@Controller//适用于controller层
//@Service//适用于service层
//@Repository//适用于dao层
@Scope(value = "singleton") //value的值为singleton(单例)或prototype(多例),默认为单例singleton
public class User {

    //成员属性是基本数据类型或String类型的
    //通过在私有成员属性上直接加注解value进行赋值
//    @Value("1001")
    private Integer id;
//    @Value("李艺芬")
    private String name;
//    @Value("123456")
    private String password;


    //成员属性是bean类型的
    @Autowired//自动按照类型注入(前提是Car这个类的对象被创建出来且存在于Spring的IOC容器中,且只有一个bean对象,默认名称是car)
    //当Spring的IOC容器中有两个Car类的bean对象,此时需要使用@Qualifier
    //@Qualifier需要和@Autowired搭配使用
//    @Qualifier(value = "car1")//在按照自动类型注入的同时,再按照名称注入 value属性,用于指定注入bean的id
    @Resource(name = "car1")//直接按照bean的id进行注入
    private Car car;


    //通过使用@PreDestroy和@PostConstruct进行初始化和销毁bean
    //相当于bean标签中的innit-method和destroy-method
    @PostConstruct
    public void init(){
        System.out.println("初始化方法");
    }

    @PreDestroy
    public void destroy(){
        System.out.println("销毁的方法");
    }

//通过在成员属性的set方法上面加注解进行注入
    @Value("1002")
    public void setId(Integer id) {
        this.id = id;
    }

    @Value("杨幂")
    public void setName(String name) {
        this.name = name;
    }

    @Value("66666")
    public void setPassword(String password) {
        this.password = password;
    }

    public void setCar(Car car) {
        this.car = car;
    }

    public Integer getId() {
        return id;
    }

    public String getName() {
        return name;
    }

    public String getPassword() {
        return password;
    }

    public Car getCar() {
        return car;
    }

    @Override
    public String toString() {
        return "User{" +
                "id=" + id +
                ", name='" + name + '\'' +
                ", password='" + password + '\'' +
                ", car=" + car +
                '}';
    }
}
package com.ayit.pojo;

import org.springframework.beans.factory.annotation.Value;
import org.springframework.context.annotation.Scope;
import org.springframework.stereotype.Component;

@Component
@Scope(value = "prototype")
public class Car {

//    @Value("保时捷")
    private String name;
//    @Value("黑色")
    private String color;
//    @Value("9825.2")
    private Double price;

    public String getName() {
        return name;
    }


    public void setName(String name) {
        this.name = name;
    }

    public String getColor() {
        return color;
    }

    public void setColor(String color) {
        this.color = color;
    }

    public Double getPrice() {
        return price;
    }

    public void setPrice(Double price) {
        this.price = price;
    }

    @Override
    public String toString() {
        return "Car{" +
                "name='" + name + '\'' +
                ", color='" + color + '\'' +
                ", price=" + price +
                '}';
    }
}
3.applicationContext.xml文件
<?xml version="1.0" encoding="UTF-8"?>
<beans xmlns="http://www.springframework.org/schema/beans"
       xmlns:xsi="http://www.w3.org/2001/XMLSchema-instance"
       xmlns:context="http://www.springframework.org/schema/context" xsi:schemaLocation="
        http://www.springframework.org/schema/beans http://www.springframework.org/schema/beans/spring-beans.xsd
        http://www.springframework.org/schema/context http://www.springframework.org/schema/context/spring-context.xsd"> <!-- bean definitions here -->

    <!--注解的方式注入-->
    <!--需要在applicationContext.xml假如context约束-->
    <!--在创建Spring的IOC容器时,扫描包下面的注解-->
    <context:component-scan base-package="com.ayit"></context:component-scan>

    <bean id="car1" class="com.ayit.pojo.Car">
        <property name="name" value="保时捷"></property>
        <property name="color" value="红色"></property>
        <property name="price" value="520.6"></property>
    </bean>

    <bean id="car2" class="com.ayit.pojo.Car">
        <property name="color" value="黑色"></property>
        <property name="name" value="法拉利"></property>
        <property name="price" value="783.6"></property>
    </bean>
</beans>
4.测试类:
import com.ayit.pojo.User;
import org.junit.Test;
import org.springframework.context.support.ClassPathXmlApplicationContext;

public class SpringTest {

    //测试@Scope注解和@PostConstruct和@PreDestroy
    @Test
    public void testScope(){
        ClassPathXmlApplicationContext applicationContext =
                new ClassPathXmlApplicationContext("applicationContext.xml");
        User user1 = (User) applicationContext.getBean("user");
        User user2 = (User) applicationContext.getBean("user");

        System.out.println("user1和user2是否相等:" + (user1 == user2));
        applicationContext.close();
    }

    //测试输出
    @Test
    public void test1(){
        ClassPathXmlApplicationContext applicationContext =
                new ClassPathXmlApplicationContext("applicationContext.xml");
        User user = (User) applicationContext.getBean("user");
        System.out.println(user);
    }
}
5.结果:

?