目录
1 服务间调用
? ? ? ? 微服务的特点是服务数量特别多,服务和服务之间也需要有交互,这就涉及到服务间的调用,即服务与服务之间如何通信。提到服务与服务之间的通信,最通用的莫过于HttpClient,在其它的通信架构中基本都使用HttpClient来作为底层的通讯模型。在SpringCloud中依然可以使用HttpClient进行服务与服务调用,只不过如果采用HttpClient调用的话,会有一些弊端,例如: 如果同一个服务有多个负载的话,采用HttpClient调用时,没有办法处理负载均衡的问题。还有另一个问题就是HttpClient只是提供了核心调用的方法并没有对调用进行封装,所以在使用上不太方便,需要自己对HttpClient进行简单的封装。
????????在SpringCloud提供了两种方式来解决服务与服务通信的问题,RestTemplate和Feign。虽然从名字上看这两种调用的方式不同,但在底层还是和HttpClient一样,采用Http的方式进行调用的。只不过是对HttpClient进行的封装。下面就一起来探讨一下这两种方式的区别。
2 RestTemplate方式调用
2.1 创建演示项目
? ? ? ? 要演示服务之间的调用,需要有服务端(Server)和客户端(Clinet),服务端提供服务供客户端调用。服务端和客户端都需要注册到Eureka提供的注册中心中,所以还需要创建注册中心项目。所以本篇我们需要创建服务提供者(服务端)项目,服务调用方(客户端)项目和注册中心项目。
????????实际上Server端和Client端是相互的,不一定Client端一定要调用Server端,Server端一样可以调用Client端。下面我们分别看一下Server端和Client端的实现。Server端的配置如下:
#端口号
server:
  port: 8001
#Eureka实例名,集群中根据这里相互识别
spring:
  application:
    name: hello-service

eureka:
  #客户端
  client:
    #注册中心地址
    service-url:
      defaultZone: http://localhost:7001/eureka/
创建一个Controller,并编写一个简单的接口来供Client调用。下面为Controller的源码。
import org.springframework.web.bind.annotation.RequestMapping;
import org.springframework.web.bind.annotation.RestController;

@RestController
public class ServerController {
    @RequestMapping("/helloServer")
    public String hello(){
        return "hello-server";
    }
}
下面我们访问一下这个接口看看,是否能正确返回数据。
在浏览器中输入:http://192.168.1.6:8001/helloServer
得到如下图所示的结果:

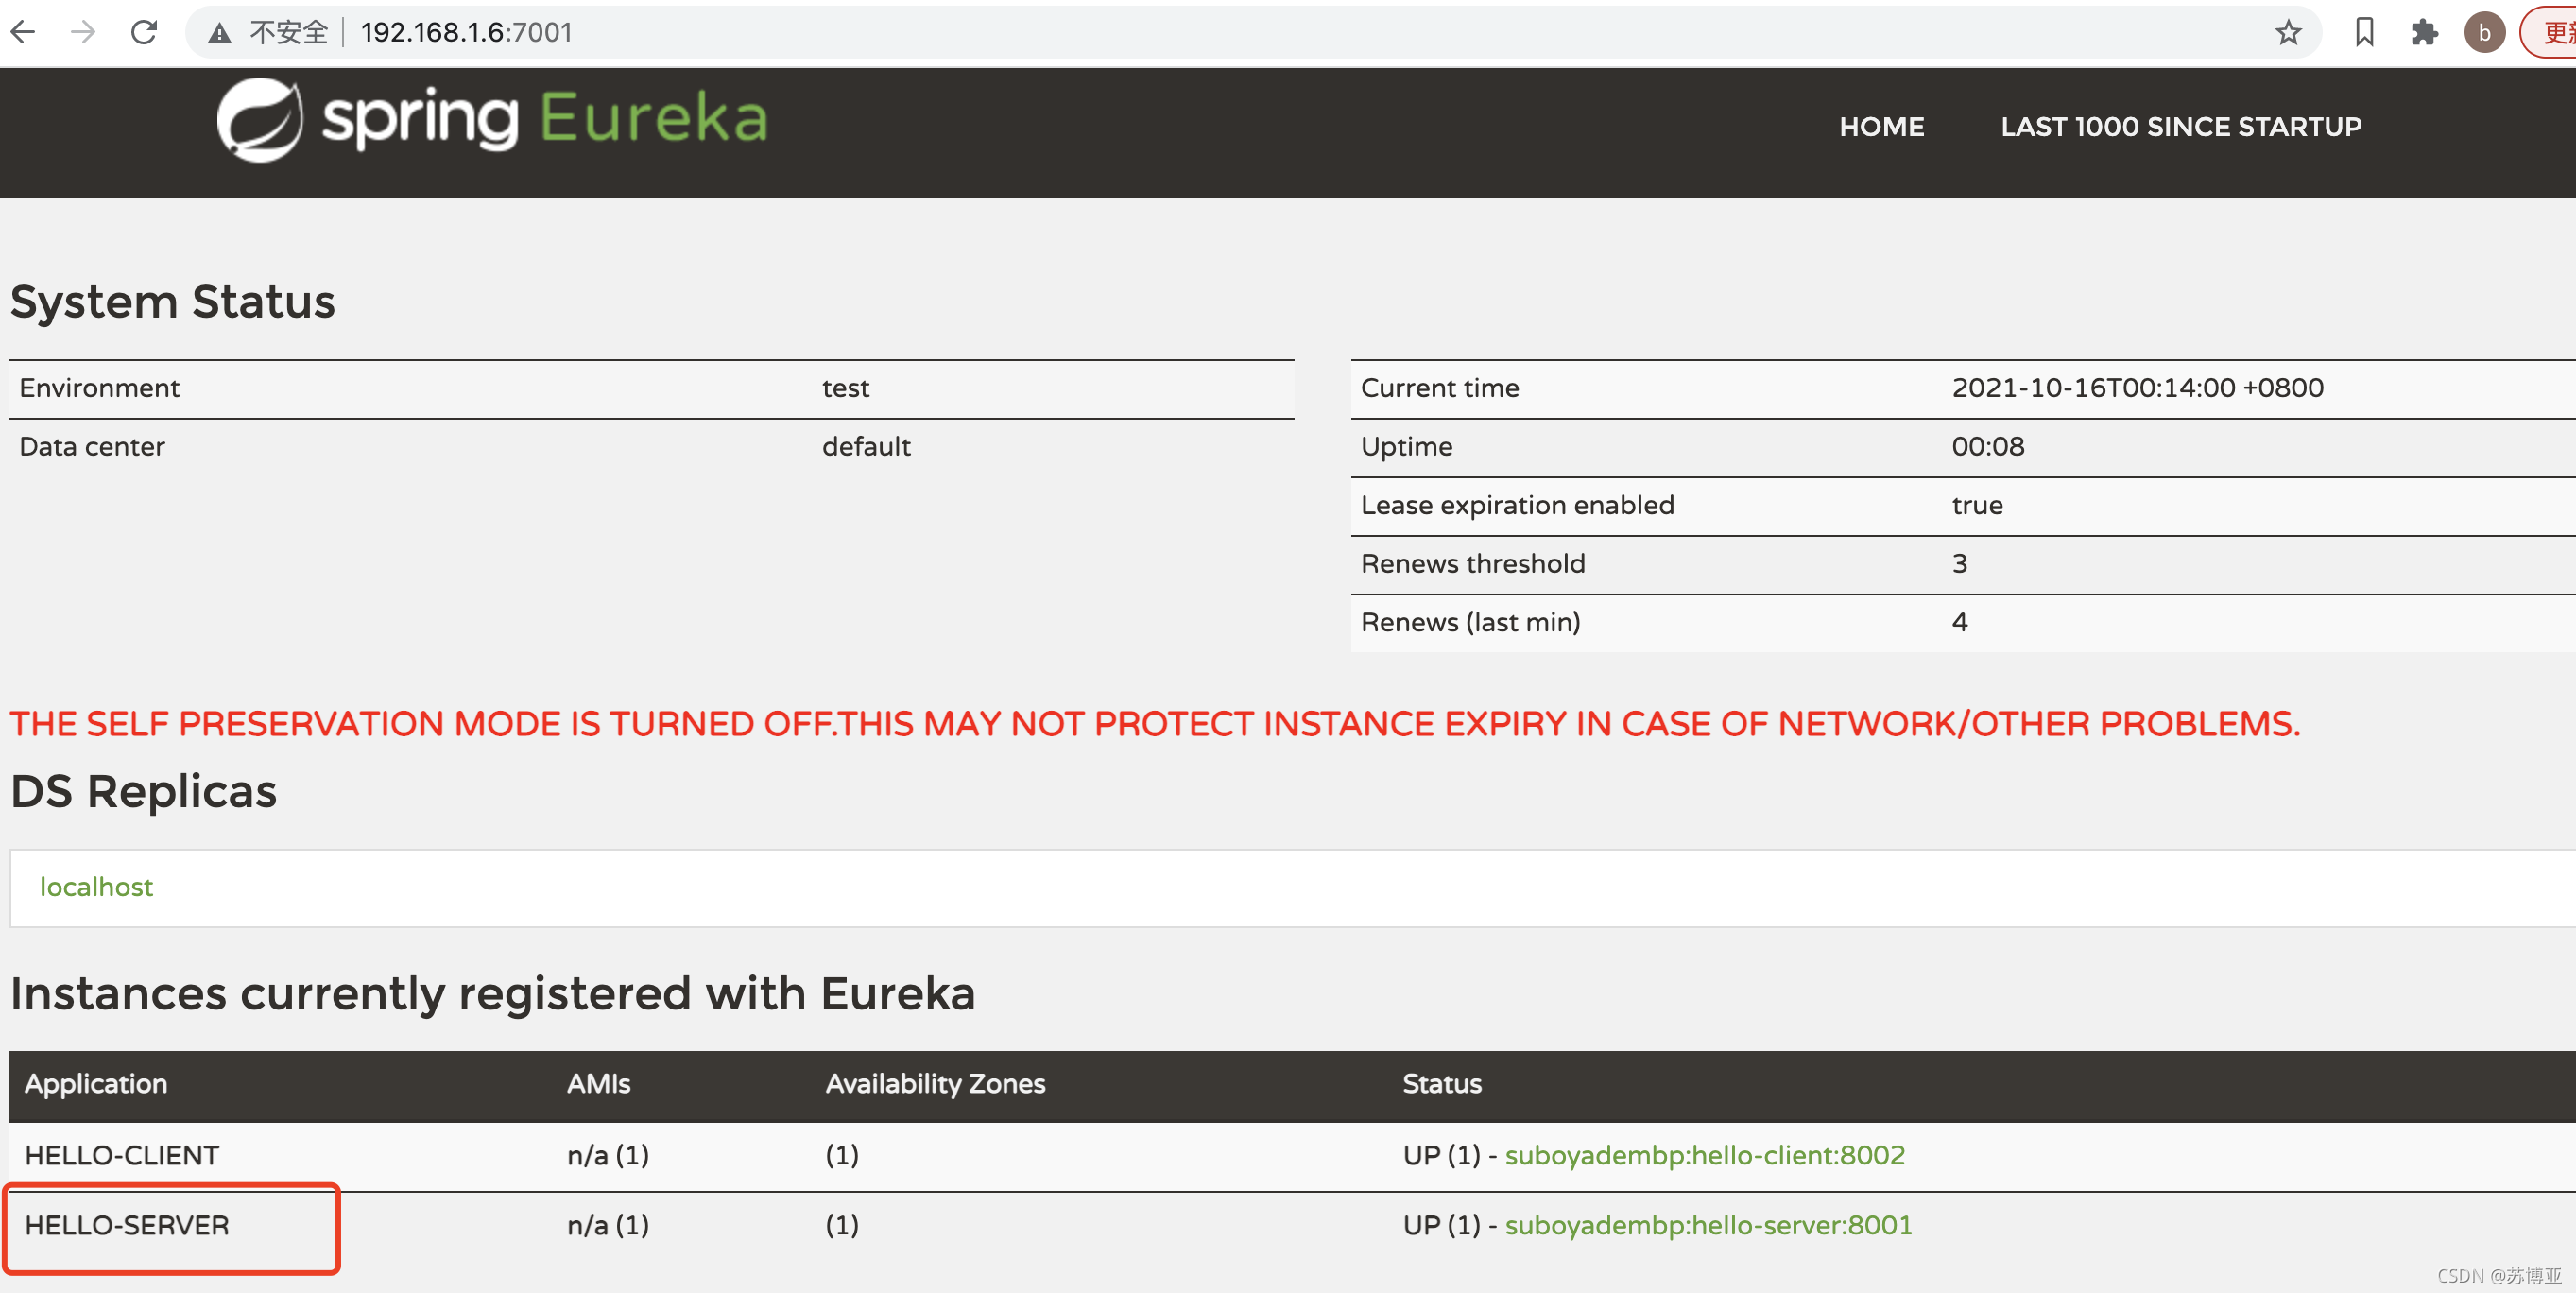
?我们看已经成功的返回了接口的数据了。下面我们看一下eureka。看看是否成功的检测到了server端的服务。
在浏览器中输入:http://localhost:7001/
下面为eureka管理界面地址:

可以看到Eureka已经成功的检测到了Server端注册成功了。
????????下面我们看一下client端的代码,创建一个Controller,并编写一个接口。下面为具体配置及代码。
import org.springframework.web.bind.annotation.RequestMapping;
import org.springframework.web.bind.annotation.RestController;

@RestController
public class ClientController {
    @RequestMapping("/helloClient")
    public String hello(){
        return "hello-client";
    }
}
配置如下所示:
#端口号
server:
  port: 8002
#Eureka实例名,集群中根据这里相互识别
spring:
  application:
    name: hello-client

eureka:
  #客户端
  client:
    #注册中心地址
    service-url:
defaultZone: http://localhost:7001/eureka/浏览器访问:http://192.168.1.6:8002/helloClient
得到如下所示的结果:

现在我们在访问一下Eureka地址看一下Client服务注册的是否成功:

可以看到注册中心也已经有客户端的服务了。?
2.2 RestTemplate 实例化
????????我们发现server和client端都已经成功的在注册中心注册成功了。这也就是我们接下来要介绍的服务间调用的前提条件。在开发Spring项目时我们知道如果我们想要使有哪个类或者哪个对象,那就需要在xml中或者用注解的方式实例化对象。所以既然我们打算使用RestTemplate类进行调用,那我们必须要先实例化RestTemplate类。下面我们就看一下怎么在实例化RestTemplate类。因为不论采用的是RestTemplate方式调用还是采用Feign方式,均是在服务的client端进行开发的,在服务的server是无需做任何更改的。所以下面我们看一下client端的改动。下面为项目源码:
package com.springcloud.provider;

import org.springframework.boot.SpringApplication;
import org.springframework.boot.autoconfigure.SpringBootApplication;
import org.springframework.cloud.client.discovery.EnableDiscoveryClient;
import org.springframework.context.annotation.Bean;
import org.springframework.web.client.RestTemplate;

/**
 * @ClassName ClientApplication
 * @Description 服务调用方
 * @Author boy
 */
@SpringBootApplication
@EnableDiscoveryClient
public class ClientApplication {

    public static void main(String[] args) {
        SpringApplication.run(ClientApplication.class, args);
    }

    @Bean
    public RestTemplate initRestTemplate() {
        return new RestTemplate();
    }
}
2.3?RestTemplate 调用方式一
????????为了演示方便我们直接在启动类上添加了一个@Bean注解。然后手动实例化了一个对象,并且要特别注意,在使用RestTemplate时,必须要先实例化,否则会抛出空指针异常。下面我们演示一下怎么使用RestTemplate来调用server端的接口。下面为Controller中的代码的改动,在原来的基础上添加函数helloClient1()
import org.springframework.beans.factory.annotation.Autowired;
import org.springframework.web.bind.annotation.RequestMapping;
import org.springframework.web.bind.annotation.RestController;
import org.springframework.web.client.RestTemplate;

@RestController
public class ClientController {

    @Autowired
    private RestTemplate template;

    @RequestMapping("/helloClient")
    public String hello(){
        return "hello-client";
    }

    @RequestMapping("/helloClient1")
    public String helloClient1(){
        String result = template.getForObject("http://127.0.0.1:8001/helloServer", String.class);
        return result;
    }
}
上面的代码比较简单,就不详细的介绍了,主要是RestTemplate中提供了getForObject方法(实际上RestTemplate提供了很多种调用的方法,主要分为Get或者Post),可以指定要调用接口的地址,指定返回的值的类型。然后就会直接返回要调用接口的结果。下面我们测试一下,还是调用client接口,看看能否正确的返回server端的数据。
浏览器输入:http://192.168.1.6:8002/helloClient1
得到如下结果:

?由上图可以看出,获得的结果是Server端返回的。
2.4?RestTemplate 调用方式二
????????我们看结果,已经成功的返回的server端的数据了,虽然返回的数据没有格式化,但返回的结果数据确实是server端的数据。这也就是RestTemplate的简单使用。但上述的代码是有弊端的,因为我们直接将调用的server端的接口地址直接写死了,这样当服务接口变更时,是需要更改客户端代码的,这显示是不合理的。那怎么办呢?这时就知道注册中心的好处了。因为注册中心知道所有服务的地址,这样我们通过注册中心就可以知道server端的接口地址,这样就避免了server端服务更改时,要同步更改client代码了。下面我们在优化一下代码,看看怎么通过注册中心来获取server端的地址,在controller中添加函数helloClient2()。
import org.springframework.beans.factory.annotation.Autowired;
import org.springframework.cloud.client.ServiceInstance;
import org.springframework.cloud.client.loadbalancer.LoadBalancerClient;
import org.springframework.web.bind.annotation.RequestMapping;
import org.springframework.web.bind.annotation.RestController;
import org.springframework.web.client.RestTemplate;

@RestController
public class ClientController {

    @Autowired
    private RestTemplate template;

    @Autowired
    private LoadBalancerClient loadBalancerClient;

    @RequestMapping("/helloClient")
    public String hello(){
        return "hello-client";
    }

    @RequestMapping("/helloClient1")
    public String helloClient1(){
        String result = template.getForObject("http://127.0.0.1:8001/helloServer", String.class);
        return result;
    }

    @RequestMapping("/helloClient2")
    public Object helloClient2() {
        ServiceInstance serviceInstance = loadBalancerClient.choose("hello-server");
        String url = String.format("http://%s:%s/helloServer", serviceInstance.getHost(), serviceInstance.getPort());
        String result = template.getForObject(url, String.class);
        return result;
    }
}
在SpringClourd中提供了LoadBalancerClient接口。通过这个接口我们可以通过用户中心的Application的名字来获取该服务的地址和端口。也就是下图中红色标红的名字(注意名字大小写)。

通过这些我们就可以获取到完整的服务接口地址了,这样就可以直接通过RestTemplate进行接口调用了。下面我们在看一下调用的结果。
浏览器输入:http://192.168.1.6:8002/helloClient2
获得结果:

2.5?RestTemplate 调用方式三
这样我们就解决了第一次服务接口地址写死的问题了。但上述的接口还有一个弊端就是我们每次调用服务时都要先通过Application的名字来获取ServiceInstance对象,然后才可以发起接口调用。实际上在SpringCloud中为我们提供了@LoadBalanced注解,只要将该注解添加到RestTemplate中的获取的地方就可以了。下面为具体修改:
启动类:
import org.springframework.boot.SpringApplication;
import org.springframework.boot.autoconfigure.SpringBootApplication;
import org.springframework.cloud.client.discovery.EnableDiscoveryClient;
import org.springframework.cloud.client.loadbalancer.LoadBalanced;
import org.springframework.context.annotation.Bean;
import org.springframework.web.client.RestTemplate;

/**
 * @ClassName ClientApplication
 * @Description 服务调用方
 * @Author boy
 */
@SpringBootApplication
@EnableDiscoveryClient
public class ClientApplication {

    public static void main(String[] args) {
        SpringApplication.run(ClientApplication.class, args);
    }

    @Bean
    @LoadBalanced
    public RestTemplate initRestTemplate() {
        return new RestTemplate();
    }
}
我们在RestTemplate实例化的地方添加了@LoadBalanced注解,这样在我们使用RestTemplate时就该注解就会自动将调用接口的地址替换成真正的服务地址。下面我们看一下Controller中的改动:
import org.springframework.beans.factory.annotation.Autowired;
import org.springframework.cloud.client.ServiceInstance;
import org.springframework.cloud.client.loadbalancer.LoadBalancerClient;
import org.springframework.web.bind.annotation.RequestMapping;
import org.springframework.web.bind.annotation.RestController;
import org.springframework.web.client.RestTemplate;

@RestController
public class ClientController {

    @Autowired
    private RestTemplate template;

    @Autowired
    private LoadBalancerClient loadBalancerClient;

    @RequestMapping("/helloClient")
    public String hello(){
        return "hello-client";
    }

    @RequestMapping("/helloClient1")
    public String helloClient1(){
        String result = template.getForObject("http://127.0.0.1:8001/helloServer", String.class);
        return result;
    }

    @RequestMapping("/helloClient2")
    public Object helloClient2() {
        ServiceInstance serviceInstance = loadBalancerClient.choose("hello-server");
        String url = String.format("http://%s:%s/helloServer", serviceInstance.getHost(), serviceInstance.getPort());
        String result = template.getForObject(url, String.class);
        return result;
    }

    @RequestMapping("/helloClient3")
    public Object helloClient3() {
        String url = String.format("http://%s/helloServer", "hello-server");
        String result = template.getForObject(url, String.class);
        return result;
    }
}
代码和第一次的代码基本一样,唯一的区别就是获取服务地址和端口的地方替换成了注册中心中的Application的名字,并且我们的RestTemplate在使用上和第一次没有任何区别,只是在url中不同。下面我们看一下返回的结果。
浏览器输入:http://192.168.1.6:8002/helloClient3
获得结果:

3 负载均衡策略
? ? ? ? 上文中演示的Server端只有一个服务,如果Server端有多个服务就会涉及到负载均衡的问题,Spring Cloud提供了Ribbon组件来解决负载均衡的问题,在实战中提供了三种策略来配置负载均衡,分别是默认负载均衡策略、编码指定负载均衡策略和配置文件指定负载均衡策略。如果下图所示:

负载均衡算法有很多种,常用的有轮询法、随机法、权重法、原地址哈希法、最小链接数法等,默认负载均衡策略使用轮询法,编码或者配置文件指定负载均衡策略可以选择随机法、轮询法、权重法三种中的一种。下面我们就一起来研究这几种负载均衡策略的使用方法。
3.1 默认负载均衡策略?
? ? ? ? 注解@LoadBalanced会自动采用默信的负载策略,默认负载均衡策略使用轮询法实现负载均衡。为了演示负载均衡策略,新增一个Server服务,并且为了演示这两个Server返回结果的不同,可以让接口返回的数据不一致来方便测试。下面为新增的Server服务端的配置信息及Controller源码。
application.yml:
#端口号
server:
  port: 8003
#Eureka实例名,集群中根据这里相互识别
spring:
  application:
    name: hello-server

eureka:
  #客户端
  client:
    #注册中心地址
    service-url:
      defaultZone: http://localhost:7001/eureka/
ServerController:
import org.springframework.web.bind.annotation.RequestMapping;
import org.springframework.web.bind.annotation.RestController;

@RestController
public class ServerController {
    @RequestMapping("/helloServer")
    public String hello(){
        return "hello-server1";
    }
}
启动服务,然后浏览器输入:http://192.168.1.6:8002/helloClient3
会依次得到如下结果:


可以频繁的调用client中的接口,并观察发现它们会交替返回的,所以基本可以确定Spring Cloud默认的负载策略为轮询方式。?
打开注册中心可以看到服务提供者HELLO-SERVICE的数量变为2,如下图所示:

3.2 编码指定负载均衡策略
????????SpringCloud底层采用的是Ribbon来实现的负载均衡。Ribbon是一个负载均衡器,Ribbon的核心组件为IRule,它也就是所有负载策略的父类。如下所示为IRule接口的源码:
public interface IRule {
    Server choose(Object var1);

    void setLoadBalancer(ILoadBalancer var1);

    ILoadBalancer getLoadBalancer();
}
该类只提供了3个方法,它们的作用分别是选择一个服务名字、设置ILoadBalancer和返回ILoadBalancer。下面我们看一下IRule接口的常见策略子类。常见的有RandomRule、RoundRobinRule、WeightedResponseTimeRule等。分别对应着随机、轮询、和权重。下面我们看一下怎么更改默认的策略方式。更改默认策略也是在Client端中操作的,Client端的代码更改:
import com.netflix.loadbalancer.IRule;
import com.netflix.loadbalancer.RandomRule;
import org.springframework.boot.SpringApplication;
import org.springframework.boot.autoconfigure.SpringBootApplication;
import org.springframework.cloud.client.discovery.EnableDiscoveryClient;
import org.springframework.cloud.client.loadbalancer.LoadBalanced;
import org.springframework.context.annotation.Bean;
import org.springframework.web.client.RestTemplate;

/**
 * @ClassName ClientApplication
 * @Description 服务调用方
 * @Author boy
 */
@SpringBootApplication
@EnableDiscoveryClient
public class ClientApplication {

    public static void main(String[] args) {
        SpringApplication.run(ClientApplication.class, args);
    }

    @Bean
    @LoadBalanced
    public RestTemplate initRestTemplate() {
        return new RestTemplate();
    }

    @Bean
    public IRule initIRule() {
        return new RandomRule();
    }
}
可以看到在启动类上新实例化了一个IRule对象,并且指定该对象实例化的子类为RandomRule,也就是随机的方式。所以当Client端启动服务调用服务时,就会采用随机的方式进行调用,因为已经将IRule对象默认的实例化方式更改了。
下面我们测试一下,浏览器输入:http://192.168.1.6:8002/helloClient3
多次调用刷新浏览器就会发现,Client接口返回的结果不在是轮询的方式了,而是变成了随机了,这就说明已经成功的将SpringCloud默认的负载策略更改了。
3.3 配置文件指定负载均衡策略
? ? ? ? 上面介绍了使用编码的方式指定负载均衡策略,那么有没有更优雅的方式指定负载均衡策略呢,显然是有的,可以在配置文件中通过配置的方式指定负载均衡策略。下面为具体的配置。(备注:为了不影响测试效果,我们需要将刚刚在启动类中的实例化的IRule注释掉)
#端口号
server:
  port: 8002
#Eureka实例名,集群中根据这里相互识别
spring:
  application:
    name: hello-client

eureka:
  #客户端
  client:
    #注册中心地址
    service-url:
      defaultZone: http://localhost:7001/eureka/

hello-server:
        ribbon:
          NFLoadBalancerRuleClassName: com.netflix.loadbalancer.RandomRule
在配置文件中指定了注册中心中的Server端的Application名字,然后指定了默认的负载策略类。下面我们测试一下。
?浏览器输入:http://192.168.1.6:8002/helloClient3
多次调用刷新浏览器就会发现,Client接口返回的结果和使用编码指定负载均衡策略返回结果规律一致,都是随机的。
4 Feign方式调用
????????在实际的开发中,服务间TestTemplate方式调用可以使用上述三种方式来控制负载均衡策略。Spring Cloud还提供了另一种服务间调用方式也就是Feign方式。使用Feign方式和RestTemplate不同,需要先添加Feign的依赖,具体依赖如下(备注:该依赖同样是在client端添加的):
pom.xml :
<dependency>
  <groupId>org.springframework.cloud</groupId>
  <artifactId>spring-cloud-starter-openfeign</artifactId>
  <version>2.1.1.RELEASE</version>
</dependency>
然后还需要在启动类中添加@EnableFeignClients注解。
ClientApplication.java :
import com.netflix.loadbalancer.IRule;
import com.netflix.loadbalancer.RandomRule;
import org.springframework.boot.SpringApplication;
import org.springframework.boot.autoconfigure.SpringBootApplication;
import org.springframework.cloud.client.discovery.EnableDiscoveryClient;
import org.springframework.cloud.client.loadbalancer.LoadBalanced;
import org.springframework.cloud.netflix.feign.EnableFeignClients;
import org.springframework.context.annotation.Bean;
import org.springframework.web.client.RestTemplate;

/**
 * @ClassName ClientApplication
 * @Description 服务调用方
 * @Author boy
 */
@EnableFeignClients
@SpringBootApplication
@EnableDiscoveryClient
public class ClientApplication {

    public static void main(String[] args) {
        SpringApplication.run(ClientApplication.class, args);
    }

    @Bean
    @LoadBalanced
    public RestTemplate initRestTemplate() {
        return new RestTemplate();
    }

//    @Bean
//    public IRule initIRule() {
//        return new RandomRule();
//    }
}
接下来需要在Client端创建一个新的接口并定义Client端需要调用的服务方法。具体代码如下:
ServerApi.java :
import org.springframework.cloud.openfeign.FeignClient;
import org.springframework.web.bind.annotation.RequestMapping;

@FeignClient(name = "hello-server")
public interface ServerApi {

    @RequestMapping("/helloServer")
    String helloServer();
}
上述接口基本上和server端的Controller一致,唯一的不同就是指定了@FeignClient注解,该注解的需要指定一个名字,也就是注册中心中Applicaiton的名字,也就是要调用的服务名字。下面我们看一下Controller层的代码,为了不和前面的演示想混淆,重新创建新的Controller:
ClientFeignController.java :
import com.springcloud.provider.service.ServerApi;
import org.springframework.beans.factory.annotation.Autowired;
import org.springframework.web.bind.annotation.RequestMapping;
import org.springframework.web.bind.annotation.RestController;

/**
 * @ClassName ClientFeignController
 * @Description TODO
 * @Author boy
 * @Date 2021/10/16 10:42 AM
 */
@RestController
public class ClientFeignController {

    @Autowired
    private ServerApi serverApi;

    @RequestMapping("/helloClient4")
    public String helloClient(){
        return serverApi.helloServer();
    }
}
在Controller中直接使用了自定义的接口,并直接调用接口中定义的方法,下面我们调用一下Client接口看看这样的方式是否可以调用成功。
浏览器输入:http://localhost:8002/helloClient4/
会随机得到 hello-server 和?hello-server1 的返回结果。因为前面在配置文件中已经指定了负载均衡策略的算法为随机法。