前言:
小伙伴们,大家好,我是狂奔の蜗牛rz,当然你们可以叫我蜗牛君,我是一个学习Java半年多时间的小菜鸟,同时还有一个伟大的梦想,那就是有朝一日,成为一个优秀的Java架构师。
这个SpringBoot基础学习系列用来记录我学习SpringBoot框架基础知识的全过程 (这个系列是参照B站狂神的SpringBoot最新教程来写的,由于是之前整理的,但当时没有发布出来,所以有些地方可能有错误,希望大家能够及时指正!)
之后我将会以一天一更的速度更新这个系列,还没有学习SpringBoot的小伙伴可以参照我的博客学习一下;当然学习过的小伙伴,也可以顺便跟我一起复习一下基础。
最后,希望能够和大家一同进步吧!加油吧!少年们!
废话不多说,让我们开始今天的学习内容吧,由于今天我们来到了SpringBoot基础学习的第七站:整合Druid数据源!
6.2 整合Druid数据源
6.2.1 Druid数据源介绍
1.Druid数据源简介
- Druid是阿里巴巴开发的一个开源的数据库连接池,结合了C3P0、DBCP和PROXOOL等DB池的优点,同时加入了日志监控
- Druid可以很好的监控DB池连接和SQL的执行情况,天生是针对监控而生的DB连接池
- Spring Boot 2.0 以上默认使用Hikari数据源,可以说Hikari与Druid都是当前Java Web上较为优秀的数据源,
2.Druid数据源常用配置参数
我们来重点介绍Spring Boot 如何集成Druid数据源,如何实现数据库监控,以下是Druid数据源的常用配置参数表:
| 配置 | 缺省值 | 说明 |
|---|---|---|
| name (数据源名称) | 配置这个属性的意义在于,如果存在多个数据源,监控时可以通过名字来区分开;如果没有配置,将会生成一个名字,格式为:“DataSource-” + System.identifyHashCode(this) | |
| url (url连接) | 连接数据库的url,不同数据库不一样;例如,mysql:jdbc:mysql://localhost:3306/druid2;orcale:jdbc:orcale:thin:@localhost:1521:ocnauto | |
| username (用户名) | 连接数据库的用户名 | |
| password (密码) | 连接数据库的密码 | |
| driverClassName (驱动名) | 根据url自动识别 | 这一项可配可不配,如果不配置Druid会根据url识别数据库类型,然后选择相应的DriverClassName |
| initialSize (初始化物理连接个数) | 0 | 初始化时建立物理连接的个数,初始化发生在显式调用init方法,或者第一次getConnection时 |
| maxActive (最大连接池数) | 8 | 最大连接池数量 |
| maxIdle (最大空闲数) | 8 | 已经不再使用了,配置了也没效果 |
| mindle | 最小连接池数量 | |
| maxWait (最大等待时间) | 获取连接时最大等待时间,单位毫秒;配置了maxWait之后,缺省启用公平锁,并发效率会有所下降;如果需要可以通过配置useUnicodeLock属性为true,使用非公平锁 | |
| poolPreparedStatements (预编译池) | false | 是否缓存preparedStatement,也就是PSCache;PSCache对支持游标的数据库性能提升巨大,比如说Oracle;在MySQL 5.5以下的版本中没有PSCache功能,建议关闭掉;MySQL 5.5以上版本有PSCache,建议开启 |
| maxOpenPreparedStatements (开放的最大预编译语句数) | -1 | 要启动PSCache,必须配置大于0,当大于0时,poolPreparedStatements自动触发修改为true;在Druid中,不会存在Orcale下PSCache占内存过多的问题,可以把这个数值配置再大一些,比如说100 |
| validationQueryfont> (查询是否生效) | 用来检测连接是否有效的SQL,要求是一个查询语句;如果validationQuery为null,testOnBorrow、testOnReturn、testWhileIdle都不会起作用;在MySQL中通知Select ‘X’,在Oracle中通常为Select 1 from dual | |
| testOnBorrow (检测引入查询语句的连接是否有效) | false | 申请连接时执行validationQuery检测连接是否有效,做了这个配置会降低性能 |
| testOnReturn (测试归还连接是否有效) | false | 归还连接时执行validationQuery检测连接是否有效,做了这个配置会降低性能 |
| testWhiteIdle (检测空闲连接时间是否大于回收和运行间隔) | false | 建议配置为true,不影响性能,并且保证安全性;申请连接时检测,如果空闲时间大于timeBetweenEvictionRunsMillis,执行validatioQuery检测连接是否有效 |
| timeBetweenEvictionRunsMillis (回收和运行时间间隔) | 有两个含义:Destroy线程检测连接的间隔时间; testWhiteIdle的判断依据 | |
| numTestsPerEvictionRun (每个回收和运行的测试数量) | 不再使用,一个DruidDatsSource只支持一个EvictionRun | |
| minEvictableTimeMillis (最小回收时间) | Destroy线程,如果检测到当前连接的最后活跃时间和当前时间大于minEvictableTimeMillis,则关闭当前连接 | |
| connectionInitSqls (连接初始化SQL) | 物理连接初始化时执行的SQL | |
| exceptionSorter (异常分类机) | 根据dbType (数据库类型)自动识别 | 当数据库抛出一些不可恢复的异常时,抛弃连接 |
| filters(过滤器) | 属性类型是字符串,通过别名的方式配置扩展插件;常用的插件有:监控统计的filter:stat;日志用的filter:log4j;防御SQL注入的filter:wall | |
| proxyFilters (动态过滤器) | 类型是List<com.alibaba.druid.filter.Filter>,如果同时配置filters和ProxyFilters,是组合关系,并非替换关系 |
6.2.2 引入Druid数据源
1.导入资源依赖和修改配置文件
1-1 导Druid的资源依赖
- 在pom.xml配置文件中导入Druid和log4j的资源依赖
<!-- Druid数据源资源依赖 -->
<!-- https://mvnrepository.com/artifact/com.alibaba/druid -->
<dependency>
    <groupId>com.alibaba</groupId>
    <artifactId>druid</artifactId>
    <version>1.1.12</version>
</dependency>
<!-- log4j资源依赖 -->
<!-- https://mvnrepository.com/artifact/log4j/log4j -->
<dependency>
    <groupId>log4j</groupId>
    <artifactId>log4j</artifactId>
    <version>1.2.17</version>
</dependency>
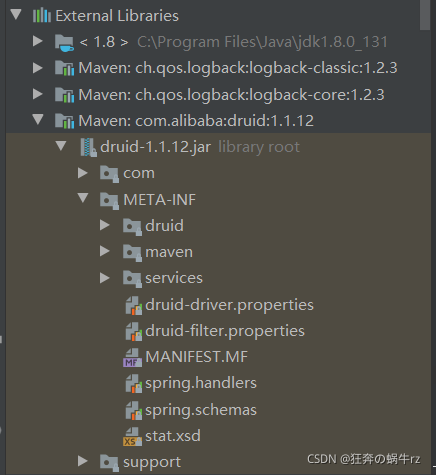
- 在外部资源中查看druid的相关资源依赖


1-2 修改核心配置文件
# 设置服务器端口号
server:
  port: 8888
# 设置数据库驱动
spring:
  datasource:
    username: root
    password: 123456
    # MySQL8.0版本的url链接格式
    #    url: jdbc:mysql://localhost:3306/mybatis?useUnicode=true&characterEncoding=utf-8&useSSL=true&serverTimezone=UTC
    url: jdbc:mysql://localhost:3306/mybatis?useUnicode=true&characterEncoding=utf-8&useSSL=true
    # com.mysql.cj.jdbc.Driver是8.0版本以上的数据库
    # driver-class-name: com.mysql.cj.jdbc.Driver
    # com.mysql.jdbc.Driver是8.0以下版本的数据库
    driver-class-name: com.mysql.jdbc.Driver
    # 使用Druid的数据源
    type: com.alibaba.druid.pool.DruidDataSource
    # Spring Boot 默认是不注入这些属性值的,因此需要自己来配置
    # 设置Druid数据源的基本配置
    # 初始化时的物理连接个数:初始化发生在显式调用init方法或者第一次getConnection时
    initialSize: 5
    # 最小连接池数量
    minIdle: 5
    # 最大连接池数量
    maxActive: 20
    # 获取连接的最大等待时间,时间单位是毫秒
    maxWait: 60000
    # 运行和回收的间隔时间:即销毁线程检测连接的间隔时间
    timeBetweenEvictionRunsMillis: 300000
    # 最小回收时间:如果检测到当前连接的最后活跃时间和当前时间大于最小回收时间,则关闭当前连接
    minEvictableIdleTimeMillis: 300000
    # 判断连接到的查询语句是否有效
    validationQuery: Select 1 from dual
    # 检测空闲连接时间:建议设置为true,申请连接检测,如果空闲时间大于回收运行间隔时间,执行检测连接到的查询语句是否生效
    testWhiteIdle: true
    # 检测引入的查询语言的连接是否生效:此配置会降低性能,默认值为false
    testOnBorrow: false
    # 检测归还连接时执行生效查询语句是否有效:此配置会降低性能
    testOnReturn: false
    # 是否缓存预编译语句池:即使用PSCache,默认值为false,MySQL5.5以上版本有PSCache,建议开启
    poolPreparedStatements: true

    # 配置监控拦截的filters:监控统计-stat;日志记录-log4j;防御SQL注入:wall
    # 如果运行时报错-java.lang.ClassNotFoundException:org.apache,log4j.Priority
    # 则导入log4j依赖即可,Maven仓库地址:https://mvnrepository.com/artifact/log4j/log4j
    filters: stat,log4j,wall
    # 设置每个连接的最大池预编译语句大小
    maxPoolPreparedStatementPerConnectionSize: 20
    # 设置使用全局的数据源的监控统计拦截器stat
    useGlobalDataSourceStat: true
    # 设置连接属性:监控统计拦截器stat的mergeSql(合并SQL)属性为true,即此配置生效;慢SQL时间为0.5秒
    connectionProperties: druid.stat.mergeSql=true;druid.stat.slowSqlMillis=500
2.查看修改后的数据源
2-1 启动测试类
package com.kuang;

import org.junit.jupiter.api.Test;
import org.springframework.beans.factory.annotation.Autowired;
import org.springframework.boot.test.context.SpringBootTest;
import javax.sql.DataSource;
import java.sql.Connection;
import java.sql.SQLException;

@SpringBootTest
class Springboot04DataApplicationTests {

    // 使用@Autowired注解将DataSource自动装配到Spring容器中
    @Autowired
    DataSource dataSource; // 数据源

    @Test
    void contextLoads() throws SQLException {
        // 查看默认的数据源:class com.zaxxer.hikari.HikariDataSource,相当于DBCP等数据源
        System.out.println(dataSource.getClass());
        // 获取数据库连接
        Connection connection  = dataSource.getConnection();
        // 打印connection连接信息
        System.out.println(connection);
        // xxx Template:SpringBoot已经配置好模板bean,拿来即用 CRUD
        // 关闭数据库连接
        connection.close();
    }

}
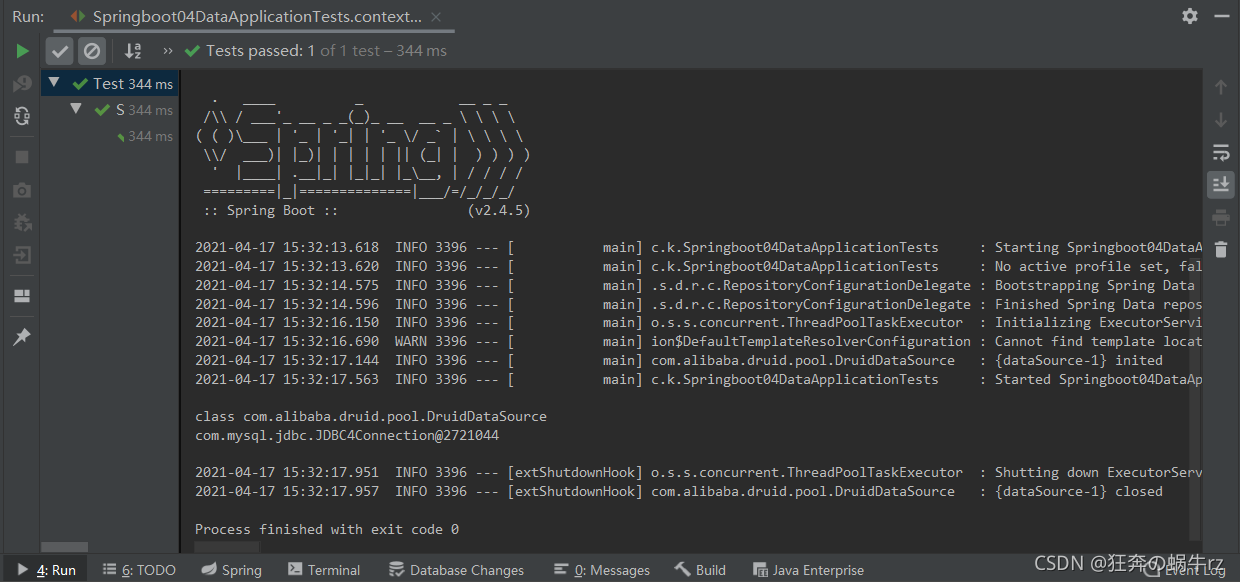
2-2 测试结果

6.2.3 自定义数据源
1.查看动态注册器Bean源码
- 在IDEA中搜索DynamicRegistrationBean类,查看其如何实现动态注册
// 动态注册器Bean
public abstract class DynamicRegistrationBean<D extends Dynamic> extends RegistrationBean {

    // 通过日志工厂获取Log日志信息
    private static final Log logger = LogFactory.getLog(RegistrationBean.class);

    private String name; // 名字

    private boolean asyncSupported = true; // 开启异步支持

    // 通过创建链表HashMap对象,使用Map键值对形式来存储初始化参数
    private Map<String, String> initParameters = new LinkedHashMap();

    // 动态注册器Bean的无参构造器
    public DynamicRegistrationBean() {
    }

    // 设置名字
    public void setName(String name) {
        // 断言名字不能为空
        Assert.hasLength(name, "Name must not be empty");
        this.name = name;
    }

    // 设置异步支持
    public void setAsyncSupported(boolean asyncSupported) {

        this.asyncSupported = asyncSupported;
    }
    // 获取异步支持
    public boolean isAsyncSupported() {
        return this.asyncSupported;
    }

    // 设置初始化参数方法
    public void setInitParameters(Map<String, String> initParameters) {
        // 断言初始化参数是否为空
        Assert.notNull(initParameters, "InitParameters must not be null");
        // 如果为空,通过创建链式HashMap对象来初始化参数
        this.initParameters = new LinkedHashMap(initParameters);
    }

    //...(省略后面部分代码)...
}
2.编写自定义DruidConfig
package com.kuang.config;

import com.alibaba.druid.pool.DruidDataSource;
import com.alibaba.druid.support.http.StatViewServlet;
import com.alibaba.druid.support.http.WebStatFilter;
import org.springframework.boot.context.properties.ConfigurationProperties;
import org.springframework.boot.web.servlet.FilterRegistrationBean;
import org.springframework.boot.web.servlet.ServletRegistrationBean;
import org.springframework.context.annotation.Bean;
import org.springframework.context.annotation.Configuration;

import javax.sql.DataSource;
import java.util.HashMap;
import java.util.Map;

// 将DruidConfig注册为配置类
@Configuration
public class DruidConfig {

    // 将Druid数据源与spring的datasource配置文件关联
    @ConfigurationProperties(prefix = "spring.datasource")
    // 将Druid数据源当做组件,注册到Spring容器中
    @Bean
    // 获取DruidDataSource的方法
    public DataSource druidDataSource() {
        return new DruidDataSource();
    }

    /**
     * 后台监控:web.xml和ServletRegistrationBean
     * 因为SpringBoot内置了Servlet容器,所以没有web.xml,替代方法:使用ServletRegistrationBean
     */
    // 将后台监控statViewServlet,当做组件注册到Spring容器中
    @Bean
    public ServletRegistrationBean statViewServlet() {
        // 创建Servlet注册Bean:有两个参数:第一个是监控视图过滤器,第二个是配置一个访问页面
        ServletRegistrationBean<StatViewServlet> bean = new ServletRegistrationBean<>(new StatViewServlet(),"/druid/*");
        // 后台需要有人登录,账号密码配置
        // 创建HashMap集合,存放账户密码键值对
        HashMap<String, String>initParameters = new HashMap<>();
        // 增加配置
        // 登录的key是固定的:loginUsername和loginPassword
        initParameters.put("loginUsername","admin");
        initParameters.put("loginPassword","123456");
        // 允许谁可以访问
        initParameters.put("allow","");
        // 禁止谁能访问
//        initParameters.put("zhangsan", "192.168.1.2");
       // 设置初始化参数
        bean.setInitParameters(initParameters);
        // 返回Servlet注册Bean
        return bean;
    }

    // Web后台监控过滤器
    public FilterRegistrationBean webStatFilter() {
        // 创建过滤器注册Bean
        FilterRegistrationBean bean = new FilterRegistrationBean();
        // 设置过滤器:通过Web后台监控过滤器
        bean.setFilter(new WebStatFilter());
        // 可以过滤哪些请求
        // 创建HashMap集合:存放不过滤信息的键值对
        Map<String, String> initParameters = new HashMap<>();
        // 设置不进行过滤的信息
        initParameters.put("exclusions", "*.js,*.css,/druid/*");
        // 设置初始化参数
        bean.setInitParameters(initParameters);
        // 返回过滤器注册Bean
        return bean;
    }

}
6.2.4 Druid登录验证和后台SQL监控
1.Druid登录验证测试
- 启动SpringBoot项目后,在地址链接后面加上/druid/login.html,然后就可以进入到登录界面了

- 输入在DruidConfig配置类中设置好的管理员用户名和密码,通过验证后进入到监控后台

- 成功进入到Druid监控后台首页,可以看到一些相关信息,例如数据库和数据源驱动,以及Java的JDK版本等

2.后台SQL监控测试
2-1 访问用户列表和查看SQL监控
- 编写JDBCController实现查询用户
package com.kuang.controller;

import org.springframework.beans.factory.annotation.Autowired;
import org.springframework.jdbc.core.JdbcTemplate;
import org.springframework.web.bind.annotation.PathVariable;
import org.springframework.web.bind.annotation.RequestMapping;
import org.springframework.web.bind.annotation.RestController;

import java.util.List;
import java.util.Map;

// 使用@RestController注解,实现Controller接口并且返回值为字符串
@RestController
public class JdbcController {

    // 使用@Autowired注解,自动装配JdbcTemplate(JDBC模板)类到Spring容器中
    @Autowired
    JdbcTemplate jdbcTemplate;

    /**
     * 查询用户列表信息
     * 没有实体类,数据库中的内容,怎么获取?可以使用万能的Map
     */
    /**
     * 使用@RequestMapping注解,设置请求映射路径
     * 真实访问路径:http://localhost:8080/getList
     */
    @RequestMapping("/getList")
    public List<Map<String, Object>> getUserList() {
        // 封装SQL查询语句到字符串sql中去
        String sql = "select * from user";
        // 调用JDBC模板引擎的queryForList来获取用户数组集合信息
        List<Map<String, Object>> list_maps = jdbcTemplate.queryForList(sql);
        // 返回到用户集合
        return list_maps;
    }

}
- 测试结果

结果:查询用户列表信息成功!
- 查看后台SQL监控

结果:SQL监控记录了执行查询SQL语句的操作!
2-2 删除用户信息
- 编写JDBCController实现删除用户
package com.kuang.controller;
import org.springframework.beans.factory.annotation.Autowired;
import org.springframework.jdbc.core.JdbcTemplate;
import org.springframework.web.bind.annotation.PathVariable;
import org.springframework.web.bind.annotation.RequestMapping;
import org.springframework.web.bind.annotation.RestController;
import java.util.List;
import java.util.Map;
//使用@RestController注解,实现Controller接口并且返回值为字符串
@RestController
public class JdbcController {
    //使用@Autowired注解,自动装配JdbcTemplate(JDBC模板)类到Spring容器中
    @Autowired
    JdbcTemplate jdbcTemplate;

    //修改用户信息
    //真实访问路径:http://localhost:8080/updateUser
    //使用@RequestMapping注解,设置请求映射路径
    @RequestMapping("/deleteUser/{userId}")
    public String delteUser(@PathVariable("userId") int id) {
        //封装SQL修改语句到字符串sql中去
        String sql = "delete from mybatis.user where id=?";
        //JDBC模板调用update方法进行修改数据
        jdbcTemplate.update(sql,id);
        //返回一个"Update-OK"
        return "Delete-OK";
    }
}
- 测试结果

结果:删除指定用户信息成功!
2-3 查看Druid的后台SQL监控

结果:SQL监控记录了执行删除SQL语句操作!
结论:
通过上面的测试,我们体会到了Druid数据源强大的SQL监控功能,不仅能够监测SQL语句的执行,包括执行次数、执行时间和更新行数、读取行数,以及最大并发操作和执行时间分布
3.Druid的SQL防火墙
- 当然,Druid除了强大的SQL监控功能,同时还具有SQL防火墙这一功能,能够统计各种SQL执行次数和函数的调用,以及统计SQL防御的白名单和黑名单,可见其功能十分强大!

好了,今天的有关 SpringBoot基础学习之整合Druid数据源 的学习就到此结束啦,欢迎小伙伴们积极学习和讨论,喜欢的可以给蜗牛君点个关注,顺便来个一键三连,我们下期见,拜拜啦!
参考视频链接:https://www.bilibili.com/video/BV1PE411i7CV(【狂神说Java】SpringBoot最新教程IDEA版通俗易懂)