注解
参考博客
菜鸟的springboot常用注解总结
@SpringBootApplication
申明让spring boot自动给程序进行必要的配置,包含@Configuration、@EnableAutoConfiguration、@ComponentScan通常用在主类上。
| 注解 | 说明 |
|---|---|
| @ComponentScan | 用来自动扫描被这些注解标识的类,最终生成ioc容器里的bean,默认扫描范围是@ComponentScan注解所在配置类包及子包的类 |
| @SpringBootConfiguration | 与@Configuration作用相同,都是用来声明当前类是一个配置类,这里表明是springboot主类使用的配置类 |
| @EnableAutoConfiguration | 是springboot实现自动化配置的核心注解,通过这个注解把spring应用所需的bean注入容器中 |
@Component、@Service、@Controller、@Repository
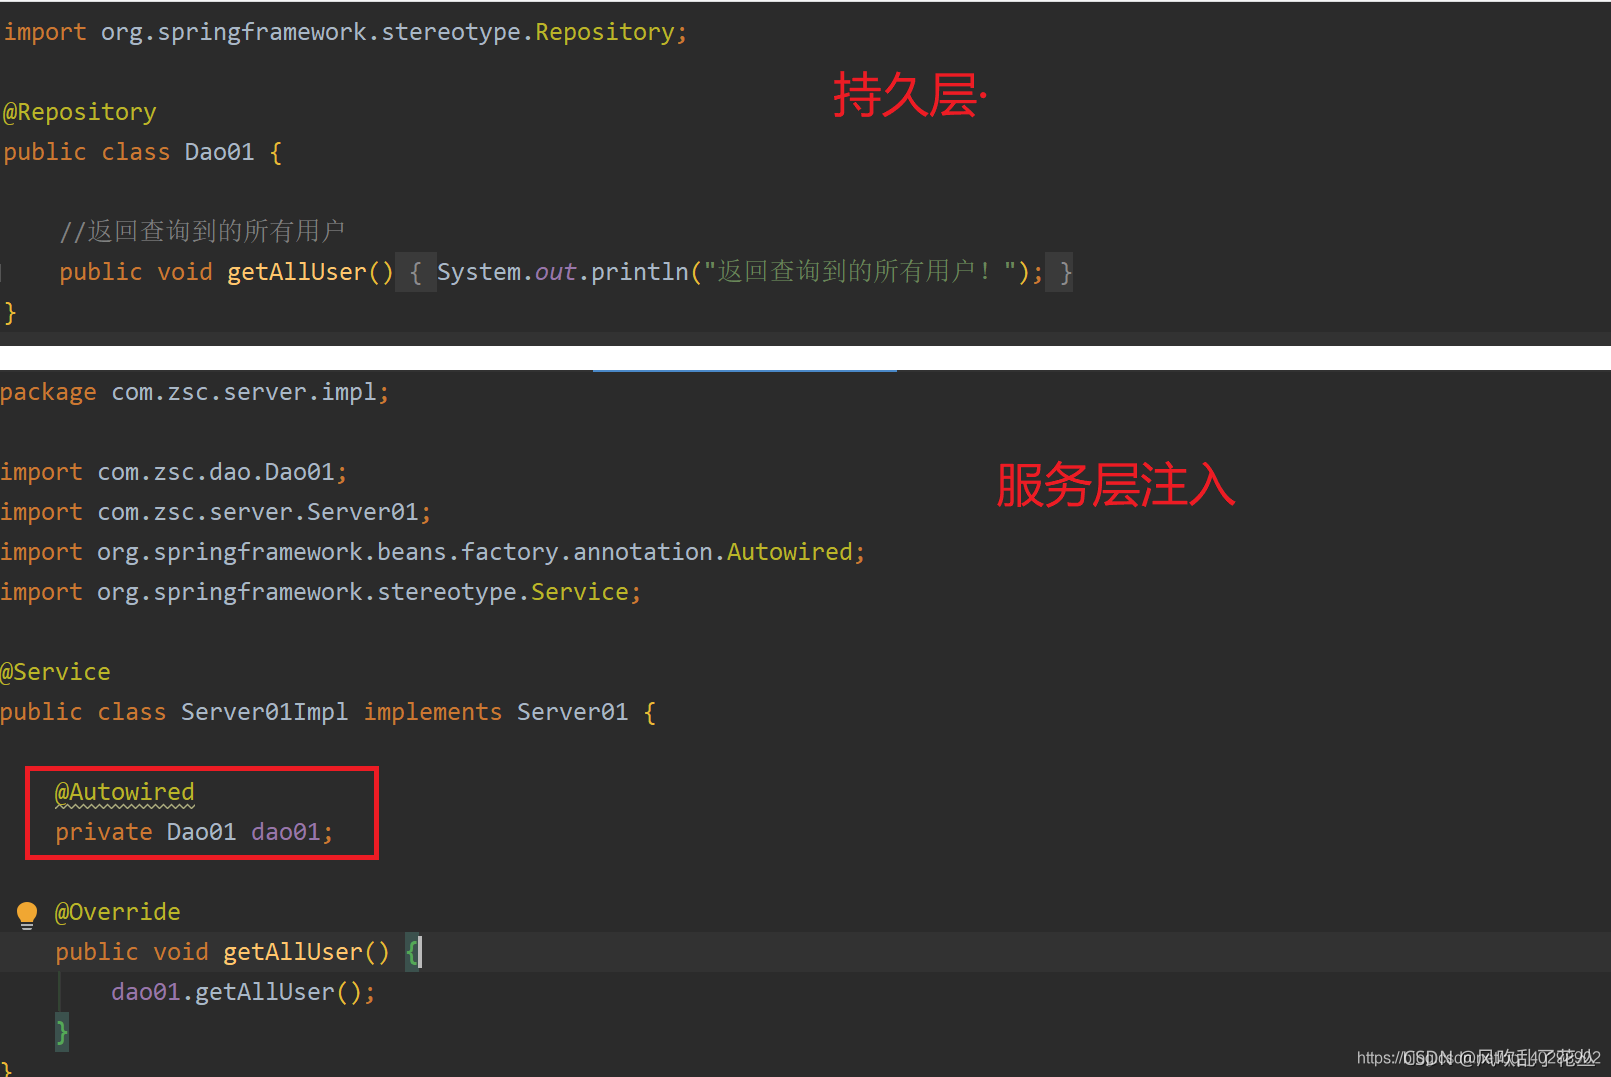
这几个注解放在一起是因为功能基本一样的,都是将类注入到spring容器中,只不过它们使用的场景不同,被@Component,@Service,@Controller,@Repository注解标注的类,这些类会被纳入进spring容器中管理。
| 注解 | 说明 |
|---|---|
| @Repository | 持久层(dao)注入spring容器 |
| @Service | 业务逻辑层(server)注入spring容器 |
| @Controller | 控制层(controller)注入spring容器 |
| @Component | 普通pojo注入spring容器 |
1、@Component
2、@Service
3、@Controller
4、@Repository
@ResponseBody
表示该方法的返回结果直接写入 HTTP response body 中,而不会被解析为跳转路径,即不会经过视图解析器,返回什么数据即在页面输入什么数据。。
加不加的区别:
springboot的注解 @ResponseBody的作用
@RequestMapping、@RestController
RequestMapping:提供路由信息,负责URL到Controller中的具体函数的映射。
RestController:用于标注控制层组件(如struts中的action),@ResponseBody和@Controller的合集。
@AutoWired、@Qualifier、@Resource
这3个注解都是基于注解方式进行自动装配,在容器里面将查找到的bean返回,一般@AutoWired用得最多,@Qualifier则需要配合@AutoWired使用,@Resource则是可以通过名字进行自动装配
| 注解 | 说明 |
|---|---|
| @AutoWired | @Autowired默认按类型装配,如果发现找到多个bean,则按照name方式比对,如果还有多个,则报出异常 |
| @Qualifier | spring的注解,按名字注入 一般当出现两个及以上bean时,不知道要注入哪个,结合@AutoWired使用 |
| @Resource | 默认按名称注入例如@Resource(name = “zhaozhao”)则根据name属性注入找不到则报错,若无name属性则根据属性名称注入,如果匹配不成功则按照类型匹配匹配不成功则报错。 |
1、@AutoWired

2、@Qualifier
当有一个接口的多个实现类时,只用@AutoWired会报错,因为它有多个接口的实现类,不知道你要找哪一个,这个时候就需要在注入bean的时候起个名字,然后用@Qualifier注解指定哪一个bean(按照名字注入与装配)

3、@Resource
该注解的使用相当于@AutoWired和@Qualifier配合使用的效果

@RequestMapping、@GetMapping、@PostMapping
这3个注解功能也是类似的,通过这3个注解来映射请求,也就是通过它来指定控制器可以处理哪些URL请求,用在方法上,可以通过配置的url进行访问。
| 注解 | 说明 |
|---|---|
| @RequestMapping | @RequestMapping(url),通过该注解就可以通过配置的url进行访问,方式可以是get或post请求,两种方式均可 |
| @GetMapping | @GetMapping(url) ,功能类似的,只是这个限定了只能是Get请求 |
| @PostMapping | @PostMapping(url),功能类似的,只是这个限定了只能是Post请求 |
@Value、@ConfigurationProperties、@PropertySource
| 注解 | 说明 |
|---|---|
| @Value | 用于获取bean的属性,一般用于读取配置文件的数据,作用在变量上 |
| @ConfigurationProperties | 用于注入Bean属性,然后再通过当前Bean获取注入值,作用在类上 |
| @PropertySource | 用于指定要读取的配置文件,可以和@Value或@ConfigurationProperties配合使用 |
1、@Value

2、@ConfigurationProperties

3、@PropertySource
不支持yml文件读取。


@Configuration、@Bean
@Configuration作用于类上面,表明这是一个配置类,@Bean产生一个Bean对象加入Spring IOC容器。
注意:@Configuration标注在类上,相当于把该类作为spring的xml配置文件中,作用为:配置spring容器(应用上下文)
| 注解 | 说明 |
|---|---|
| @Configuration | 作用于类上表示这是一个配置类,可理解为用spring的时候xml里面的< beans>标签 |
| @Bean | 产生bean对象加入容器,作用于方法,可理解为用spring的时候xml里面的标签 |
@RequestParam、@RequestBody、@PathVariable、@RequestHeader、@CookieValue
| 注解 | 说明 |
|---|---|
| @RequestParam | 获取查询参数。即url?name=这种形式 |
| @PathVariable | 获取路径参数。即url/{id}这种形式。 |
| @RequestParam | 获取Body的参数,一般用于post获取参数 |
| @RequestHeader | 获取请求头的信息 |
| @CookieValue | 获取Cookie的信息 |
1、@RequestParam
主要用于接收url?后面的参数,get或post请求,只要后面的url?有参数都可以获取到对应的参数
重要的属性:
- required 表示是否必须,默认为 true,必须。
- defaultValue 可设置请求参数的默认值。
- value 为接收url的参数名(相当于key值)。
    @GetMapping("/requestParam")
    @ResponseBody
    public Map<String, String> requestParam(
            UserDto userDto,//通过一个实体类来接收,字段名必须一致
            @RequestParam(value = "id", required = false) String userId,
            @RequestParam(value = "name", required = false) String userName,
            @RequestParam(value = "pageIndex", required = true, defaultValue = "1") String pageIndex,
            @RequestParam(value = "pageSize", required = true, defaultValue = "5") String pageSize) {

        Map<String, String> map = new HashMap<>();
        map.put("userDto",userDto.toString());
        map.put("id", userId);
        map.put("name", userName);
        map.put("pageIndex", pageIndex);
        map.put("pageSize", pageSize);
        return map;
    }
2、@RequestBody
该注解用于获取请求体数据(body),get没有请求体,故而一般用于post请求。
    @PostMapping("/test01")
    @ResponseBody
    public UserDto test01(@RequestBody UserDto userDto) {
        return userDto;
    }

    @PostMapping("/test02")
    @ResponseBody
    public String test02(@RequestBody String str) {
        return str;
    }

3、@PathVariable
该注解主要用于获取路径参数,像url/{id}/{name}这种形式的参数都可以,get获取post请求均可
    @PostMapping("/pathVariable/{id}/{name}")
    @ResponseBody
    public Map<String, String> pathVariable(
            @PathVariable(name = "id") String userId,
            @PathVariable(name = "name") String userName) {

        Map<String, String> map = new HashMap<>();
        map.put("id", userId);
        map.put("name", userName);
        return map;
    }


4、@RequestHeader
    @PostMapping("/requestHeader")
    @ResponseBody
    public String requestBody03(@RequestHeader(name = "Content-Type") String contentType){
        return contentType;
    }

5、@CookieValue
由于postman模拟cookie本人不会弄,只能用别人的代码。
@GetMapping("/demo3")
public void demo3(@RequestHeader(name = "myHeader") String myHeader,
        @CookieValue(name = "myCookie") String myCookie) {
    System.out.println("myHeader=" + myHeader);
    System.out.println("myCookie=" + myCookie);
}
@ExceptionHandler异常统一处理
异常统一处理
/** 控制器类的基类 */
public class BaseController {
    /** @ExceptionHandler用于统一处理方法抛出的异常 */
    @ExceptionHandler({ServiceException.class, FileUploadException.class})
    public JsonResult<Void> handleException(Throwable e) {
        JsonResult<Void> result = new JsonResult<Void>(e);
        if (e instanceof UsernameDuplicateException) {
            result.setState(4000);
        } else if (e instanceof UserNotFoundException) {
            result.setState(4001);
        } else if (e instanceof PasswordNotMatchException) {
            result.setState(4002);
        } else if (e instanceof AddressCountLimitException) {
            result.setState(4003);
        } else if (e instanceof AddressNotFoundException) {
            result.setState(4004);
        } else if (e instanceof AccessDeniedException) {
            result.setState(4005);
        } else if (e instanceof ProductNotFoundException) {
            result.setState(4006);
        } else if (e instanceof CartNotFoundException) {
            result.setState(4007);
        } else if (e instanceof InsertException) {
            result.setState(5000);
        } else if (e instanceof UpdateException) {
            result.setState(5001);
        } else if (e instanceof DeleteException) {
            result.setState(5002);
        } else if (e instanceof FileEmptyException) {
            result.setState(6000);
        } else if (e instanceof FileSizeException) {
            result.setState(6001);
        } else if (e instanceof FileTypeException) {
            result.setState(6002);
        } else if (e instanceof FileStateException) {
            result.setState(6003);
        } else if (e instanceof FileUploadIOException) {
            result.setState(6004);
        }
        return result;
    }
}
基本使用
拦截器
案例一:
①、实现拦截器可以通过继承HandlerInterceptorAdapter类。如果preHandle方法return true,则继续后续处理。
public class InterceptorDemo extends HandlerInterceptorAdapter {


    @Override
    public boolean preHandle(HttpServletRequest httpServletRequest, HttpServletResponse httpServletResponse, Object o) throws Exception {
        StringBuffer requestURL = httpServletRequest.getRequestURL();
        System.out.println("前置拦截器1 preHandle: 请求的uri为:"+requestURL.toString());
        return true;
    }

    @Override
    public void postHandle(HttpServletRequest httpServletRequest, HttpServletResponse httpServletResponse, Object o, ModelAndView modelAndView) throws Exception {
        System.out.println("拦截器1 postHandle: ");
    }

    @Override
    public void afterCompletion(HttpServletRequest httpServletRequest, HttpServletResponse httpServletResponse, Object o, Exception e) throws Exception {
        System.out.println("拦截器1 afterCompletion: ");
    }
}
② 、注册拦截器
实现拦截器后还需要将拦截器注册到spring容器中,可以通过implements WebMvcConfigurer,覆盖其addInterceptors(InterceptorRegistry registry)方法。记得把Bean注册到Spring容器中,可以选择@Component 或者 @Configuration。
@Configuration
public class InterceptorConfig implements WebMvcConfigurer{

	 /**
     * 注册自定义拦截器
     */
    @Override
    public void addInterceptors(InterceptorRegistry registry) {

       	registry.addInterceptor(new InterceptorDemo2()).addPathPatterns("/**");
        registry.addInterceptor(new InterceptorDemo()).addPathPatterns("/**");
    }
 }
案例二:登录拦截案例
/** 注册处理器拦截器 */
@Configuration
public class LoginInterceptorConfigurer implements WebMvcConfigurer {
    /** 拦截器配置 */
    @Override
    public void addInterceptors(InterceptorRegistry registry) {
        // 创建拦截器对象
        HandlerInterceptor interceptor = new LoginInterceptor();

        // 白名单
        List<String> patterns = new ArrayList<String>();
        patterns.add("/bootstrap3/**");
        patterns.add("/css/**");
        patterns.add("/images/**");
        patterns.add("/js/**");
        patterns.add("/web/register.html");
        patterns.add("/web/login.html");
        patterns.add("/web/index.html");
        patterns.add("/web/product.html");
        patterns.add("/users/reg");
        patterns.add("/users/login");
        patterns.add("/districts/**");
        patterns.add("/products/**");

        // 通过注册工具添加拦截器
        //addPathPatterns("/**","这里是拦截路径可以设置多个参数,/**是对所有路径进行拦截")
        registry.addInterceptor(interceptor).addPathPatterns("/**").excludePathPatterns(patterns);
    }
}
参考博客:
application.properties常用配置
# 设置访问端口
server.port=8081
# 设置访问路径
server.servlet.context-path=/springBootLearn
# MySQL数据库连接配置
spring.datasource.url=jdbc:mysql://localhost:3306/store?useUnicode=true&characterEncoding=utf-8&serverTimezone=Asia/Shanghai
spring.datasource.username=root
spring.datasource.password=123456

# 告诉MyBatis  xml文件位置
mybatis.mapper-locations=classpath:mapper/*.xml
# 服务器向客户端不响应为null的属性
spring.jackson.default-property-inclusion=NON_NULL

# server.servlet.context-path=/store
# spring.servlet.multipart.maxFileSize=10MB
# spring.servlet.multipart.maxRequestSize=10MB

#配置json时间日期格式
spring:
  jackson:
    date-format: yyyy-MM-dd HH:mm:ss
    time-zone: GMT+8

# 使用开发环境配置文件
spring.profiles.active: dev