前言:
小伙伴们,大家好,我是狂奔の蜗牛rz,当然你们可以叫我蜗牛君,我是一个学习Java半年多时间的小菜鸟,同时还有一个伟大的梦想,那就是有朝一日,成为一个优秀的Java架构师。
这个SpringMVC基础学习系列是用来记录我学习SpringMVC框架基础知识的全过程 (这个系列是参照B站狂神的SpringMVC最新教程来写的,由于是之前整理的,但当时没有发布出来,所以有些地方可能有错误,希望大家能够及时指正!)
之后我将尽量以两天一更的速度更新这个系列,还没有学习SpringMVC框架的小伙伴可以参照我的博客学习一下;当然学习过的小伙伴,也可以顺便跟我一起复习一下基础。最后,希望能够和大家一同进步吧,加油吧,编程人!
特别提醒:如果对SpringMVC基础学习系列感兴趣,可以阅读本系列往期博客:
第一篇:SpringMVC基础学习之简单回顾MVC架构和Servlet的使用
第二篇:SpringMVC基础学习之初识SpringMVC
第三篇:SpringMVC基础学习之初识
今天我们来到了SpringMVC基础学习的第四站:使用注解开发 。废话不多说,让我们开始今天的学习内容吧。
4.使用注解开发
4.1 搭建基本环境
4.1.1 创建子项目和导入资源依赖
1.创建Module子项目
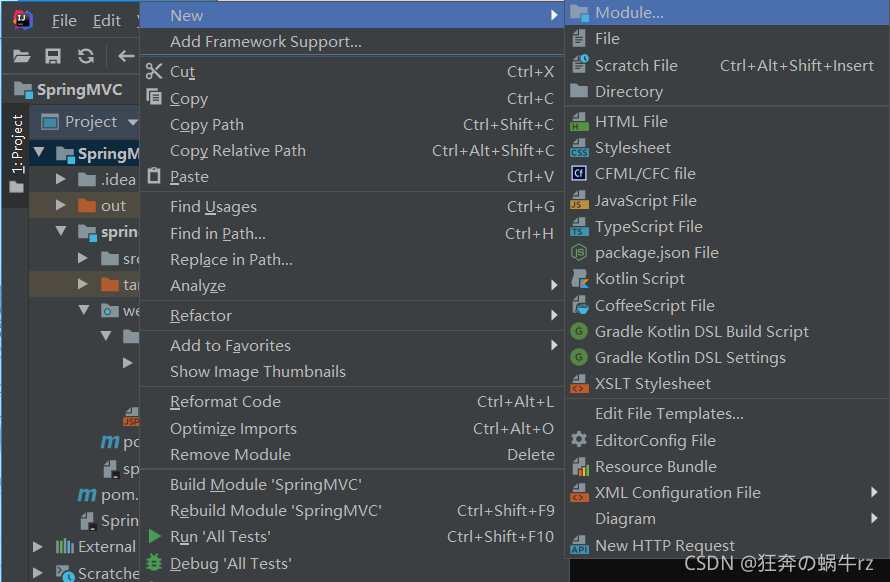
- 右击父工程名称 【SpringMVC】,选择【New】即新建,然后选择【Module】即新建模块

2. 创建普通Maven项目
- 与父工程相同,子模块还是选择创建一个普通的Maven项目,不用勾选任何选项,然后给子项目起名字,比如【springmvc-04-mvcannotation】

3. 导入资源依赖
- 在子项目的pom.xml配置文件中引入相关的资源jar包
<dependencies>
    <!-- servlet-api资源依赖 -->
    <dependency>
        <groupId>javax.servlet</groupId>
        <artifactId>servlet-api</artifactId>
        <version>2.5</version>
    </dependency>
    <!-- jsp-api资源依赖 -->
    <dependency>
        <groupId>javax.servlet.jsp</groupId>
        <artifactId>jsp-api</artifactId>
        <version>2.2</version>
    </dependency>
</dependencies>
4.在build中配置resources
- 在pom.xml配置文件的build中配置resources,来防止我们资源导出失败的问题
<!-- 在build中配置resources,来防止我们资源导出失败的问题 -->
<build>
    <resources>
        <resource>
            <directory>src/main/resources</directory>
            <includes>
                <include>**/*.properties</include>
                <include>**/*.xml</include>
            </includes>
            <filtering>false</filtering>
        </resource>
        <resource>
            <directory>src/main/java</directory>
            <includes>
                <include>**/*.properties</include>
                <include>**/*.xml</include>
            </includes>
            <filtering>false</filtering>
        </resource>
    </resources>
</build>
4.1.2 添加框架支持和配置项目结构
1.给项目添加框架支持
给项目添加框架支持,解决src文件下的java文件变灰的问题
1-1 选择添加框架支持
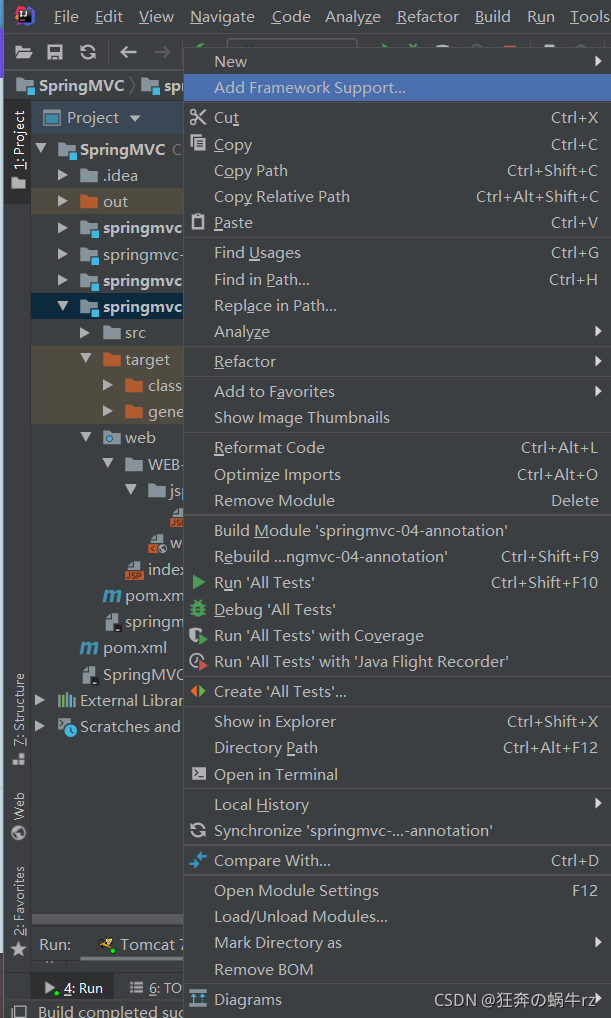
- 右击项目名称,选择【Add Framework Support】,即添加框架支持

1-2.勾选Web Application选项
- 进入【Add Framework Support】(即添加框架支持) 界面,接着勾选JavaEE目录下的 【Web Application】 (即Web应用程序)

2.配置项目结构
2-1 点击项目结构
- 在IDE编译器左上方的工具栏一行,找到倒数第三个长得像文件夹的图标,点击进入【Project Structure】即项目结构页面


2-2 新建lib文件目录

2-3 给lib文件添加Library Files
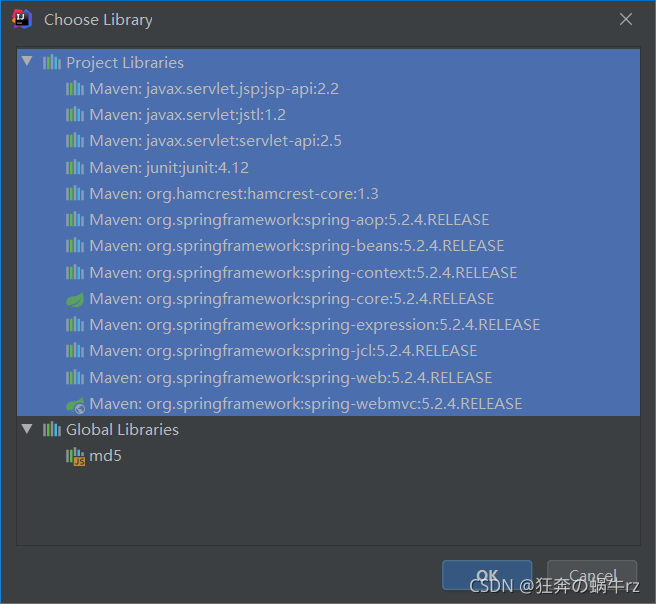
- 点击lib文件目录,右击选择【Add Copy of】(即添加复制),然后接着选择【Library Files】(即资源文件)

2-4 选择项目Library资源
- 选择【Project Library】下的所有资源依赖,点击【OK】即可

2-5 添加Library资源成功
- 如下图所示,lib文件夹下成功添加了前面所选的Library资源,然后点击【Apply】应用此设置,然后就可以了

4.1.3 配置web.xml文件
- 找到该子项目的web文件目录下的WEB-INF文件,然后找到web.xml配置文件,进行配置文件的编写
<?xml version="1.0" encoding="UTF-8"?>
<web-app xmlns="http://xmlns.jcp.org/xml/ns/javaee"
         xmlns:xsi="http://www.w3.org/2001/XMLSchema-instance"
         xsi:schemaLocation="http://xmlns.jcp.org/xml/ns/javaee http://xmlns.jcp.org/xml/ns/javaee/web-app_4_0.xsd"
         version="4.0">

    <!-- 配置DispatcherServlet: 表示前置控制器
         主要作用: 这个是SpringMVC的核心,请求分发器 -->
    <servlet>
        <servlet-name>springmvc</servlet-name>
        <servlet-class>org.springframework.web.servlet.DispatcherServlet</servlet-class>
        <!-- DispatcherServlet要绑定Spring的配置文件 -->
        <init-param>
            <param-name>contextConfigLocation</param-name>
            <!-- classpath*:会去所有的包中找,建议使用classpath: -->
            <param-value>classpath:springmvc-servlet.xml</param-value>
        </init-param>
        <!-- 启动级别 -->
        <load-on-startup>1</load-on-startup>
    </servlet>

    <!-- 在SpringMVC中,/ 和 /* 作用不相同
         /: 匹配所有的请求,不会去匹配jsp (推荐使用 /)
         /*:匹配所有的请求,包括jsp页面 -->
    <servlet-mapping>
        <servlet-name>springmvc</servlet-name>
        <url-pattern>/</url-pattern>
    </servlet-mapping>

</web-app>
4.2 完善环境搭建
4.2.1 创建HelloController控制类
- 在src目录下的main文件下的java文件下,创建一个com.kuang.controller包,来存放控制层的HelloController类
package com.kuang.controller;

import org.springframework.stereotype.Controller;
import org.springframework.ui.Model;
import org.springframework.web.bind.annotation.RequestMapping;

// 使用@Controller注解, 将该类注册为控制器, 交由Spring的IOC容器统一管理
@Controller
// 使用@RequestMapping注解, 设置请求映射: 作用域是类或者方法
@RequestMapping("/hello")
public class HelloController {

    // 真实访问地址:localhost:8080/hello/h1
    @RequestMapping("/h1")
    public String hello1(Model model) {
        // 封装数据: 向模型中添加属性msg与值, 可以在JSP页面中取出并渲染
        model.addAttribute("msg","Hello,SpringMVCAnnotation!");
        // 视图解析器处理视图名称 (注意: 这里的"hello"是指jsp页面的名称)
        return "hello";
    }

    /**
     * 设置多个请求映射, 用来跳转不同的页面
     */
    // 真实访问地址:localhost:8080/hello/h2
    @RequestMapping("/h2")
    public String hello2(Model model) {
        // 封装数据
        model.addAttribute("msg","Hello,SpringMVC!");
        // 视图解析器处理视图名称
        return "hello";
    }

    // 真实访问地址:localhost:8080/hello/h3
    @RequestMapping("/h3")
    public String hello3(Model model) {
        // 封装数据
        model.addAttribute("msg","Hello,Spring!");
        // 视图解析器处理视图名称
        return "hello";
    }

}
4.2.2 编写springmvc-servlet.xml配置文件
<?xml version="1.0" encoding="UTF-8"?>
<beans xmlns="http://www.springframework.org/schema/beans"
       xmlns:xsi="http://www.w3.org/2001/XMLSchema-instance"
       xmlns:context="http://www.springframework.org/schema/context"
       xmlns:mvc="http://www.springframework.org/schema/mvc"
       xsi:schemaLocation="
        http://www.springframework.org/schema/beans
        http://www.springframework.org/schema/beans/spring-beans.xsd
        http://www.springframework.org/schema/context
        http://www.springframework.org/schema/context/spring-context.xsd
        http://www.springframework.org/schema/mvc
        http://www.springframework.org/schema/mvc/spring-mvc.xsd">

    <!-- 自动扫描包,让指定包下的注解生效,由IOC容器统一管理 -->
    <context:component-scan base-package="com.kuang.controller"/>

    <!-- 让SpringMVC不处理静态资源: .css .js .html .mp3 .mp4 -->
    <mvc:default-servlet-handler/>
    <!-- 支持mvc注解驱动
         (在Spring中一般采用@RequstMapping注解来完成映射关系, 要想让@RequstMapping注解生效, 必须向上下文注册DefaultAnnotationHandlerMapping和一个AnnotationMethodHandlerAdapter实例, 这两个实例分别在类级别和方法级别处理, 而annotation-driven配置帮助我们自动完成上述两个实例的注入) -->
    <mvc:annotation-driven/>

    <!-- 视图解析器 -->
    <bean class="org.springframework.web.servlet.view.InternalResourceViewResolver"
          id="internalResourceViewResolver">
        <!-- 在视图解析器中我们吧所有的视图都放在/WEB-INF/目录下 (这样可以保证视图安全,因为这个目录下的文件,客户端不能直接访问) -->
        <!-- 前缀 -->
        <property name="prefix" value="/WEB-INF/jsp/"/>
        <!-- 后缀 -->
        <property name="suffix" value=".jsp"/>
    </bean>

</beans>
4.2.3 编写视图层JSP页面
- 在web文件夹下的WEB-INF文件中,创建一个jsp文件夹,用来存放视图层的相关页面文件
<%@ page contentType="text/html;charset=UTF-8" language="java" %>
<html>
<head>
    <title>Title</title>
</head>
<body>
    <!-- 展示HellloController控制器中封装的对象信息 -->
    ${msg}
</body>
</html>
4.3 发布项目和项目测试
4.3.1 设置项目发布信息和启动Tomcat服务器
1 设置发布项目信息
- 查看IDEA编译器左上方的工具栏图形一行,找到【Tomcat 7】,点击后选择【Edit Configurations】

- 在【Deployment】下点击右侧的“+”号,选择【Artifact…】

- 然后添加发布项目信息,最后点击右下角的【Apply】即应用此配置

2.运行TomCat服务器
- 点击左上角工具栏中的【Tomcat7】后面的【Run】(即运行服务器)

- 等待服务器启动,在控制台查看项目是否发布成功

4.3.2 测试结果
1.访问index.jsp页面
- 欢迎页面index.jsp的URL链接为 http://localhost:8888/springmvc_04_annotation_war_exploded/

结果:访问默认页面成功!
2.访问hello/h1页面
在默认的URL链接后面加上hello/h1,即访问地址为http://localhost:8888/springmvc_04_annotation_war_exploded/hello/h1

结果:访问hello/h1页面成功,并且显示“Hello,SpringMVCAnnotation!”的信息!
3.访问hello/h2页面
- 在默认的URL链接后面加上hello/h2,即访问地址为http://localhost:8888/springmvc_04_annotation_war_exploded/hello/h2

结果:访问hello/h2页面成功,并且显示“Hello,SpringMVC!”的信息!
4.访问hello/h3页面
- 在默认的URL链接后面加上hello/h3,即访问地址为http://localhost:8888/springmvc_04_annotation_war_exploded/hello/h3

? 结果:访问hello/h3页面成功,并且显示“Hello,Spring”的信息!
好了,今天的有关 使用注解开发 的学习就到此结束啦。欢迎小伙伴们积极学习和讨论,喜欢的可以给蜗牛君点个关注,顺便来个一键三连。我们下期见,拜拜啦!