Spring5
1.IOC
1.1 IOC概念
IOC,即控制反转,是将创建对象、对象调用交给了Spring管理,然后通过依赖注入(DI),将对象注入,降低了耦合度
1.2 IOC的原理
IOC容器是由工厂模式、反射、解析xml实现
1.3 IOC的两个重要接口
-
BeanFactory:它是IOC容器的基本实现,是Spring内部使用的接口。其特点是,加载配置时不会创建Bean的对象,使用时才会创建
-
ApplicationContext,它是BeanFactory的子接口,比BeanFactory的功能更多更强,一般是开发人员使用。其特点是,加载配置时就会创建Bean的对象。(如果Bean对象很大就可以使用ApplicationContext来创建,而不是BeanFactory在使用时才创建,那将很费时)

这两个类就是ApplicationContext的两个实现类,File开头的是从磁盘中去找xml;Class开头的是从类路径找(常用)
1.4 什么是Bean管理?
所谓Bean管理,包括两个操作:
- 创建对象
- 属性注入
1.5 Bean管理的两种方式
- 基于xml配置文件
- 基于注解
基于xml配置文件
xml配置文件使用bean标签即可,xml方式默认使用的是无参构造(如果你写了有参构造,请把无参构造显示的写出来,因为spring在你显示的声明构造函数后就不会自动创建无参了)
基本使用如下:
<?xml version="1.0" encoding="UTF-8"?>
<beans xmlns="http://www.springframework.org/schema/beans"
       xmlns:xsi="http://www.w3.org/2001/XMLSchema-instance"
       xsi:schemaLocation="http://www.springframework.org/schema/beans 		  http://www.springframework.org/schema/beans/spring-beans.xsd">

    <bean id="user" class="com.xp.spring.beans.User">
        <property name="name" value="xiaoxiang"></property>
        <property name="age" value="2"></property>
    </bean>
</beans>

属性注入的两种方式
(属性注入就是为属性赋值,即xml中的property标签):
- set方法注入
- 有参构造
1.set方法注入:
其实就是我上面的那段代码,同时对象中必须也要为属性添加set方法,如:
public class User {

    private String name;
    private Integer age;

    public void setName(String name) {
        this.name = name;
    }

    public void setAge(Integer age) {
        this.age = age;
    }
}
2.有参构造:
既然是有参构造,类中肯定要写有参构造函数的
<?xml version="1.0" encoding="UTF-8"?>
<beans xmlns="http://www.springframework.org/schema/beans"
       xmlns:xsi="http://www.w3.org/2001/XMLSchema-instance"
       xsi:schemaLocation="http://www.springframework.org/schema/beans http://www.springframework.org/schema/beans/spring-beans.xsd">

    <bean id="user" class="com.xp.spring.beans.User">
        <constructor-arg name="name" value="xiaoxiang"></constructor-arg>
        <constructor-arg name="age" value="100"></constructor-arg>
    </bean>
</beans>

3. 注入一些特殊的值
注入null值

测试代码:
@Test
    void test(){
        ApplicationContext context =new ClassPathXmlApplicationContext("user.xml");
        User user = context.getBean("user", User.class);
        System.out.println(user);
    }
看下效果:

注入带特殊字符的值
比如我们要注入< 开头的,它会被xml当作某个标签,会报错,应该这样(<![CDATA[值]]>)
<?xml version="1.0" encoding="UTF-8"?>
<beans xmlns="http://www.springframework.org/schema/beans"
       xmlns:xsi="http://www.w3.org/2001/XMLSchema-instance"
       xsi:schemaLocation="http://www.springframework.org/schema/beans http://www.springframework.org/schema/beans/spring-beans.xsd">

    <bean id="user" class="com.xp.spring.beans.User">
        <property name="name">
            <value> <![CDATA[<>]]> </value>
        </property>
        <property name="age" value="18"></property>
    </bean>
</beans>

或者你可以将它转义:


注入引用类型的参数
注入其它bean,可以分为外部bean、内部bean。它两个的作用都是注入对象类型的属性。
值得注意的是,这里的内部、外部均是从一个bean的角度来说的,外部就是写两个bean,其中一个引用另一个,而内部就是bean里面套个bean,看下例子就明白了
首先,我们需要新建一个Order类,然后再User类中定义一个Order类型的属性,并加上set方法,如:
[外链图片转存失败,源站可能有防盗链机制,建议将图片保存下来直接上传(img-EBLxLd91-1636447936813)(…/AppData/Roaming/Typora/typora-user-images/image-20211106193859562.png)]
外部bean写法:


外部这种还有一种写法,可做了解:(这种需要在User类里为order对象写一个getter方法,不然报错,ref那一句必须写在前面;此时对order对象属性的赋值可以在user bean中,也可以在order bean中,但是同时在两个bean中为同一个属性赋值,会使用user的,比如下图中的money,结果为123456而不是10000)

内部bean写法:
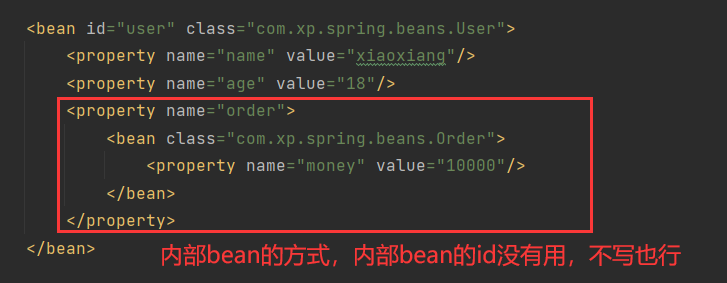
这两种方式的目的和作用是一样的,根据个人喜好,我比较喜欢第一种
数组、集合注入值
创建一个类,其属性包括数组和集合:并为它们生成setter方法,添加toString方法
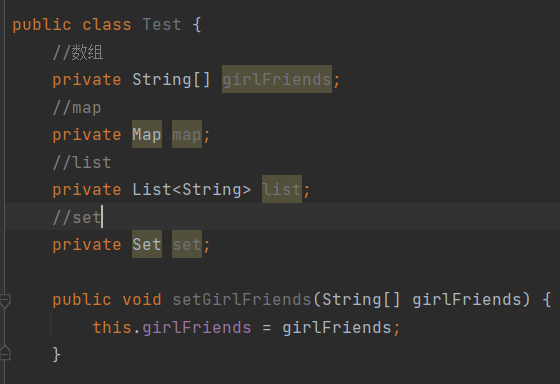
xml配置:
<?xml version="1.0" encoding="UTF-8"?>
<beans xmlns="http://www.springframework.org/schema/beans"
       xmlns:xsi="http://www.w3.org/2001/XMLSchema-instance"
       xsi:schemaLocation="http://www.springframework.org/schema/beans http://www.springframework.org/schema/beans/spring-beans.xsd">

    <bean id="test" class="com.xp.spring.beans.Test">
        <!--数组-->
        <property name="girlFriends">
            <array>
                <value>我</value>
                <value>是</value>
                <value>谁</value>
            </array>
        </property>

        <!--map-->
        <property name="map">
            <map>
                <entry key="0" value="我"/>
                <entry key="1" value="帅"/>
                <entry key="2" value="吗"/>
            </map>
        </property>

        <!--list-->
        <property name="list">
            <list>
                <value>6</value>
                <value>不</value>
                <value>6</value>
            </list>
        </property>

        <!--set-->
        <property name="set">
            <set>
                <value>对</value>
                <value>吧?</value>
            </set>
        </property>
    </bean>
</beans>
测试:
@Test
void test(){
    ApplicationContext context =new ClassPathXmlApplicationContext("test.xml");
    Test test = context.getBean("test", Test.class);
    System.out.println(test);
}
结果:

错误原因是因为Test这个类名,改一下,我该成了Pig,涉及到类名的地方都应改为Pig

可以看到没问题,但是我们现在给数组、集合的值都是String的,如果是对象呢?
数组、集合注入对象
这里就演示下list:
private List<Order> list;
我将list的元素类型改为了Order,你可以随便建一个类
public class Order {
    private Integer money;


    public void setMoney(Integer money) {
        this.money = money;
    }

    @Override
    public String toString() {
        return "Order{" +
                "money=" + money +
                '}';
    }
}
xml配置:
首先你应该再写两个bean标签:创建多个(一个也行,重复赋给list)
<bean id="order1" class="com.xp.spring.beans.Order">
    <property name="money" value="123456"/>
</bean>
<bean id="order2" class="com.xp.spring.beans.Order">
    <property name="money" value="654321"/>
</bean>
list的配置改为:
<!--list-->
<property name="list">
    <list>
        <ref bean="order1"/>
        <ref bean="order2"/>
    </list>
</property>
运行一下测试方法:

对于map:都一样的使用方式
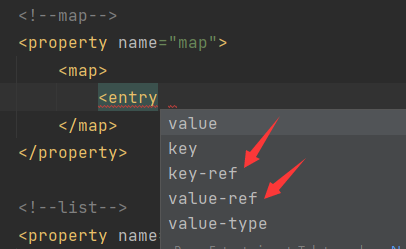
视频里说还可以将这些map、list封装一下,让所有的bean都能使用;需要用到命名空间,我觉得用处不大,放个视频链接:
Spring中两种类型的Bean
Spring中有两种类型的bean,一种是普通的就是我们xml中配置的那些;还有一个叫FactoryBean
普通的bean:
配置文件中的class属性指定是哪个类,就创建哪个类的对象
<bean id="order1" class="com.xp.spring.beans.Order">
    <property name="money" value="123456"/>
</bean>
FactoryBean:
可以和class指定的类型不一样,我们只需要让Order类实现FactoryBean接口并实现其中的方法
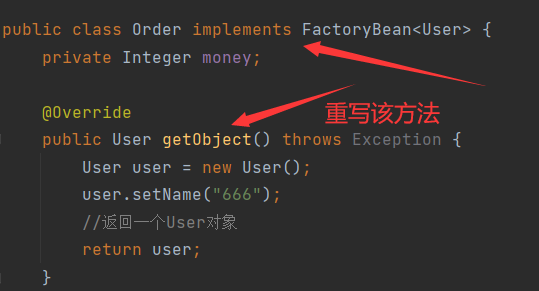
<bean id="order1" class="com.xp.spring.beans.Order"/>
测试方法:
@Test
void test(){
    ApplicationContext context =new ClassPathXmlApplicationContext("test.xml");
    User user = context.getBean("order1", User.class);
    System.out.println(user);
}
这样就达到了返回非class属性指定类型的对象(不过我觉得没啥意义)
Bean的作用域
- singleton
- prototype
- request
- session
singleton(默认就是它):单例,意为只会为这个类创建一个对象
我们创建两个User对象:user1和user2,并打印引用地址


可以看到,user1和user2是指向的同一个对象地址。这就是单例
prototype:多例,即可以为这个类创建多个对象,和单例相反。除此之外,单例是在加载配置文件时就创建对象,而多例则是在getBean()的时候创建的
我们只需要改下xml配置:


可以看到,引用地址是不同的,创建了两个对象
request(web环境下才可使用,即引入web依赖):将产生的对象放到request中
<bean id="order" class="com.xp.spring.beans.Order" scope="request">
    <property name="money" value="123456"/>
</bean>
session(web环境下才可使用):将产生的对象放到session中
<bean id="order" class="com.xp.spring.beans.Order" scope="session">
    <property name="money" value="123456"/>
</bean>
request、session不常用
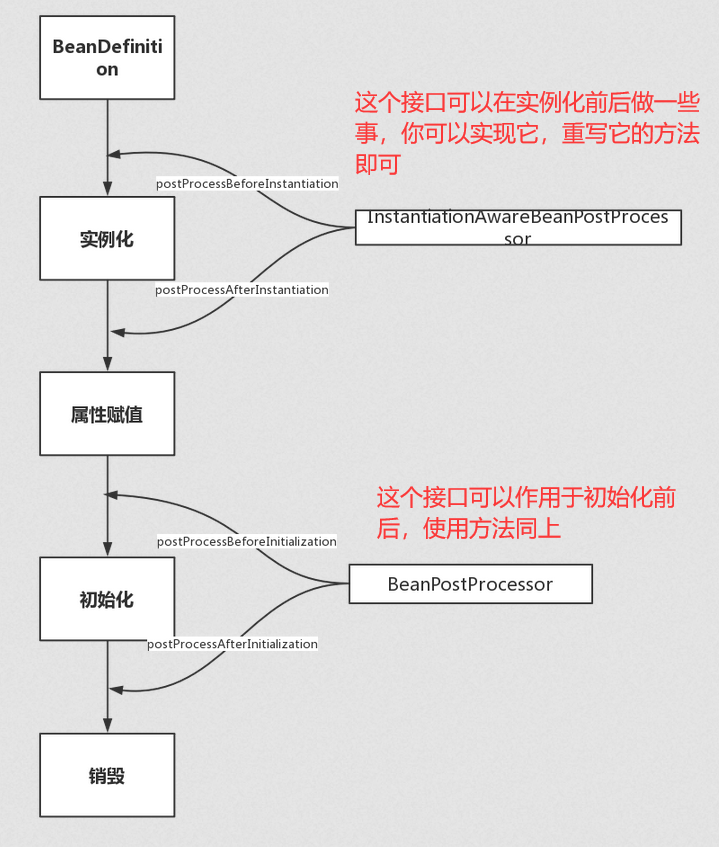
Bean的生命周期
- 实例化
- 属性值注入
- 初始化
- 销毁
这里有一篇不错的博文,存个地址在这:https://www.jianshu.com/p/1dec08d290c1

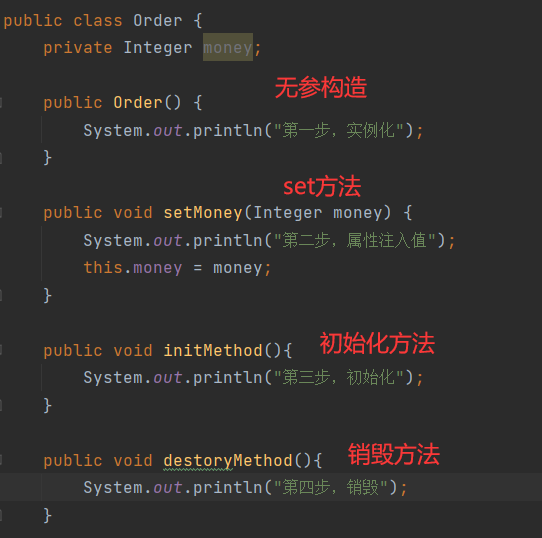
这是我的Order类,里面定义了一个初始化方法和销毁方法:
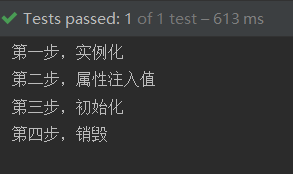
运行一下:
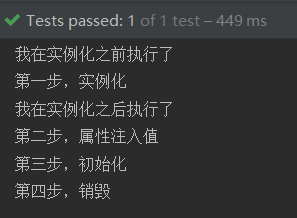
然后我们实现一下InstantiationAwareBeanPostProcessor接口,它有两个方法分别会在实例化前后执行:
public class MyInstence implements InstantiationAwareBeanPostProcessor {
    @Override
    public Object postProcessBeforeInstantiation(Class<?> beanClass, String beanName) throws BeansException {
        System.out.println("我在实例化之前执行了");
        return InstantiationAwareBeanPostProcessor.super.postProcessBeforeInstantiation(beanClass, beanName);
    }

    @Override
    public boolean postProcessAfterInstantiation(Object bean, String beanName) throws BeansException {
        System.out.println("我在实例化之后执行了");
        return InstantiationAwareBeanPostProcessor.super.postProcessAfterInstantiation(bean, beanName);
    }
}
然后在配置文件中写一个bean:(该接口就会对这个配置文件的全部bean生效)
<bean id="instence" class="com.xp.spring.beans.MyInstence"/>
运行一下:
BeanPostProcessor接口也是同样的用法,只是你需要实现不同的方法:

XML方式的自动装配(均针对引用类型)
byName:


byType:

如果存在多个class中的类相同,比如:
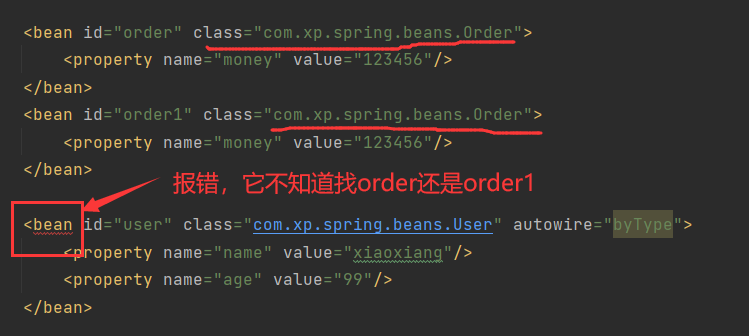
Xml中引入外部的配置文件
个人感觉用处不大,放个视频链接,有需要还能看看:https://www.bilibili.com/video/BV1Vf4y127N5?p=19
基于注解的Bean管理
有四个注解可以将类交给IOC容器管理:
@Controller
@Service
@Component
@Repository
但是仅仅加上注解还不行,我们还需要配置xml,让它去扫描带这些注解的类:
<?xml version="1.0" encoding="UTF-8"?>
<beans xmlns="http://www.springframework.org/schema/beans"
       xmlns:xsi="http://www.w3.org/2001/XMLSchema-instance"
       xmlns:context="http://www.springframework.org/schema/context"
       xsi:schemaLocation="http://www.springframework.org/schema/beans 		http://www.springframework.org/schema/beans/spring-beans.xsd
                            http://www.springframework.org/schema/context http://www.springframework.org/schema/context/spring-context.xsd">
    <!--组件扫描-->
<context:component-scan base-package="com.xp.spring.beans,com.xp.spring.controller"/>


</beans>


你需要额外加上这两句才行!!!!
我们在Order类上加上@Component:
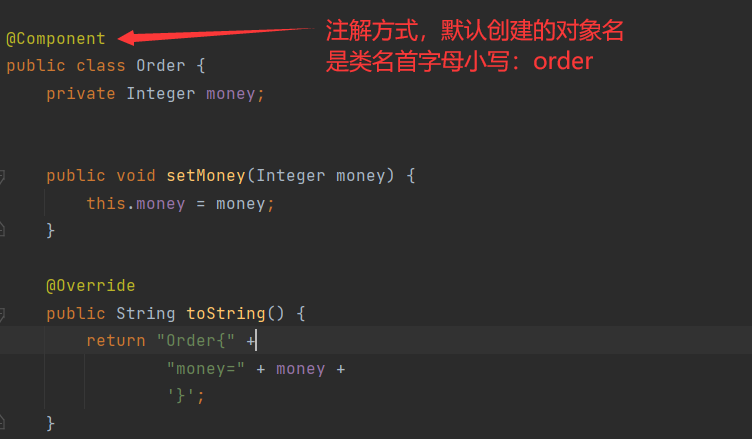
测试类:

运行:

在配置扫描时,我们还可以选择扫描哪些、不扫描哪些:


使用注解注入属性
以下四个注解:
@Autowired :根据类型注入
@Qualifier :根据名字注入,需搭配@Autowired或者@Resource使用
@Resource :既可以根据type也可以根据name注入(先找name)
@Value :普通类型的属性注入,如:字符串
结构:
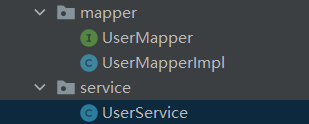
userservice中注入usermapperimpl对象(@AutoWried)
@Service
public class UserService {
    @Value("xiaoxiang")
    private String name;
    @Autowired
    private UserMapper userMapper;

    public void test(){
        userMapper.add();
    }
}
UserMapper:
public interface UserMapper {
    void add();
}
实现类:
@Repository
public class UserMapperImpl implements UserMapper {
    @Override
    public void add() {
        System.out.println("添加成功");
    }
}

@Resource和@AutoWried使用是一样的,只是Resource默认先匹配name,再type
说说@Qualifier和@AutoWried的搭配使用:
现在,我们再写一个UserMapper接口的实现类UserMapperImpl1:此时单独使用@AutoWried按类型注入是会报错的,因为按类型查找会找到两个类,他不知道注入哪一个

但是此时加上@Qualifier,根据name指定,就能注入指定的对象

你也许会说那直接用@Resource不就行了,来看看吧:

错误是:找不到正确的UserMapper类型的对象,期望是一个但是找到两个。
我们注入的UserMapper是接口,它的实现类都被Spring管理。这里其实是用了多态,
不管UserMapper有没有通过注解交给Spring进行Bean管理,注入接口,都会去找其实现类(当然实现类必须交给Spring管理),所以针对注入接口类型的(且实现类超过一个),都会按照type去找,此时必须使用@AutoWried+@Qualifier 或者 @Resource(因为此时会按照type注入,等于和@AutoWried一样) +@Qualifier。
因为@AutoWried是Spring中的,而@Resource是扩展包的,所以更推荐@AutoWried

完全注解开发
创建一个配置类,替代xml中的组件扫描
@Configuration
//可配置多个包路径
@ComponentScan({"com.xp.spring.mapper","com.xp.spring.service"})
public class MyConfig {
}
这样就好了,测试类我们需要改一下:
@Test
void test2(){
    ApplicationContext context = new AnnotationConfigApplicationContext(MyConfig.class);
    UserService userService = context.getBean("userService", UserService.class);
    userService.test();
}
[外链图片转存失败,源站可能有防盗链机制,建议将图片保存下来直接上传(img-JcNvIjik-1636447936918)(…/AppData/Roaming/Typora/typora-user-images/image-20211107215954986.png)]
1.6 Aop
面向切面编程,降低耦合度,提高程序可重用性
原理:
动态代理
动态代理的两种情况:
- 有接口,使用JDK动态代理,为接口实现类创建代理对象(里面有增强操作)
- 无接口,使用CGLIB动态代理,创建类的子类作为代理对象
下面演示以下,使用JDK的动态代理:
首先创接口UserDao,其实现类UserDaoImpl

然后创建一个类进行测试:
public class Abc {

    public static void main(String[] args) {
        //获取代理对象
        UserDao userDaoPlus = (UserDao) Proxy.newProxyInstance(Abc.class.getClassLoader(), new Class[]{UserDao.class}, new InvocationHandler() {
            //这是匿名内部类

            //你要代理的类
            UserDaoImpl userDao = new UserDaoImpl();

            @Override
            public Object invoke(Object proxy, Method method, Object[] args) throws Throwable {

                System.out.println("我在方法执行前");

                //获取代理对象
                Object userproxy = method.invoke(userDao, args);

                System.out.println("我在方法执行后");

                //返回代理对象(已完成加强)
                return userproxy;
            }
        });
        //执行增强后的add方法
        userDaoPlus.add();
    }
}
效果:

AOP中的几个术语
连接点:类中哪些方法可以增强,这些方法就叫连接点
切入点:实际被增强的方法叫切入点
通知:方法中的增强的部分就叫通知
切面:把通知应用到切入点的过程的那个类
其中,通知分为:前置、后置、环绕、异常、返回(方法return之后)这5个形式。
使用AOP
Spring框架一般都是基于AspectJ实现AOP,这里就介绍注解,xml配置就不说了
1.需添加aspectj的依赖:(因为我是使用springboot写的)
<dependency>
	<groupId>org.springframework.boot</groupId>
	<artifactId>spring-boot-starter-aop</artifactId>
</dependency>
2.创建一个类:User
@Component
public class User {

    public void add(){
        System.out.println("添加成功");
    };

    public void delete(){
        System.out.println("删除成功");
    }
}
exection表达式: 修饰符(常用*代表所有)类全路径.方法名(…)
如:
execution(* com.xp.spring.beans.User.add(…)) User类的add方法增强
execution(* com.xp.spring.beans.User.*(…)) User类的所有方法增强
3.写一个增强类:里面是你要增强的东西,我们就输出一句话即可
@Component
@Aspect   //生成代理对象
public class UserPlus {
    @Before(value = "execution(* com.xp.spring.beans.User.add(..))")
    public void before(){
        System.out.println("方法前输出");
    }

}
测试方法:
@Test
void test(){
    ClassPathXmlApplicationContext context =new ClassPathXmlApplicationContext("aop.xml");
    User user = context.getBean("user", User.class);
    user.add();

}
效果:
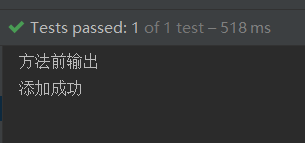
现在,我们再添加上其它的通知方式
@Component
@Aspect
public class UserPlus {
	//前置
    @Before(value = "execution(* com.xp.spring.beans.User.add(..))")
    public void before(){
        System.out.println("这是before");
    }
	//后置
    @After(value = "execution(* com.xp.spring.beans.User.add(..))")
    public void after(){
        System.out.println("这是after,最终");
    }
    //环绕
    @Around(value = "execution(* com.xp.spring.beans.User.add(..))")
    public void around(ProceedingJoinPoint proceedingJoinPoint) throws Throwable {
        System.out.println("环绕输出1");
        //方法执行
        proceedingJoinPoint.proceed();
        System.out.println("环绕输出2");
    }
    //返回
    @AfterReturning(value = "execution(* com.xp.spring.beans.User.add(..))")
    public void afterreturn(){
        System.out.println("这是方法return后");
    }
    //异常
    @AfterThrowing(value = "execution(* com.xp.spring.beans.User.add(..))")
    public void afterth(){
        System.out.println("这是方法return后");
    }
}

将切入点抽取为公共方法
写一个方法,加上@Pointcut(value=“execution表达式”),后续的通知注解value值就写这个方法名就行
@Component
@Aspect
public class UserPlus {
    @Pointcut(value = "execution(* com.xp.spring.beans.User.add(..))")
    public void point(){

    }

    @Before(value = "point()")
    public void before(){
        System.out.println("这是before");
    }

    @After(value = "point()")
    public void after(){
        System.out.println("这是after,最终");
    }
    @Around(value = "point()")
    public void around(ProceedingJoinPoint proceedingJoinPoint) throws Throwable {
        System.out.println("环绕输出1");
        //方法执行
        proceedingJoinPoint.proceed();
        System.out.println("环绕输出2");
    }
    @AfterReturning(value = "point()")
    public void afterreturn(){
        System.out.println("这是方法return后");
    }

}
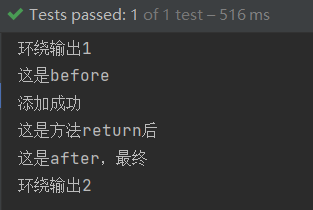
设置增强类的优先级
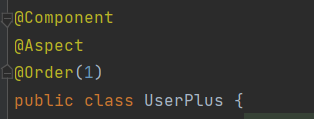
如果多个增强类都增强同一个方法,可设置优先级
在增强类上加@Order(数值),数值越小优先级越高
1.7 事务
事务是数据库操作的最基本单元,逻辑上一组操作,要么都成功,要么都失败
事务的四大特性:
原子性:事务所包含的操作要么都成功,要么都失败
一致性:事务必须使数据库从一个一致性状态转变为另一个一致性状态举。例来说,假设用户A和用户B两者的钱加起来一共是1000,那么不管A和B之间如何转账、转几次账,事务结束后两个用户的钱相加起来应该还得是1000,这就是事务的一致性。
隔离性:隔离性是当多个用户并发访问数据库时,比如同时操作同一张表时,数据库为每一个用户开启的事务,不能被其他事务的操作所干扰,多个并发事务之间要相互隔离。
持久性:持久性是指一个事务一旦被提交了,那么对数据库中的数据的改变就是永久性的,即便是在数据库系统遇到故障的情况下也不会丢失提交事务的操作。例如我们在使用JDBC操作数据库时,在提交事务方法后,提示用户事务操作完成,当我们程序执行完成直到看到提示后,就可以认定事务已经正确提交,即使这时候数据库出现了问题,也必须要将我们的事务完全执行完成。否则的话就会造成我们虽然看到提示事务处理完毕,但是数据库因为故障而没有执行事务的重大错误。这是不允许的。
Spring有两种方式进行事务管理:
编程式、声明式
现在都是使用声明式
声明式又有两种:
基于注解、基于xml配置;注解最为常用
Spring声明式事务底层使用的是Aop,Spring管理事务提供一个接口PlatformTransactionManager,这个接口针对不同的框架提供不同的实现类:

事务方法?:指对数据库存在增删改的方法
基于注解的声明式事务:
使用@Transactional,加在类上,表示类的所有方法都使用事务;加在方法上,表示该方法使用事务
其中的参数有:
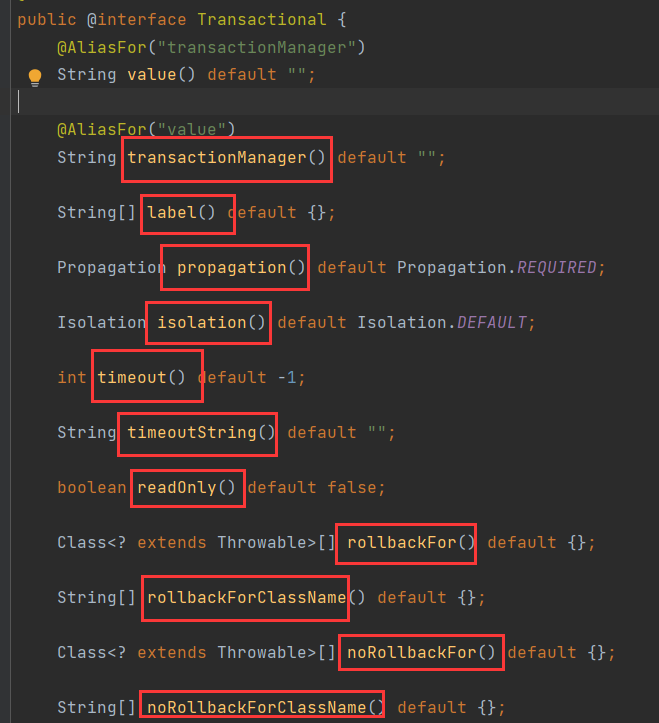
transactionManager:事务管理器
propagation:事务传播行为(多个事务方法存在调用时,如何处理事务。比如有事务管理的事务方法调用没有事务管理的事务方法或者反过来,事务如何处理)
isolation:隔离级别
timeout:超时
readOnly:是否只读
rollbackFor:回滚
norollbackFor:不回滚
propagation中的7个属性:
REQUIRED(默认):支持当前事务,如果当前没有事务,就新建一个事务。这是最常见的选择。
SUPPORTS:支持当前事务,如果当前没有事务,就以非事务方式执行。
MANDATORY:支持当前事务,如果当前没有事务,就抛出异常。
REQUIRES_NEW:新建事务,如果当前存在事务,把当前事务挂起。
NOT_SUPPORTED:以非事务方式执行操作,如果当前存在事务,就把当前事务挂起。
NEVER:以非事务方式执行,如果当前存在事务,则抛出异常。
NESTED:支持当前事务,如果当前事务存在,则执行一个嵌套事务,如果当前没有事务,就新建一个事务。
四个隔离级别:
- READ UNCOMMITTED(读未提交数据): 允许事务读取未被其他事务提交的变更数据,会出现脏读、不可重复读和幻读问题。
- READ COMMITTED(读已提交数据): 只允许事务读取已经被其他事务提交的变更数据,可避免脏读,仍会出现不可重复读和幻读问题。
- REPEATABLE READ(可重复读,mysql默认隔离级别): 确保事务可以多次从一个字段中读取相同的值,在此事务持续期间,禁止其他事务对此字段的更新,可以避免脏读和不可重复读,仍会出现幻读问题。
- SERIALIZABLE(序列化): 确保事务可以从一个表中读取相同的行,在这个事务持续期间,禁止其他事务对该表执行插入、更新和删除操作,可避免所有并发问题,但性能非常低。
脏读:未提交的事务读到未提交事务的数据
不可重复度:未提交的事务读到已提交事务修改的数据
幻读(虚读):未提交事务读到已提交事务添加的数据
超时:设置事务需在一定时间内提交,时间到了就回滚;默认值-1,即没有超时时间,单位秒
readOnly:只读,设置为true,只能做查询操作,不能做增删改;设置为false(默认值),都可以做
rollbackFor:设置出现哪些异常,触发回滚(默认RuntimeException和error时回滚, Checked异常不会触发)
norollbackFor:设置出现哪些异常不触发回滚
使用:
@Transactional(propagation = Propagation.REQUIRED, readOnly = false, isolation = Isolation.REPEATABLE_READ, rollbackFor = {RuntimeException.class,ClassNotFoundException.class})
事务这一截的视频:
https://www.bilibili.com/video/BV1Vf4y127N5?p=44
今天到这里
持续更新中。。。。。。。。。。。。。。。。。。。。。。。。。。