说明: 本次通过nacos来整合seata1.4.2版本,除了是新版本外,最大原因是1.4.2版本支持从一个Nacos dataId中获取所有配置信息,比之前版本需要上传几十个配置项相比,兼职不要太爽。
一、安装seata-server
seata-server-1.4.2下载: http://seata.io/zh-cn/blog/download.html
注意:源码也要下载。

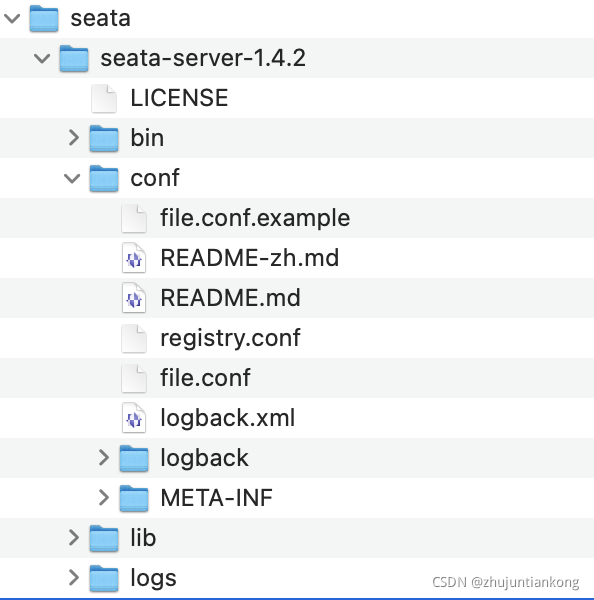
下载下来后对seata-server-1.4.2进行解压:

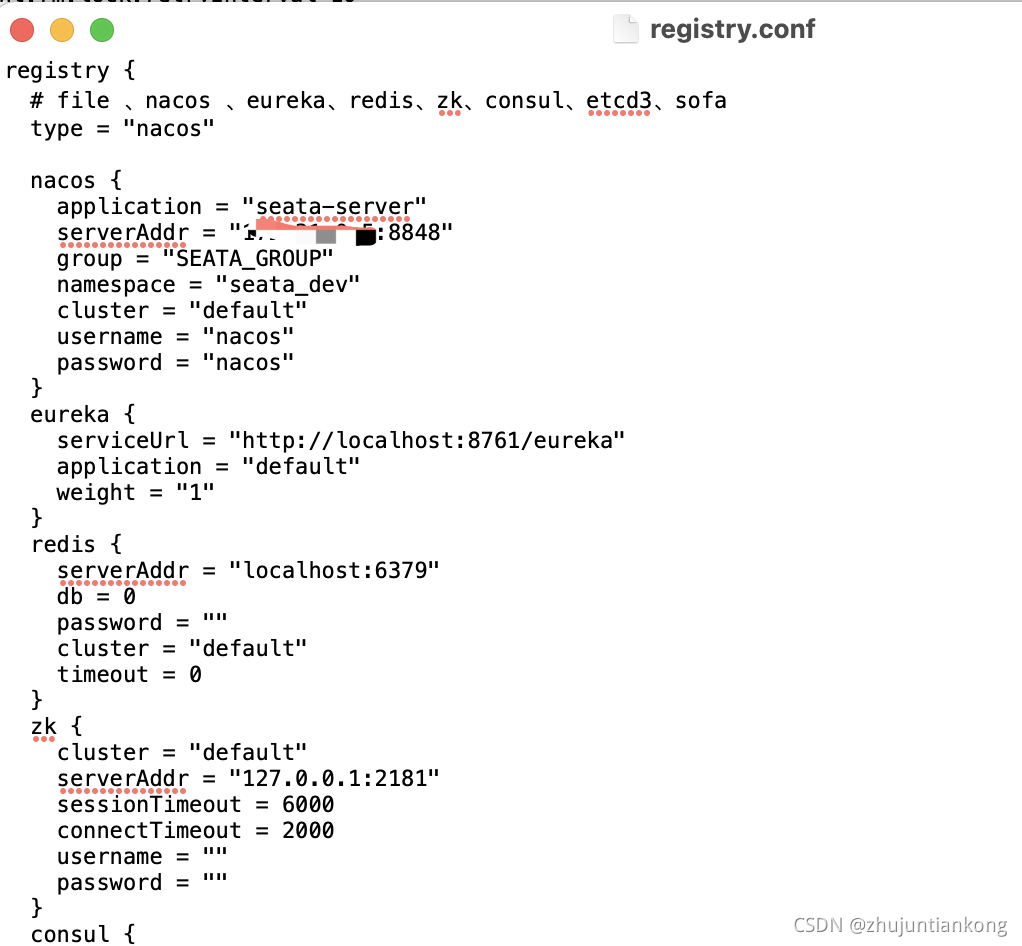
修改conf目录下的registry.conf
1.先修改seata-server的注册中心配置:
type默认file(这种方式需要把源码的file.conf文件复制到项目中,比较麻烦不推荐),改成nacos,然后再修改里面配置
registry {
	# file 、nacos 、eureka、redis、zk、consul、etcd3、sofa
 	type = "nacos"
	nacos {
	    application = "seata-server" #对应nacos注册后的服务名
	    serverAddr = "127.0.0.1:8848"  #nacos服务的地址端口
	    group = "SEATA_GROUP"  #在nacos中的分组
	    namespace = "seata_dev"  #指定在nacos的命名空间
	    cluster = "default"   #集群 默认的
	    username = "nacos" #nacos账号名称
	    password = "nacos" #nacos账号密码
	  }
}

2.修改seata-server的配置中心地址
config {
	  # file、nacos 、apollo、zk、consul、etcd3
	  type = "nacos"
	  nacos {
	    serverAddr = "172.31.0.5:8848" #nacos服务的地址端口
	    namespace = "seata_dev"   #指定在nacos的命名空间
	    group = "SEATA_GROUP"  #在nacos中的分组
        username = "nacos"
        password = "nacos"
        dataId = "seataServer.properties"  # nacos中seata的配置文件的dataId(1.4.2版本以上才支持)
	  }
  }

3.在nacos添加seata-server的配置文件
配置文件在seata-server源码包下:/seata-1.4.2/script/config-center/config.txt
在nacos的seata_dev空间下,新增配置seataServer.properties
然后把config.txt里的内容拷贝进去,再保存

4.在mysql中创建seata-server的库表
说明:本次采用mysql来做seata-server的存储(也支持redis)。
我们在上一步中已经导入了seata-server的配置,所以直接在上面改存储的配置
store.mode=db
store.db.dbType=mysql
store.db.driverClassName=com.mysql.cj.jdbc.Driver  #注意mysql8.0以上的驱动
store.db.url=jdbc:mysql://127.0.0.1:3306/seata?useUnicode=true
store.db.user=root
store.db.password=123456
注意: 其中有一个事务分组的配置my_test_tx_group,这个是可以自定义修改的,该了需要与项目中的事务分组配置保持一致。
service.vgroupMapping.my_test_tx_group=default

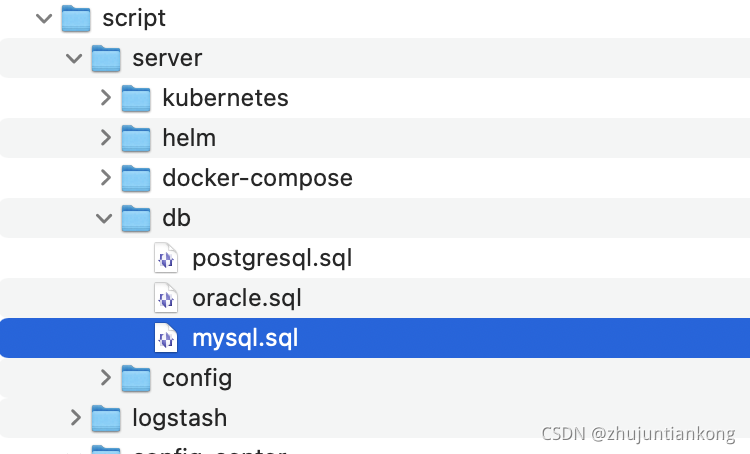
在源码目录:seata-1.4.2/script/server/db/mysql.sql
拿到seata所依赖的表结构,创建seata库,然后执行


分别是:分支表、全局表、锁表
5.启动seata-server

sh ./bin/seata-server.sh -p 8091 -h 127.0.0.1 -m db
| 参数 | 全写 | 作用 | 备注 |
|---|---|---|---|
| -h | –host | 指定在注册中心注册的 IP | 不指定时获取当前的 IP,外部访问部署在云环境和容器中的 server 建议指定 |
| -p | –port | 指定 server 启动的端口 | 默认为 8091 |
| -m | –storeMode | 事务日志存储方式 | 支持file,db,redis,默认为 file 注:redis需seata-server 1.3版本及以上 |
| -n | –serverNode | 用于指定seata-server节点ID | 如 1,2,3…, 默认为 1 |
| -e | –seataEnv | 指定 seata-server 运行环境 | 如 dev, test 等, 服务启动时会使用 registry-dev.conf 这样的配置 |
注意此处还有个坑: 启动时会报找不到事务分组,所以我手动又加了个service.vgroupMapping.my_test_tx_grouppei配置


有点尴尬,不知道是1.4.2的bug漏掉了从seataServer.properties里拿这个配置,还是我这里才会这样。
然后启动,搞定,在nacos查看服务

二、项目整合seata
需在pom.xml中引入的依赖,springcloud alibaba的方便之处就在于,seata-spring-boot-starter已经整合了seata全部事务xid的自动传递。
因为spring-cloud-starter-alibaba-seata最高版本还没整合1.4.2,所以需要手动指定一下
注意:凡是涉及分布式事务的服务都需要引入seata的依赖和配置。
<dependency>
  <groupId>com.alibaba.cloud</groupId>
  <artifactId>spring-cloud-starter-alibaba-seata</artifactId>
  <exclusions>
      <exclusion>
          <groupId>io.seata</groupId>
          <artifactId>seata-spring-boot-starter</artifactId>
      </exclusion>
  </exclusions>
</dependency>
<dependency>
  <groupId>io.seata</groupId>
  <artifactId>seata-spring-boot-starter</artifactId>
  <version>1.4.2</version>
</dependency>
再bootstrap.yml中加入seata配置
seata:
  tx-service-group: my_test_tx_group  #对应seataServer.properties中的service.vgroupMapping.my_test_tx_group 集群分组
  registry:
    type: nacos   #注册中心类型:nacos
    nacos:
      application: seata-server      # seata-server注册在nacos中的服务名
      server-addr: 127.0.0.1:8848    # nacos的地址端口
      group : SEATA_GROUP            # seata-server在nacos的分组
      namespace: seata_dev           # seata-server在nacos的命名空间ID
      username: nacos                # nacos账号
      password: nacos                # nacos密码
  config:
    type: nacos
    nacos:
      server-addr: 127.0.0.1:8848
      group: SEATA_GROUP
      namespace: seata_dev                 # seata-server的配置文件的命名空间ID
      dataId: seataServer.properties       # seata-server在nacos的配置dataId
      username: nacos
      password: nacos

创建UNDO_LOG表
在涉及到分布式事务微服务的各个数据库,都需要新增这张表。
作用: 该表是用来记录事务前和事务后的镜像,当需要回滚的时候,TC发送回滚指令,本地的RM就可以通过branch_id和xid来找到需要回滚的信息,进行回滚。
-- 注意此处0.3.0+ 增加唯一索引 ux_undo_log
CREATE TABLE `undo_log` (
  `id` bigint(20) NOT NULL AUTO_INCREMENT,
  `branch_id` bigint(20) NOT NULL,
  `xid` varchar(100) NOT NULL,
  `context` varchar(128) NOT NULL,
  `rollback_info` longblob NOT NULL,
  `log_status` int(11) NOT NULL,
  `log_created` datetime NOT NULL,
  `log_modified` datetime NOT NULL,
  `ext` varchar(100) DEFAULT NULL,
  PRIMARY KEY (`id`),
  UNIQUE KEY `ux_undo_log` (`xid`,`branch_id`)
) ENGINE=InnoDB AUTO_INCREMENT=1 DEFAULT CHARSET=utf8;
启动项目

到此,我们已经整合好了。
三、测试seata
说明: 本次测试seata的AT模式,无代码侵入,只需一个注解@GlobalTransactional 简直不要太爽。
为了少点文字,直接上图啦

第二行goodsCategoryFeignApi.add(this.buildGoodsCategory());是会报错的。
断点第二行,看日志发现已经生成了xid,说明开启了事务

第一行数据已经执行成功

生成了回滚记录

第一行的数据已经存入表中

放开断点,执行第二行代码,发现报错了,日志显示进行了回滚

刷新undo_log表发现刚才的回滚记录数据已删除,说明已经回滚成功

查看该表,发现刚才添加的数据已经回滚。

由此可见,seata已经成功整合。
四、seata1.4.2不回滚的坑
1、各微服务中使用了全局异常捕捉处理
@RestControllerAdvice 这个注解把服务抛出的异常给提前捕捉处理掉了,导致seata无法捕捉到该异常,导致seata认为本次没有问题,而执行commit操作,不进行回滚。

既然发现问题了,解决办法也简单,就是写个aop切面,进行拦截异常,并手动进行回滚
@Aspect
@Component
@Slf4j
public class SeataTransactionAspect {

    @Before("execution(* com.pig.test.*.service.*.*(..))")
    public void before(JoinPoint joinPoint) {
        String xid = RootContext.getXID();
        if (StringUtils.hasText(xid)) {
            MethodSignature signature = (MethodSignature) joinPoint.getSignature();
            Method method = signature.getMethod();
            log.info("分布式事务开启: xid={}, method={}", xid, method.getDeclaringClass() + "." + method.getName());
        }
    }

    @AfterThrowing(throwing = "e", pointcut = "execution(* com.pig.test.*.service.*.*(..))")
    public void doRecoveryActions(Throwable e) throws TransactionException {
        String xid = RootContext.getXID();
        if (StringUtils.hasText(xid)) {
            log.info("分布式事务方法执行异常,进行事务回滚,xid={}, e={}", xid, e.getMessage());
            GlobalTransactionContext.reload(xid).rollback();
        }
    }
}
2、使用feign降级,导致回滚失败
当项目中使用了feign服务降级
feign:
  hystrix:
    enabled: true
@Component
@Slf4j
public class CreditFallBackFactory implements FallbackFactory<CreditFeign> {

    @Autowired
    private WorkAspect workAspect;

    @Override
    public CreditFeign create(Throwable throwable) {
        /**
         * 手动进行事务回滚
         */
        try {
            this.workAspect.doRecoveryActions(throwable);
        } catch (TransactionException e) {
            e.printStackTrace();
        }
        return new CreditFeign() {
            @Override
            public void increaseAmount(Bonus bonus) {
                log.info("服务降级 {}", throwable);
            }
        };
    }
}
参考资料: http://seata.io/zh-cn/docs/overview/what-is-seata.html
https://blog.csdn.net/qq_36155375/article/details/115950439