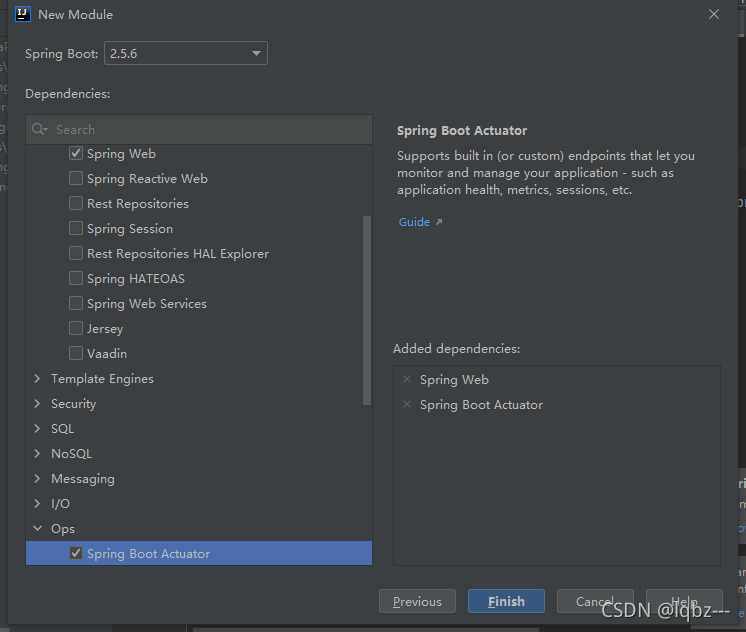
SpringBoot 自带控制功能Actuator,可以帮助实现对程序内部运行情况监控,比如监控状态、Bean加载情况、配置属性、日志信息等。
使用步骤
- 导入坐标
- 访问http://localhost:8080/actuator
新建模块,选择web、Actuator两个依赖

访问后返回
{"_links":{"self":{"href":"http://localhost:8080/actuator","templated":false},"health":{"href":"http://localhost:8080/actuator/health","templated":false},"health-path":{"href":"http://localhost:8080/actuator/health/{*path}","templated":true}}}
访问health,http://localhost:8080/actuator/health
{"status":"UP"}
开启健康检查的完整信息
application.properties文件添加
management.endpoint.health.show-details=always
返回,当前只有磁盘健康检查
{"status":"UP","components":{"diskSpace":{"status":"UP","details":{"total":262142947328,"free":137631236096,"threshold":10485760,"exists":true}},"ping":{"status":"UP"}}}
添加redis坐标后
        <dependency>
            <groupId>org.springframework.boot</groupId>
            <artifactId>spring-boot-starter-data-redis</artifactId>
        </dependency>
返回
{"status":"DOWN","components":{"diskSpace":{"status":"UP","details":{"total":262142947328,"free":137631236096,"threshold":10485760,"exists":true}},"ping":{"status":"UP"},"redis":{"status":"DOWN","details":{"error":"org.springframework.data.redis.RedisConnectionFailureException: Unable to connect to Redis; nested exception is io.lettuce.core.RedisConnectionException: Unable to connect to localhost:6379"}}}}
基本的只有health与info两个信息,可以继续在application.properties文件通过以下开启所有的监控暴露出来
management.endpoints.web.exposure.include=*
访问http://localhost:8080/actuator
{"_links":{"self":{"href":"http://localhost:8080/actuator","templated":false},"beans":{"href":"http://localhost:8080/actuator/beans","templated":false},"caches-cache":{"href":"http://localhost:8080/actuator/caches/{cache}","templated":true},"caches":{"href":"http://localhost:8080/actuator/caches","templated":false},"health":{"href":"http://localhost:8080/actuator/health","templated":false},"health-path":{"href":"http://localhost:8080/actuator/health/{*path}","templated":true},"info":{"href":"http://localhost:8080/actuator/info","templated":false},"conditions":{"href":"http://localhost:8080/actuator/conditions","templated":false},"configprops":{"href":"http://localhost:8080/actuator/configprops","templated":false},"configprops-prefix":{"href":"http://localhost:8080/actuator/configprops/{prefix}","templated":true},"env":{"href":"http://localhost:8080/actuator/env","templated":false},"env-toMatch":{"href":"http://localhost:8080/actuator/env/{toMatch}","templated":true},"loggers":{"href":"http://localhost:8080/actuator/loggers","templated":false},"loggers-name":{"href":"http://localhost:8080/actuator/loggers/{name}","templated":true},"heapdump":{"href":"http://localhost:8080/actuator/heapdump","templated":false},"threaddump":{"href":"http://localhost:8080/actuator/threaddump","templated":false},"metrics-requiredMetricName":{"href":"http://localhost:8080/actuator/metrics/{requiredMetricName}","templated":true},"metrics":{"href":"http://localhost:8080/actuator/metrics","templated":false},"scheduledtasks":{"href":"http://localhost:8080/actuator/scheduledtasks","templated":false},"mappings":{"href":"http://localhost:8080/actuator/mappings","templated":false}}}
Spring Boot Admin
- Spring Boot Admin是一个开源社区项目,用于管理和监控SpringBoot应用程序。
- Spring Boot Admin有两个角色,客户端和服务器
- 应用程序作为Spring Boot Admin Client向Spring Boot Admin Server注册
- Spring Boot Admin Server的UI界面将Spring Boot Admin Client的Actuator Endpoint上的一些监控信息
使用步骤
admin-server
- 创建admin-server模块
- 导入依赖坐标admin-starter-server
- 在引导类上启用监控功能@EnableAdminServer
admin-client
- 创建admin-client模块
- 导入依赖坐标admin-starter-client
- 配置相关信息:server地址等
- 启动server和client服务,访问server
新建两个模块springboot-admin-client与springboot-admin-server

springboot-admin-server模块
application.properties添加端口
server.port=9000
springboot-admin-client模块
#admin.server地址
spring.boot.admin.client.url=http://localhost:9000

#开启健康检查的完整信息
management.endpoint.health.show-details=always
#开启所有的检查
management.endpoints.web.exposure.include=*
先启动server再启动client,在client日志中会打印注册的server

访问http://localhost:9000/

应用墙性能中显示访问过的URL

此时在springboot-admin-client模块,添加一个UserController
package com.yy.springbootadminclient;


import org.springframework.web.bind.annotation.RequestMapping;
import org.springframework.web.bind.annotation.RestController;

@RestController
@RequestMapping("/user")
public class UserController {

    @RequestMapping("findAll")
    public String findAll(){
        return "Success";
    }
}
访问一次后

此时再到监控网页查看

多访问几次再查看监控也随着变化

IDE中也集成了些类功能
