Spring Security简介
Spring Security是一个高度自定义的安全框架。利用Spring IOC/DI和AOP功能,为系统提供了声明式安全访问控制功能,减少了为系统安全而编写大量重复代码的工作
spring security 的核心功能主要包括:
- 认证 (系统认证用户是否登录)
- 授权 (系统判断用户是否有权限去做某些事情)
- 攻击防护 (防止伪造身份)
Spring Security项目搭建
一:导入依赖
 <!--导入spring security依赖-->
        <dependency>
            <groupId>org.springframework.boot</groupId>
            <artifactId>spring-boot-starter-security</artifactId>
            <version>2.5.2</version>
        </dependency>
二:访问页面
导入spring-boot-starter-security启动器后,spring security已经生效了,默认拦截全部请求,如果没有登录页面,则回跳转到内置登录页面
默认的username为user password打印在控制台上

UserDetailsService详解
当什么也没有配置的时候,账号和密码是由Spring Security定义生成的。而实际项目中账号和密码都是从数据库中查询出来的,所以我们要通过自定义逻辑控制认证逻辑
如果需要自定义逻辑时,只需要实现UserDetailsService接口即可,如
public interface UserDetailsService {
    public UserDetails loadUserByUsername(String var1) throws UsernameNotFoundException;
}
返回值
返回值UserDetails是一个接口,定义如下:
public interface UserDetails extends Serializable {
Collection<? extends GrantedAuthority> getAuthorities();//获取所有权限
String getPassword();//获取密码

String getUsername();//获取用户名

boolean isAccountNonExpired();//账号是否过期

boolean isAccountNonLocked();//账号是否被锁定

boolean isCredentialsNonExpired();//凭证(密码)是否过期

boolean isEnabled();	//是否可用
}
想要返回UserDetails的实例就只能返回接口的实现类。Spring Security中提供了如下实例。对于我们只需要使用里面的User类即可,注意User的权限路径是:
org.springframework.security.core.userdetails.User;
PasswordEncoder密码解析器
Spring Security要求容器中必须有PasswordEncoder实例,所以当自定义登录逻辑时要求必须给容器注入PasswordEncoder的bean对象
接口介绍
encode():把参数按照特定的解析规则进行解析
matches():验证从存储中获取的编码密码与编码后提交的原始密码是否匹配,如何密码匹配,则返回true,如果不匹配则返回false,第一个参数表示需要解析的密码,第二个参数表示存储的密码
upgradeEncoding():如果解析的密码能够再次进行解析且达到更安全的结果,则返回true,否则返回false,默认返回false
securityConfig
package com.zuxia.config;

import org.springframework.context.annotation.Bean;
import org.springframework.context.annotation.Configuration;
import org.springframework.security.crypto.bcrypt.BCryptPasswordEncoder;
import org.springframework.security.crypto.password.PasswordEncoder;

@Configuration
public class SecurityConfig {
	//PasswordEncoder的实例
    @Bean
    protected PasswordEncoder passwordEncoder(){
        return new BCryptPasswordEncoder();
    }
}
UserDetailsService接口的实现类
package com.zuxia.security.service.impl;

import com.zuxia.security.service.UserDetailsService;
import org.springframework.beans.factory.annotation.Autowired;
import org.springframework.security.core.authority.AuthorityUtils;
import org.springframework.security.core.userdetails.User;
import org.springframework.security.core.userdetails.UserDetails;
import org.springframework.security.core.userdetails.UsernameNotFoundException;
import org.springframework.security.crypto.password.PasswordEncoder;
import org.springframework.stereotype.Service;

@Service
public class UserDetailsServiceImpl implements UserDetailsService{
    @Autowired
    private PasswordEncoder passwordEncoder;
    @Override
    public UserDetails loadUserByUsername(String username)  throws UsernameNotFoundException{
        if (!username.equals("admin")) {
            throw new UsernameNotFoundException("用户不存在");
        }
        String password="pwd";
        //调用加密的方法进行加密,应该是从数据库中查到的
        String encodePassword=passwordEncoder.encode(password);
        UserDetails userDetails = new User(username, encodePassword, AuthorityUtils.commaSeparatedStringToAuthorityList("admin1,admin2"));
        return userDetails;
    }
}
测试类
package com.zuxia.test;

import com.zuxia.SpringSecurityProjectApplication;
import org.junit.runner.RunWith;
import org.springframework.boot.test.context.SpringBootTest;
import org.springframework.security.crypto.bcrypt.BCryptPasswordEncoder;
import org.springframework.security.crypto.password.PasswordEncoder;
import org.springframework.test.context.junit4.SpringJUnit4ClassRunner;

@SpringBootTest(classes = SpringSecurityProjectApplication.class)
@RunWith(SpringJUnit4ClassRunner.class)
public class Test {
    @org.junit.jupiter.api.Test
    public  void test(){
        PasswordEncoder encoder=new BCryptPasswordEncoder();
        String result = encoder.encode("pwd");
        System.out.println(result);

        boolean match=encoder.matches("pwd",result);
        //System.out.println(match);
    }
}
自定义登录页面和登录页面name属性名的改变
虽然 Spring Security 给我们提供了登录页面,但是对于实际项目中,大多喜欢使用自己的登录页面。所以 Spring Security 中不仅仅提供了登录页面,还支持用户自定义登录页面。实现过程也比较简单,只需要修改配置类即可。
- 编写登录页面
<!DOCTYPE html>
<html lang="en">
<head>
    <meta charset="UTF-8">
    <title>Title</title>
</head>
<body>
    <form action="/login" method="post">
        登录: <input type="text" name="username">
        密码:<input type="password" name="password">
        <input type="submit" value="登录">
    </form>
</body>
</html>
- 修改配置类
修改配置类中主要是设置哪个页面是登录页面。配置类需要继承WebSecurityConfigurerAdapter,并重写 configure 方法。
- successForwardUrl():登录成功后跳转地址
- loginPage() :登录页面
- loginProcessingUrl:登录页面表单提交地址,此地址可以不真实存在。
- antMatchers():匹配内容
- permitAll():允许
package com.zuxia.config;

import com.zuxia.security.service.impl.UserDetailsServiceImpl;
import org.springframework.context.annotation.Bean;
import org.springframework.context.annotation.Configuration;
import org.springframework.security.config.annotation.web.builders.HttpSecurity;
import org.springframework.security.config.annotation.web.configuration.WebSecurityConfigurerAdapter;
import org.springframework.security.crypto.bcrypt.BCryptPasswordEncoder;
import org.springframework.security.crypto.password.PasswordEncoder;

@Configuration
public class SecurityConfig extends WebSecurityConfigurerAdapter {
    @Override
    protected void configure(HttpSecurity http) throws Exception {
        //自定义登录页面
        http.formLogin()
                //自定义登录页面
                .loginPage("/login.html")
                //自定义登录逻辑
               .loginProcessingUrl("/login")
                //自定义登录成功页面 必须为POST请求方式
                .successForwardUrl("/toindex")
                .failureForwardUrl("/toerroe")
                //改变登录路径的方式
               // .successHandler(new MyAuthenticationHandler("http://www.baidu.com"))
                .failureHandler(new MyAuthenticationHandler("error.html"))
                //自定义登录失败页面  必须为POST请求方式
                .failureForwardUrl("/error.html")
                //自定义登录页面的name值
                .usernameParameter("username")
                .passwordParameter("password");
        //授权
        http.authorizeRequests()
                //放行登录和失败页面的路径
                .antMatchers("/login.html").permitAll()
                .antMatchers("/errot.html").permitAll()
                //拦截所有请求
                .anyRequest().authenticated();
        //关闭csrf
        http.csrf().disable();
    }

    //PasswordEncoder的实例
    @Bean
    protected PasswordEncoder passwordEncoder(){
        return new BCryptPasswordEncoder();
    }
}
- 编写控制器
package com.zuxia.controller;

import org.springframework.stereotype.Controller;
import org.springframework.web.bind.annotation.RequestMapping;
import org.springframework.web.bind.annotation.ResponseBody;

@Controller
public class TestController {

    @RequestMapping("/toindex")
    public String toindex(){
        return "redirect:index.html";
    }

    @RequestMapping("/toerror")
    public String toerror(){
        return "redirect:error.html";
    }
}
自定义登录逻辑
package com.zuxia.bean;

import org.springframework.security.core.Authentication;
import org.springframework.security.core.AuthenticationException;
import org.springframework.security.web.authentication.AuthenticationFailureHandler;
import org.springframework.security.web.authentication.AuthenticationSuccessHandler;

import javax.servlet.FilterChain;
import javax.servlet.ServletException;
import javax.servlet.http.HttpServletRequest;
import javax.servlet.http.HttpServletResponse;
import java.io.IOException;

/**
 * 自定义登录成功/失败逻辑
 */
public class MyAuthenticationHandler implements AuthenticationSuccessHandler, AuthenticationFailureHandler {
    private final String url;

    public MyAuthenticationHandler(String url) {
        this.url = url;
    }
    //将登录成功后必须用post请求跳转成功页面改为用get
    @Override
    public void onAuthenticationSuccess(HttpServletRequest httpServletRequest, HttpServletResponse httpServletResponse, Authentication authentication) throws IOException, ServletException {
        httpServletResponse.sendRedirect(url);
    }
    //将登录失败后必须用post请求跳转成功页面改为用get
    @Override
    public void onAuthenticationFailure(HttpServletRequest httpServletRequest, HttpServletResponse httpServletResponse, AuthenticationException e) throws IOException, ServletException {
        httpServletResponse.sendRedirect(url);
    }
}
修改登录成功失败的路径
package com.zuxia.bean;

import org.springframework.context.annotation.Bean;
import org.springframework.context.annotation.Configuration;
import org.springframework.security.config.annotation.web.builders.HttpSecurity;
import org.springframework.security.config.annotation.web.configuration.WebSecurityConfigurerAdapter;
import org.springframework.security.crypto.bcrypt.BCryptPasswordEncoder;
import org.springframework.security.crypto.password.PasswordEncoder;


@Configuration
public class SecurityConfig extends WebSecurityConfigurerAdapter {
    @Override
    protected void configure(HttpSecurity http) throws Exception {
        //表单登录
        http.formLogin()
                //自定义登录页面
                .loginPage("/login.html")
                //自定义登录逻辑
                .loginProcessingUrl("/login")
                //登录成功后跳转的页面,必须为post请求
                //.successForwardUrl("/toMain")
                //将登录成功后跳转的页面方式改为get,要自定义登录成功逻辑 MyAuthenticationHandler
                .successHandler(new MyAuthenticationHandler("http://www.baidu.com"))
                //登录失败后跳转的页面
                 //.failureForwardUrl("/toError")
                .failureHandler(new MyAuthenticationHandler("/error.html"))
                //自定义登录页面登录名和登录密码的name属性值,否则必须为username和password
                  .usernameParameter("LoginName")
                  .passwordParameter("LoginPwd");


        //授权
        http.authorizeRequests()
                //放行登录页面
                .antMatchers("/login.html").permitAll()
                //方行失败页面
                .antMatchers("/error.html").permitAll()
                //所有的请求都必须被认证后才可以访问
                .anyRequest().authenticated();

        //关闭csrf防护
        http.csrf().disable();
    }

    @Bean
    public PasswordEncoder getPasswordEncoder(){
        return new BCryptPasswordEncoder();
    }
}
自定义403
- 实现AccessDeniedHandler接口
重写handle方法
package com.zuxia.bean;

import org.springframework.security.access.AccessDeniedException;
import org.springframework.security.web.access.AccessDeniedHandler;
import org.springframework.stereotype.Component;

import javax.servlet.ServletException;
import javax.servlet.http.HttpServletRequest;
import javax.servlet.http.HttpServletResponse;
import java.io.IOException;
import java.io.PrintWriter;
@Component
public class MyAccessDeniedHander implements AccessDeniedHandler {
    @Override
    public void handle(HttpServletRequest httpServletRequest, HttpServletResponse httpServletResponse, AccessDeniedException e) throws IOException, ServletException {
        httpServletResponse.setStatus(HttpServletResponse.SC_FORBIDDEN);
        httpServletResponse.setContentType("application/json;charset=utf-8");
        PrintWriter writer= httpServletResponse.getWriter();
        writer.write("{\"status\":\"403\",msg:\"权限不足,请联系管理员\"}");
        writer.flush();
        writer.close();
    }
}
2.配置类中注入MyAccessDeniedHander对象
@Autowired
    private MyAccessDeniedHander myAccessDeniedHander;

  //自定义异常
        http.exceptionHandling()
                .accessDeniedHandler(myAccessDeniedHander);
自定义权限
RememberMe功能实现
Spring Security 中 Remember Me 为“记住我”功能,用户只需要在登录时添加 remember-me复选框,取值为true。Spring Security 会自动把用户信息存储到数据源中,以后就可以不登录进行访问
- 添加依赖
Spring Security 实 现 Remember Me 功 能 时 底 层 实 现 依 赖Spring-JDBC,所以需要导入 Spring-JDBC。以后多使用 MyBatis 框架而很少直接导入 spring-jdbc,所以此处导入 mybatis 启动器同时还需要添加 MySQL 驱动
<!-- mybatis 依赖 -->
<dependency>
   <groupId>org.mybatis.spring.boot</groupId>
   <artifactId>mybatis-spring-boot-starter</artifactId>
   <version>2.1.1</version>
</dependency>
<!-- mysql 数据库依赖 -->
<dependency>
   <groupId>mysql</groupId>
   <artifactId>mysql-connector-java</artifactId>
   <version>8.0.18</version>
</dependency>
- 配置数据源
在 application.properties 中配置数据源。请确保数据库中已经存在shop数据库
server:
  port: 8888

mybatis:
  type-aliases-package: com.zuxia.entity
  mapper-locations: classpath:mapper/*.xml
#
## 数据源配置
spring:
  datasource:
    type: com.alibaba.druid.pool.DruidDataSource
    driverClassName: com.mysql.jdbc.Driver
    url: jdbc:mysql://localhost:3306/userdb?useUnicode=true&characterEncoding=utf-8
    username: root
    # 1.配置生成的password
    password: 123456
    #   Druid数据源配置
    # 初始连接数
    initialSize: 5
    # 最小连接池数量
    minIdle: 10
    # 最大连接池数量
    maxActive: 20
    # 配置获取连接等待超时的时间
    maxWait: 60000
    # 配置间隔多久才进行一次检测,检测需要关闭的空闲连接,单位是毫秒
    timeBetweenEvictionRunsMillis: 60000
    # 配置一个连接在池中最小生存的时间,单位是毫秒
    minEvictableIdleTimeMillis: 300000
    # 配置一个连接在池中最大生存的时间,单位是毫秒
    maxEvictableIdleTimeMillis: 900000
    # 配置检测连接是否有效
    validationQuery: SELECT 1 FROM DUAL
    #申请连接的时候检测,如果空闲时间大于timeBetweenEvictionRunsMillis,执行validationQuery检测连接是否有效。
    testWhileIdle: true
    #配置从连接池获取连接时,是否检查连接有效性,true每次都检查;false不检查。做了这个配置会降低性能。
    testOnBorrow: false
    #配置向连接池归还连接时,是否检查连接有效性,true每次都检查;false不检查。做了这个配置会降低性能。
    testOnReturn: false
    #打开PsCache,并且指定每个连接上PSCache的大小
    poolPreparedStatements: true
    maxPoolPreparedStatementPerConnectionSize: 20
    #   配置监控统计拦截的filters,去掉后监控界面sql无法统计,'wall'用于防火墙
    filters: stat,wall,log4j
    #合并多个DruidDatasource的监控数据
    useGlobalDataSourceStat: true
    #通过connectProperties属性来打开mergesql功能罗慢sQL记录
    connectionProperties: druid.stat.mergeSql=true;druid.stat.slowSqlMillis=500;
    #配置DruidStatFilter
    web-view-servlet:
      enabled: true
      url-pattern: "/*"
      exclusions: ".js,*.gif,*.jpg,*.bmp,*.png,*.css,*.ico,/druid/*"
    # 配置 DruidStatViewServlet
    stat-view-servlet:
      url-pattern: "/druid/*"
      # IP 白名单,没有配置或者为空,则允许所有访问
      allow: 127.0.0.1
      # IP 黑名单,若白名单也存在,则优先使用
      deny: 192.168.31.253
      # 禁用 HTML 中 Reset All 按钮
      reset-enable: false
      # 登录用户名/密码
      login-username: root
      login-password: 123
- 编写配置
注入登录逻辑和数据源
编写配置类和记住我配置
@Autowired
    private UserDetailsServiceImpl userDetailsService;

    @Autowired
    private DataSource dataSource;
 @Bean
   public PersistentTokenRepository getPersistentTokenRepository(){
      JdbcTokenRepositoryImpl jdbcTokenRepository = new JdbcTokenRepositoryImpl();
      jdbcTokenRepository.setDataSource(dataSource);
      //自动建表,第一次启动时需要,第二次启动时注释掉
      jdbcTokenRepository.setCreateTableOnStartup(true);
      return jdbcTokenRepository;
   }
//记住我
        http.rememberMe()
                //自定义name属性值
                .rememberMeParameter("renbername")
                //设置失效时间,默认为两周
                //.tokenValiditySeconds(1200)
                //自定义记住我的时间
                //.rememberMeServices("fdsaf")
                //自定义登录逻辑
                .userDetailsService(userDetailsService)
                //指定存储位置
                .tokenRepository(tokenRepository());
 @Bean
   public PersistentTokenRepository getPersistentTokenRepository(){
      JdbcTokenRepositoryImpl jdbcTokenRepository = new JdbcTokenRepositoryImpl();
      jdbcTokenRepository.setDataSource(dataSource);
      //自动建表,第一次启动时需要,第二次启动时注释掉
      jdbcTokenRepository.setCreateTableOnStartup(true);
      return jdbcTokenRepository;
   }
如:
package com.zuxia.config;

import com.zuxia.security.service.impl.UserDetailsServiceImpl;
import org.springframework.beans.factory.annotation.Autowired;
import org.springframework.context.annotation.Bean;
import org.springframework.context.annotation.Configuration;
import org.springframework.context.annotation.EnableMBeanExport;
import org.springframework.security.config.annotation.web.builders.HttpSecurity;
import org.springframework.security.config.annotation.web.configuration.WebSecurityConfigurerAdapter;
import org.springframework.security.crypto.bcrypt.BCryptPasswordEncoder;
import org.springframework.security.crypto.password.PasswordEncoder;
import org.springframework.security.web.authentication.rememberme.JdbcTokenRepositoryImpl;
import org.springframework.security.web.authentication.rememberme.PersistentTokenRepository;

import javax.sql.DataSource;

@Configuration
public class SecurityConfig extends WebSecurityConfigurerAdapter {
    @Autowired
    private MyAccessDeniedHandler accessDeniedHandler;


    @Autowired
    private UserDetailsServiceImpl userDetailsService;

    @Autowired
    private DataSource dataSource;
    @Override
    protected void configure(HttpSecurity http) throws Exception {
        //自定义登录页面
        http.formLogin()
                //自定义登录页面
                .loginPage("/login.html")
                //自定义登录逻辑
               .loginProcessingUrl("/login")
                //自定义登录成功页面 必须为POST请求方式
                .successForwardUrl("/toindex")
                .failureForwardUrl("/toerroe")
                //改变登录路径的方式
               // .successHandler(new MyAuthenticationHandler("http://www.baidu.com"))
                .failureHandler(new MyAuthenticationHandler("error.html"))
                //自定义登录失败页面  必须为POST请求方式
                .failureForwardUrl("/error.html")
                //自定义登录页面的name值
                .usernameParameter("username")
                .passwordParameter("password");

        //授权
        http.authorizeRequests()
                //放行登录和失败页面的路径
                .antMatchers("/login.html").permitAll()
                .antMatchers("/errot.html").permitAll()
                //拦截所有请求
                .anyRequest().authenticated()
                //设置访问权限
                .antMatchers("/index1.html").hasAnyAuthority("admin1","admiN");
        //异常处理
        http.exceptionHandling()
                .accessDeniedHandler(accessDeniedHandler);
        //记住我
        http.rememberMe()
                //自定义name属性值
                .rememberMeParameter("renbername")
                //设置失效时间,默认为两周
                //.tokenValiditySeconds(1200)
                //登录逻辑交给哪个对象
                //.rememberMeServices("userinfo")
                //自定义登录逻辑
                .userDetailsService(userDetailsService)
                //指定存储位置
                .tokenRepository(tokenRepository());
        //关闭csrf
        http.csrf().disable();
    }

    //PasswordEncoder的实例
    @Bean
    protected PasswordEncoder passwordEncoder(){
        return new BCryptPasswordEncoder();
    }
    @Bean
    public PersistentTokenRepository tokenRepository(){
        JdbcTokenRepositoryImpl tokenRepository=new JdbcTokenRepositoryImpl();
        //设置数据源
        tokenRepository.setDataSource(dataSource);
        //启动时是否创建表,第一次要,之后注释掉
        tokenRepository.setCreateTableOnStartup(true);
        return tokenRepository;
    }
}
- 编写前端页面
<form action="/login" method="post">
    用户名:<input type="text" name="username" /><br/>
    密码:<input type="password" name="password" /><br/>
    <input type="checkbox" name="remember-me" value="true"/><br/>
    <input type="submit" value="登录" />
</form>
Thymeleaf中SpringSecurity的使用
Spring Security 可以在一些视图技术中进行控制显示效果。例如:JSP或 Thymeleaf。在非前后端分离且使用 Spring Boot 的项目中多使用 Thymeleaf作为视图展示技术。
1. Thymeleaf 对 Spring Security 的 支 持 都 放 在thymeleaf-extras-springsecurityX中,目前最新版本为 5。所以需要在项目中添加此 jar 包的依赖和 thymeleaf 的依赖。
<!--thymeleaf springsecurity5 依赖-->
<dependency>
   <groupId>org.thymeleaf.extras</groupId>
   <artifactId>thymeleaf-extras-springsecurity5</artifactId>
</dependency>
<!--thymeleaf依赖-->
<dependency>
   <groupId>org.springframework.boot</groupId>
   <artifactId>spring-boot-starter-thymeleaf</artifactId>
</dependency>
- 在 html 页面中引入 thymeleaf 命名空间和 security 命名空间
<html xmlns="http://www.w3.org/1999/xhtml"
      xmlns:th="http://www.thymeleaf.org"
      xmlns:sec="http://www.thymeleaf.org/thymeleaf-extras-springsecurity5">
获取属性
可以在html页面中通过sec:authentication=""获取
UsernamePasswordAuthenticationToken中所有 getXXX的内容,包含父类中的 getXXX的内容。
根据源码得出下面属性:
- name:登录账号名称
- principal:登录主体,在自定义登录逻辑中是 UserDetails
- credentials:凭证
- authorities:权限和角色
- details:实际上是 WebAuthenticationDetails的实例。可以获取remoteAddress(客户端 ip)和 sessionId(当前 sessionId)
- 新建demo.html
在项目 resources 中新建 templates 文件夹,在 templates 中新建demo.html 页面
<!DOCTYPE html>
<html xmlns="http://www.w3.org/1999/xhtml"
      xmlns:sec="http://www.thymeleaf.org/thymeleaf-extras-springsecurity5">
<head>
    <meta charset="UTF-8">
    <title>Title</title>
</head>
<body>
    登录账号:<span sec:authentication="name"></span><br/>
    登录账号:<span sec:authentication="principal.username"></span><br/>
    凭证:<span sec:authentication="credentials"></span><br/>
    权限和角色:<span sec:authentication="authorities"></span><br/>
    客户端地址:<span sec:authentication="details.remoteAddress"></span><br/>
    sessionId:<span sec:authentication="details.sessionId"></span><br/>
</body>
</html>
- 编写Controller
thymeleaf 页面需要控制转发,在控制器类中编写下面方法
 @RequestMapping("/demo")
public String demo(){
   return "demo";
}
权限判断
设置用户角色和权限
设定用户具有 admin,/insert,/delete 权限 ROLE_abc 角色。
return new User(username,password, AuthorityUtils.commaSeparatedStringToAuthorityList("admin,ROLE_abc,/insert,/delete"));
控制页面显示效果
在页面中根据用户权限和角色判断页面中显示的内容
通过权限判断:
<button sec:authorize="hasAuthority('/insert')">新增</button>
<button sec:authorize="hasAuthority('/delete')">删除</button>
<button sec:authorize="hasAuthority('/update')">修改</button>
<button sec:authorize="hasAuthority('/select')">查看</button>
<br/>
通过角色判断:
<button sec:authorize="hasRole('abc')">新增</button>
<button sec:authorize="hasRole('abc')">删除</button>
<button sec:authorize="hasRole('abc')">修改</button>
<button sec:authorize="hasRole('abc')">查看</button>
退出登录
用户只需要向 Spring Security 项目中发送/logout退出请求即可。
退出登录
实现退出非常简单,只要在页面中添加/logout 的超链接即可。
<a href="/logout">退出登录</a>
如果不希望使用默认值,可以通过下面的方法进行修改。
http.logout()
      .logoutUrl("/logout")
      .logoutSuccessUrl("/login.html");
logout其他常用配置源码解读
addLogoutHandler(LogoutHandler)
默认是 contextLogoutHandler

默认实例内容

clearAuthentication(boolean)
是否清除认证状态,默认为 true

invalidateHttpSession(boolean)
是否销毁 HttpSession 对象,默认为 true

logoutSuccessHandler(LogoutSuccessHandler)
退出成功处理器

也可以自己进行定义退出成功处理器。只要实现了LogoutSuccessHandler接口。与之前讲解的登录成功处理器和登录失败处理器极其类似。
SpringSecurity中的CSRF
从刚开始学习Spring Security时,在配置类中一直存在这样一行代码:http.csrf().disable();如果没有这行代码导致用户无法被认证。这行代码的含义是:关闭 csrf 防护。
什么是CSRF
CSRF(Cross-site request forgery)跨站请求伪造,也被称为“OneClick Attack” 或者 Session Riding。通过伪造用户请求访问受信任站点的非法请求访问。
跨域:只要网络协议,ip 地址,端口中任何一个不相同就是跨域请求。
客户端与服务进行交互时,由于 http 协议本身是无状态协议,所以引入了cookie进行记录客户端身份。在cookie中会存放session id用来识别客户端身份的。在跨域的情况下,session id 可能被第三方恶意劫持,通过这个 session id 向服务端发起请求时,服务端会认为这个请求是合法的,可能发生很多意想不到的事情。
2、Spring Security中的CSRF
从 Spring Security4开始CSRF防护默认开启。默认会拦截请求。进行CSRF处理。CSRF为了保证不是其他第三方网站访问,要求访问时携带参数名为_csrf值为token(token 在服务端产生)的内容,如果token和服务端的token匹配成功,则正常访问。
2.1、编写控制器方法
编写控制器方法,跳转到 templates 中 login.html 页面。
@RequestMapping("/showLogin")
public String showLogin(){
   return "login";
}
2.2、新建login.html
红色部分是必须存在的否则无法正常登录。
<!DOCTYPE html>
<html xmlns="http://www.w3.org/1999/xhtml"
      xmlns:th="http://www.thymeleaf.org"
>
<head>
    <meta charset="UTF-8">
    <title>Title</title>
</head>
<body>
<form action="/login" method="post">
    <input type="hidden" th:value="${_csrf.token}" name="_csrf" th:if="${_csrf}"/>
    用户名:<input type="text" name="username" /><br/>
    密码:<input type="password" name="password" /><br/>
    <input type="submit" value="登录" />
</form>
</body>
</html>
修改配置类
在配置类中注释掉 CSRF 防护失效
//关闭csrf防护
// http.csrf().disable();
Oauth2认证
Oauth2简介
简介
第三方认证技术方案最主要是解决认证协议的通用标准问题,因为要实现跨系统认证,各系统之间要遵循一定的接口协议。
OAUTH协议为用户资源的授权提供了一个安全的、开放而又简易的标准。同时,任何第三方都可以使用OAUTH认证服务,任何服务提供商都可以实现自身的OAUTH认证服务,因而OAUTH是开放的。业界提供了OAUTH的多种实现如PHP、JavaScript,Java,Ruby等各种语言开发包,大大节约了程序员的时间,因而OAUTH是简易的。互联网很多服务如Open API,很多大公司如Google,Yahoo,Microsoft等都提供了OAUTH认证服务,这些都足以说明OAUTH标准逐渐成为开放资源授权的标准。
Oauth协议目前发展到2.0版本,1.0版本过于复杂,2.0版本已得到广泛应用。
参考:https://baike.baidu.com/item/oAuth/7153134?fr=aladdin
Oauth 协议:https://tools.ietf.org/html/rfc6749
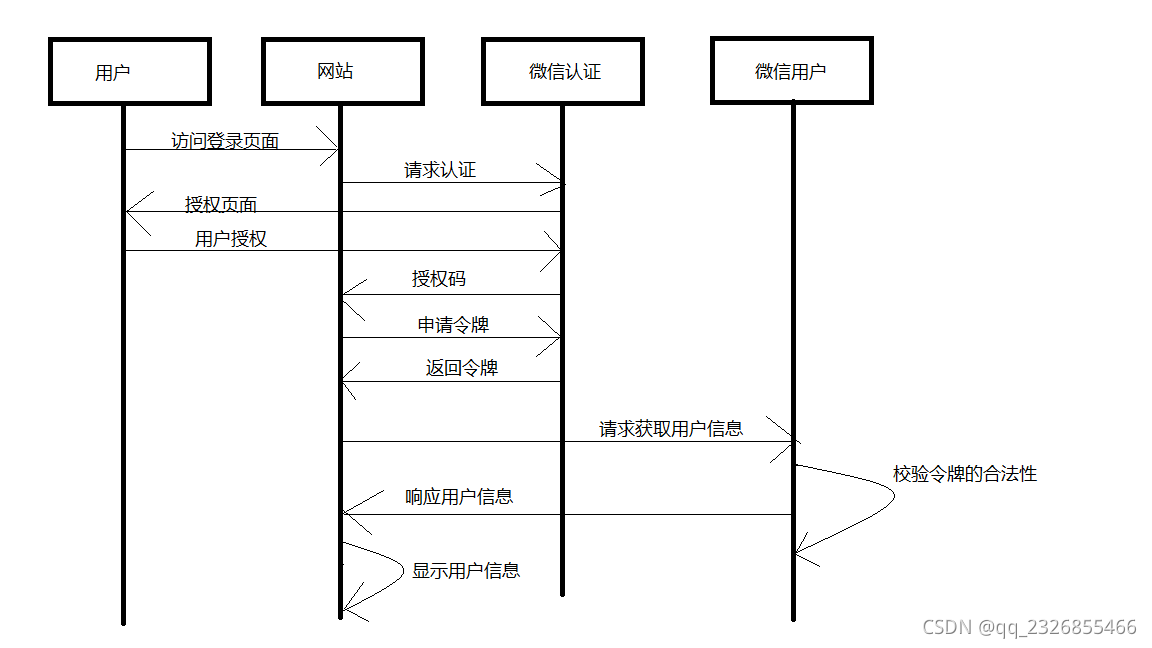
下边分析一个Oauth2认证的例子,网站使用微信认证的过程:

-
用户进入网站的登录页面,点击微信的图标以微信账号登录系统,用户是自己在微信里信息的资源拥有者。

-
点击“微信”出现一个二维码,此时用户扫描二维码,开始给网站授权。
-
资源拥有者同意给客户端授权
资源拥有者扫描二维码表示资源拥有者同意给客户端授权,微信会对资源拥有者的身份进行验证,验证通过后,微信会询问用户是否给授权网站访问自己的微信数据,用户点击“确认登录”表示同意授权,微信认证服务器会颁发一个授权码,并重定向到网站。 -
客户端获取到授权码,请求认证服务器申请令牌
此过程用户看不到,客户端应用程序请求认证服务器,请求携带授权码。 -
认证服务器向客户端响应令牌
认证服务器验证了客户端请求的授权码,如果合法则给客户端颁发令牌,令牌是客户端访问资源的通行证。此交互过程用户看不到,当客户端拿到令牌后,用户在网站看到已经登录成功。 -
客户端请求资源服务器的资源
客户端携带令牌访问资源服务器的资源。网站携带令牌请求访问微信服务器获取用户的基本信息。 -
资源服务器返回受保护资源
资源服务器校验令牌的合法性,如果合法则向用户响应资源信息内容。
注意:资源服务器和认证服务器可以是一个服务也可以分开的服务,如果是分开的服务资源服务器通常要请求认证服务器来校验令牌的合法性。
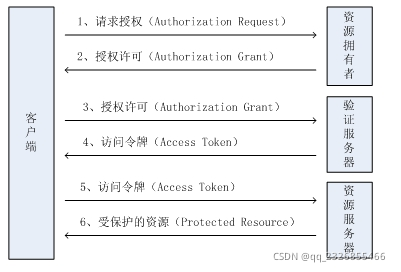
Oauth2.0认证流程如下:
引自Oauth2.0协议rfc6749 https://tools.ietf.org/html/rfc6749

角色
客户端
本身不存储资源,需要通过资源拥有者的授权去请求资源服务器的资源,比如:Android客户端、Web客户端(浏览器端)、微信客户端等。
资源拥有者
通常为用户,也可以是应用程序,即该资源的拥有者。
授权服务器(也称认证服务器)
用来对资源拥有的身份进行认证、对访问资源进行授权。客户端要想访问资源需要通过认证服务器由资源拥有者授权后方可访问。
资源服务器
存储资源的服务器,比如,网站用户管理服务器存储了网站用户信息,网站相册服务器存储了用户的相册信息,微信的资源服务存储了微信的用户信息等。客户端最终访问资源服务器获取资源信息。
常用术语
- 客户凭证(client Credentials):客户端的clientId和密码用于认证客户
- 令牌(tokens):授权服务器在接收到客户请求后,颁发的访问令牌
- 作用域(scopes):客户请求访问令牌时,由资源拥有者额外指定的细分权限(permission)
令牌类型
- 授权码:仅用于授权码授权类型,用于交换获取访问令牌和刷新令牌
- 访问令牌:用于代表一个用户或服务直接去访问受保护的资源
- 刷新令牌:用于去授权服务器获取一个刷新访问令牌
- BearerToken:不管谁拿到Token都可以访问资源,类似现金
- Proof of Possession(PoP) Token:可以校验client是否对Token有明确的拥有权
特点
优点:
 更安全,客户端不接触用户密码,服务器端更易集中保护

 广泛传播并被持续采用

 短寿命和封装的token

 资源服务器和授权服务器解耦

 集中式授权,简化客户端

 HTTP/JSON友好,易于请求和传递token

 考虑多种客户端架构场景

 客户可以具有不同的信任级别
缺点:
 协议框架太宽泛,造成各种实现的兼容性和互操作性差

 不是一个认证协议,本身并不能告诉你任何用户信息。
Spring Security Oauth2授权码模式
- 创建项目
- 导入依赖
 <dependency>
         <groupId>org.springframework.cloud</groupId>
         <artifactId>spring-cloud-starter-oauth2</artifactId>
      </dependency>
      <dependency>
         <groupId>org.springframework.cloud</groupId>
         <artifactId>spring-cloud-starter-security</artifactId>
      </dependency>
      <dependencyManagement>
      <dependencies>
         <dependency>
            <groupId>org.springframework.cloud</groupId>
            <artifactId>spring-cloud-dependencies</artifactId>
            <version>${spring-cloud.version}</version>
            <type>pom</type>
            <scope>import</scope>
         </dependency>
      </dependencies>
   </dependencyManagement>
3、编写实体类
package com.zuxia.entity;

import org.springframework.security.core.GrantedAuthority;
import org.springframework.security.core.userdetails.UserDetails;

import java.util.Collection;
import java.util.List;

/**
 * 用户类
 */
public class User implements UserDetails {
    private String username;
    private String password;
    private List<GrantedAuthority> authorities;
    @Override
    public Collection<? extends GrantedAuthority> getAuthorities() {
        return authorities;
    }

    @Override
    public String getPassword() {
        return password;
    }

    @Override
    public String getUsername() {
        return username;
    }

    @Override
    public boolean isAccountNonExpired() {
        return true;
    }

    @Override
    public boolean isAccountNonLocked() {
        return true;
    }

    @Override
    public boolean isCredentialsNonExpired() {
        return true;
    }

    @Override
    public boolean isEnabled() {
        return true;
    }
}
4.编写配置类
SecurityConfig.java
package com.zuxai.springsecurityoauth2demo.config;

import org.springframework.context.annotation.Bean;
import org.springframework.context.annotation.Configuration;
import org.springframework.security.config.annotation.web.builders.HttpSecurity;
import org.springframework.security.config.annotation.web.configuration.EnableWebSecurity;
import org.springframework.security.config.annotation.web.configuration.WebSecurityConfigurerAdapter;
import org.springframework.security.crypto.bcrypt.BCryptPasswordEncoder;
import org.springframework.security.crypto.password.PasswordEncoder;

/**
 * Spring Security 配置类
 *
 * @author zhoubin
 */
@Configuration
@EnableWebSecurity
public class SecurityConfig extends WebSecurityConfigurerAdapter {

   @Bean
   public PasswordEncoder passwordEncoder() {
      return new BCryptPasswordEncoder();
   }


   @Override
   public void configure(HttpSecurity http) throws Exception {
      http.csrf()
            .disable()//关闭csrf
            .authorizeRequests()//授权
            .antMatchers("/oauth/**", "/login/**", "/logout/**").permitAll()//放行授权服务器端点
            .anyRequest().authenticated()//拦截所有的请求
            .and()
            .formLogin().permitAll();//放行所有的表单请求
   }
}
5.编写自定义登录逻辑
UserService.java
package com.zuxia.springsecurityoauth2demo.service;

import com.yjxxt.springsecurityoauth2demo.pojo.User;
import org.springframework.beans.factory.annotation.Autowired;
import org.springframework.security.core.authority.AuthorityUtils;
import org.springframework.security.core.userdetails.UserDetails;
import org.springframework.security.core.userdetails.UserDetailsService;
import org.springframework.security.core.userdetails.UsernameNotFoundException;
import org.springframework.security.crypto.password.PasswordEncoder;
import org.springframework.stereotype.Service;

/**
 * @author zhoubin
 * @since 1.0.0
 */
@Service
public class UserService implements UserDetailsService {

   @Autowired
   private PasswordEncoder passwordEncoder;

   @Override
   public UserDetails loadUserByUsername(String username) throws UsernameNotFoundException {
      String password = passwordEncoder.encode("123456");
      return new User("admin",password, AuthorityUtils.commaSeparatedStringToAuthorityList("admin"));
   }
}