一、新建工程
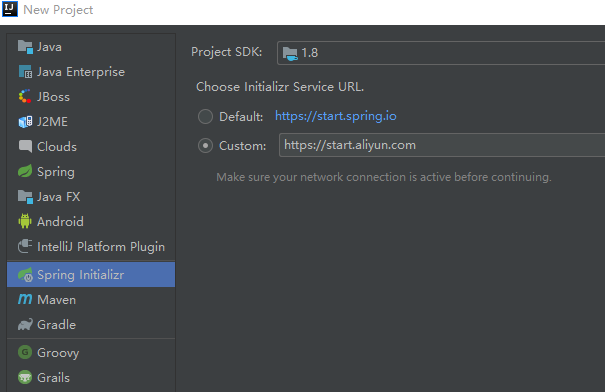
用阿里云创建一个springboot工程
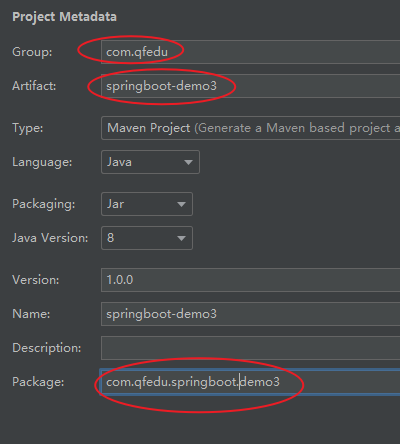
?随便取个组名、工程名、包名
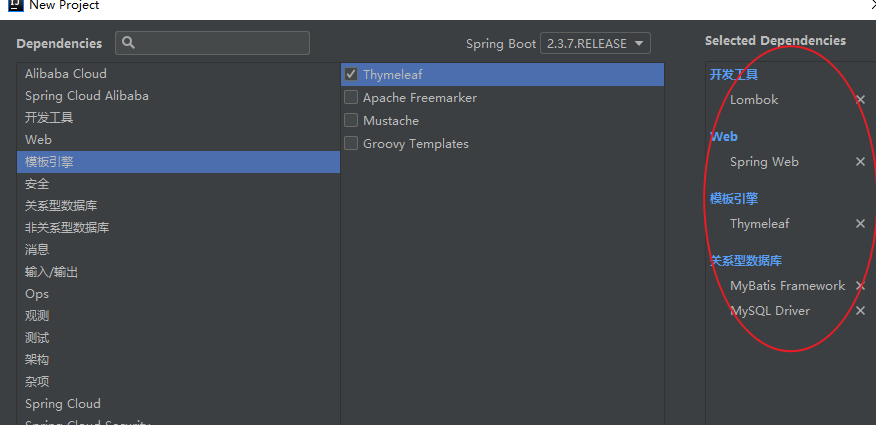
选择依赖,这里用thymeleaf当前端了
?随便选个路径,就建好项目了,边等待下载依赖边去建数据库
二、创建数据库
用navicat,随便建一个
create table if not exists books(
	id int PRIMARY key auto_increment,
	bookName varchar(20),
	price int,
	writer varchar(20)
)


delimiter $
create procedure mypro(in insertCount int)
BEGIN
	declare i int default 1;
	aa:while(i<insertCount)
	DO
		insert into books(bookName,price,writer) values(CONCAT('book',i),i*5,'jack' );
		set i = i+1;
		if(i>20) then LEAVE aa;
		end IF;
	end while aa;
end $

call mypro(20)

select * from books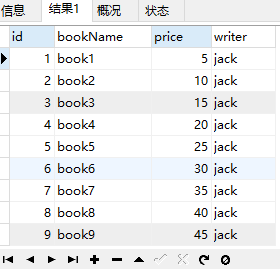
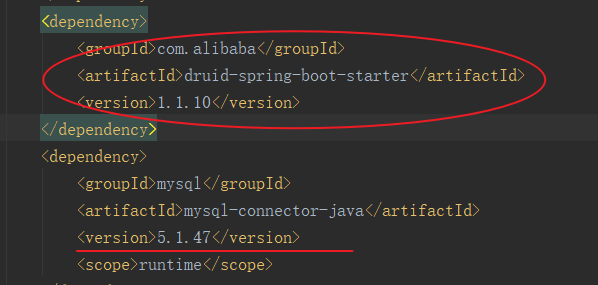
三、修改pom文件
加个druid,把mysql的版本改一改?
四、修改配置文件
因为加了druid,所以数据库的配置都要加个druid
另外就是修改要连接的数据库名,用户名,密码,驱动名?,entity前的mybatis去掉
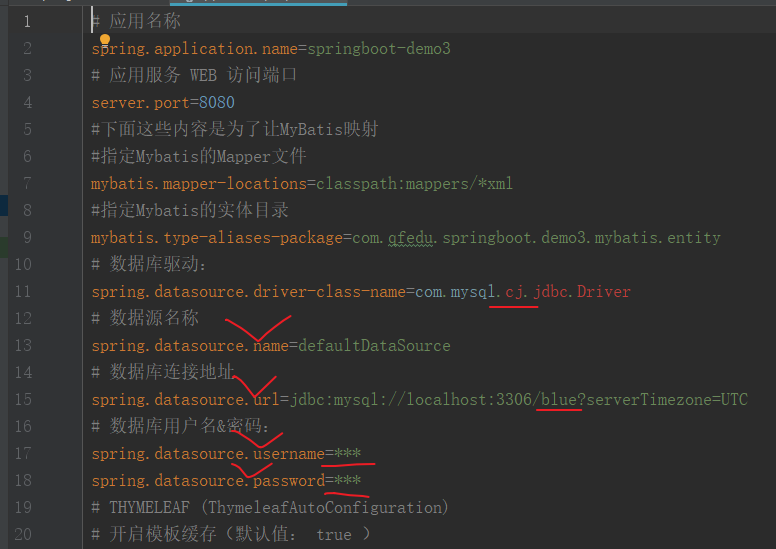
改完是这样的,thymeleaf相关的都不改,注意下要写数据库名,而不是表名
# 应用名称
spring.application.name=springboot-demo3
# 应用服务 WEB 访问端口
server.port=8080
#下面这些内容是为了让MyBatis映射
#指定Mybatis的Mapper文件
mybatis.mapper-locations=classpath:mappers/*xml
#指定Mybatis的实体目录
mybatis.type-aliases-package=com.qfedu.springboot.demo3.entity
# 数据库驱动:
spring.datasource.driver-class-name=com.mysql.jdbc.Driver
# 数据源名称
spring.datasource.name=defaultDataSource
# 数据库连接地址
spring.datasource.url=jdbc:mysql://localhost:3306/test?serverTimezone=UTC
# 数据库用户名&密码:
spring.datasource.username=root
spring.datasource.password=root
# THYMELEAF (ThymeleafAutoConfiguration)
# 开启模板缓存(默认值: true )
spring.thymeleaf.cache=true
# 检查模板是否存在,然后再呈现
spring.thymeleaf.check-template=true
# 检查模板位置是否正确(默认值 :true )
spring.thymeleaf.check-template-location=true
#Content-Type 的值(默认值: text/html )
spring.thymeleaf.content-type=text/html
# 开启 MVC Thymeleaf 视图解析(默认值: true )
spring.thymeleaf.enabled=true
# 模板编码
spring.thymeleaf.encoding=UTF-8
# 要被排除在解析之外的视图名称列表,?逗号分隔
spring.thymeleaf.excluded-view-names=
# 要运?于模板之上的模板模式。另? StandardTemplate-ModeHandlers( 默认值: HTML5)
spring.thymeleaf.mode=HTML5
# 在构建 URL 时添加到视图名称前的前缀(默认值: classpath:/templates/ )
spring.thymeleaf.prefix=classpath:/templates/
# 在构建 URL 时添加到视图名称后的后缀(默认值: .html )
spring.thymeleaf.suffix=.html
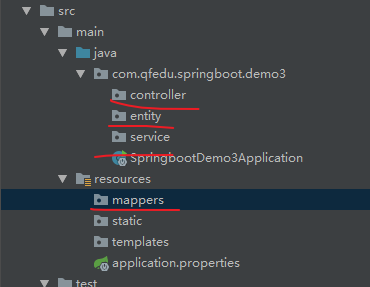
五、添加缺少的包名
六、beans
根据数据库建一个实体类,有了lombok,创建实体类方便了一丁点
@Data
@AllArgsConstructor
@NoArgsConstructor
@ToString
public class Books {

    private int id;
    private String bookName;
    private int price;
    private String writer;
}
七、dao
前面忘了建dao包了,这里补上,在包里建接口BookDao
public interface BooksDao {
    public List<Books> selectBooks();
}
在mappers包里建相关的XML文件
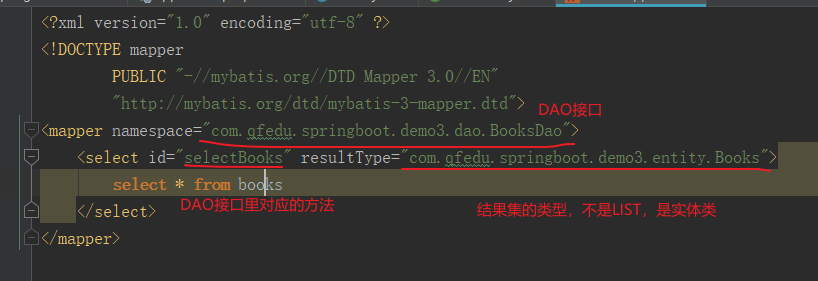
<?xml version="1.0" encoding="utf-8" ?>
<!DOCTYPE mapper
        PUBLIC "-//mybatis.org//DTD Mapper 3.0//EN"
        "http://mybatis.org/dtd/mybatis-3-mapper.dtd">
<mapper namespace="com.qfedu.springboot.demo3.dao.BooksDao">
    <select id="selectBooks" resultType="com.qfedu.springboot.demo3.entity.Books">
        select * from books
    </select>
</mapper>
八、service
先在service包里建个接口
public interface BookService {
    List<Books> queryBooks();
}
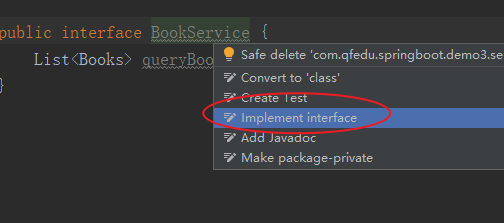
然后实现这个接口,在接口名上按ALT+回车
?service的目录结构是这样的

方法里就调用一下DAO
@Service
public class BookServiceImpl implements BookService {

    @Resource
    private BooksDao booksDao;
    @Override
    public List<Books> queryBooks() {
        List<Books> books = booksDao.selectBooks();
        return books;
    }
}
九、controller
成功的话跳转到页面books.html,把数据也传过去
@Controller
@RequestMapping("/books")
public class BooksController {

    @Resource
    private BookService bookService;

    @RequestMapping("/query")
    public String getBooks(Model model){
        List<Books> books = bookService.queryBooks();
        model.addAttribute("books",books);
        return "books.html";
    }
}
十、html文件
最后写个页面,由于用的是thymeleaf,在页头要加行字

页面里放个表格显示一下查询内容
<!DOCTYPE html>
<html lang="en" xmlns:th="thymeleaf.org">
<head>
    <meta charset="UTF-8">
    <title>books</title>
</head>
<body>
<div>
    <table>
        <tr>
            <th>序号</th>
            <th>书名</th>
            <th>价格</th>
            <th>作者</th>
        </tr>
        <tr th:each="b:${books}">
            <td th:text="${b.id}"></td>
            <td th:text="${b.bookName}"></td>
            <td th:text="${b.price}"></td>
            <td th:text="${b.writer}"></td>
        </tr>
    </table>
</div>
</body>
</html>
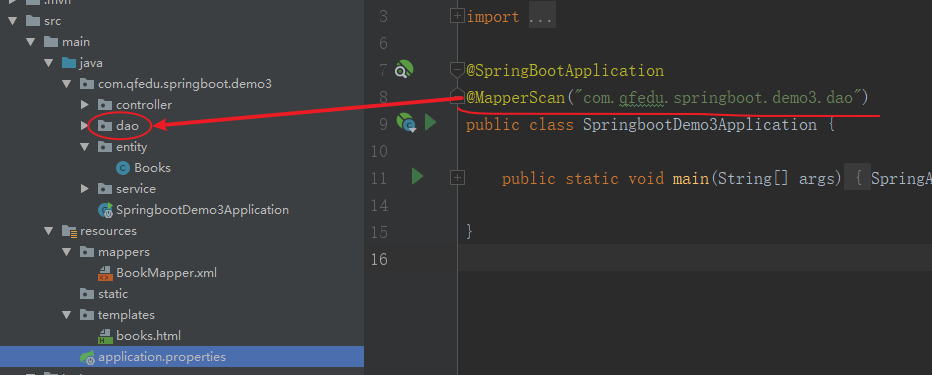
十一、在启动方法上加个注解,扫描DAO类
十二、目录结构
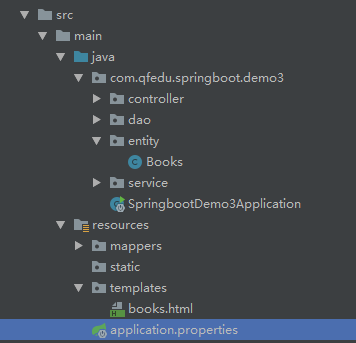
最终的目录结构
?十三、访问结果
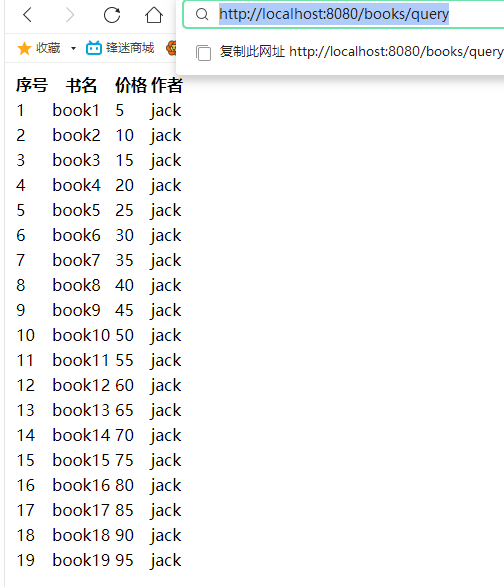
在浏览器上直接输入地址:http://localhost:8080/books/query
最基本的创建工程方法,练到肌肉记忆就好?