SpringBoot学习笔记
第一章
基础配置文件的使用
替换配置文件的方法和把配置文件导入到类中ImportResource
public class Student {
    private String name;
    private Integer age;
    private String sex;
    //后面还有set方法和toString方法
    }
配置文件的内容,名字为applicationContext.xml
<bean id="myStudent" class="com.njupt.vo.Student">
        <property name="name" value="悦悦"/>
        <property name="age" value="24"/>
        <property name="sex" value="女"/>
    </bean>
package com.njupt.config;

import com.njupt.vo.Student;
import org.springframework.context.annotation.Bean;
import org.springframework.context.annotation.Configuration;
import org.springframework.context.annotation.ImportResource;

/**
 * Creat with IntelliJ IDEA
 *
 * @Auther:倔强的加瓦
 * @Date:2021/11/16/16:03
 * @Description:
 */
/*Configuration注解:作用是表示当前类是作为配置文件使用,就是用来配置容器的
* 位置是放在类的上面
* Configuration这个类就相当于beans.xml*/
@Configuration
@ImportResource(value = "classpath:applicationContext.xml")
public class SpringConfig {
    /*
    * 创建方法,方法的返回值是对象,在方法上加入@Bean,犯法的返回值对象就注入到容器中
    * 要是不指定名字则默认使用方法名
    * */
    @Bean
    public Student creatStudent(){
        Student student = new Student();
        student.setAge(12);
        student.setName("狼");
        student.setSex("男");
        return student;
    }

    @Bean(name="lang")
    public Student creatStudent1(){
        Student student = new Student();
        student.setAge(15);
        student.setName("狼微软");
        student.setSex("男");
        return student;
    }
}
测试方法
 @Test
    public void test02(){
        ApplicationContext ctx=new AnnotationConfigApplicationContext(SpringConfig.class);
        Student student = (Student) ctx.getBean("creatStudent");
        System.out.println(student);
    }

    @Test
    public void test03(){
        ApplicationContext ctx=new AnnotationConfigApplicationContext(SpringConfig.class);
        Student student = (Student) ctx.getBean("lang");
        System.out.println(student);
    }
@PropertyResource:
读取properties属性配置文件,使用属性配置文件可以实现外部化配置,在程序代码之外提供数据
步骤:
- 在resources目录之下,创建一个properties配置文件,使用k=v的方式提供数据
- 用PropertyResource指定properties文件的位置
- 使用@Value(value="${key}")
SpringBoot项目创建
连接网络使用国内的https://start.springboot.io
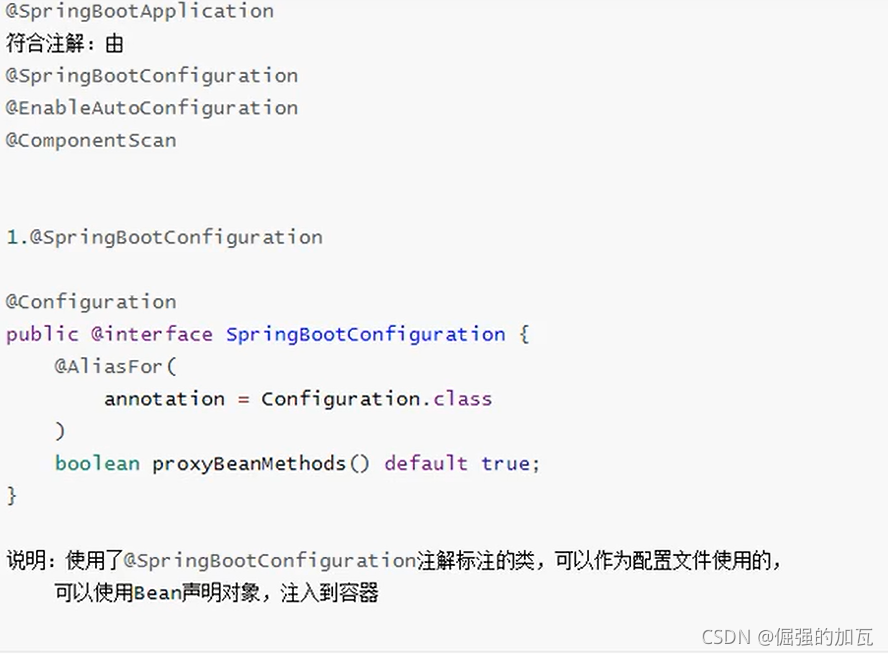
SpringBootApplication的注解

SpringBoot配置文件
名称是:application
扩展名有 properties(k=v); yml(k:v)
优先使用properties文件
 当有多个环境时,可以使用不同测试环境、开发环境等的配置文件,命名规则如下:
application-环境名称.properties
例如
开发时的配置文件:application-dev.properties
测试时的配置文件:application-test.properties
只需要在主配置文件中指定激活哪一个配置文件即可

把简单的属性写在配置文件中,并且利用@Value读取
#指定端口号
server.port=9090
#来指定项目名
server.servlet.context-path=/myboot
#一些简单的属性也可以写在配置文件中,并且靠这个@Value注解进行注入参数
inf.name=海水
inf.site=www.baidu.com
inf.age=12
@Controller
public class MyController {

    @Value("${inf.name}")
    private String name;
    @Value("${inf.site}")
    private String site;
    @Value("${inf.age}")
    private Integer age;

    @ResponseBody
    @RequestMapping("/hello")
    public String getString(){
        return name+site+age;
    }
}
把一些简单属性写在一个类中作为对象
@Component
//在配置文件中找前缀是这个的属性进行自动注入赋值
@ConfigurationProperties(prefix = "inf")
public class Student {
    private String name;
    private Integer age;
    private String site;
    }
    @Resource//自动注入,先byname后byType
    private Student student;
    @ResponseBody
    @RequestMapping("/objHello")
    public String getObject(){
        return student.toString();
    }
使用JSP005
springboot不推荐使用jsp,而推荐使用模板技术
1要先加入依赖,负责编译jsp文件

2如果需要使用servlet和jsp,jstl的功能要加入相应的依赖

3在main下自己创建一个存放jsp文件的目录,一般叫做webapp,这时这个文件只是一个普通的文件夹,需要指定该文件夹是一个资源文件夹。
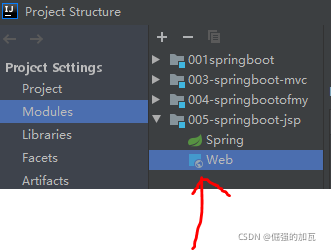
 点击加号后,把创建的目录加入,就可以使普通的文件变成资源文件。
用于放置jsp文件,如index.jsp
4需要在pom.xml指定jsp编译后的存放目录
META-INF/resources

5创建Controller,访问jsp
@Controller
public class JspController {


//这里不加ResponseBody就是返回jsp界面,要是加就是返回字符串
    @RequestMapping("/myjsp")
    public String doShow(HttpServletRequest request){
        request.setAttribute("date","这是利用jsp的返回来的值");
        return "index";//这个是前端jsp文件名
    }

    @RequestMapping("/myjsp1")
    public String doShow2(Model model){
        //放入到作用域中
        model.addAttribute("date","这是利用jsp的返回来的值");
        return "index";
    }
}
6在application.properties文件中配置文件解析器
#配置端口号
server.port=8080
server.servlet.context-path=/myboot

#配置视图解析器的前缀和后缀
#默认的起始地址为src/main/webapp
spring.mvc.view.prefix=/
spring.mvc.view.suffix=.jsp
容器中获取对象的使用006
希望通过代码,从容器中获取对象
这个run方法,返回值就是一个容器。
@SpringBootApplication
public class Application {

	public static void main(String[] args) {
		SpringApplication.run(Application.class, args);
	}

}
准备的类,希望从容器中拿到这个类,并且执行方法
@Service("userService")
public class UserServiceImpl implements UserService {
    @Override
    public void sayHello(String name) {
        System.out.println("执行了业务方法"+name);
    }
}
@SpringBootApplication
public class Application {

	public static void main(String[] args) {
		ConfigurableApplicationContext ctx = SpringApplication.run(Application.class, args);
		UserServiceImpl bean = (UserServiceImpl) ctx.getBean("userService");
		bean.sayHello("小孩");
	}

}
可以通过这个方法正确的获取容器中的对象,并且执行方法
CommandLineRunner接口和ApplicationRunner接口
这两个方法都有一个run方法,执行时间在容器对象创建好之后,主动的执行run()方法,可以完成自定义的在容器对象创建好之后的一些操作。
@FunctionalInterface
public interface CommandLineRunner {
    void run(String... args) throws Exception;
}

@FunctionalInterface
public interface ApplicationRunner {
    void run(ApplicationArguments args) throws Exception;
}
举例子验证这两个接口执行与创建容器的顺序:
这个是准备
@Service
public class UserServiceImpl implements UserService {
    @Override
    public String sayHello(String name) {
        return "你这次所要欢迎的对象是"+name;
    }
}
这个是测试
@SpringBootApplication
public class Application implements CommandLineRunner {
     @Resource
	 UserService userService;
	public static void main(String[] args) {


		System.out.println("开始创建容器对象1");
		SpringApplication.run(Application.class, args);
		System.out.println("创建对象完毕2");
	}

	@Override
	public void run(String... args) throws Exception {

		String s = userService.sayHello("小孩");
		System.out.println(s+3);

	}
}
测试结果
开始创建容器对象1
你这次所要欢迎的对象是小孩3
创建对象完毕2
可以理解为当SpringApplication调用完run方法之后,会自动的调用下一个run方法,之后才执行主方法的其他程序。
第二章SpringBoot和web组件
拦截器
拦截器框架中有系统的拦截器,还可以自定义拦截器,实现对请求预先处理
实现自定义的拦截器
1创建类实现SpringMvc框架的HandlerInterceptor接口
public class LoginInterceptor implements HandlerInterceptor {
    /**
     * 拦截器,用来拦截请求
     * @param request
     * @param response
     * @param handler
     * @return
     * @throws Exception
     */
    @Override
    public boolean preHandle(HttpServletRequest request, HttpServletResponse response, Object handler) throws Exception {
        System.out.println("已经判断过了,是符合要求的,所以通过拦截器");
        return true;
    }
}
2在springmvc的配置文件中声明拦截器
@Configuration
public class MyAppConfig implements WebMvcConfigurer {
    //添加拦截器对象,注入到容器中
    @Override
    public void addInterceptors(InterceptorRegistry registry) {
        //创建拦截器对象
        HandlerInterceptor interceptor=new LoginInterceptor();
        //指定拦截的地址和不拦截的地址
        String path[]={"/user/**"};
        String excludePath[]={"/user/login"};
        registry.addInterceptor(interceptor)
                .addPathPatterns(path)
                .excludePathPatterns(excludePath);
    }
}
测试代码
@Controller
public class MyController {

    @RequestMapping("/user/account")
    @ResponseBody
    public String userAccount(){
        return "获取到user/account界面";
    }

    @RequestMapping("/user/login")
    @ResponseBody
    public String userLogin(){
        return "获取到user/login界面";
    }

}
当在浏览器端开始访问这些界面时,就有的经过过滤器,有的不经过过滤器。
Servlet
在springboot中使用Servlet对象
使用步骤:
1创建Servlet类,就是要创建类来继承HttpServlet
package com.njupt.web;

import javax.servlet.ServletException;
import javax.servlet.http.HttpServlet;
import javax.servlet.http.HttpServletRequest;
import javax.servlet.http.HttpServletResponse;
import java.io.IOException;
import java.io.PrintWriter;

/**
 * Creat with IntelliJ IDEA
 *
 * @Auther:倔强的加瓦
 * @Date:2021/11/17/15:30
 * @Description:
 */

public class MyServlet extends HttpServlet {
    @Override
    protected void doGet(HttpServletRequest req, HttpServletResponse resp) throws ServletException, IOException {
        doPost(req, resp);
    }

    @Override
    protected void doPost(HttpServletRequest req, HttpServletResponse resp) throws ServletException, IOException {
        resp.setContentType("text/html;charset=utf-8");
        PrintWriter out=resp.getWriter();
        out.println("执行的是Servlet");
        out.flush();
        out.close();
    }
}
2注册Servlet,让框架能找到这个类
@Configuration
public class SystemConfig {

    //定义方法来注册Servlet对象
    /*第一种是通过构造方法进行传值*/
    @Bean
    public ServletRegistrationBean servletRegistrationBean(){
        ServletRegistrationBean bean = new ServletRegistrationBean(new MyServlet(),"/myServletByConstruct");
        return bean;
    }

   /* *//*第二种通过方法传值*//*
    @Bean
    public ServletRegistrationBean servletRegistrationBean1(){
        ServletRegistrationBean bean = new ServletRegistrationBean();
        bean.setServlet(new MyServlet());
        bean.addUrlMappings("/loginByMethod","/testByMethod");
        return bean;
    }*/

}
Filter过滤器
Filter是Servlet规范中的过滤器,可以处理请求,对请求的参数、属性进行调整,常常是用来处理字符编码,在框架中使用过滤器的步骤:
1.创建自定义的过滤器类
//自定义的过滤器类
public class MyFilter  implements Filter {
    @Override
    public void doFilter(ServletRequest servletRequest, ServletResponse servletResponse, FilterChain filterChain) throws IOException, ServletException {

        System.out.println("执行了过滤器的方法doFilter");
        filterChain.doFilter(servletRequest,servletResponse);
    }
}
2注册Filter过滤器对象
@Configuration
public class MyFilterConfig {

    @Bean
    public FilterRegistrationBean get(){
        FilterRegistrationBean bean = new FilterRegistrationBean();
        bean.setFilter(new MyFilter());
        bean.addUrlPatterns("/user/*");
        return bean;
    }

}
测试
@Controller
public class MyController {
    @RequestMapping("/user/account")
    @ResponseBody
    public String getFilter(){

        return "经过过滤器后执行的controller代码";
    }

    @RequestMapping("/query/account")
    @ResponseBody
    public String getFilter1(){

        return "不经过过滤器后执行的controller代码";
    }
}
使用过滤器来指定编码字符集从而解决中文乱码问题
如果不指定字符集,默认的是ISO-8859-1
Content-Typetext/html;charset=ISO-8859-1
1基础的servlet类
public class MyServlet extends HttpServlet {
    @Override
    protected void doGet(HttpServletRequest req, HttpServletResponse resp) throws ServletException, IOException {
        doPost(req,resp);
    }

    @Override
    protected void doPost(HttpServletRequest req, HttpServletResponse resp) throws ServletException, IOException {
        resp.setContentType("text/html");
        PrintWriter out=resp.getWriter();
        out.println("在servlet中输出中文测试");
        out.flush();
        out.close();
    }
}
2编写配置字符集过滤器类
@Configuration
public class ServletConfig {

    //注册servlet
    @Bean
    public ServletRegistrationBean getBean(){

        ServletRegistrationBean bean = new ServletRegistrationBean();
        bean.setServlet(new MyServlet());
        bean.addUrlMappings("/myservlet");

        return bean;
    }


    @Bean
    public FilterRegistrationBean filterRegistrationBean(){
        FilterRegistrationBean bean = new FilterRegistrationBean();
        //使用框架中的过滤器类
        CharacterEncodingFilter filter = new CharacterEncodingFilter();
        //指定使用的编码方式
        filter.setEncoding("utf-8");
        //把request和respond都设为这种编码字符集
        filter.setForceEncoding(true);
        bean.setFilter(filter);

        bean.addUrlPatterns("/*");
        return bean;
    }

}
最后,别忘了在配置文件中更改默认的配置
#为什么设置成假,因为springboot已经默认配置了CharacterEncodingFilter,编码默认为8859-1,设置初始为false,作用是关闭系统配置好的过滤器,使用自定义的过滤器
server.servlet.encoding.enabled=false
也可以直接在配置文件中更改字符编码方式,直接在配置文件中使用,不需要在写过滤器类了

第三章ORM操作MYSQL
使用MyBatis框架操作数据,
在SpringBoot框架加入Mybatis
使用步骤:
1加入mybatis依赖,完成mybatis对象的自动配置,对象放在容器中
<repositories><!-- 阿里云代码库 -->
		<repository>
			<id>maven-ali</id>
			<url>http://maven.aliyun.com/nexus/content/repositories/central</url>
			<releases>
				<enabled>true</enabled>
			</releases>
			<snapshots>
				<enabled>true</enabled>
				<updatePolicy>always</updatePolicy>
				<checksumPolicy>fail</checksumPolicy>
			</snapshots>
		</repository>
	</repositories>

	<dependencies>
		<dependency>
			<groupId>org.springframework.boot</groupId>
			<artifactId>spring-boot-starter-web</artifactId>
		</dependency>

		<dependency>
			<groupId>org.mybatis.spring.boot</groupId>
			<artifactId>mybatis-spring-boot-starter</artifactId>
			<version>2.2.0</version>
		</dependency>
		<dependency>
			<groupId>mysql</groupId>
			<artifactId>mysql-connector-java</artifactId>
			<scope>runtime</scope>
		</dependency>
		<dependency>
			<groupId>org.springframework.boot</groupId>
			<artifactId>spring-boot-starter-test</artifactId>
			<scope>test</scope>
		</dependency>
	</dependencies>
2pom.xml的build里指定把src/main/java目录中的xml文件包含到classpath中
<resources>
			<resource>
				<directory>src/main/java</directory>
				<includes>
					<include>**/*.xml</include>
				</includes>
			</resource>
		</resources>
3创建实体类Student
4创建dao接口,StudentDao顺便创建一个可以查询学生的方法
当接口比较少的时候:@Mapper
@Mapper
public interface StudentDao {
    Student selectById(@Param("stuId") Integer id);
}
当接口比较多时在主启动类上加@MapperScan,来找到dao接口和一些映射文件
1.在主启动类上加入注解@MapperScan,用来扫描接口类
@SpringBootApplication
@MapperScan(basePackages = {"com.njupt.dao","其他dao接口的包名"})
public class Application {

	public static void main(String[] args) {
		SpringApplication.run(Application.class, args);
	}

}
2.在配置文件中扫描接口的xml文件的位置

```java
server.port=8990
server.servlet.context-path=/myboot

spring.datasource.driver-class-name=com.mysql.cj.jdbc.Driver
spring.datasource.url=jdbc:mysql://localhost:3306/springdb?useUnicode=true&characterEncoding=UTF-8&serverTimezone=GMT%2B8
spring.datasource.username=root
spring.datasource.password=5264
#扫描接口的配置文件的位置
mybatis.mapper-locations=classpath:mapper/*.xml
3在pom文件中,把主配置文件也要编译到类路径之下
<build>
      <resources>
            <resource>
                <directory>src/main/resources</directory>
                <includes>
                    <include>**/*.*</include>
                </includes>
            </resource>
        </resources>
</build>
5创建dao接口对应的mapper文件即StudentDao.xml文件,在文件中红写sql语句

```xml
<mapper namespace="com.njupt.dao.StudentDao">
    <select id="selectById" resultType="com.njupt.entity.Student">
        select id,name,email,age from  student where id=#{stuId}
    </select>
</mapper>
6service层,来调用dao,完成数据的查询
public interface StudentService {
    Student queryStudent(Integer id);
}
@Service
public class StudentServiceImpl implements StudentService {

    @Resource
    private StudentDao studentDao;

    @Override
    public Student queryStudent(Integer id) {
        Student student = studentDao.selectById(id);
        return student;
    }
}
7创建controller层,访问service
@Controller
public class StudentController {
    @Resource
    private StudentService service;

    @RequestMapping("/student/query")
    @ResponseBody
    public String queryStudent(Integer id){
        Student student = service.queryStudent(id);
        return student.toString();
    }


}
8写配置文件,配置连接信息
server.port=9001
server.servlet.context-path=/orm


#连接数据库
spring.datasource.driver-class-name=com.mysql.cj.jdbc.Driver
spring.datasource.url=jdbc:mysql://localhost:3306/springdb?useUnicode=true&characterEncoding=UTF-8&serverTimezone=GMT%2B8
spring.datasource.username=root
spring.datasource.password=5264
使用事务
- 回顾在spring框架中的事务
1)管理事务的对象:事务管理器(接口和实现类)
例如使用jdbc或者mybatis访问数据库,使用事务管理器:DataSourceTransactionManager
2)声明式事务:在xml文件中或者使用注解说明事务的控制的内容
控制事务:隔离级别、传播行为、超时时间
3)事务的处理方式:
1)Spring框架中的@Transaction
2)aspectj 框架可以在xml配置文件中,声明事务的控制内容
- SpringBoot中使用事务:上面两种方法都可以
1)在业务方法上加@Transactional 加入注解之后就有事务功能
2)明确在主启动类上加@EnableTransactionManager
学习使用mybatis代码自动生成器
1在pom文件中添加插件,如果添加不成功,可参考这一篇
<plugin>
				<groupId>org.mybatis.generator</groupId>
				<artifactId>mybatis-generator-maven-plugin</artifactId>
				<version>1.3.6</version>
				<configuration>
					<configurationFile>mybatis-generator-cfg.xml</configurationFile>
					<verbose>true</verbose>
					<overwrite>true</overwrite>
				</configuration>
			</plugin>
2.添加成功之后编写mybatis-generator-cfg.xml配置文件,我直接放在了项目模块之下
<?xml version="1.0" encoding="UTF-8"?>
<!DOCTYPE generatorConfiguration
PUBLIC "-//mybatis.org//DTD MyBatis Generator Configuration 1.0//EN"
"http://mybatis.org/dtd/mybatis-generator-config_1_0.dtd">
<generatorConfiguration>
<!---->
<properties resource="application.properties"></properties>
<!--指定连接数据库所在的jdbc驱动包所在的位置-->
<classPathEntry location="E:\java\maventools\maven_repository\mysql\mysql-connector-java\8.0.27\mysql-connector-java-8.0.27.jar"/>
<context id="test" targetRuntime="MyBatis3">
<plugin type="org.mybatis.generator.plugins.EqualsHashCodePlugin"></plugin>
<plugin type="org.mybatis.generator.plugins.SerializablePlugin"></plugin>
<plugin type="org.mybatis.generator.plugins.ToStringPlugin"></plugin>
<commentGenerator>
<!-- 这个元素用来去除指定生成的注释中是否包含生成的日期 false:表示保护 -->
<!-- 如果生成日期,会造成即使修改一个字段,整个实体类所有属性都会发生变化,不利于版本控制,所以设置为true -->
<property name="suppressDate" value="true" />
<!-- 是否去除自动生成的注释 true:是 : false:否 -->
<property name="suppressAllComments" value="true" />
</commentGenerator>
<!--数据库链接URL,用户名、密码 -->
<jdbcConnection driverClass="com.mysql.cj.jdbc.Driver"
connectionURL="jdbc:mysql://localhost:3306/springdb?useUnicode=true&characterEncoding=UTF-8&serverTimezone=GMT%2B8"
userId="root"
password="5264">
</jdbcConnection>
<javaTypeResolver>
<!-- This property is used to specify whether MyBatis Generator should
force the use of java.math.BigDecimal for DECIMAL and NUMERIC fields, -->
<property name="forceBigDecimals" value="false" />
</javaTypeResolver>
<!-- targetpakage是即将生成的目录,targetProject是对应的前缀目录。可根据自己需求生到对应目录。下次运行会直接默认覆盖原来位置的文件 -->
<!-- 生成模型的包名和位置 映射实体类的位置 -->
<javaModelGenerator targetPackage="com.njupt.model"
targetProject="E:\Java学习\springboot-prj\015-springboot-transactional\src\main\java">
<property name="enableSubPackages" value="false" />
<property name="trimStrings" value="false" />
</javaModelGenerator>
<!-- 生成映射文件的包名和位置 mapper.xml -->
<sqlMapGenerator targetPackage="mapper"
targetProject="src/main/resources">
<property name="enableSubPackages" value="false" />
</sqlMapGenerator>
<!-- 生成DAO的包名和位置 mapper接口-->
<javaClientGenerator type="XMLMAPPER" targetPackage="com.njupt.dao"
targetProject="src/main/java">
<property name="enableSubPackages" value="true" />
</javaClientGenerator>
<!-- 要生成哪些表 orders是我的表名,Orders是生成的类名,比如我的映射类为Order,映射接口OrderMapper, 映射文件为OrderMapper.xml,可以添加多个表,里面的几个配置大概意思就是是否允许生成example文件和支持selectByExample。用过Mybatis的应该知道selectByExample,对于一些简单查询用这个还是比较方便的。哈哈、话有点多,记得删除 -->
<table tableName="student" domainObjectName="Student"
enableCountByExample="false" enableUpdateByExample="false"
enableDeleteByExample="false" enableSelectByExample="false"
selectByExampleQueryId="false"></table>
<!-- 要生成哪些表
<table tableName="products" domainObjectName="Products"
enableCountByExample="false" enableUpdateByExample="false"
enableDeleteByExample="false" enableSelectByExample="false"
selectByExampleQueryId="false"></table>-->
</context>
</generatorConfiguration>
3点击右侧maven的插件来测试启动,如果显示buildSuccess,则成功生成代码
4处理事务的代码,在后面测试即可。若不成功就会回滚。
@Transactional//让这个方法启用事务/*默认使用数据库的隔离级别和传播行为:超时时间*/
    @Override
    public int addStudent(Student student) {
        System.out.println("业务方法添加一个新学生");
        int insert = dao.insert(student);

        System.out.println("执行sql");

        //int m=10/0;
        return insert;
    }
主启动类
@MapperScan(basePackages = "com.njupt.dao")
@SpringBootApplication
@EnableTransactionManagement
public class Application {

	public static void main(String[] args) {
		SpringApplication.run(Application.class, args);
	}

}
第四章接口架构风格-RESTful
1 REST(Representational State Transfer:表现层状态转移)
是一种接口的框架风格和设计理念,不是标准,优点氏:更加简洁和更有层次
表现层状态转移:
表现层就是视图层,显示资源的,通过视图页面显示操作资源的结果
状态:资源变化
转移:资源可以变化。修改之后资源和之前不一样了
2 REST中的要素
用REST表示资源和对资源的操作,表示一个资源或者一个操作
对资源进行查询、新建、更新、删除操作
GET:查询资源 sql select
格式:
对单个资源
http://localhost:8080/myboot/student/001
对多个资源
http://localhost:8080/myboot/students/001/002
POST: 创建资源 -sql insert
格式:http://localhost:8080/myboot/student
PUT:更新资源 --sql update
http://localhost:8080/myboot/student/1
DELETE:删除资源
http://localhost:8080/myboot/student/1
总结就是:使用url表示资源,使用http动作来操作资源。
有用的注解
@PathVariable:从url中获取数据
@GetMapping:支持get请求方法,@RequestMapping(method=RequestMethod.GET)
@PostMapping:支持post请求,创建
@PutMapping:支持put请求,更新
@DeleteMapping:支持delete请求方式,删除
@RestController:符合注解,是@Controller和@ResponseBody组合
实例:可以通过前面传来的参数,利用下面的注解来获取参数
@RestController
public class MyRestController {
    /**
     *@PathVariable:获取url中的数据
     * {stuId}自定义的名字,一个占位符,以后这个位置的数据就是id值
     */
    @GetMapping("/student/{stuId}")
    public  String query(@PathVariable(value = "stuId") Integer id){
        return "查询的学生id"+id;
    }


    @PostMapping("/student/{name}/{age}")
    public String post(@PathVariable("name") String name
            ,@PathVariable("age") Integer age){

        return "postmapping获取的参数"+name+age;
    }

    @PutMapping("/student/{id}/{age}")
    public String put(@PathVariable("id") Integer id,@PathVariable("age") Integer age){
        return "更新资源,执行put请求方式id="+id+age;
    }


    @DeleteMapping("/student/{id}")
    public String remove(@PathVariable("id") Integer id){
        return "执行删除操作的参数传递"+id;

    }

}
Postman测试工具,有机会了解一下,可以指定请求的方法,但是在界面中如html和jsp中,表单可以采用get和post,但是不可以采用put和delete。为了在前端界面中采用这两种,需要加入过滤器
在前端界面支持使用put和delete
在SpringMvc中有一个过滤器,支持将post变成put和delete
org.springframework.web.filter.HiddenHttpMethodFilter
在Springboot中已经自动加入了这个过滤器,只需要在配置文件中启用HiddenHttpMethodFilter即可
实现步骤:
1在配置文件中开启使用HiddenHttpMethodFilter过滤器
#启动支持put和delete
spring.mvc.hiddenmethod.filter.enabled=true
2在请求界面中加入隐藏域包括_method参数,他的值是put、delete,发起这个请求要求使用post方式
<form action="/myboot/student/lisi/34" method="post">
    <input type="hidden" name="_method" value="put">
    <input type="submit" value="注册学生">
</form>
注意要保证url+请求方式的的唯一性,要不然会出现歧义

第五章SpringBoot集成Redis

加入依赖
     <dependency>
			<groupId>org.springframework.boot</groupId>
			<artifactId>spring-boot-starter-data-redis</artifactId>
		</dependency>
1 redis序列化


public class Student implements Serializable {}
2配置文件的编写,指定redis
server.port=8080
server.servlet.context-path=/myboot

spring.redis.host=192.168.66.***
spring.redis.port=6379
spring.redis.password=****
spring.redis.timeout=10000
spring.redis.connect-timeout=10000
3对比StringRedisTemplate和RedisTemplate

当序列化简单的类型时,直接进行序列化即可
package com.njupt.controller;

import org.springframework.data.redis.core.RedisTemplate;
import org.springframework.data.redis.core.ValueOperations;
import org.springframework.data.redis.serializer.StringRedisSerializer;
import org.springframework.web.bind.annotation.GetMapping;
import org.springframework.web.bind.annotation.PathVariable;
import org.springframework.web.bind.annotation.PostMapping;
import org.springframework.web.bind.annotation.RestController;

import javax.annotation.Resource;

/**
 * Creat with IntelliJ IDEA
 *
 * @Auther:倔强的加瓦
 * @Date:2021/11/19/12:40
 * @Description:
 */
@RestController
public class MyRedis {

    @Resource
    RedisTemplate redisTemplate;

    @GetMapping("/user/{name}")
    public String get(@PathVariable("name") String name){
        ValueOperations valueOperations = redisTemplate.opsForValue();
        valueOperations.set("hai","lang");
        return name+"获得此次姓名";
    }

    @PostMapping("user/{key}")
    public String post(@PathVariable("key") String key){

        Object o = redisTemplate.opsForValue().get(key);
        return "查找的key是"+key+",获得的值为:"+o;
    }

    @PostMapping("user/my/{key}/{value}")
    public String addSer(@PathVariable("key") String key,@PathVariable("value") String value){
        //序列化key
        redisTemplate.setKeySerializer(new StringRedisSerializer());
        //序列化value
        redisTemplate.setValueSerializer(new StringRedisSerializer());

        redisTemplate.opsForValue().set(key,value);

        return "自定义的序列化key="+key+"value="+value;
    }

    @GetMapping("get/{key}")
    public String getSer(@PathVariable("key") String key){
        Object o = redisTemplate.opsForValue().get(key);
        return "返回的值为"+o;
    }
}
当需要序列化对象时,一般序列化成json的格式
 @PostMapping("/red/{a}")
    public String addJson(@PathVariable("a") String a){
        Student student = new Student();
        student.setId(1001);
        student.setName("粤语");
        student.setAge(24);
        redisTemplate.setKeySerializer(new StringRedisSerializer());
        redisTemplate.setValueSerializer(new Jackson2JsonRedisSerializer(Student.class));

        //序列化对象成json格式
        redisTemplate.opsForValue().set("stu1",student);

        //反序列化得到对象
        Object stu1 = redisTemplate.opsForValue().get("stu1");
        System.out.println(stu1);
        return a;
    }
使用postman进行相应的访问即可。
第六章 SpringBoot集成Dubbo
和spring集成dubbo类似,spring boot集成dubbo也需要三个角色,提供者、公共接口、消费者。
首先使用到dubbo,所以要在提供者和消费者的主启动类上开启dubbo功能,使用注解
@SpringBootApplication
@EnableDubbo//启用dubbo,会报错,因为引入依赖时多加入了日志依赖,故需要排除多余依赖
public class ProviderApplication {

	public static void main(String[] args) {
		SpringApplication.run(ProviderApplication.class, args);
	}

}

@SpringBootApplication
@EnableDubbo
public class ConsumerApplication {

	public static void main(String[] args) {
		SpringApplication.run(ConsumerApplication.class, args);
	}

}
- 公共接口项目是一个普通的Java工程项目,在此项目里要有业务接口和实现可序列化接口的实体类

- 业务提供者,里面要有接口类中业务的具体实现,还要在配置文件中指定dubbo名称和zookeeper的地址和端口号
2.1pom文件中加入的依赖
<dependencies>

		<!--加入接口的依赖-->
		<dependency>
			<groupId>com.njupt</groupId>
			<artifactId>021-springboot-zkdu-interface</artifactId>
			<version>1.0.0</version>
		</dependency>

		<!--加入dubbo依赖-->
		<dependency>
			<groupId>org.apache.dubbo</groupId>
			<artifactId>dubbo-spring-boot-starter</artifactId>
			<version>2.7.8</version>
		</dependency>
		<!--加入zookeeper依赖-->
		<dependency>
			<groupId>org.apache.dubbo</groupId>
			<artifactId>dubbo-dependencies-zookeeper</artifactId>
			<version>2.7.8</version>
			<type>pom</type>
			<!--排除掉多余的日志依赖-->
			<exclusions>
				<exclusion>
					<artifactId>slf4j-log4j12</artifactId>
					<groupId>org.slf4j</groupId>
				</exclusion>
			</exclusions>
		</dependency>

		<dependency>
			<groupId>org.springframework.boot</groupId>
			<artifactId>spring-boot-starter</artifactId>
		</dependency>

		<dependency>
			<groupId>org.springframework.boot</groupId>
			<artifactId>spring-boot-starter-test</artifactId>
			<scope>test</scope>
		</dependency>
	</dependencies>
2.2 加入依赖之后,需要写接口具体的实现类(具体的业务实现),并且注意在实现类上的注解。
@DubboService(interfaceClass =StudentService.class,version = "1.0",timeout = 15000)
public class StudentServiceImpl implements StudentService {

    @Override
    public Student queryStudent(Integer id) {
        Student student=new Student();
        if(id==1001){
            student.setId(1001);
            student.setName("yueyue");
        }else if(id==1002){
            student.setId(1002);
            student.setName("halan");
        }
        return student;
    }
}
2.3在properties配置文件中指定dubbo的属性和zookeeper的地址端口号,一定写上超时时间
#配置dubbo名称名称
spring.application.name=studentservice-provider
#配置扫描的包
dubbo.scan.base-packages=com.njupt.service

#dubbo.protocol.name=dubbo
#dubbo.protocol.port=20880
#注册中心
dubbo.registry.address=zookeeper://192.168.66.***:2181
dubbo.provider.timeout=15000
dubbo.registry.timeout=15000
- 消费者,消费者一般都是一个web工程,通过访问zookeeper来获取注册中心中的接口,从而访问到提供者提供的业务。
3.1pom文件和服务提供者的依赖一样,但是要是一个web工程
3.2controller文件的编写,用来调用业务获取相应的资源
@RestController
public class MyController {
    @DubboReference(interfaceClass = StudentService.class,version = "1.0")
    private StudentService service;

    @GetMapping("/query")
    public String queryStudent(Integer id){
        Student student = service.queryStudent(id);
        return "调用远程接口的对象"+student;
    }
}
3.3配置文件,指定消费者的姓名和zookeeper的地址与端口号
spring.application.name=consumer-application

dubbo.registry.address=zookeeper://192.168.66.128:2181
dubbo.registry.timeout=15000
启动消费者与提供者的服务,就可以通过网页来调用消费者的接口,从而实现业务。
第七章 SpringBoot打包
如果将一个项目打包成一个war包,则需要运行在具体的服务器之上,缺点是需要额外的服务器来运行程序,优点是可以充分的利用服务器的处理能力。
把项目打成jar包,则整个项目比较的小巧,不需要过多的配置,内置了服务器,但是缺点内置的服务器肯定没有单独的服务器功能强大和完善。
1 打包成war文件并且部署到独立的tomcat服务器上的过程
1.1 针对一个工程建立时,都要先完善pom文件现在pom文件中加入相应的依赖,并且在pom文件中指定打包的类型

1.2将文件下的一些资源文件也要编译到类路径之下
<build>
		<!--指定打好包之后的包名-->
		<finalName>myboot</finalName>
		<!--resoures插件,目的是把jsp编译到指定的文件下-->
		<resources>
			<resource>
				<directory>src/main/webapp</directory>
				<targetPath>META-INF/resources</targetPath>
				<includes>
					<include>
						**/*.*
				    </include>
				</includes>
			</resource>
			<!--如果使用了mybatis,但是mapper文件在java目录下,所以还要指明Java中接口配置文件的位置-->
			<resource>
				<directory>src/main/java</directory>
				<includes>
					<include>**/*.xml</include>
				</includes>
			</resource>
			<!--把resources下面的所有配置文件都写道classes目录中-->
			<resource>
				<directory>src/main/resources</directory>
				<includes>
					<include>**/*.*</include>
				</includes>
			</resource>
		</resources>
		<plugins>
			<plugin>
				<groupId>org.springframework.boot</groupId>
				<artifactId>spring-boot-maven-plugin</artifactId>
			</plugin>
		</plugins>
	</build>
1.3编写整个工程的业务代码
1.4为了部署到tomcat之上,需要springboot的主启动类去继承一个抽象类SpringBootServletInitializer,并且重写方法
/*继承SpringBootServletInitializer,可以实现单独的使用tomcat*/
@SpringBootApplication
public class Application extends SpringBootServletInitializer {

	public static void main(String[] args) {
		SpringApplication.run(Application.class, args);
	}

	@Override
	protected SpringApplicationBuilder configure(SpringApplicationBuilder builder) {
		return builder.sources(Application.class);
	}
}
1.5将整个工程打成war包和部署在tomcat之上步骤如下:
1将相应的工程打开右侧maven,双击package,来实现打包,当出现BUILD SUCCESS时,打包成功。

2找到打包之后的位置

然后在磁盘中找到这个war包,过程为选中鼠标右键–》show in explore从而找到在目录中的位置。
 找到之后,把war包复制到tomcat的webapp目录下。
 然后到tomcat的bin目录下,点击startup.bat启动tomcat,他会自动解压你的war包成文件夹(因为我的运行过了,所以已经自动解压好了)
 最后在浏览器上访问服务即可,注意此时访问的端口号为8080端口,不是你在创建项目时在配置文件中的端口,因为独立的tomcat的端口号为8080.
把工程打包成jar包
1和打成war包相似,如果在pom文件中不指定打包方式,则默认打包成jar包,但是需要指定内置插件的版本和打包之后的jar包包名。
 <finalName>mybootjar</finalName>

<plugins>
            <plugin>
                <groupId>org.springframework.boot</groupId>
                <artifactId>spring-boot-maven-plugin</artifactId>
                <!--要打成jar包时必须要指定版本,并且版本只能是1.4.2.RELEASE-->
                <version>1.4.2.RELEASE</version>
            </plugin>
        </plugins>
2.完成业务代码,注意由于默认使用的是内置的tomcat服务器,所以不需要在主启动类中继承抽象方法
@SpringBootApplication
public class Application   {

    public static void main(String[] args) {
        SpringApplication.run(Application.class, args);
    }
}
3.完成业务代码之后,点击右侧maven工程,开始打成jar包maven–>clean–>package
,出现 BUILD SUCCESS,则打包成功
 4.运行jar包的步骤
4.1找到在电脑中的位置,右键—》show in explorer找到目标文件
 4.2找到目标位置之后,在点击上面的目录,输入cmd,回车就可以切换到命令行窗口,执行java -jar +jar包的名字,就可以执行jar包

 即可执行jar包。
第八章Thymeleaf模板引擎
在服务器端运行,把处理好的数据发送给浏览器,模板

1标准变量表达式
语法${key}
作用是获取key对应的文本数据,key为request作用域中分如key,使用request.setAttribute(key,value)或者model.setAttribute(key,value)
页面在html标签中使用如下
<div style="margin-left: 400px">
    <h3>使用thymeleaf来访问数据</h3>
    <p th:text="${data}">会被覆盖掉的数据</p>
    <p th:text="${user.id}">id</p>
    <p th:text="${user.name}">name</p>
    <p th:text="${user.age}">age</p>
    <p th:text="${user.sex}">sex</p>
</div>
2选择变量表达式(星号变量表达式)
用来配合对象的获取,和th:object属性一起使用,nudity是可以简单的获取对象的属性值
<!--主要是用来对象的值的获取-->
<div th:object="${user}">
    <p th:text="*{id}">对象的id</p>
    <p th:text="*{name}">对象的name</p>
    <p th:text="*{age}">对象的age</p>
    <p th:text="*{sex}">对象的sex</p>
</div>
3链接表达式
@{url}
作用是超链接并且还可以传递参数
<h3>测试链接</h3>
<a th:href="@{http://www.baidu.com}">链接到百度</a>

<a th:href="@{/query}">相对地址没有参数</a>

<a th:href="@{'/queryGetId?id='+${user.Id}}">相对地址,并且获取参数</a>

<a th:href="@{/queryGetId(id=1234)}">比较推荐的传参单个方式</a>

<a th:href="@{/queryGetId(id=1234,age=28)}">比较推荐的传参多个方式</a>
使用模板的属性
可以把参数放到作用域中,可以动态的实现属性参数的变化,html中的属性不变,只是在前面加上th:就默认属性由模板引擎处理了
<form th:method="${method}" th:action="${action}">

    <p th:text="${user.name}">姓名</p>
    <p th:text="${user.age}">年龄</p>
    <input type="text" th:name="${user.name}" th:value="${user.age}">
    <input type="button" id="btn" th:onclick="btnClic()" value="">
    <input type="submit" value="提交">
</form>
</body>
<script type="text/javascript">
    function btnClic(){
        alert("按钮被单机")
    }
</script>
each循环遍历循环
可以循环LIST,ARRAY,MAP等集合
语法:
 1. 遍历list集合
<table style="margin-left: 500px" border="1px">
    <tr>
        <td>序号</td>
        <td>编号</td>
        <td>姓名</td>
        <td>年龄</td>
        <td>性别</td>
    </tr>
    <tr th:each="student,studentIter:${students}">
        <td th:text="${studentIter.count}+'/'+${studentIter.size}"></td>
        <td th:text="${student.id}" ></td>
        <td th:text="${student.name}" ></td>
        <td th:text="${student.age}" ></td>
        <td th:text="${student.sex}" ></td>
    </tr>
</table>

- 遍历数组,语法和遍历循环list集合一样
- 遍历map集合的方式
<div style="margin-left: 400px">
<!--users是后端传递过来的map集合-->
    <div th:each="student,studentIter:${users}">
        <p th:text="${student.key}"></p>
        <p th:text="${student.value.id}"></p>
        <p th:text="${student.value.name}"></p>
        <p th:text="${student.value.age}"></p>
        <p th:text="${student.value.sex}"></p>
    </div>
</div>
4.遍历复杂的集合嵌套list(map)集合
<div style="margin-left: 400px">

    <div th:each="map,studentIter:${users}">
        <!--双重循环,先从list集合中取出map,在遍历map-->
        <div th:each="student:${map}">
            <p th:text="${student.key}"></p>
            <p th:text="${student.value.id}"></p>
            <p th:text="${student.value.name}"></p>
            <p th:text="${student.value.age}"></p>
            <p th:text="${student.value.sex}"></p>
        </div>

    </div>
</div>
th:if和th:unless
if判断语句,当条件为真时,就显示html标签内的内容,反之就是不显示,没有else语句
unless和if相反,当条件为假时,执行标签内的语句
<!--
model.addAttribute("sex","m");
       model.addAttribute("islogin",true);
       model.addAttribute("name","");
       model.addAttribute("isnull",null);
-->
<p th:if="${sex=='m'}">性别是男</p>
<p th:if="${islogin}">登录成功,欢迎</p>
<p th:if="${name}">空字符串判定为真!</p>
<p th:if="${isnull==null}">null值判定为false</p>
<p th:unless="${sex=='f'}">性别是男</p>
switch/case
和java中的语法一致
<!--model.addAttribute("sex","m");-->
<div th:switch="${sex}">
    <p th:case="m">性别为男</p>
    <p th:case="f">性别为女</p>
    <!--如果都不满足则默认的情况-->
    <p th:case="*">性别未知</p>
</div>
th:inline内联text
1可以直接获取里面的值
<!--
        model.addAttribute("name","张三");
        model.addAttribute("age","17")
        ;-->
<div th:inline="text">
    <p>我的名字是[[${name}]],年龄为[[${age}]]</p>
</div>
<!--即使没有指明内联标签,这样也可以直接用内联格式-->
<p>我的名字是[[${name}]],年龄为[[${age}]]</p>
2 在javascript中使用内联表达式来获取数据
<script type="text/javascript" th:inline="javascript">
        var name=[[${name}]]
        var age=[[${age}]]
        alert("模板中获取的数据为"+name+age)
    </script>
字面量
主要是用来解决在字符串中加入变量的问题
1使用单引号括起来字符串,在使用+来进行数据的链接,但是对于长文本,比较麻烦
<h3>字面量</h3>
<!--文本字面量-->
<p th:text="'我的名字是'+${name}+'年龄为'+${age}">显示数据</p>
<!--数字字面量-->
<p th:if="${1<2}">1小于2</p>
<!--null字面量-->
<p th:if="${name!=null}">数据不为空</p>
2使用双竖线–|字符串+表达式|
<p th:text="|我的名字是${name},年龄是+${age}|"></p>
运算符
<p th:text="${age>10}">年龄大于十岁</p>
<p th:text="${20+30}"></p>

<p th:text="${islogin==true ? '用户已经登录':'用户还未登录'}"></p>
内置工具类对象
1#request 表示httpServletRequest对象,调用的是对象的方法来获取数据
2#session 表示HttpSession对象,调用的是方法
3 session表示HttpSession,是#session的简写可以获取值,表示map,可以直接获取对应的key的值
<!--request.setAttribute("requestData","request作用域的值");
        request.getSession().setAttribute("sessionData","session中的值");
        session.setAttribute("loginname","Zhangsan");-->
<p th:text="${#request.getAttribute('requestData')}"></p>
<p th:text="${#session.getAttribute('sessionData')}"></p>
<p th:text="${session.loginname}"></p>
4使用内置对象的方法
<p th:text="|getRequestURL代表的是${#request.getRequestURL()}|"></p>
<p th:text="|getRequestURI代表的是${#request.getRequestURI()}|"></p>
<p th:text="|getRequestURI代表的是提交的参数${#request.getQueryString()}|"></p>
<p th:text="|getContextPath代表的是项目名称${#request.getContextPath()}|"></p>
<p th:text="|getServerPort代表的是${#request.getServerPort()}|"></p>
<p th:text="|getServerName代表的是${#request.getServerName()}|"></p>

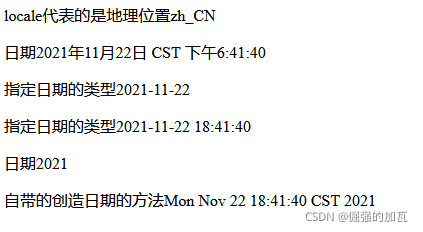
自带的日期类方法
<p th:text="|日期${#dates.format(mydate)}|"></p>
<p th:text="|指定日期的类型${#dates.format(mydate,'yyyy-MM-dd')}|"></p>
<p th:text="|指定日期的类型${#dates.format(mydate,'yyyy-MM-dd HH:mm:ss')}|"></p>
<p th:text="|日期${#dates.year(mydate)}|"></p>
<p th:text="|自带的创造日期的方法${#dates.createNow()}|"></p>
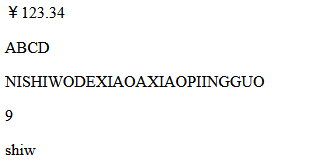
number数字操作方法和字符串操作
<p th:text="${#numbers.formatCurrency(number)}"></p>
<p th:text="${#strings.toUpperCase('abcd')}"></p>
<p th:text="${#strings.toUpperCase(string)}"></p>
<!--找到xiao所在的下标-->
<p th:text="${#strings.indexOf(string,'xiao')}"></p>
<!--字符串的截取,从下标为2截取到6-->
<p th:text="${#strings.substring(string,2,6)}"></p>
list集合的工具类
<!--list是一个后台传过来的集合-->
<p th:text="${#lists.size(list)}"></p>
<!--判断集合中是否包含元素-->
<p th:if="${#lists.contains(list,'a')}">包含a</p>
<!--判断是否为空-->
<p th:if="${#lists.isEmpty(list)}"></p>
处理null值
<!--用来解决因为不知道对象是否为null的解决办法-->
<p th:text="${student?.id}"></p>
thymeleaf的模板,用于页头/页脚等公共部分的提取
用法:先创建好公共的部分,用来准备其他界面提取
1.创建一个名为zhead.mxl文件,用于模拟网页中头部公共部分,里面的内容为
<!DOCTYPE html>
<html lang="en" xmlns:th="http://www.thymeleaf.org">
<head>
    <meta charset="UTF-8">
    <title>Title</title>
</head>
<body>
<div th:fragment="head">
    <p>这里放置的是网页的头部,所以一般是位于最上方</p>
</div>

</body>
</html>
2创建一个名为zfoot.xml,用于模拟网页中尾部公共部分
<div th:fragment="foot">
    <p>这里放置的是网页的尾部,所以一般是位于最下方</p>
</div>
insert方式引入
3,在创建一个准备引用头部文件和尾部文件的界面,引用方法如下:分别介绍了两种方法
<div style="margin-left: 400px">
    <h3>插入公共的头部模板</h3>
<!--    找到zhead.xml文件中的head模板-->
    <div th:insert="~{ zhead :: head}">
    </div>
</div>

<div style="margin-left: 400px">
    <h3>中间的内容</h3>
    <p>就是一些不是公共的部分</p>
</div>

<div style="margin-left: 400px">
    <h3>插入公共的页脚模板</h3>
    <!--找到zfoot.xml文件中foot模板-->
    <div th:insert="zfoot :: foot">
    </div>
</div>
include方式引入
<div style="margin-left: 400px">
    <h3>第一种使用include插入公共的页脚模板</h3>
    <!--找到zfoot.xml文件中foot模板-->
    <div th:include="~{zfoot :: foot}">
    </div>
</div>
<div style="margin-left: 400px">
    <h3>第二种使用include插入公共的页脚模板</h3>
    <!--找到zfoot.xml文件中foot模板-->
    <div th:include="zfoot :: foot">
    </div>
</div>
include和insert两种方式的差异
include 引入方式会用模板里的标签完全替换掉引入的标签而采用insert方式引入会将模板里的一些标签全部引入

希望引入整个html文件的两种方法
zfoot代表文件名
<div th:include="zfoot :: html"></div>
<div th:include="zfoot "></div>

<div th:insert="zfoot :: html"></div>
<div th:insert="zfoot "></div>
引入其他包下的公共部分
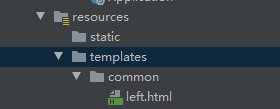
只需要找到相应包下的位置就可
leftpart表示公共部分的名字
<div th:fragment="leftpart">
    这里是引用了其他目录之下的公共部分
</div>
两种方法使用如下:
<div th:insert="common/left::leftpart"></div>
<div th:include="common/left::leftpart "></div>